tail gate lift KIA NIRO 2019 Owners Manual
[x] Cancel search | Manufacturer: KIA, Model Year: 2019, Model line: NIRO, Model: KIA NIRO 2019Pages: 611, PDF Size: 15.28 MB
Page 146 of 611
411
Features of your vehicle
Record your key number
The key code number
is stamped on the bar
code tag attached to
the key set. Should
you lose your keys,
this number will enable an author-
ized Kia dealer to duplicate the keys
easily. Remove the bar code tag and
store it in a safe place. Also, record
the code number and keep it in a
safe and handy place, but not in the
vehicle.
Smart key function
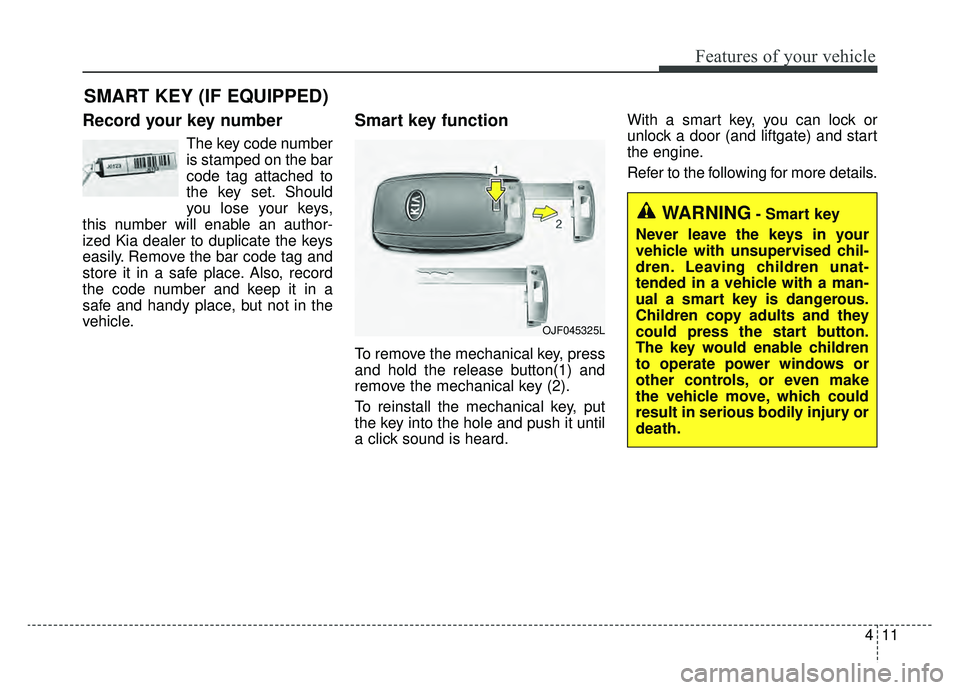
To remove the mechanical key, press
and hold the release button(1) and
remove the mechanical key (2).
To reinstall the mechanical key, put
the key into the hole and push it until
a click sound is heard. With a smart key, you can lock or
unlock a door (and liftgate) and start
the engine.
Refer to the following for more details.
SMART KEY (IF EQUIPPED)
OJF045325L
WARNING- Smart key
Never leave the keys in your
vehicle with unsupervised chil-
dren. Leaving children unat-
tended in a vehicle with a man-
ual a smart key is dangerous.
Children copy adults and they
could press the start button.
The key would enable children
to operate power windows or
other controls, or even make
the vehicle move, which could
result in serious bodily injury or
death.
Page 148 of 611
413
Features of your vehicle
✽ ✽NOTICE
You can activate or deactivate the
Two Press Unlock function. Refer to
“User settings” in this chapter.
Liftgate unlocking
If you are within 28 ~ 40 in (0.7 ~ 1 m)
from the outside liftgatehandle, with
your smart key in possession, the lift-
gate will unlock and open when you
press the liftgate handle switch.
The hazard warning lights will blink
twice to indicate that the liftgate is
unlocked.
Also, once the liftgate is opened and
then closed, the liftgate will lock
automatically.
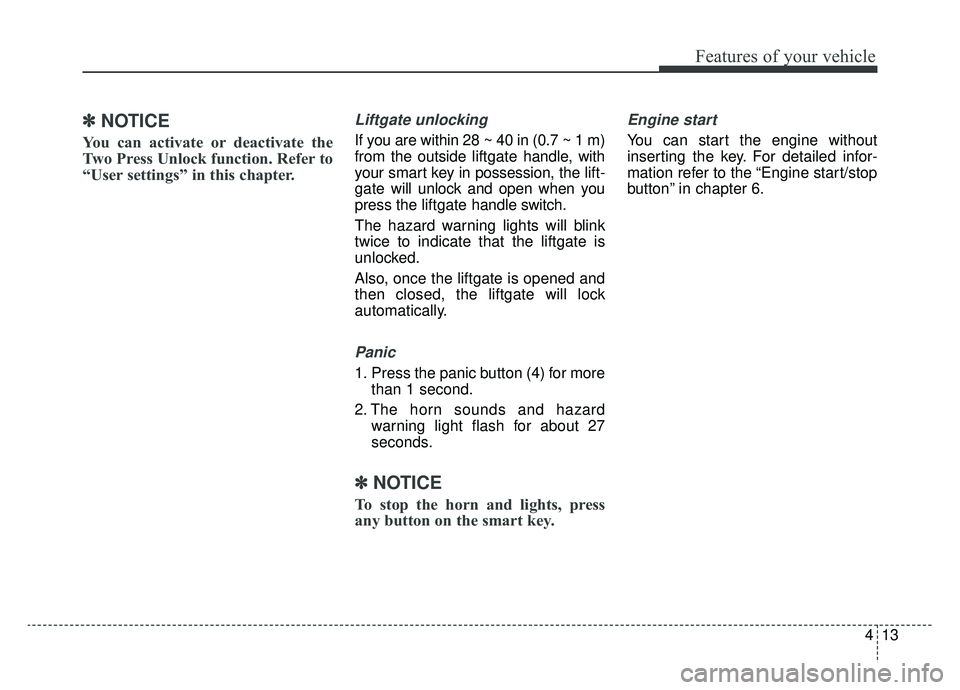
Panic
1. Press the panic button (4) for more than 1 second.
2. The horn sounds and hazard warning light flash for about 27
seconds.
✽ ✽NOTICE
To stop the horn and lights, press
any button on the smart key.
Engine start
You can start the engine without
inserting the key. For detailed infor-
mation refer to the “Engine start/stop
button” in chapter 6.
Page 263 of 611
Features of your vehicle
128
4
WELCOME SYSTEM (IF EQUIPPED)
Headlight (Headlamp) escort
function
The headlights (and/or taillights)
remain on for approximately 5 min-
utes after the ignition key is removed
or turned to the ACC or LOCK posi-
tion. However, if the driver’s door is
opened and closed, the headlights
are turned off after 15 seconds.
The headlights can be turned off by
pressing the lock button on the trans-
mitter or smart key twice or turning
off the light switch from the headlight
or Auto light position.
Interior light
When the interior light switch is in the
DOOR position and all doors (and lift-
gate) are locked and closed, the
room lamp will come on for 30 sec-
onds if any of the below is performed.
With the smart key system
- When the door unlock button ispressed on the smart key.
- When the button of the outside door handle is pressed.
At this time, if you press the door lock
button, the lamps will turn off imme-
diately.
Pocket lamp (if equipped)
When all doors are locked and
closed, the pocket lamp will come on
for 15 seconds if any of the below is
performed.
With the smart key system - When the door unlock button ispressed on the smart key.
- When the button of the outside door handle is pressed.
At this time, if you press the door lock
button, the lamps will turn off imme-
diately.
Page 476 of 611
Tire terminology and definitions . . . . . . . . . . . . . . . . 8-50
All season tires . . . . . . . . . . . . . . . . . . . . . . . . . . . . . . 8-53
Summer tires . . . . . . . . . . . . . . . . . . . . . . . . . . . . . . . . 8-53
Snow tires . . . . . . . . . . . . . . . . . . . . . . . . . . . . . . . . . . . 8-\
53
Tire chains . . . . . . . . . . . . . . . . . . . . . . . . . . . . . . . . . . 8-54\
Radial-ply tires . . . . . . . . . . . . . . . . . . . . . . . . . . . . . . 8-54
Low aspect ratio tire . . . . . . . . . . . . . . . . . . . . . . . . . . 8-55
Fuses . . . . . . . . . . . . . . . . . . . . . . . . . . . . . . . . . . . . \
8-56
Inner panel fuse replacement . . . . . . . . . . . . . . . . . . . 8-57
Engine compartment fuse replacement. . . . . . . . . . . 8-59
Fuse/relay panel description. . . . . . . . . . . . . . . . . . . . 8-62
Light bulbs . . . . . . . . . . . . . . . . . . . . . . . . . . . . . . . 8-84
Bulb replacement precaution . . . . . . . . . . . . . . . . . . 8-84
Light bulb position (Front). . . . . . . . . . . . . . . . . . . . . 8-85
Light bulb position (Rear) . . . . . . . . . . . . . . . . . . . . . 8-86
Light bulb position (Side) . . . . . . . . . . . . . . . . . . . . . . 8-87
Headlamp (HID type) bulb replacement . . . . . . . . . 8-87
Headlamp (LED type) replacement. . . . . . . . . . . . . . 8-88
Headlamp (High/Low beam) bulb replacement . . . 8-88
Front turn signal lamp bulb replacement . . . . . . . . 8-89
Fog lamp/DRL bulb replacement . . . . . . . . . . . . . . . 8-90
Stop and tail lamp bulb replacement . . . . . . . . . . . . 8-90
Tail lamp (inside) bulb replacement . . . . . . . . . . . . . 8-92
Stop and tail lamp (LED type) bulb replacement . . 8-93
Back-up lamp bulb replacement . . . . . . . . . . . . . . . . 8-93
High mounted stop lamp bulb replacement . . . . . . . 8-93
License plate lamp bulb replacement . . . . . . . . . . . . 8-94
Side repeater lamp (LED type) bulb replacement . . 8-94
Map lamp (Bulb type) bulb replacement . . . . . . . . . 8-95
Map lamp (LED type) bulb replacement . . . . . . . . . 8-95
Vanity mirror lamp bulb replacement . . . . . . . . . . . 8-95
Room lamp (Bulb type) bulb replacement . . . . . . . . 8-96
Room lamp (LED type) bulb replacement . . . . . . . . 8-97
Liftgate room lamp bulb replacement . . . . . . . . . . . 8-97
Appearance care . . . . . . . . . . . . . . . . . . . . . . . . . . . 8-98
Exterior care . . . . . . . . . . . . . . . . . . . . . . . . . . . . . . . . 8-98
Interior care . . . . . . . . . . . . . . . . . . . . . . . . . . . . . . . . 8-103
Emission control system . . . . . . . . . . . . . . . . . . . 8-106
Crankcase emission control system . . . . . . . . . . . . . 8-106
Evaporative emission control (Including ORVR :
Onboard Refueling Vapor Recovery) system . . . . 8-106
Exhaust emission control system . . . . . . . . . . . . . . . 8-107
California perchlorate notice . . . . . . . . . . . . . . . 8-109
8
Page 564 of 611
Maintenance
90
8
4. Insert a new bulb by inserting it
into the bulb-socket and rotating it
until it locks into place.
5. Install the socket in the headlamp assembly by aligning the tabs on
the bulb-socket with the slots in
the assembly. Push the bulb-sock-
et into the headlamp assembly
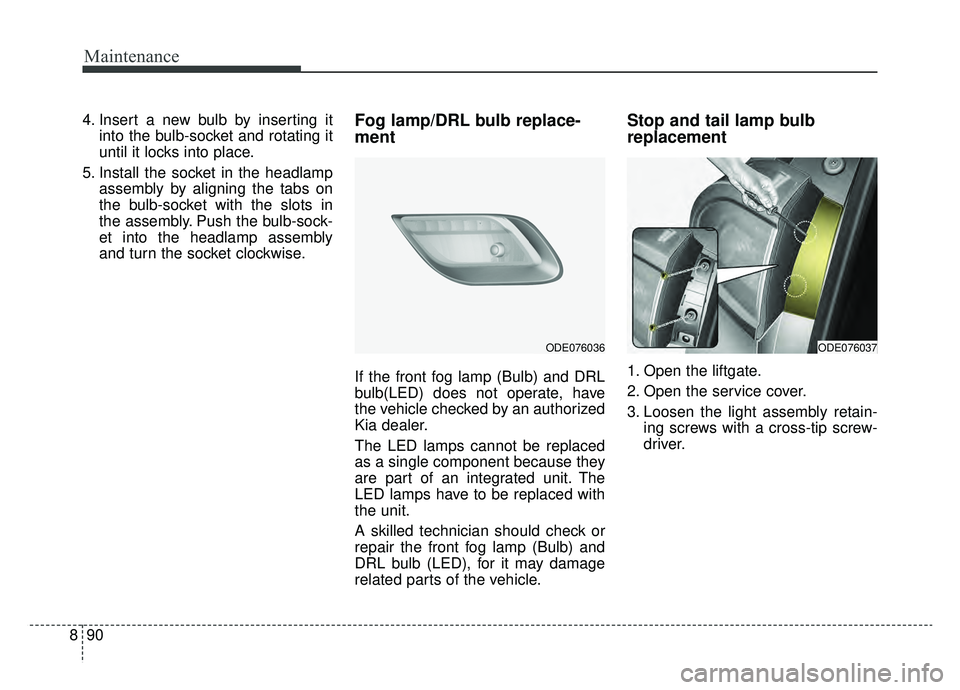
and turn the socket clockwise.Fog lamp/DRL bulb replace-
ment
If the front fog lamp (Bulb) and DRL
bulb(LED) does not operate, have
the vehicle checked by an authorized
Kia dealer.
The LED lamps cannot be replaced
as a single component because they
are part of an integrated unit. The
LED lamps have to be replaced with
the unit.
A skilled technician should check or
repair the front fog lamp (Bulb) and
DRL bulb (LED), for it may damage
related parts of the vehicle.
Stop and tail lamp bulb
replacement
1. Open the liftgate.
2. Open the service cover.
3. Loosen the light assembly retain-ing screws with a cross-tip screw-
driver.
ODE076036ODE076037
Page 566 of 611
Maintenance
92
8
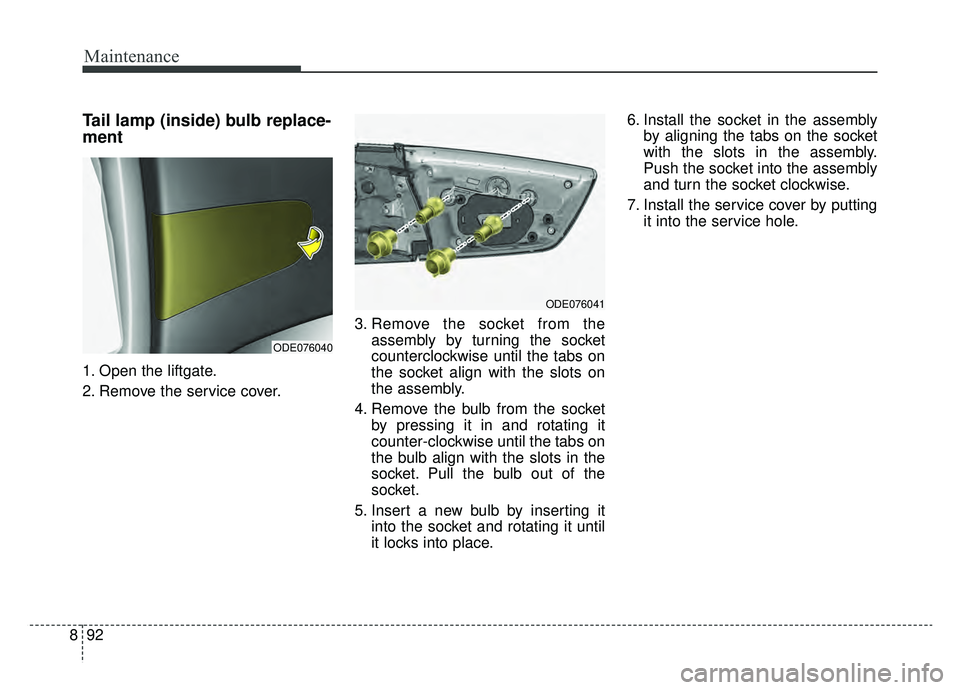
Tail lamp (inside) bulb replace-
ment
1. Open the liftgate.
2. Remove the service cover. 3. Remove the socket from the
assembly by turning the socket
counterclockwise until the tabs on
the socket align with the slots on
the assembly.
4. Remove the bulb from the socket by pressing it in and rotating it
counter-clockwise until the tabs on
the bulb align with the slots in the
socket. Pull the bulb out of the
socket.
5. Insert a new bulb by inserting it into the socket and rotating it until
it locks into place. 6. Install the socket in the assembly
by aligning the tabs on the socket
with the slots in the assembly.
Push the socket into the assembly
and turn the socket clockwise.
7. Install the service cover by putting it into the service hole.
ODE076040
ODE076041
Page 586 of 611
93
Specifications, Consumer information, Reporting safety defects
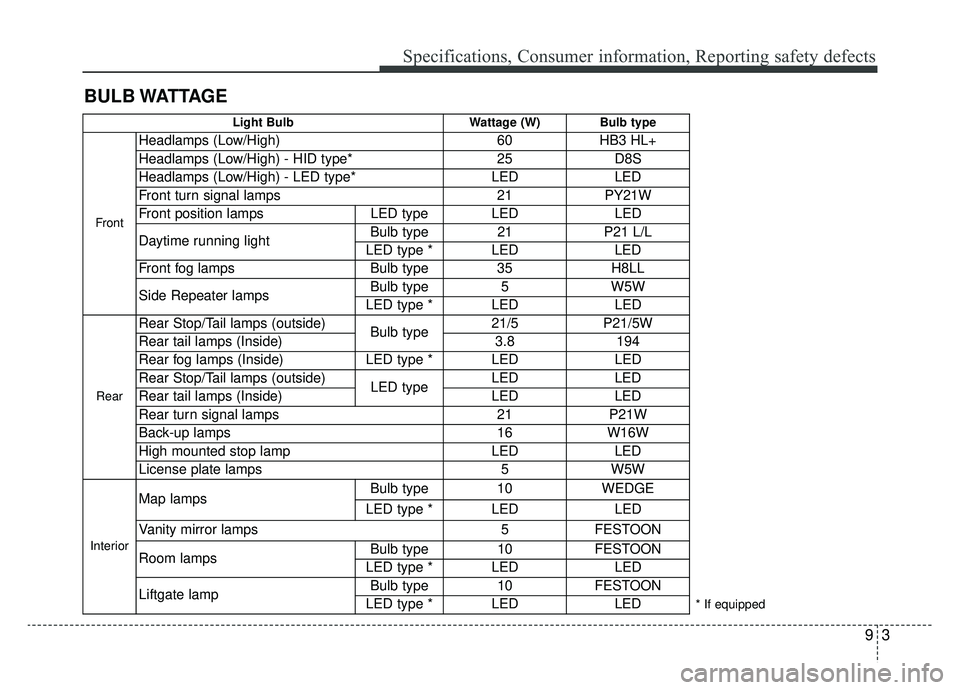
BULB WATTAGE
Light BulbWattage (W) Bulb type
Front
Headlamps (Low/High) 60HB3 HL+
Headlamps (Low/High) - HID type* 25D8S
Headlamps (Low/High) - LED type* LEDLED
Front turn signal lamps 21PY21W
Front position lamps LED type LED LED
Daytime running light Bulb type 21
P21 L/L
LED type *LEDLED
Front fog lamps Bulb type 35 H8LL
Side Repeater lamps Bulb type
5W5W
LED type * LED LED
Rear
Rear Stop/Tail lamps (outside)
Bulb type21/5 P21/5W
Rear tail lamps (Inside) 3.8194
Rear fog lamps (Inside) LED type * LED LED
Rear Stop/Tail lamps (outside) LED typeLED
LED
Rear tail lamps (Inside) LEDLED
Rear turn signal lamps 21P21W
Back-up lamps 16W16W
High mounted stop lamp LEDLED
License plate lamps 5W5W
Interior
Map lamps Bulb type 10 WEDGE
LED type * LED LED
Vanity mirror lamps 5 FESTOON
Room lamps Bulb type 10 FESTOON
LED type * LED LED
Liftgate lamp Bulb type 10 FESTOON
LED type *LEDLED* If equipped
Page 606 of 611
I7
Index
Emergency liftgate safety release. . . . . . . . . . . . . . . 4-26
Opening the liftgate . . . . . . . . . . . . . . . . . . . . . . . . . 4-25
Light bulbs . . . . . . . . . . . . . . . . . . . . . . . . . . . . . . . . . . 8-84\
Back-up lamp bulb replacement . . . . . . . . . . . . . . . 8-93
Bulb replacement precaution . . . . . . . . . . . . . . . . . 8-84
Fog lamp/DRL bulb replacement . . . . . . . . . . . . . . . 8-90
Front turn signal lamp bulb replacement . . . . . . . . 8-89
Headlamp (HID type) bulb replacement . . . . . . . . . 8-87
Headlamp (High/Low beam) bulb replacement . . . 8-88
Headlamp (LED type) replacement . . . . . . . . . . . . . 8-88
High mounted stop lamp bulb replacement . . . . . . . 8-93
License plate lamp bulb replacement. . . . . . . . . . . . 8-94
Liftgate room lamp bulb replacement . . . . . . . . . . . 8-97
Light bulb position (Front). . . . . . . . . . . . . . . . . . . . 8-85
Light bulb position (Rear) . . . . . . . . . . . . . . . . . . . . 8-86
Light bulb position (Side) . . . . . . . . . . . . . . . . . . . . 8-87
Map lamp (Bulb type) bulb replacement . . . . . . . . . 8-95
Map lamp (LED type) bulb replacement . . . . . . . . . 8-95
Room lamp (Bulb type) bulb replacement. . . . . . . . 8-96
Room lamp (LED type) bulb replacement . . . . . . . . 8-97
Side repeater lamp (LED type) bulb replacement . . 8-94
Stop and tail lamp (LED type) bulb replacement . . 8-93
Stop and tail lamp bulb replacement . . . . . . . . . . . 8-90
Tail lamp (inside) bulb replacement . . . . . . . . . . . . 8-92
Vanity mirror lamp bulb replacement . . . . . . . . . . . 8-95 Lighting. . . . . . . . . . . . . . . . . . . . . . . . . . . . . . . . . . . . \
4-116
Battery saver function . . . . . . . . . . . . . . . . . . . . . . 4-116
Check headlight . . . . . . . . . . . . . . . . . . . . . . . . . . . 4-120
Daytime running light . . . . . . . . . . . . . . . . . . . . . . 4-116
Front fog light . . . . . . . . . . . . . . . . . . . . . . . . . . . . 4-120
Headlight escort function . . . . . . . . . . . . . . . . . . . . 4-116
High beam operation . . . . . . . . . . . . . . . . . . . . . . . 4-118
Lighting control . . . . . . . . . . . . . . . . . . . . . . . . . . . 4-117
Turn signals and lane change signals . . . . . . . . . . . 4-119
Luggage volume . . . . . . . . . . . . . . . . . . . . . . . . . . . . . . . 9-6
Maintenance services . . . . . . . . . . . . . . . . . . . . . . . . . . . 8-5 Owner maintenance precautions . . . . . . . . . . . . . . . . 8-6
Owner’s responsibility . . . . . . . . . . . . . . . . . . . . . . . . 8-5
Mirrors . . . . . . . . . . . . . . . . . . . . . . . . . . . . . . . . . . . . \
. 4-48 Inside rearview mirror . . . . . . . . . . . . . . . . . . . . . . . 4-48
Outside rearview mirror . . . . . . . . . . . . . . . . . . . . . . 4-50
Online factory authorized manuals (U.S. only) . . . . . . 9-16 Electrical troubleshooting manual . . . . . . . . . . . . . . 9-16
Owner's manual . . . . . . . . . . . . . . . . . . . . . . . . . . . . 9-16
Service manual . . . . . . . . . . . . . . . . . . . . . . . . . . . . . 9-16
Owner maintenance . . . . . . . . . . . . . . . . . . . . . . . . . . . . 8-7 Owner maintenance schedule . . . . . . . . . . . . . . . . . . 8-7
M
O