check engine KIA NIRO 2021 Manual Online
[x] Cancel search | Manufacturer: KIA, Model Year: 2021, Model line: NIRO, Model: KIA NIRO 2021Pages: 710, PDF Size: 14.77 MB
Page 605 of 710
741
Maintenance
When recharging the battery,
observe the following precautions:
The battery must be removed from
the vehicle and placed in an area
with good ventilation.
Do not allow cigarettes, sparks, or
flame near the battery.
Watch the battery during charging,
and stop or reduce the charging
rate if the battery cells begin
gassing (boiling) violently or if the
temperature of the electrolyte of
any cell exceeds 120°F (49°C).
Wear eye protection when check-
ing the battery during charging.
Disconnect the battery charger in
the following order.
1. Turn off the battery charger main
switch.
2. Unhook the negative clamp from
the negative battery terminal.
3. Unhook the positive clamp from
the positive battery terminal. Before performing maintenance or
recharging the battery, turn off all
accessories and stop the engine.
The negative battery cable must be
removed first and installed last
when the battery is disconnected.Reset items
The following items should be reset
after the battery has been dis-
charged or the battery has been dis-
connected.
Auto up/down window
Sunroof
Trip computer
Climate control system
Driver position memory system
Audio
Page 622 of 710
Maintenance
58 7
FUSES
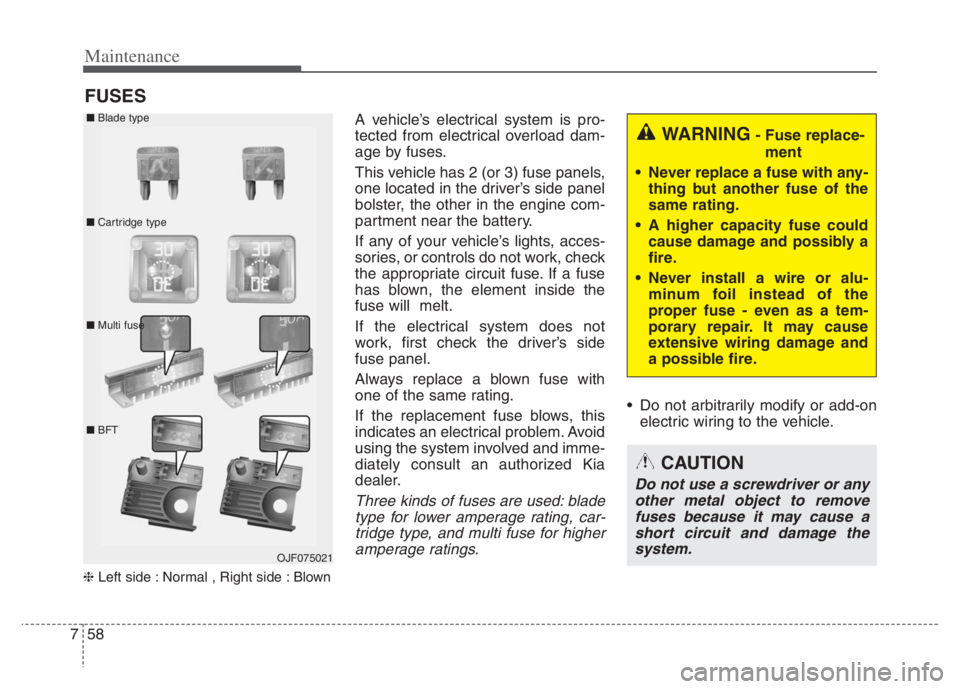
❈Left side : Normal , Right side : Blown
A vehicle’s electrical system is pro-
tected from electrical overload dam-
age by fuses.
This vehicle has 2 (or 3) fuse panels,
one located in the driver’s side panel
bolster, the other in the engine com-
partment near the battery.
If any of your vehicle’s lights, acces-
sories, or controls do not work, check
the appropriate circuit fuse. If a fuse
has blown, the element inside the
fuse will melt.
If the electrical system does not
work, first check the driver’s side
fuse panel.
Always replace a blown fuse with
one of the same rating.
If the replacement fuse blows, this
indicates an electrical problem. Avoid
using the system involved and imme-
diately consult an authorized Kia
dealer.
Three kinds of fuses are used: blade
type for lower amperage rating, car-
tridge type, and multi fuse for higher
amperage ratings.
Do not arbitrarily modify or add-on
electric wiring to the vehicle.
WARNING- Fuse replace-
ment
Never replace a fuse with any-
thing but another fuse of the
same rating.
A higher capacity fuse could
cause damage and possibly a
fire.
Never install a wire or alu-
minum foil instead of the
proper fuse - even as a tem-
porary repair. It may cause
extensive wiring damage and
a possible fire.
CAUTION
Do not use a screwdriver or any
other metal object to remove
fuses because it may cause a
short circuit and damage the
system.
OJF075021 ■Blade type
■Cartridge type
■Multi fuse
■BFT
Page 624 of 710
Maintenance
60 7
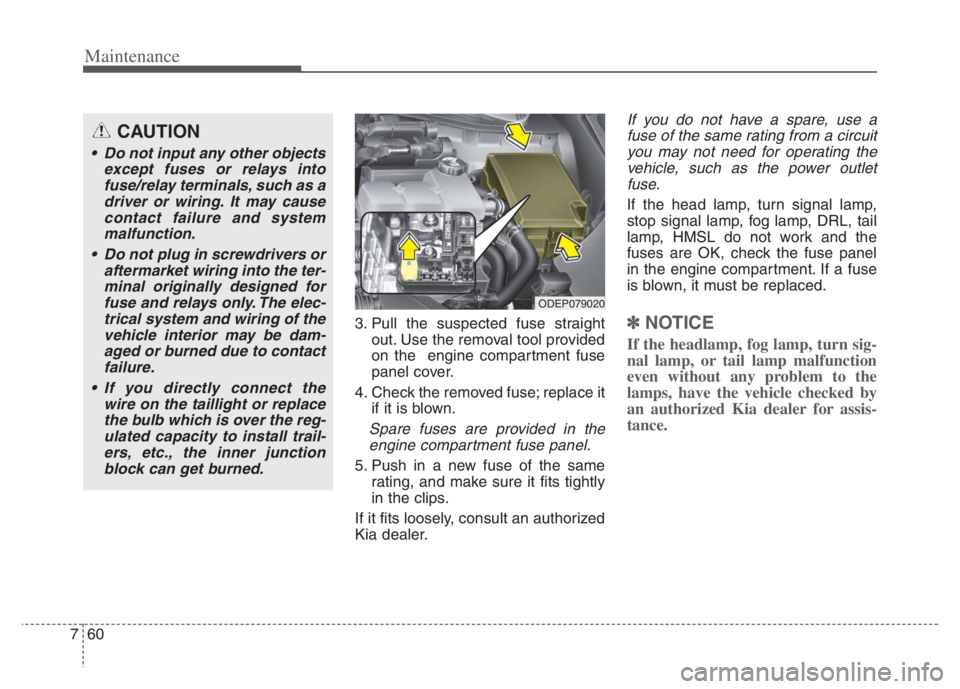
3. Pull the suspected fuse straight
out. Use the removal tool provided
on the engine compartment fuse
panel cover.
4. Check the removed fuse; replace it
if it is blown.
Spare fuses are provided in the
engine compartment fuse panel.
5. Push in a new fuse of the same
rating, and make sure it fits tightly
in the clips.
If it fits loosely, consult an authorized
Kia dealer.
If you do not have a spare, use a
fuse of the same rating from a circuit
you may not need for operating the
vehicle, such as the power outlet
fuse.
If the head lamp, turn signal lamp,
stop signal lamp, fog lamp, DRL, tail
lamp, HMSL do not work and the
fuses are OK, check the fuse panel
in the engine compartment. If a fuse
is blown, it must be replaced.
✽ ✽
NOTICE
If the headlamp, fog lamp, turn sig-
nal lamp, or tail lamp malfunction
even without any problem to the
lamps, have the vehicle checked by
an authorized Kia dealer for assis-
tance.
ODEP079020
CAUTION
Do not input any other objects
except fuses or relays into
fuse/relay terminals, such as a
driver or wiring. It may cause
contact failure and system
malfunction.
Do not plug in screwdrivers or
aftermarket wiring into the ter-
minal originally designed for
fuse and relays only. The elec-
trical system and wiring of the
vehicle interior may be dam-
aged or burned due to contact
failure.
If you directly connect the
wire on the taillight or replace
the bulb which is over the reg-
ulated capacity to install trail-
ers, etc., the inner junction
block can get burned.
Page 626 of 710
Maintenance
62 7
3. Check the removed fuse; replace it
if it is blown. To remove or insert
the fuse, use the fuse puller in the
engine compartment fuse panel.
4. Push in a new fuse of the same
rating, and make sure it fits tightly
in the clips. If it fits loosely, consult
an authorized Kia dealer.Multi fuse
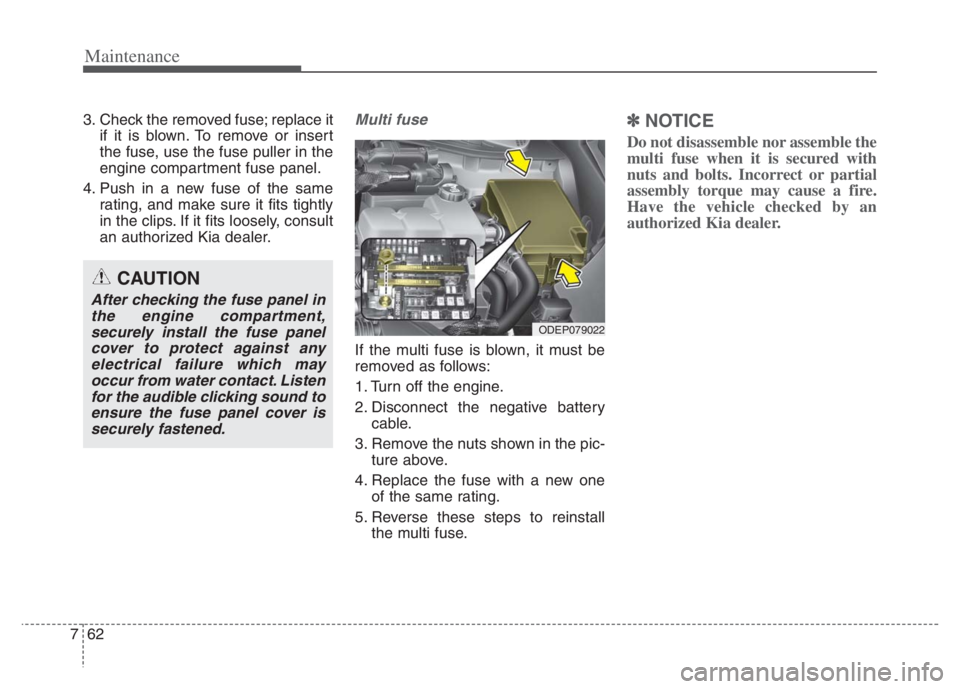
If the multi fuse is blown, it must be
removed as follows:
1. Turn off the engine.
2. Disconnect the negative battery
cable.
3. Remove the nuts shown in the pic-
ture above.
4. Replace the fuse with a new one
of the same rating.
5. Reverse these steps to reinstall
the multi fuse.
✽ ✽
NOTICE
Do not disassemble nor assemble the
multi fuse when it is secured with
nuts and bolts. Incorrect or partial
assembly torque may cause a fire.
Have the vehicle checked by an
authorized Kia dealer.
ODEP079022
CAUTION
After checking the fuse panel in
the engine compartment,
securely install the fuse panel
cover to protect against any
electrical failure which may
occur from water contact. Listen
for the audible clicking sound to
ensure the fuse panel cover is
securely fastened.
Page 627 of 710
763
Maintenance
Main fuse (Plug-in Hybrid)
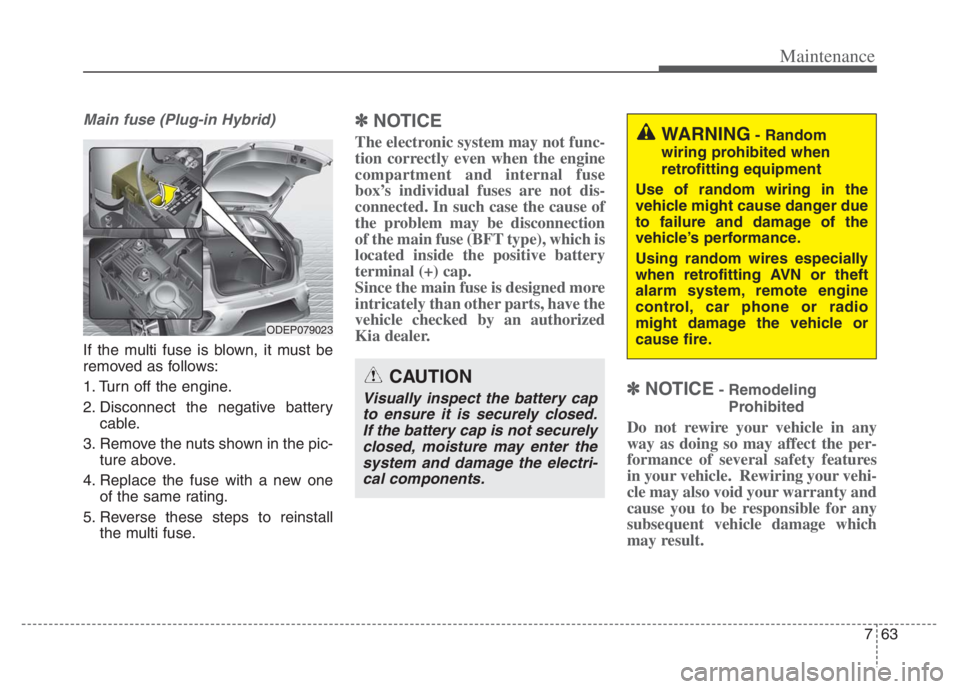
If the multi fuse is blown, it must be
removed as follows:
1. Turn off the engine.
2. Disconnect the negative battery
cable.
3. Remove the nuts shown in the pic-
ture above.
4. Replace the fuse with a new one
of the same rating.
5. Reverse these steps to reinstall
the multi fuse.
✽ ✽
NOTICE
The electronic system may not func-
tion correctly even when the engine
compartment and internal fuse
box’s individual fuses are not dis-
connected. In such case the cause of
the problem may be disconnection
of the main fuse (BFT type), which is
located inside the positive battery
terminal (+) cap.
Since the main fuse is designed more
intricately than other parts, have the
vehicle checked by an authorized
Kia dealer.
✽ ✽
NOTICE- Remodeling
Prohibited
Do not rewire your vehicle in any
way as doing so may affect the per-
formance of several safety features
in your vehicle. Rewiring your vehi-
cle may also void your warranty and
cause you to be responsible for any
subsequent vehicle damage which
may result.
CAUTION
Visually inspect the battery cap
to ensure it is securely closed.
If the battery cap is not securely
closed, moisture may enter the
system and damage the electri-
cal components.
WARNING- Random
wiring prohibited when
retrofitting equipment
Use of random wiring in the
vehicle might cause danger due
to failure and damage of the
vehicle’s performance.
Using random wires especially
when retrofitting AVN or theft
alarm system, remote engine
control, car phone or radio
might damage the vehicle or
cause fire.
ODEP079023
Page 650 of 710

Maintenance
86 7
LIGHT BULBS
Bulb replacement precaution
Please keep extra bulbs on hand
with appropriate wattage ratings in
case of emergencies.
Refer to “Bulb Wattage” in chapter 8.
When changing lamps, first turn off
the engine at a safe place, firmly
apply the parking brake and detach
the battery’s negative (-) terminal.
Use only bulbs of the specified
wattage.✽ ✽
NOTICE
• If the light bulb or lamp connector
is removed while the lamp is still
on, the fuse box's electronic sys-
tem may log it as a malfunction.
Therefore, a lamp malfunction
incident may be recorded as a
Diagnostic Trouble Code (DTC) in
the fuse box.
• It is normal for an operating lamp
to flicker momentarily. This is due
to a stabilization function of the
vehicle’s electronic control device.
If the lamp lights up normally
after momentarily blinking, then
it is functioning as normal.
However, if the lamp continues to
flicker several times or turns off
completely, there may be an error
in the vehicle’s electronic control
device. Please have the vehicle
checked by an authorized Kia
dealer immediately.
✽ ✽
NOTICE
We recommend that the headlight
aiming be adjusted by an authorized
Kia dealer after an accident or after
the headlight assembly is reinstalled.
WARNING- Working on
the lights
Prior to working on the light,
firmly apply the parking brake,
ensure that the engine
start/stop button is in OFF posi-
tion and turn off the lights to
avoid sudden movement of the
vehicle and burning your fingers
or receiving an electric shock.
CAUTION -Light replace-
ment
Be sure to replace the burned-
out bulb with one of the same
wattage rating. Otherwise, it
may cause damage to the fuse
or electric wiring system.
CAUTION -Headlamp
Lens
To prevent damage, do not
clean the headlamp lens with
chemical solvents or strong
detergents.
Page 679 of 710
7115
Maintenance
Canister
Fuel vapors generated inside the fuel
tank are absorbed and stored in the
onboard canister. When the engine is
running, the fuel vapors absorbed in
the canister are drawn into the surge
tank through the purge control sole-
noid valve.
Purge Control Solenoid Valve
(PCSV)
The purge control solenoid valve is
controlled by the Engine Control
Module (ECM); when the engine
coolant temperature is low during
idling, the PCSV closes so that evap-
orated fuel is not taken into the
engine. After the engine warms up
during ordinary driving, the PCSV
opens to introduce evaporated fuel to
the engine.
3. Exhaust emission control
system
The Exhaust Emission Control
System is a highly effective system
which controls exhaust emissions
while maintaining good vehicle per-
formance.
Engine exhaust gas precautions
(carbon monoxide)
Carbon monoxide can be present
with other exhaust fumes.
Therefore, if you smell exhaust
fumes of any kind inside your vehi-
cle, have it inspected and repaired
immediately. If you ever suspect
exhaust fumes are coming into
your vehicle, drive it only with all
the windows fully open. Have your
vehicle checked and repaired
immediately.
WARNING - Exhaust
Engine exhaust gases contain
carbon monoxide (CO). Though
colorless and odorless, it is
dangerous and could be lethal if
inhaled. Follow the instructions
on this page to avoid CO poi-
soning.
Page 701 of 710
I3
Index
Parking brake – Foot type . . . . . . . . . . . . . . . . . . . . 5-33
Power brakes . . . . . . . . . . . . . . . . . . . . . . . . . . . . . . 5-31
Vehicle Stability Management (VSM) . . . . . . . . . . . 5-51
Warning messages . . . . . . . . . . . . . . . . . . . . . . . . . . 5-43
Bulb wattage . . . . . . . . . . . . . . . . . . . . . . . . . . . . . . . . . . 8-3
California perchlorate notice . . . . . . . . . . . . . . . . . . . 7-117
Checking fluid levels . . . . . . . . . . . . . . . . . . . . . . . . . . 7-18
Child Restraint System (CRS) . . . . . . . . . . . . . . . . . . . 3-35
Children always in the rear . . . . . . . . . . . . . . . . . . . 3-35
Installing a Child Restraint System (CRS) . . . . . . . 3-39
Selecting a Child Restraint System (CRS) . . . . . . . 3-36
Climate control air filter . . . . . . . . . . . . . . . . . . . . . . . . 7-34
Filter inspection . . . . . . . . . . . . . . . . . . . . . . . . . . . . 7-34
Consumer assistance (U.S. only) . . . . . . . . . . . . . . . . . 8-13
Emergency roadside assistance . . . . . . . . . . . . . . . . 8-13
Registering your vehicle in a foreign country . . . . . 8-15
Toll free consumer assistance . . . . . . . . . . . . . . . . . 8-13
Trip interruption . . . . . . . . . . . . . . . . . . . . . . . . . . . . 8-14
Coolant . . . . . . . . . . . . . . . . . . . . . . . . . . . . . . . . . . . . . 7-21
Changing the coolant . . . . . . . . . . . . . . . . . . . . . . . . 7-25
Checking the coolant level . . . . . . . . . . . . . . . . . . . . 7-21
Engine coolant . . . . . . . . . . . . . . . . . . . . . . . . . . . . . 7-22
Inverter coolant. . . . . . . . . . . . . . . . . . . . . . . . . . . . . 7-22
Recommended coolant . . . . . . . . . . . . . . . . . . . . . . . 7-23Cruise Control (CC) . . . . . . . . . . . . . . . . . . . . . . . . . . 5-114
Driving Assist button . . . . . . . . . . . . . . . . . . . . . . . 5-115
To cancel Cruise Control, do one of the following. . 5-117
To decrease the cruising speed . . . . . . . . . . . . . . . . 5-116
To increase Cruise Control set speed . . . . . . . . . . . 5-116
To resume cruising speed at more than approximately
20 mph (30 km/h). . . . . . . . . . . . . . . . . . . . . . . . . 5-118
To set Cruise Control speed . . . . . . . . . . . . . . . . . . 5-115
To temporarily accelerate with Cruise Control on . 5-117
To turn Cruise Control off, do one of the following . 5-118
Declaration of Conformity . . . . . . . . . . . . . . . . . . . . . 4-182
FCC . . . . . . . . . . . . . . . . . . . . . . . . . . . . . . . . . . . . 4-182
Declaration of conformity . . . . . . . . . . . . . . . . . . . . . 5-173
Defroster . . . . . . . . . . . . . . . . . . . . . . . . . . . . . . . . . . . 4-140
Rear window defroster . . . . . . . . . . . . . . . . . . . . . . 4-140
Dimensions . . . . . . . . . . . . . . . . . . . . . . . . . . . . . . . . . . . 8-2
Door locks. . . . . . . . . . . . . . . . . . . . . . . . . . . . . . . . . . . 4-22
Child-protector rear door lock . . . . . . . . . . . . . . . . . 4-26
Operating door locks from inside the vehicle . . . . . 4-23
Operating door locks from outside the vehicle . . . . 4-22
Rear Occupant Alert (ROA) system. . . . . . . . . . . . . 4-26
Driver Attention Warning (DAW). . . . . . . . . . . . . . . . 5-107
Leading Vehicle Departure Alert . . . . . . . . . . . . . . 5-112
Low Activity Warning . . . . . . . . . . . . . . . . . . . . . . 5-107
C
D
Page 702 of 710

Index
4I
Dual Clutch Transmission (DCT). . . . . . . . . . . . . . . . . 5-16
Dual clutch transmission operation . . . . . . . . . . . . . 5-16
Good driving practices . . . . . . . . . . . . . . . . . . . . . . . 5-26
Economical operation . . . . . . . . . . . . . . . . . . . . . . . . . 5-182
Electrical Equipment (U.S. only) . . . . . . . . . . . . . . . . . 8-16
Installation of a mobile two-way radio system . . . . 8-16
Emergency starting . . . . . . . . . . . . . . . . . . . . . . . . . . . . . 6-5
Before Jump Starting (For Hybrid) . . . . . . . . . . . . . . 6-5
Jump starting . . . . . . . . . . . . . . . . . . . . . . . . . . . . . . . 6-8
Method to disconnect the (-) cable for regular
maintenance (For Hybrid) . . . . . . . . . . . . . . . . . . . . 6-7
Push-starting . . . . . . . . . . . . . . . . . . . . . . . . . . . . . . . 6-10
Emission control system . . . . . . . . . . . . . . . . . . . . . . . 7-114
Crankcase emission control system . . . . . . . . . . . . 7-114
Evaporative emission control (including ORVR:
Onboard Refueling Vapor Recovery) system. . . . 7-114
Exhaust emission control system . . . . . . . . . . . . . . 7-115
Engine . . . . . . . . . . . . . . . . . . . . . . . . . . . . . . . . . . . . . . 8-2
Engine clutch actuator fluid . . . . . . . . . . . . . . . . . . . . . 7-28
Checking the engine clutch actuator fluid level. . . . 7-28
Engine compartment . . . . . . . . . . . . . . . . . . . . . . . . 2-6, 7-4
Engine number . . . . . . . . . . . . . . . . . . . . . . . . . . . . . . . 8-11
Engine oil . . . . . . . . . . . . . . . . . . . . . . . . . . . . . . . . . . . 7-19
Changing the engine oil and filter . . . . . . . . . . . . . . 7-20
Checking the engine oil level . . . . . . . . . . . . . . . . . . 7-19ENGINE START/STOP button . . . . . . . . . . . . . . . . . . 5-11
ENGINE START/STOP button position . . . . . . . . . 5-11
Illuminated ENGINE START/STOP button . . . . . . 5-11
Starting the hybrid system . . . . . . . . . . . . . . . . . . . . 5-13
Explanation of scheduled maintenance items . . . . . . . 7-15
Exterior features . . . . . . . . . . . . . . . . . . . . . . . . . . . . . 4-176
Roof rack . . . . . . . . . . . . . . . . . . . . . . . . . . . . . . . . 4-176
Exterior overview . . . . . . . . . . . . . . . . . . . . . . . . . . . . . . 2-2
Folding key . . . . . . . . . . . . . . . . . . . . . . . . . . . . . . . . . . . 4-4
Battery replacement . . . . . . . . . . . . . . . . . . . . . . . . . . 4-7
Immobilizer system . . . . . . . . . . . . . . . . . . . . . . . . . . 4-8
Key operations . . . . . . . . . . . . . . . . . . . . . . . . . . . . . . 4-4
Record your key number . . . . . . . . . . . . . . . . . . . . . . 4-4
Transmitter precautions . . . . . . . . . . . . . . . . . . . . . . . 4-6
Forward Collision-Avoidance Assist (FCA)
(Front view camera only) . . . . . . . . . . . . . . . . . . . . . 5-54
Brake operation . . . . . . . . . . . . . . . . . . . . . . . . . . . . 5-58
Detecting sensor (Front view camera) . . . . . . . . . . . 5-59
FCA warning message and function control . . . . . . 5-57
Function malfunction . . . . . . . . . . . . . . . . . . . . . . . . 5-61
Function setting and activation . . . . . . . . . . . . . . . . 5-54
Limitation of the function . . . . . . . . . . . . . . . . . . . . 5-63
Forward Collision-Avoidance Assist (FCA)
(Sensor fusion) . . . . . . . . . . . . . . . . . . . . . . . . . . . . . 5-70
Brake operation . . . . . . . . . . . . . . . . . . . . . . . . . . . . 5-75
E
F
Page 703 of 710
I5
Index
Detecting sensors (Front view camera/Front radar). 5-75
FCA warning message and function control . . . . . . 5-73
Function malfunction . . . . . . . . . . . . . . . . . . . . . . . . 5-77
Function setting and activation . . . . . . . . . . . . . . . . 5-70
Limitation of the function . . . . . . . . . . . . . . . . . . . . 5-79
Fuel filler door (Hybrid) . . . . . . . . . . . . . . . . . . . . . . . . 4-38
Closing the fuel filler door . . . . . . . . . . . . . . . . . . . . 4-39
Opening the fuel filler door . . . . . . . . . . . . . . . . . . . 4-38
Fuel filler door (Plug-in hybrid) . . . . . . . . . . . . . . . . . . 4-40
Closing the fuel filler door . . . . . . . . . . . . . . . . . . . . 4-41
Opening the fuel filler door . . . . . . . . . . . . . . . . . . . 4-40
Fuel requirements . . . . . . . . . . . . . . . . . . . . . . . . . . . . . . 1-2
Do not use methanol . . . . . . . . . . . . . . . . . . . . . . . . . 1-3
Fuel additives . . . . . . . . . . . . . . . . . . . . . . . . . . . . . . . 1-4
Gasoline containing alcohol and methanol . . . . . . . . 1-2
Operation in foreign countries . . . . . . . . . . . . . . . . . . 1-4
Fuses . . . . . . . . . . . . . . . . . . . . . . . . . . . . . . . . . . . . . . . 7-58
Engine compartment fuse replacement . . . . . . . . . . 7-61
Fuse/relay panel description. . . . . . . . . . . . . . . . . . . 7-64
Inner panel fuse replacement . . . . . . . . . . . . . . . . . . 7-59
Gross vehicle weight. . . . . . . . . . . . . . . . . . . . . . . . . . . . 8-6HEV/PHEV powertrain . . . . . . . . . . . . . . . . . . . . . . . . . 1-5
Highway Driving Assist (HDA) . . . . . . . . . . . . . . . . . 5-156
HDA malfunction . . . . . . . . . . . . . . . . . . . . . . . . . . 5-161
HDA operation . . . . . . . . . . . . . . . . . . . . . . . . . . . 5-157
Operating conditions . . . . . . . . . . . . . . . . . . . . . . . 5-157
Setting and activating HDA . . . . . . . . . . . . . . . . . 5-157
Warning related to steering wheel . . . . . . . . . . . . . 5-158
When the hands-off warning lasts for a certain
period of time . . . . . . . . . . . . . . . . . . . . . . . . . . . 5-159
Hood . . . . . . . . . . . . . . . . . . . . . . . . . . . . . . . . . . . . . . . 4-36
Closing the hood . . . . . . . . . . . . . . . . . . . . . . . . . . . 4-37
Opening the hood . . . . . . . . . . . . . . . . . . . . . . . . . . 4-36
If an accident occurs . . . . . . . . . . . . . . . . . . . . . . . . . . . 6-44
If the engine overheats . . . . . . . . . . . . . . . . . . . . . . . . . 6-11
If the engine will not start . . . . . . . . . . . . . . . . . . . . . . . 6-4
If engine doesn't turn over or turns over slowly . . . . 6-4
If engine turns over normally but does not start . . . . 6-4
If you have a flat tire (with spare tire) . . . . . . . . . . . . . 6-19
Changing tires . . . . . . . . . . . . . . . . . . . . . . . . . . . . . 6-20
Jack and tools . . . . . . . . . . . . . . . . . . . . . . . . . . . . . . 6-19
Removing and storing the spare tire . . . . . . . . . . . . 6-20
If you have a flat tire (with Tire Mobility Kit). . . . . . . 6-28
Checking the tire inflation pressure . . . . . . . . . . . . . 6-36H
I
G