low beam KIA NIRO EV 2019 Features and Functions Guide
[x] Cancel search | Manufacturer: KIA, Model Year: 2019, Model line: NIRO EV, Model: KIA NIRO EV 2019Pages: 54, PDF Size: 3.49 MB
Page 6 of 54

4*IF EQUIPPED NIRO EV FEATURES & FUNCTIONS GUIDE
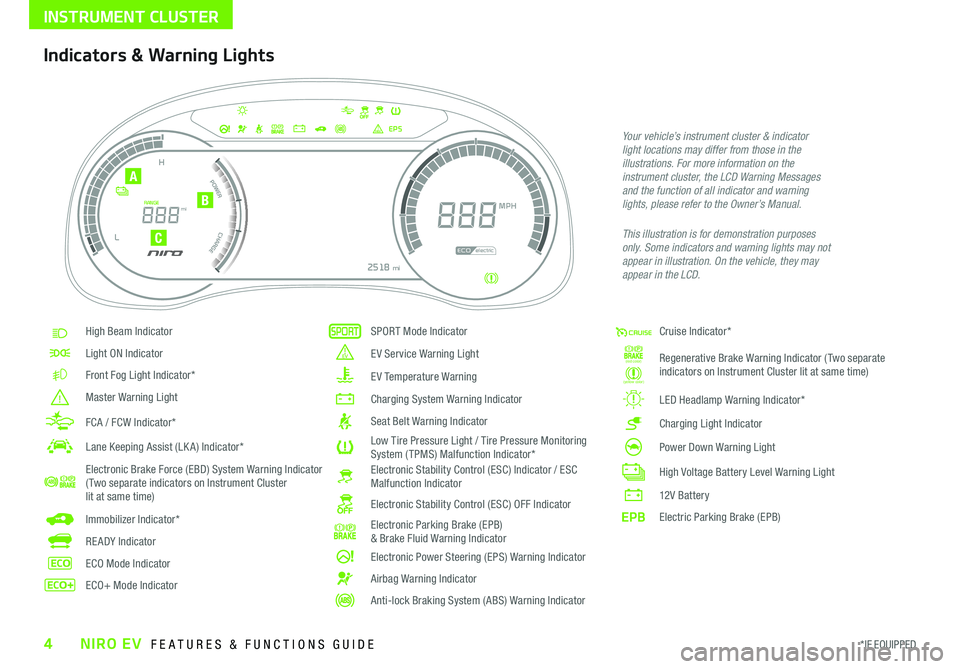
Indicators & Warning Lights
High Beam Indicator
Light ON Indicator
Front Fog Light Indicator*
Master Warning Light
FCA / FCW Indicator*
Lane Keeping Assist (LK A) Indicator*
Electronic Brake Force (EBD) System Warning Indicator( Two separate indicators on Instrument Cluster lit at same time)
Immobilizer Indicator*
READY Indicator
ECO Mode Indicator
ECO+ Mode Indicator
SPORT Mode Indicator
E V Service Warning Light
EV Temperature Warning
Charging System Warning Indicator
Seat Belt Warning Indicator
Low Tire Pressure Light / Tire Pressure Monitoring System (TPMS) Malfunction Indicator*Electronic Stability Control (ESC) Indicator / ESC Malfunction Indicator
Electronic Stability Control (ESC) OFF Indicator
Electronic Parking Brake (EPB) & Brake Fluid Warning Indicator
Electronic Power Steering (EPS) Warning Indicator
Airbag Warning Indicator
Anti-lock Braking System (ABS) Warning Indicator
Cruise Indicator*
(red color)
(yellow color)
Regenerative Brake Warning Indicator (Two separate indicators on Instrument Cluster lit at same time)
LED Headlamp Warning Indicator*
Charging Light Indicator
Power Down Warning Light
High Voltage Battery Level Warning Light
12 V B a t ter y
EPBElectric Parking Brake (EPB)
Your vehicle’s instrument cluster & indicator light locations may differ from those in the illustrations. For more information on the instrument cluster, the LCD Warning Messages and the function of all indicator and warning lights, please refer to the Owner’s Manual.
This illustration is for demonstration purposes only. Some indicators and warning lights may not appear in illustration. On the vehicle, they may appear in the LCD.
220200
20
20 12 0
1 40
40
10 0
60
80180
40 160
60 140
80 120
100
E
F
mi
RANGE
68
°cCRUISE 60 mi/h
EPS
ECO
MPH
electric
LV .3R ND
L H
2518 mi
C
A
B
INSTRUMENT CLUSTER
Page 9 of 54

7*IF EQUIPPED ALWAYS CHECK THE OWNER’S MANUAL FOR COMPLETE OPER ATING INFORMATION AND SAFET Y WARNINGS .
Trip Modes / Trip Computer
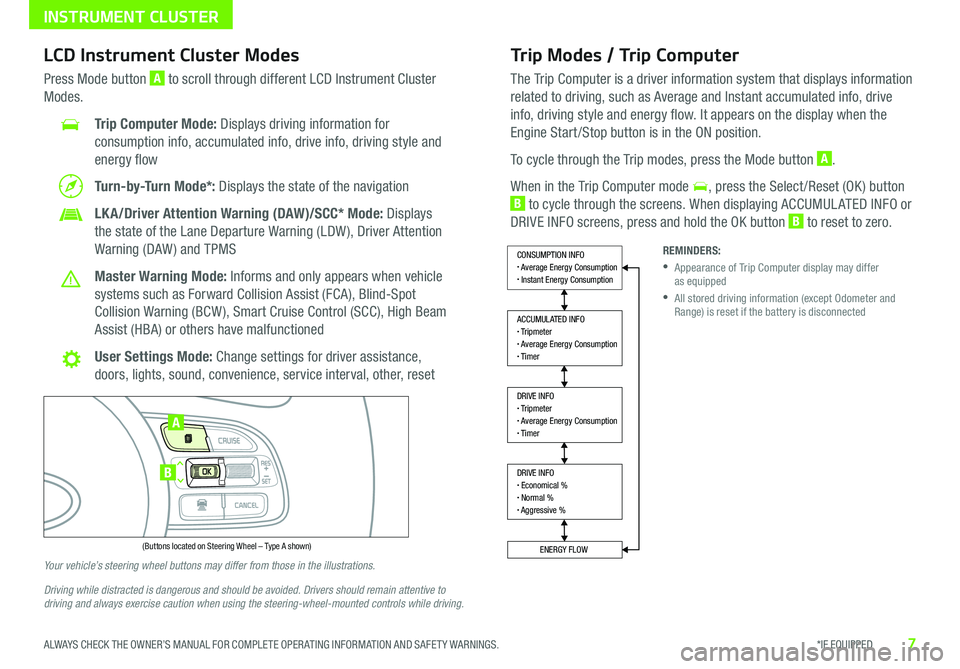
The Trip Computer is a driver information system that displays information
related to driving, such as Average and Instant accumulated info, drive
info, driving style and energy flow . It appears on the display when the
Engine Start /Stop button is in the ON position .
To cycle through the Trip modes, press the Mode button A .
When in the Trip Computer mode , press the Select /Reset (OK ) button
B to cycle through the screens . When displaying ACCUMUL ATED INFO or
DRIVE INFO screens, press and hold the OK button B to reset to zero .
LCD Instrument Cluster Modes
Press Mode button A to scroll through different LCD Instrument Cluster
Modes .
Trip Computer Mode: Displays driving information for
consumption info, accumulated info, drive info, driving style and
energy flow
Turn-by-Turn Mode*: Displays the state of the navigation
LKA/Driver Attention Warning (DAW)/SCC* Mode: Displays
the state of the Lane Departure Warning (LDW ), Driver Attention
Warning (DAW ) and TPMS
Master Warning Mode: Informs and only appears when vehicle
systems such as Forward Collision Assist (FCA), Blind-Spot
Collision Warning (BCW ), Smart Cruise Control (SCC), High Beam
Assist (HBA) or others have malfunctioned
User Settings Mode: Change settings for driver assistance,
doors, lights, sound, convenience, service interval, other, reset
Your vehicle’s steering wheel buttons may differ from those in the illustrations.
Driving while distracted is dangerous and should be avoided. Drivers should remain attentive to driving and always exercise caution when using the steering-wheel-mounted controls while driving.
REMINDERS:
•
Appearance of Trip Computer display may differ as equipped
•
All stored driving information (except Odometer and Range) is reset if the battery is disconnected
DRIVE INFO• Economical %• Normal %• Aggressive %
CONSUMPTION INFO• Average Energy Consumption• Instant Energy Consumption
ACCUMULATED INFO• Tripmeter• Average Energy Consumption• Timer
DRIVE INFO• Tripmeter• Average Energy Consumption• Timer
ENERGY FLOW
Accumulated Info
T rip
Average
Ti mer 247.5
15.7
17:42mi
MPG
h
(Buttons located on Steering Wheel – Type A shown)
MODE
RES
CRUISE
CAN CELOKSET
MODE
RES
CRUISE
CAN CELOKSET
MODE
A
B
INSTRUMENT CLUSTER
Page 26 of 54

24*IF EQUIPPED NIRO EV FEATURES & FUNCTIONS GUIDE
Headlight position ON
Parking light position
AUTO*Auto Light Position / Daytime Running Lights (DRL)
DRL* OFFHeadlight / DRL* OFF position
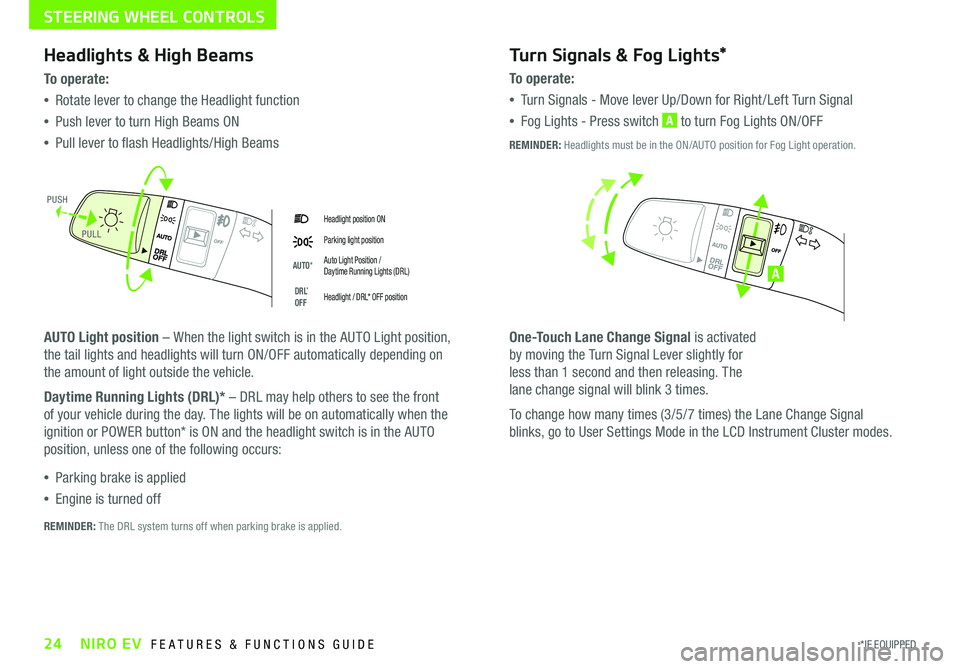
Headlights & High Beams
To o p e rate:
•Rotate lever to change the Headlight function
•Push lever to turn High Beams ON
•Pull lever to flash Headlights/High Beams
AUTO Light position – When the light switch is in the AUTO Light position,
the tail lights and headlights will turn ON/OFF automatically depending on
the amount of light outside the vehicle .
Daytime Running Lights (DRL)* – DRL may help others to see the front
of your vehicle during the day . The lights will be on automatically when the
ignition or POWER button* is ON and the headlight switch is in the AUTO
position, unless one of the following occurs:
•Parking brake is applied
•Engine is turned off
Turn Signals & Fog Lights*
To o p e r a t e :
•Tu r n Signals - Move lever Up/Down for Right /Left Turn Signal
•Fog Lights - Press switch A to turn Fog Lights ON/OFF
One-Touch Lane Change Signal is activated
by moving the Turn Signal Lever slightly for
less than 1 second and then releasing . The
lane change signal will blink 3 times .
To change how many times (3/5/7 times) the Lane Change Signal
blinks, go to User Settings Mode in the LCD Instrument Cluster modes .
REMINDER: The DRL system turns off when parking brake is applied .
A
REMINDER: Headlights must be in the ON/AUTO position for Fog Light operation .
PUSH
PULL
STEERING WHEEL CONTROLS
Page 46 of 54

44NIRO EV FEATURES & FUNCTIONS GUIDE*IF EQUIPPED
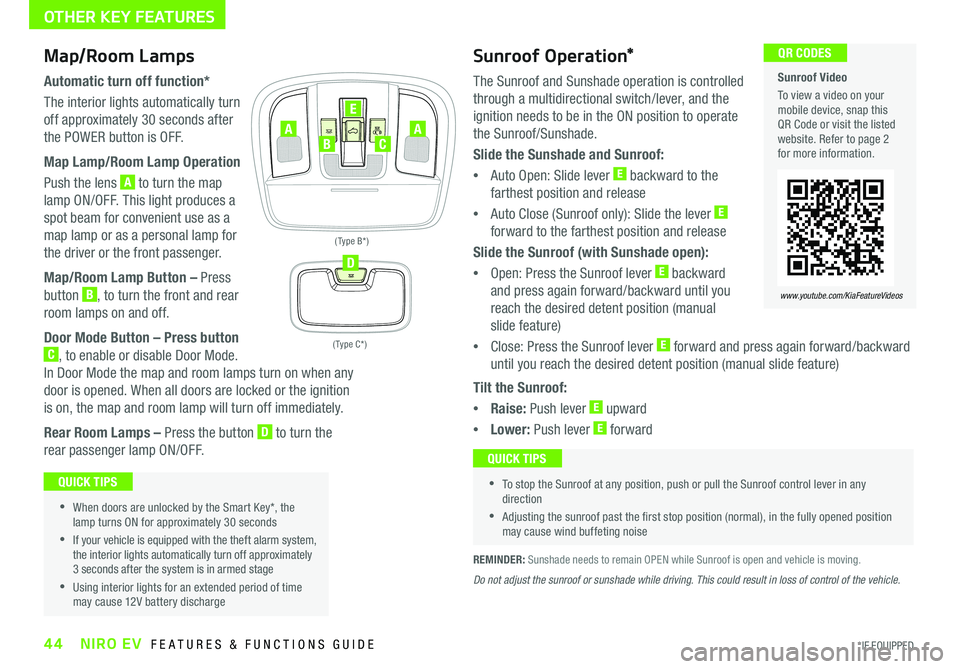
The Sunroof and Sunshade operation is controlled
through a multidirectional switch/lever, and the
ignition needs to be in the ON position to operate
the Sunroof/Sunshade .
Slide the Sunshade and Sunroof:
•
Auto Open: Slide lever E backward to the
farthest position and release
•
Auto Close (Sunroof only): Slide the lever E
forward to the farthest position and release
Slide the Sunroof (with Sunshade open):
•
Open: Press the Sunroof lever E backward
and press again forward/backward until you
reach the desired detent position (manual
slide feature)
• Close: Press the Sunroof lever E forward and press again forward/backward
until you reach the desired detent position (manual slide feature)
Sunroof Video
To view a video on your mobile device, snap this QR Code or visit the listed website . Refer to page 2 for more information .
QR CODES
www.youtube.com/KiaFeatureVideos
Map/Room Lamps
Automatic turn off function*
The interior lights automatically turn
off approximately 30 seconds after
the POWER button is OFF .
Map Lamp/Room Lamp Operation
Push the lens A to turn the map
lamp ON/OFF . This light produces a
spot beam for convenient use as a
map lamp or as a personal lamp for
the driver or the front passenger .
Map/Room Lamp Button – Press
button B, to turn the front and rear
room lamps on and off .
Door Mode Button – Press button
C, to enable or disable Door Mode .
In Door Mode the map and room lamps turn on when any
door is opened . When all doors are locked or the ignition
is on, the map and room lamp will turn off immediately .
Rear Room Lamps – Press the button D to turn the
rear passenger lamp ON/OFF .
•When doors are unlocked by the Smart Key*, the lamp turns ON for approximately 30 seconds
•If your vehicle is equipped with the theft alarm system, the interior lights automatically turn off approximately 3 seconds after the system is in armed stage
•Using interior lights for an extended period of time may cause 12V battery discharge
QUICK TIPS
•To stop the Sunroof at any position, push or pull the Sunroof control lever in any direction
•Adjusting the sunroof past the first stop position (normal), in the fully opened position may cause wind buffeting noise
QUICK TIPS
Tilt the Sunroof:
•Raise: Push lever E upward
•Lower: Push lever E forward
OTHER KEY FEATURES
Sunroof Operation*
REMINDER: Sunshade needs to remain OPEN while Sunroof is open and vehicle is moving .
Do not adjust the sunroof or sunshade while driving. This could result in loss of control of the vehicle.
( Type C * )
( Type B * )
D
AC
E
BA