KIA NIRO EV 2020 Features and Functions Guide
Manufacturer: KIA, Model Year: 2020, Model line: NIRO EV, Model: KIA NIRO EV 2020Pages: 54, PDF Size: 3.46 MB
Page 11 of 54
9*IF EQUIPPED ALWAYS CHECK THE OWNER’S MANUAL FOR COMPLETE OPER ATING INFORMATION AND SAFET Y WARNINGS .
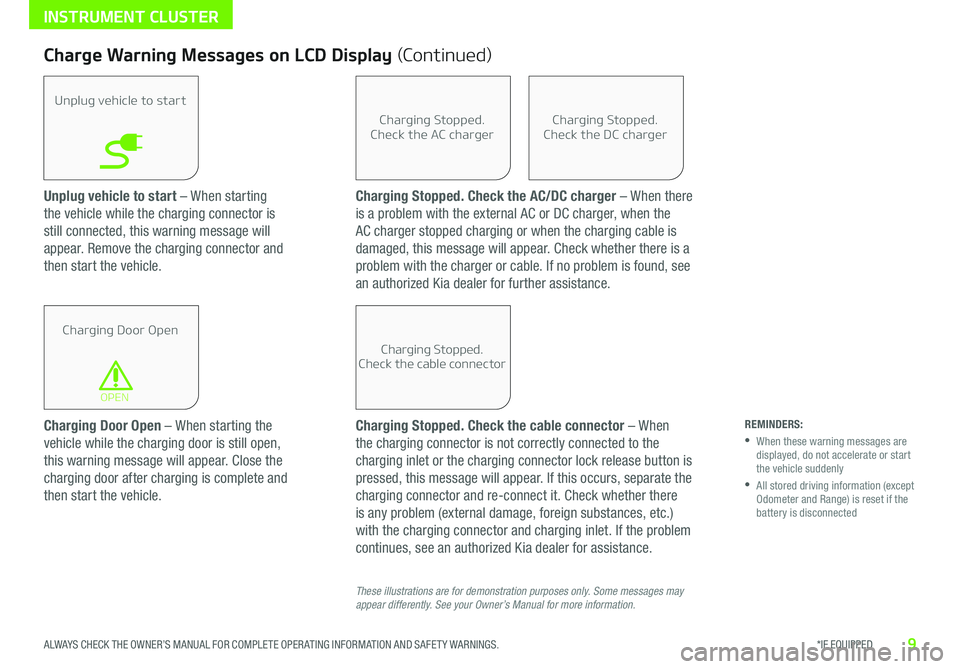
Unplug vehicle to start – When starting
the vehicle while the charging connector is
still connected, this warning message will
appear . Remove the charging connector and
then start the vehicle .
Charge Warning Messages on LCD Display (Continued)
Unplug vehicle to start
Charging Door Open
OPEN
Charging Stopped.Check the AC charger
Charging Stopped.Check the cable connector
Charging Stopped.Check the DC charger
Charging Door Open – When starting the
vehicle while the charging door is still open,
this warning message will appear . Close the
charging door after charging is complete and
then start the vehicle .
Charging Stopped. Check the AC/DC charger – When there
is a problem with the external AC or DC charger, when the
AC charger stopped charging or when the charging cable is
damaged, this message will appear . Check whether there is a
problem with the charger or cable . If no problem is found, see
an authorized Kia dealer for further assistance .
Charging Stopped. Check the cable connector – When
the charging connector is not correctly connected to the
charging inlet or the charging connector lock release button is
pressed, this message will appear . If this occurs, separate the
charging connector and re-connect it . Check whether there
is any problem (external damage, foreign substances, etc . )
with the charging connector and charging inlet . If the problem
continues, see an authorized Kia dealer for assistance .
These illustrations are for demonstration purposes only. Some messages may appear differently. See your Owner’s Manual for more information.
REMINDERS:
•
When these warning messages are displayed, do not accelerate or start the vehicle suddenly
•
All stored driving information (except Odometer and Range) is reset if the battery is disconnected
INSTRUMENT CLUSTER
Page 12 of 54
10*IF EQUIPPED NIRO EV FEATURES & FUNCTIONS GUIDE
Service Interval Mode
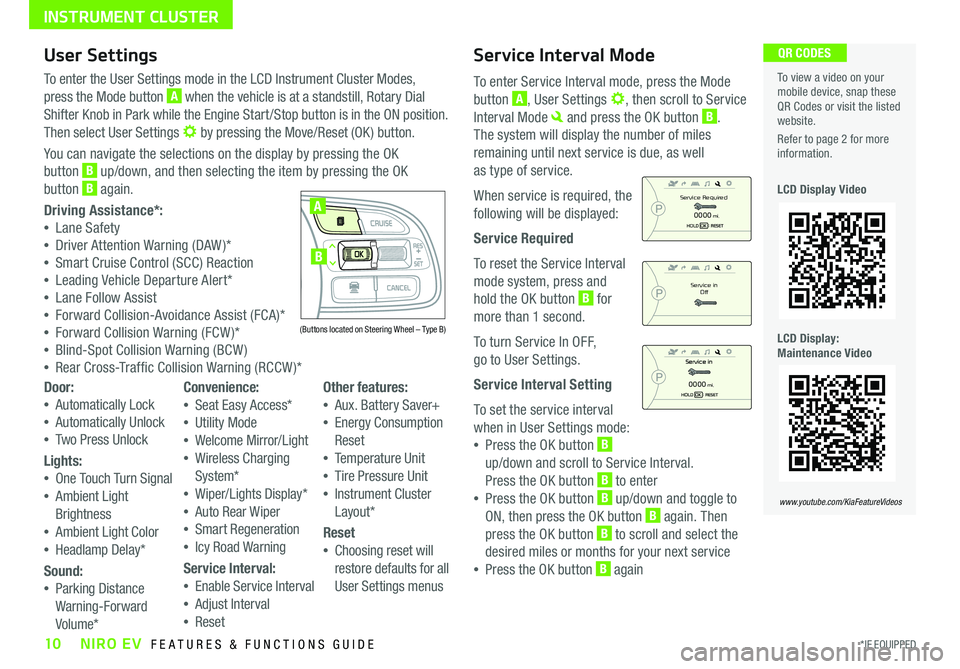
To enter Service Interval mode, press the Mode
button A, User Settings , then scroll to Service
Interval Mode and press the OK button B .
The system will display the number of miles
remaining until next service is due, as well
as type of service .
When service is required, the
following will be displayed:
Service Required
To reset the Service Interval
mode system, press and
hold the OK button B for
more than 1 second .
To turn Service In OFF,
go to User Settings .
Service Interval Setting
To set the service interval
when in User Settings mode:
•Press the OK button B
up/down and scroll to Service Interval .
Press the OK button B to enter
•Press the OK button B up/down and toggle to
ON, then press the OK button B again . Then
press the OK button B to scroll and select the
desired miles or months for your next service
•Press the OK button B again
User Settings
To enter the User Settings mode in the LCD Instrument Cluster Modes,
press the Mode button A when the vehicle is at a standstill, Rotary Dial
Shifter Knob in Park while the Engine Start /Stop button is in the ON position .
Then select User Settings by pressing the Move/Reset (OK ) button .
You can navigate the selections on the display by pressing the OK
button B up/down, and then selecting the item by pressing the OK
button B again .
Driving Assistance*:
•Lane Safety
•Driver Attention Warning (DAW )*
•Smart Cruise Control (SCC) Reaction
•Leading Vehicle Departure Alert*
•Lane Follow Assist
•Forward Collision-Avoidance Assist (FCA)*
•Forward Collision Warning (FCW )*
•Blind-Spot Collision Warning (BCW )
•Rear Cross-Traffic Collision Warning (RCCW )*
To view a video on your mobile device, snap these QR Codes or visit the listed website .
Refer to page 2 for more information .
LCD Display Video
LCD Display: Maintenance Video
QR CODES
www.youtube.com/KiaFeatureVideos
(Buttons located on Steering Wheel – Type B)
MODE
RES
CRUISE
CAN CELOKSET
MODE
RES
CRUISE
CAN CELOKSET
MODE
A
B
Service in
Off
Service Required
0000mi.
0000mi.
Door:
•Automatically Lock
•Automatically Unlock
•Two Press Unlock
Lights:
•One Touch Turn Signal
•Ambient Light
Brightness
•Ambient Light Color
•Headlamp Delay*
Sound:
•Parking Distance
Warning-Forward
Volume*
Convenience:
•Seat Easy Access*
•Utility Mode
•Welcome Mirror/Light
•Wireless Charging
System*
•Wiper/Lights Display*
•Auto Rear Wiper
•Smart Regeneration
•Icy Road Warning
Service Interval:
•Enable Service Interval
•Adjust Interval
•Reset
Other features:
•Aux . Battery Saver+
•Energy Consumption
Reset
•Temperature Unit
•Tire Pressure Unit
•Instrument Cluster
Layout*
Reset
•Choosing reset will
restore defaults for all
User Settings menus
INSTRUMENT CLUSTER
Page 13 of 54

11*IF EQUIPPED ALWAYS CHECK THE OWNER’S MANUAL FOR COMPLETE OPER ATING INFORMATION AND SAFET Y WARNINGS .
mi
To help reduce energy consumption:
•Drive at a moderate speed, accelerating smoothly and at a moderate rate
•Keep tires inflated to the recommended pressure and wheels aligned properly
QUICK TIP
For more information on Driving Modes, refer to your Owner’s Manual or contact your local dealership.
Drive Modes
Niro EV is equipped with four distinct and customizable driving modes . Press
the Drive Mode button A to select the desired mode .
•ECO+ – This super power-saving mode is designed to help maximize
battery energy . Press and hold the Drive Mode button A to select the
ECO+ mode
•ECO – This mode can help enhance efficiency by managing battery usage
•NORMAL – This mode balances drivability and efficiency
•SPORT – This mode provides enhanced acceleration and dynamic
drivability
An indicator in the instrument cluster will illuminate to show which drive
mode you have selected (no indicator will appear for the NORMAL mode) .
Smart ECO pedal guide – When ECO mode is selected, the
instrument cluster will show 3 efficiency zones to keep you
informed of your power usage with accelerator pedal input .
B Variable ECO zone
C Variable power zone
D Regeneration/charge zone
N
P
PRELEASE
AUTO
HOLD
D
R
DRIVE
MODEA
(Button located at right below Rotary Dial Shifter Knob)
D
C
B
ELECTRIC VEHICLE (EV) FEATURES
Power Range
Regen Range
Variable ECO Range
Accelerator pedal input*
Page 14 of 54
12*IF EQUIPPED NIRO EV FEATURES & FUNCTIONS GUIDE
ELECTRIC VEHICLE (EV) FEATURES
EV Mode - UVO link with Navigation*
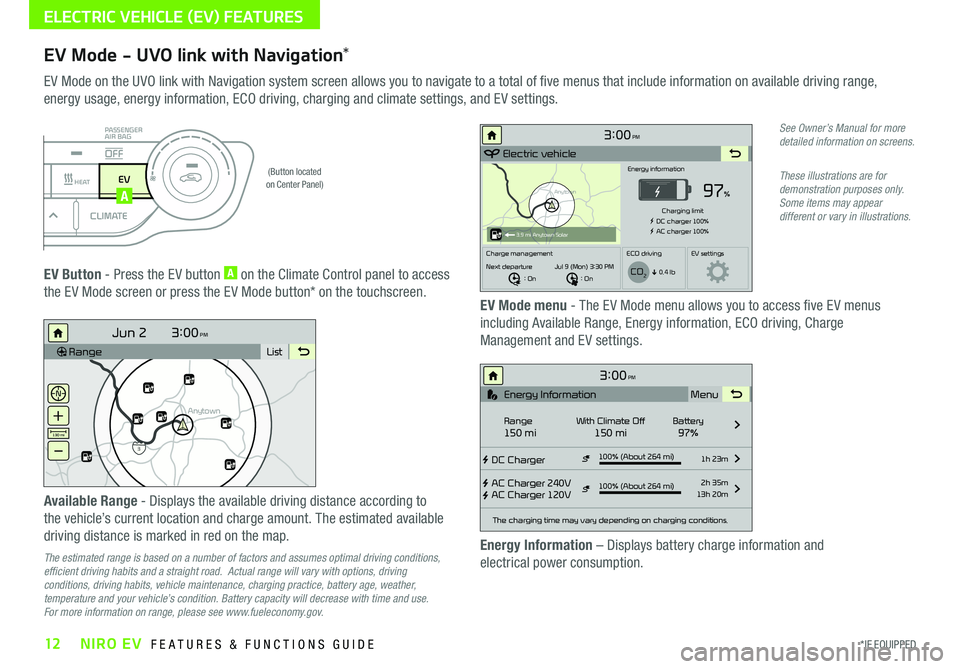
EV Mode on the UVO link with Navigation system screen allows you to navigate to a total of five menus that include information on available driving range,
energy usage, energy information, ECO driving, charging and climate settings, and EV settings .
(Button located on Center Panel)
EV Button - Press the EV button A on the Climate Control panel to access
the EV Mode screen or press the EV Mode button* on the touchscreen .EV Mode menu - The EV Mode menu allows you to access five EV menus
including Available Range, Energy information, ECO driving, Charge
Management and EV settings .
Available Range - Displays the available driving distance according to
the vehicle’s current location and charge amount . The estimated available
driving distance is marked in red on the map .
The estimated range is based on a number of factors and assumes optimal driving conditions, efficient driving habits and a straight road. Actual range will vary with options, driving conditions, driving habits, vehicle maintenance, charging practice, battery age, weather, temperature and your vehicle’s condition. Battery capacity will decrease with time and use. For more information on range, please see www.fueleconomy.gov.
Energy Information – Displays battery charge information and
electrical power consumption .
See Owner’s Manual for more detailed information on screens.
These illustrations are for demonstration purposes only. Some items may appear different or vary in illustrations.
3:00PM
Range List
Anytown
3
Jun 2
+
–
130 mi
Anytown
3:00PM
Electric vehicle
97%
Energy information
Charging limit
DC charger 100% AC charger 100%
Charge management ECO drivingEV settings
Next departure : On : On
Jul 9 (Mon) 3:30 PM
0.4 lb
3.9 mi Anytown Solar
CO2
3:00PM
DC Charger
AC Charger 240V
AC Charger 120V100% (About 264 mi) 1h 23m
2h 35m
13h 20m
The charging time may vary depending on charging conditions.
Range150 miWith Climate Off150 miBattery97% Menu
Energy Information
100% (About 264 mi)
i
DRIVERAUTOACHEAT
CLIMATEOFF
ONLYEV
PASSENGER
AIR BAG
OFF
A
Page 15 of 54

13*IF EQUIPPED ALWAYS CHECK THE OWNER’S MANUAL FOR COMPLETE OPER ATING INFORMATION AND SAFET Y WARNINGS .
See Owner’s Manual for more detailed information on screens.
These illustrations are for demonstration purposes only. Some items may appear different or vary in illustrations.
EV Mode - UVO link with Navigation* (Continued)
Electricity Use – Displays current energy
consumption for each system of the vehicle .
ECO Driving – Displays ECO level information and
ECO driving history .
Charge Management – Allows you to select the time
and date you wish to reserve for automatic charging
and automatic climate control .
EV Settings – Allows the user to change the Winter
mode, warning and EV route settings .
3:00PM
Instant
Cumulative(Ignition on - Now)Driving
256 kw
--- % 83 % 17 %--- %
0.00 kw
0.54 kw0.20 kw
Climate
ElectronicsBattery care
Electricity Use
3:00
Nov. 27PM
Charge Management
Charging
and ClimateNext Departure
Jul 9 (Mon) 3:30 PM
Scheduled Charging
Scheduled Charging is not set.
Scheduled ClimateClimate is not set.
Charging
Location
Charging
Current
Max %
Charge
3:00PM
EV settings
Winter mode Range warning
Warning
EV Route
The range warning is displayed if the distance to
the destination exceeds the available vehicle range.
3:00PM
ECO driving
Eco contrib. Carbon dioxide reduction
Reduced 2.0 lb compared to the carbon
dioxide emitted when driving a gasoline
vehicle in the same segment.
EV Economy
History
CO22.0 lb(2 mi)
ELECTRIC VEHICLE (EV) FEATURES
Page 16 of 54
14*IF EQUIPPED NIRO EV FEATURES & FUNCTIONS GUIDE
POWER
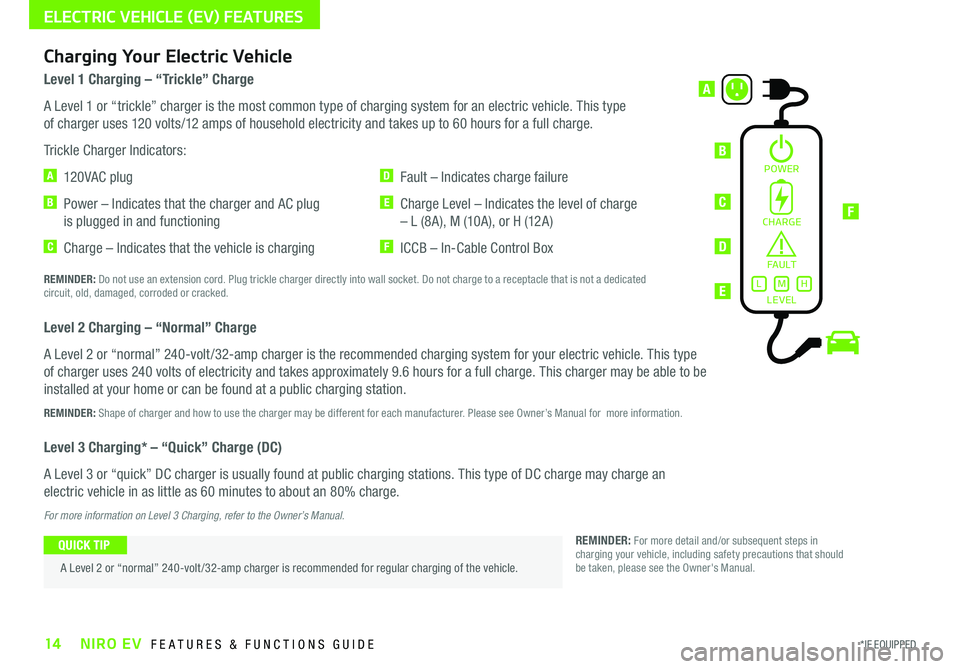
Level 1 Charging – “Trickle” Charge
A Level 1 or “trickle” charger is the most common type of charging system for an electric vehicle . This type
of charger uses 120 volts/12 amps of household electricity and takes up to 60 hours for a full charge .
Trickle Charger Indicators:
A 12 0 VA C plug
B Power – Indicates that the charger and AC plug
is plugged in and functioning
C Charge – Indicates that the vehicle is charging
D Fault – Indicates charge failure
E Charge Level – Indicates the level of charge
– L (8A), M (10A), or H (12A)
F ICCB – In-Cable Control Box
REMINDER: Do not use an extension cord . Plug trickle charger directly into wall socket . Do not charge to a receptacle that is not a dedicated circuit, old, damaged, corroded or cracked .
Level 2 Charging – “Normal” Charge
A Level 2 or “normal” 240-volt /32-amp charger is the recommended charging system for your electric vehicle . This type
of charger uses 240 volts of electricity and takes approximately 9 .6 hours for a full charge . This charger may be able to be
installed at your home or can be found at a public charging station .
REMINDER: Shape of charger and how to use the charger may be different for each manufacturer . Please see Owner’s Manual for more information .
Level 3 Charging* – “Quick” Charge (DC)
A Level 3 or “quick” DC charger is usually found at public charging stations . This type of DC charge may charge an
electric vehicle in as little as 60 minutes to about an 80% charge .
For more information on Level 3 Charging, refer to the Owner’s Manual.
B
A
FC
D
E
Charging Your Electric Vehicle
A Level 2 or “normal” 240-volt /32-amp charger is recommended for regular charging of the vehicle .
QUICK TIPREMINDER: For more detail and/or subsequent steps in charging your vehicle, including safety precautions that should be taken, please see the Owner's Manual .
CHARGE
FA U LT!
LEVELLMH
ELECTRIC VEHICLE (EV) FEATURES
Page 17 of 54
15*IF EQUIPPED ALWAYS CHECK THE OWNER’S MANUAL FOR COMPLETE OPER ATING INFORMATION AND SAFET Y WARNINGS .
ELECTRIC VEHICLE (EV) FEATURES
Zero Emission
POWER
CHARGE
FAULT
Zero Emission
POWER
CHARGE
FAULT
Zero Emission
POWER
CHARGE
FAULT
Zero Emission
POWER
CHARGE
FAULT
( Trickle / normal charge shown)
Charging Your Electric Vehicle (Continued)
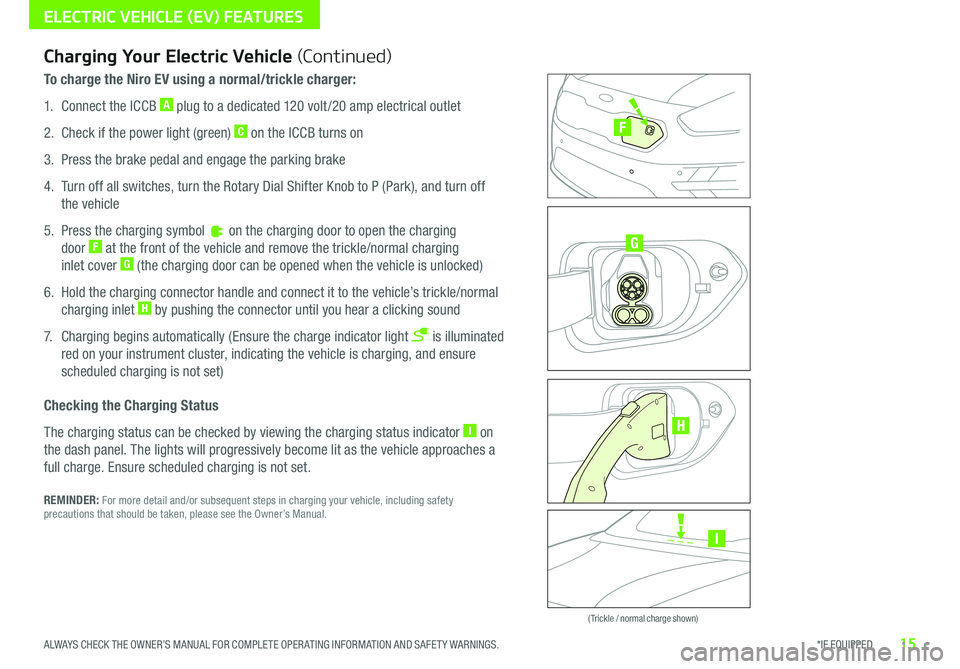
To charge the Niro EV using a normal/trickle charger:
1 . Connect the ICCB A plug to a dedicated 120 volt /20 amp electrical outlet
2 . Check if the power light (green) C on the ICCB turns on
3 . Press the brake pedal and engage the parking brake
4 . Turn off all switches, turn the Rotary Dial Shifter Knob to P (Park), and turn off
the vehicle
5 . Press the charging symbol on the charging door to open the charging
door F at the front of the vehicle and remove the trickle/normal charging
inlet cover G (the charging door can be opened when the vehicle is unlocked)
6 . Hold the charging connector handle and connect it to the vehicle’s trickle/normal
charging inlet H by pushing the connector until you hear a clicking sound
7 . Charging begins automatically (Ensure the charge indicator light is illuminated
red on your instrument cluster, indicating the vehicle is charging, and ensure
scheduled charging is not set)
Checking the Charging Status
The charging status can be checked by viewing the charging status indicator I on
the dash panel . The lights will progressively become lit as the vehicle approaches a
full charge . Ensure scheduled charging is not set .
REMINDER: For more detail and/or subsequent steps in charging your vehicle, including safety precautions that should be taken, please see the Owner’s Manual .
I
G
F
H
Page 18 of 54
16*IF EQUIPPED NIRO EV FEATURES & FUNCTIONS GUIDE
ELECTRIC VEHICLE (EV) FEATURES
AUTO
OFF
AUTO
OFF
(Buttons are located left of the Steering Wheel)
AB
Scheduled Charging*Charging Connector Auto/Lock Mode
Charging times can be set using the UVO link with Navigation
.*
You can also use the Scheduled Charging* App on your
smartphone .
Charging with the UVO link smartphone app:
The Kia Access with UVO link smartphone app can help you find
the nearest charging station, and also displays charging status
and Scheduled Charging information . On your smartphone, go
to an app store or marketplace to download the Kia Access with
UVO link smartphone app .
REMINDER: When Scheduled Charging is set and the charger is plugged in, charging of the electric vehicle will not begin until the time and date set .
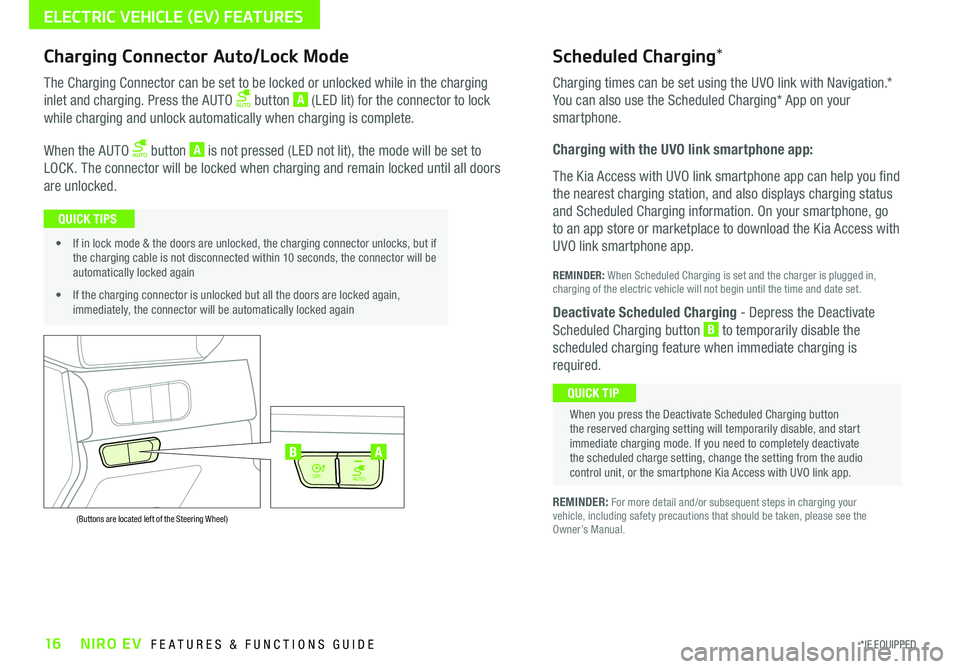
Deactivate Scheduled Charging - Depress the Deactivate
Scheduled Charging button B to temporarily disable the
scheduled charging feature when immediate charging is
required .
The Charging Connector can be set to be locked or unlocked while in the charging
inlet and charging . Press the AUTO button A (LED lit) for the connector to lock
while charging and unlock automatically when charging is complete .
When the AUTO button A is not pressed (LED not lit), the mode will be set to
LOCK . The connector will be locked when charging and remain locked until all doors
are unlocked .
REMINDER: For more detail and/or subsequent steps in charging your vehicle, including safety precautions that should be taken, please see the Owner’s Manual .
When you press the Deactivate Scheduled Charging button the reserved charging setting will temporarily disable, and start immediate charging mode . If you need to completely deactivate the scheduled charge setting, change the setting from the audio control unit, or the smartphone Kia Access with UVO link app .
QUICK TIP
• If in lock mode & the doors are unlocked, the charging connector unlocks, but if the charging cable is not disconnected within 10 seconds, the connector will be automatically locked again
• If the charging connector is unlocked but all the doors are locked again, immediately, the connector will be automatically locked again
QUICK TIPS
Page 19 of 54
17*IF EQUIPPED ALWAYS CHECK THE OWNER’S MANUAL FOR COMPLETE OPER ATING INFORMATION AND SAFET Y WARNINGS .
ELECTRIC VEHICLE (EV) FEATURES
Regenerative Braking with Paddle Shifters
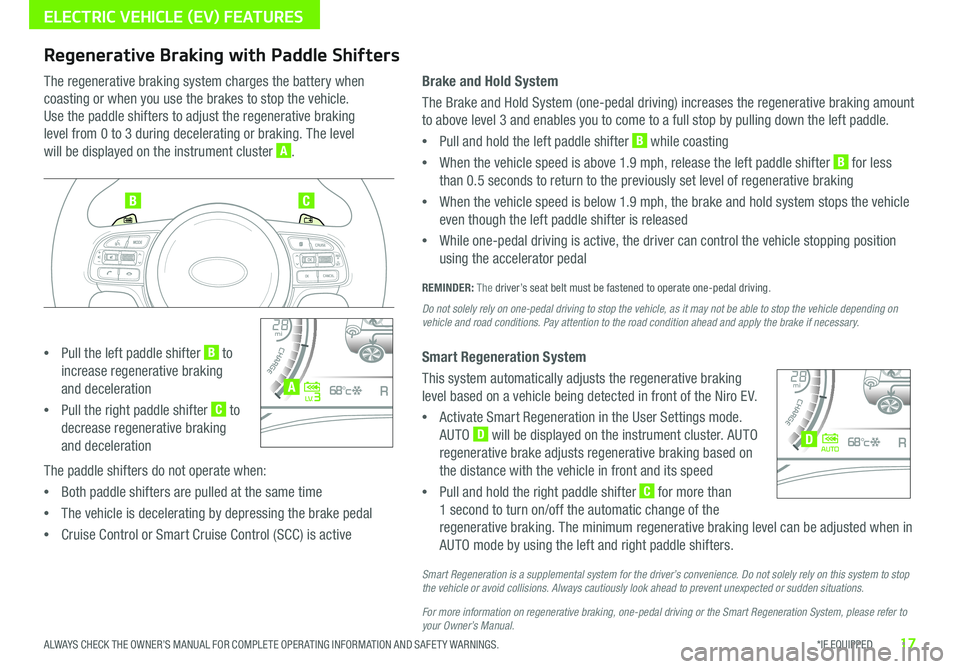
The regenerative braking system charges the battery when
coasting or when you use the brakes to stop the vehicle .
Use the paddle shifters to adjust the regenerative braking
level from 0 to 3 during decelerating or braking . The level
will be displayed on the instrument cluster A .
•Pull the left paddle shifter B to
increase regenerative braking
and deceleration
•Pull the right paddle shifter C to
decrease regenerative braking
and deceleration
The paddle shifters do not operate when:
•Both paddle shifters are pulled at the same time
•The vehicle is decelerating by depressing the brake pedal
•Cruise Control or Smart Cruise Control (SCC) is active
Brake and Hold System
The Brake and Hold System (one-pedal driving) increases the regenerative braking amount
to above level 3 and enables you to come to a full stop by pulling down the left paddle .
•Pull and hold the left paddle shifter B while coasting
•When the vehicle speed is above 1 .9 mph, release the left paddle shifter B for less
than 0 .5 seconds to return to the previously set level of regenerative braking
•When the vehicle speed is below 1 .9 mph, the brake and hold system stops the vehicle
even though the left paddle shifter is released
•While one-pedal driving is active, the driver can control the vehicle stopping position
using the accelerator pedal
REMINDER: The driver’s seat belt must be fastened to operate one-pedal driving .
Do not solely rely on one-pedal driving to stop the vehicle, as it may not be able to stop the vehicle depending on vehicle and road conditions. Pay attention to the road condition ahead and apply the brake if necessary.
Smart Regeneration System
This system automatically adjusts the regenerative braking
level based on a vehicle being detected in front of the Niro EV .
•Activate Smart Regeneration in the User Settings mode .
AUTO D will be displayed on the instrument cluster . AUTO
regenerative brake adjusts regenerative braking based on
the distance with the vehicle in front and its speed
•Pull and hold the right paddle shifter C for more than
1 second to turn on/off the automatic change of the
regenerative braking . The minimum regenerative braking level can be adjusted when in
AUTO mode by using the left and right paddle shifters .
Smart Regeneration is a supplemental system for the driver’s convenience. Do not solely rely on this system to stop the vehicle or avoid collisions. Always cautiously look ahead to prevent unexpected or sudden situations.
For more information on regenerative braking, one-pedal driving or the Smart Regeneration System, please refer to your Owner’s Manual.
BC
4010 0
60
80160
60140
80 120
100
kmmi
mi
RANGE
68
°c
CRUISE 60 mi/hECO
44444 mi
150
240
km/h
MPH
electric
L V .3RN D
L H
40
10 0
60
80160
60140
80 120
100
kmmi
mi
RANGE
68
°c
CRUISE 60 mi/hECO
44444 mi
150
240
km/h
MPH
electric
AUTORN D
L H
A
D
Page 20 of 54
18NIRO EV FEATURES & FUNCTIONS GUIDE*IF EQUIPPED †LEGAL DISCL AIMERS ON BACK INSIDE COVER
Blind-Spot Collision Warning (BCW)*†7
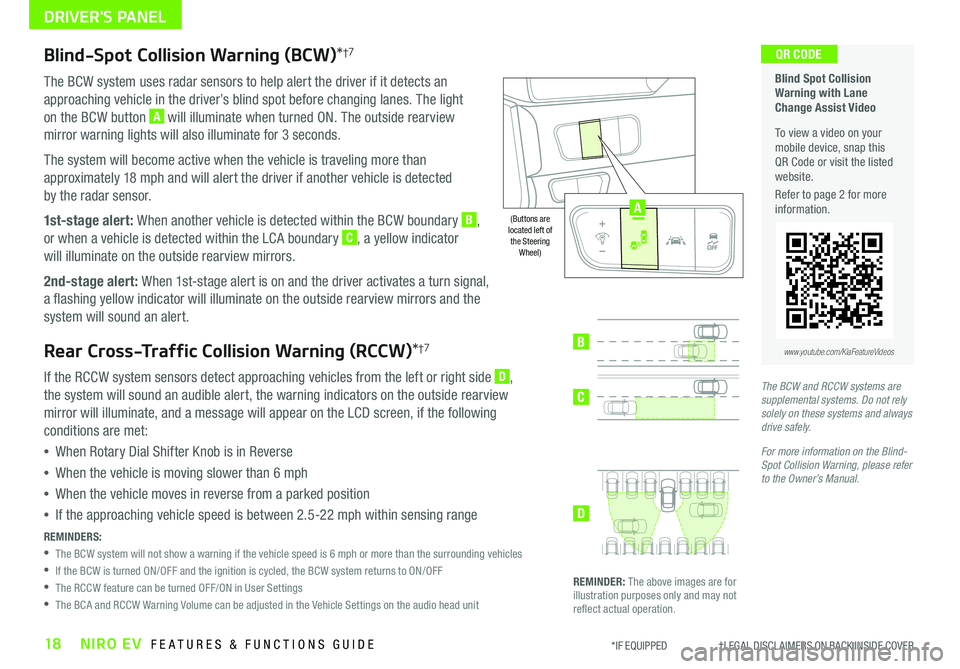
The BCW system uses radar sensors to help alert the driver if it detects an
approaching vehicle in the driver’s blind spot before changing lanes . The light
on the BCW button A will illuminate when turned ON . The outside rearview
mirror warning lights will also illuminate for 3 seconds .
The system will become active when the vehicle is traveling more than
approximately 18 mph and will alert the driver if another vehicle is detected
by the radar sensor .
1st-stage alert: When another vehicle is detected within the BCW boundary B,
or when a vehicle is detected within the LCA boundary C, a yellow indicator
will illuminate on the outside rearview mirrors .
2nd-stage alert: When 1st-stage alert is on and the driver activates a turn signal,
a flashing yellow indicator will illuminate on the outside rearview mirrors and the
system will sound an alert .
Rear Cross-Traffic Collision Warning (RCCW)*†7
If the RCCW system sensors detect approaching vehicles from the left or right side D,
the system will sound an audible alert, the warning indicators on the outside rearview
mirror will illuminate, and a message will appear on the LCD screen, if the following
conditions are met:
•When Rotary Dial Shifter Knob is in Reverse
•When the vehicle is moving slower than 6 mph
•When the vehicle moves in reverse from a parked position
•If the approaching vehicle speed is between 2 .5-22 mph within sensing range
REMINDERS:
•
The BCW system will not show a warning if the vehicle speed is 6 mph or more than the surrounding vehicles
•If the BCW is turned ON/OFF and the ignition is cycled, the BCW system returns to ON/OFF
•The RCCW feature can be turned OFF/ON in User Settings
•The BCA and RCCW Warning Volume can be adjusted in the Vehicle Settings on the audio head unit
Blind Spot Collision Warning with Lane Change Assist Video
To view a video on your mobile device, snap this QR Code or visit the listed website .
Refer to page 2 for more information .
QR CODE
B
C
D
REMINDER: The above images are for illustration purposes only and may not reflect actual operation .
AUTO
OFF
www.youtube.com/KiaFeatureVideos
(Buttons are located left of the Steering Wheel)
The BCW and RCCW systems are supplemental systems. Do not rely solely on these systems and always drive safely.
For more information on the Blind-Spot Collision Warning, please refer to the Owner’s Manual.
AUTO
OFF
A
DRIVER'S PANEL