display KIA NIRO EV 2020 Features and Functions Guide
[x] Cancel search | Manufacturer: KIA, Model Year: 2020, Model line: NIRO EV, Model: KIA NIRO EV 2020Pages: 54, PDF Size: 3.46 MB
Page 18 of 54
16*IF EQUIPPED NIRO EV FEATURES & FUNCTIONS GUIDE
ELECTRIC VEHICLE (EV) FEATURES
AUTO
OFF
AUTO
OFF
(Buttons are located left of the Steering Wheel)
AB
Scheduled Charging*Charging Connector Auto/Lock Mode
Charging times can be set using the UVO link with Navigation
.*
You can also use the Scheduled Charging* App on your
smartphone .
Charging with the UVO link smartphone app:
The Kia Access with UVO link smartphone app can help you find
the nearest charging station, and also displays charging status
and Scheduled Charging information . On your smartphone, go
to an app store or marketplace to download the Kia Access with
UVO link smartphone app .
REMINDER: When Scheduled Charging is set and the charger is plugged in, charging of the electric vehicle will not begin until the time and date set .
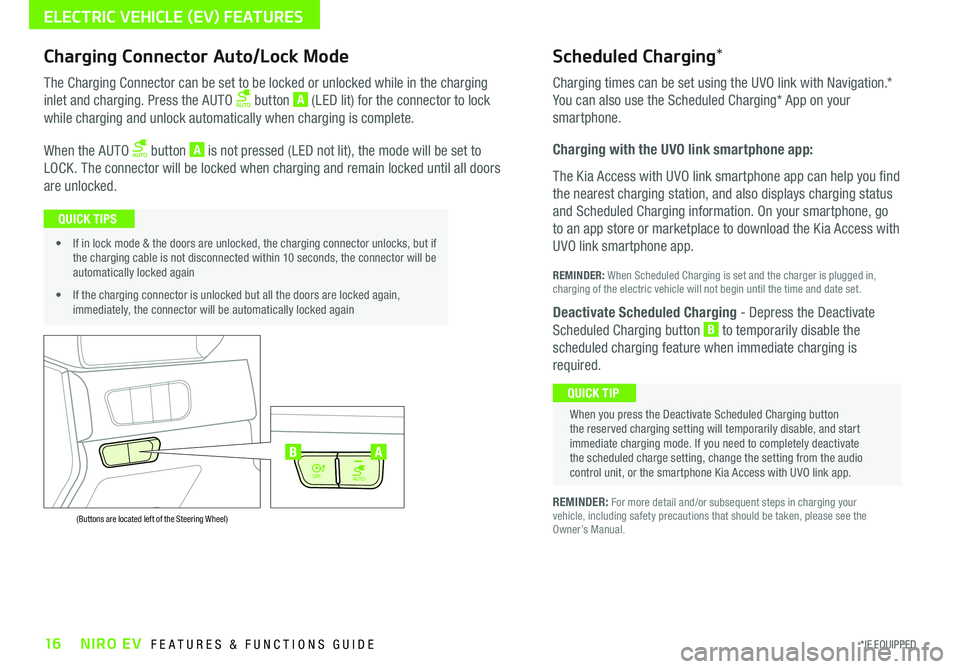
Deactivate Scheduled Charging - Depress the Deactivate
Scheduled Charging button B to temporarily disable the
scheduled charging feature when immediate charging is
required .
The Charging Connector can be set to be locked or unlocked while in the charging
inlet and charging . Press the AUTO button A (LED lit) for the connector to lock
while charging and unlock automatically when charging is complete .
When the AUTO button A is not pressed (LED not lit), the mode will be set to
LOCK . The connector will be locked when charging and remain locked until all doors
are unlocked .
REMINDER: For more detail and/or subsequent steps in charging your vehicle, including safety precautions that should be taken, please see the Owner’s Manual .
When you press the Deactivate Scheduled Charging button the reserved charging setting will temporarily disable, and start immediate charging mode . If you need to completely deactivate the scheduled charge setting, change the setting from the audio control unit, or the smartphone Kia Access with UVO link app .
QUICK TIP
• If in lock mode & the doors are unlocked, the charging connector unlocks, but if the charging cable is not disconnected within 10 seconds, the connector will be automatically locked again
• If the charging connector is unlocked but all the doors are locked again, immediately, the connector will be automatically locked again
QUICK TIPS
Page 19 of 54
17*IF EQUIPPED ALWAYS CHECK THE OWNER’S MANUAL FOR COMPLETE OPER ATING INFORMATION AND SAFET Y WARNINGS .
ELECTRIC VEHICLE (EV) FEATURES
Regenerative Braking with Paddle Shifters
The regenerative braking system charges the battery when
coasting or when you use the brakes to stop the vehicle .
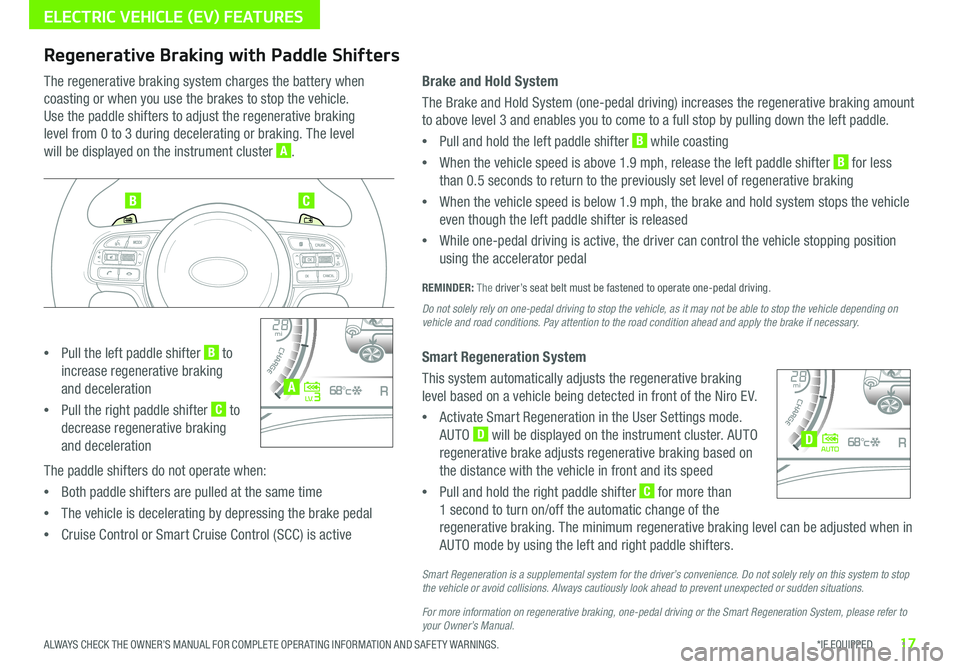
Use the paddle shifters to adjust the regenerative braking
level from 0 to 3 during decelerating or braking . The level
will be displayed on the instrument cluster A .
•Pull the left paddle shifter B to
increase regenerative braking
and deceleration
•Pull the right paddle shifter C to
decrease regenerative braking
and deceleration
The paddle shifters do not operate when:
•Both paddle shifters are pulled at the same time
•The vehicle is decelerating by depressing the brake pedal
•Cruise Control or Smart Cruise Control (SCC) is active
Brake and Hold System
The Brake and Hold System (one-pedal driving) increases the regenerative braking amount
to above level 3 and enables you to come to a full stop by pulling down the left paddle .
•Pull and hold the left paddle shifter B while coasting
•When the vehicle speed is above 1 .9 mph, release the left paddle shifter B for less
than 0 .5 seconds to return to the previously set level of regenerative braking
•When the vehicle speed is below 1 .9 mph, the brake and hold system stops the vehicle
even though the left paddle shifter is released
•While one-pedal driving is active, the driver can control the vehicle stopping position
using the accelerator pedal
REMINDER: The driver’s seat belt must be fastened to operate one-pedal driving .
Do not solely rely on one-pedal driving to stop the vehicle, as it may not be able to stop the vehicle depending on vehicle and road conditions. Pay attention to the road condition ahead and apply the brake if necessary.
Smart Regeneration System
This system automatically adjusts the regenerative braking
level based on a vehicle being detected in front of the Niro EV .
•Activate Smart Regeneration in the User Settings mode .
AUTO D will be displayed on the instrument cluster . AUTO
regenerative brake adjusts regenerative braking based on
the distance with the vehicle in front and its speed
•Pull and hold the right paddle shifter C for more than
1 second to turn on/off the automatic change of the
regenerative braking . The minimum regenerative braking level can be adjusted when in
AUTO mode by using the left and right paddle shifters .
Smart Regeneration is a supplemental system for the driver’s convenience. Do not solely rely on this system to stop the vehicle or avoid collisions. Always cautiously look ahead to prevent unexpected or sudden situations.
For more information on regenerative braking, one-pedal driving or the Smart Regeneration System, please refer to your Owner’s Manual.
BC
4010 0
60
80160
60140
80 120
100
kmmi
mi
RANGE
68
°c
CRUISE 60 mi/hECO
44444 mi
150
240
km/h
MPH
electric
L V .3RN D
L H
40
10 0
60
80160
60140
80 120
100
kmmi
mi
RANGE
68
°c
CRUISE 60 mi/hECO
44444 mi
150
240
km/h
MPH
electric
AUTORN D
L H
A
D
Page 21 of 54
19ALWAYS CHECK THE OWNER’S MANUAL FOR COMPLETE OPER ATING INFORMATION AND SAFET Y WARNINGS . *IF EQUIPPED †LEGAL DISCL AIMERS ON BACK INSIDE COVER
Lane Keeping Assist
Lane Keeping Assist
Lane Keeping Assist
Lane Keeping Assist
Lane Keeping Assist
Lane Keeping Assist Lane Keeping Assist
Lane Keeping Assist
Lane Keeping Assist (LKA)*†7
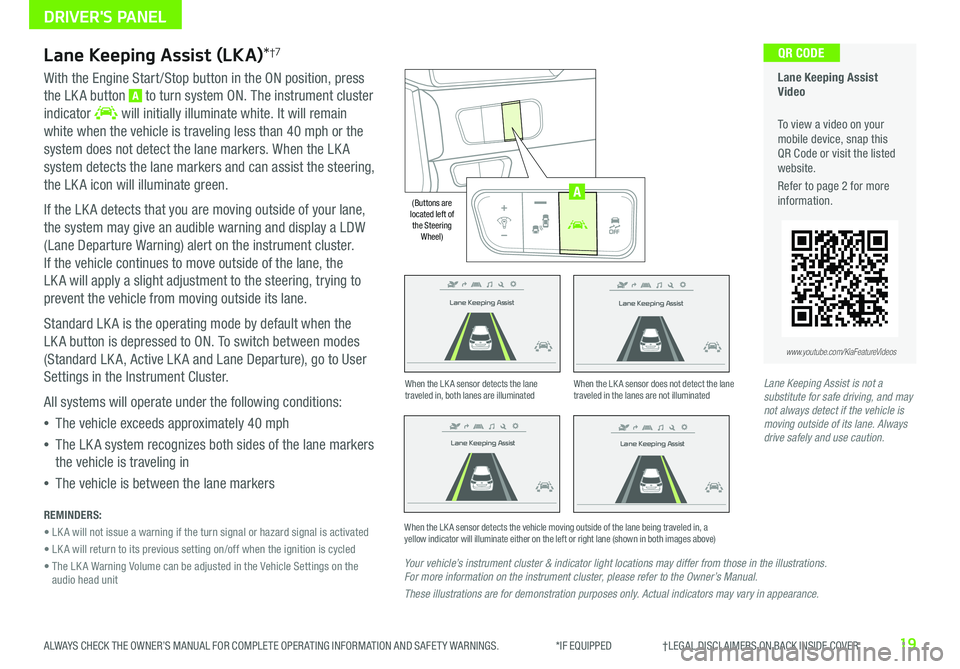
With the Engine Start /Stop button in the ON position, press
the LK A button A to turn system ON . The instrument cluster
indicator will initially illuminate white . It will remain
white when the vehicle is traveling less than 40 mph or the
system does not detect the lane markers . When the LK A
system detects the lane markers and can assist the steering,
the LK A icon will illuminate green .
If the LK A detects that you are moving outside of your lane,
the system may give an audible warning and display a LDW
(Lane Departure Warning) alert on the instrument cluster .
If the vehicle continues to move outside of the lane, the
LK A will apply a slight adjustment to the steering, trying to
prevent the vehicle from moving outside its lane .
Standard LK A is the operating mode by default when the
LK A button is depressed to ON . To switch between modes
(Standard LK A, Active LK A and Lane Departure), go to User
Settings in the Instrument Cluster .
All systems will operate under the following conditions:
•The vehicle exceeds approximately 40 mph
•The LK A system recognizes both sides of the lane markers
the vehicle is traveling in
•The vehicle is between the lane markers
REMINDERS:
• LK A will not issue a warning if the turn signal or hazard signal is activated
• LK A will return to its previous setting on/off when the ignition is cycled
• The LK A Warning Volume can be adjusted in the Vehicle Settings on the audio head unit
Your vehicle’s instrument cluster & indicator light locations may differ from those in the illustrations. For more information on the instrument cluster, please refer to the Owner’s Manual.
These illustrations are for demonstration purposes only. Actual indicators may vary in appearance.
When the LK A sensor detects the lane traveled in, both lanes are illuminatedWhen the LK A sensor does not detect the lane traveled in the lanes are not illuminated
When the LK A sensor detects the vehicle moving outside of the lane being traveled in, a yellow indicator will illuminate either on the left or right lane (shown in both images above)
Lane Keeping Assist
Lane Keeping Assist Lane Keeping Assist
Lane Keeping AssistLane Keeping Assist
Lane Keeping AssistLane Keeping Assist
Lane Keeping Assist
Lane Keeping Assist Video
To view a video on your mobile device, snap this QR Code or visit the listed website .
Refer to page 2 for more information .
QR CODE
www.youtube.com/KiaFeatureVideos
AUTO
OFF
(Buttons are located left of the Steering Wheel)
AUTO
OFF
A
Lane Keeping Assist is not a substitute for safe driving, and may not always detect if the vehicle is moving outside of its lane. Always drive safely and use caution.
DRIVER'S PANEL
Page 22 of 54
20NIRO EV FEATURES & FUNCTIONS GUIDE*IF EQUIPPED †LEGAL DISCL AIMERS ON BACK INSIDE COVER
Forward Collision-Avoidance Assist Video
To view a video on your mobile device, snap this QR Code or visit the listed website .
www.youtube.com/KiaFeatureVideos
QR CODE
A
(Buttons are located on Steering Wheel - Type B)
DRIVER'S PANEL
Forward Collision-Avoidance Assist (FCA)*†7
The FCA system is designed to help alert the driver, and, under
certain conditions, apply emergency braking, when rapidly
approaching a vehicle that is slowing down, braking or stopped .
Initially, FCA provides Forward Collision Warning (FCW ) when it
detects a potential collision with a vehicle in front, emitting an
audible warning and visual alert on the instrument cluster .
Adjust the alert settings (Early, Normal, Late) in the User Settings .
To turn FCA /FCW off, go to User Settings again and turn it off .
If the collision risk increases, Forward Collision-Avoidance Assist
(FCA) is designed to automatically apply the brakes to reduce
your speed, potentially helping to reduce the effects of a possible
collision . FCA is ON by default and can be turned OFF in the User
Settings menu on the Instrument Cluster display .
FCA /FCW will become active when the:
• Engine Start /Stop button is ON
• Vehicle is traveling more than 5 mph
• Electronic Stability Control (ESC) is ON
Lane Following Assist (LFA) System*†7
The Lane Following Assist (LFA) System is designed to help
ensure that the vehicle stays in its lane by monitoring the
detected lane ahead and adjusting steering .
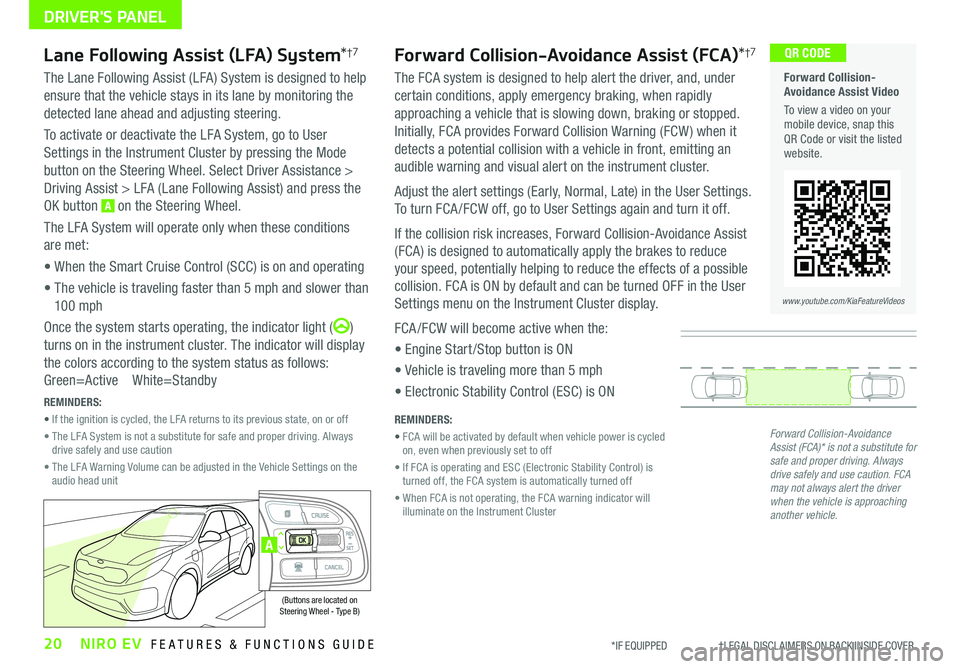
To activate or deactivate the LFA System, go to User
Settings in the Instrument Cluster by pressing the Mode
button on the Steering Wheel . Select Driver Assistance >
Driving Assist > LFA (Lane Following Assist) and press the
OK button A on the Steering Wheel .
The LFA System will operate only when these conditions
are met:
• When the Smart Cruise Control (SCC) is on and operating
• The vehicle is traveling faster than 5 mph and slower than
10 0 mph
Once the system starts operating, the indicator light ()
turns on in the instrument cluster . The indicator will display
the colors according to the system status as follows:
Green=Active White=Standby
Forward Collision-Avoidance Assist (FCA)* is not a substitute for safe and proper driving. Always drive safely and use caution. FCA may not always alert the driver when the vehicle is approaching another vehicle.
REMINDERS:
• FCA will be activated by default when vehicle power is cycled on, even when previously set to off
• If FCA is operating and ESC (Electronic Stability Control) is turned off, the FCA system is automatically turned off
• When FCA is not operating, the FCA warning indicator will illuminate on the Instrument Cluster
REMINDERS:
• If the ignition is cycled, the LFA returns to its previous state, on or off
• The LFA System is not a substitute for safe and proper driving . Always drive safely and use caution
• The LFA Warning Volume can be adjusted in the Vehicle Settings on the audio head unit
Page 23 of 54
21ALWAYS CHECK THE OWNER’S MANUAL FOR COMPLETE OPER ATING INFORMATION AND SAFET Y WARNINGS . *IF EQUIPPED †LEGAL DISCL AIMERS ON BACK INSIDE COVER
Electronic Stability Control (ESC)†9
The ESC system is designed to help stabilize the vehicle during certain
cornering maneuvers . It is a good idea to keep ESC turned ON whenever
possible .
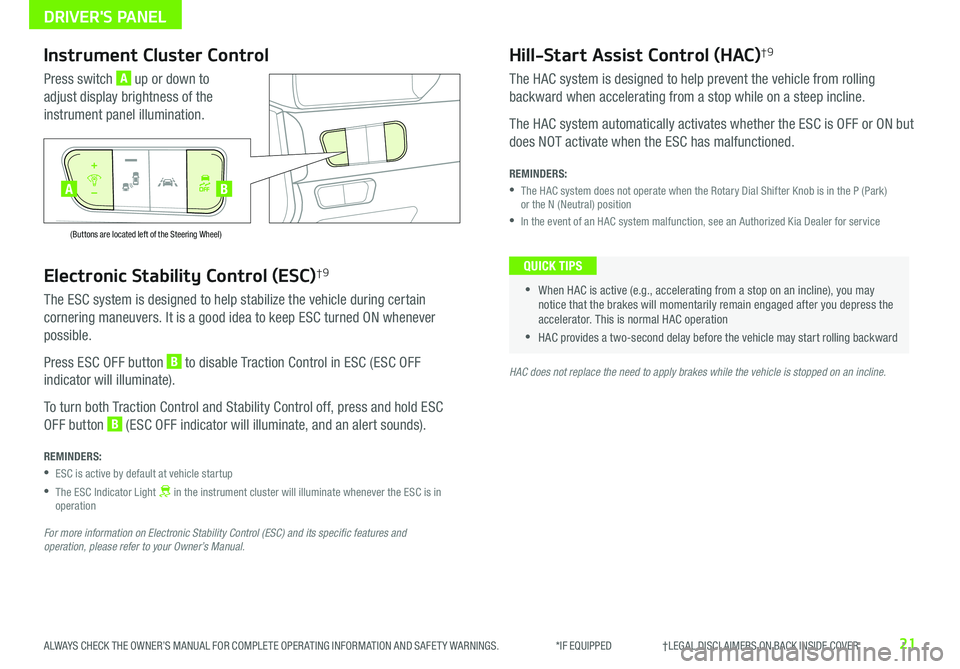
Press ESC OFF button B to disable Traction Control in ESC (ESC OFF
indicator will illuminate) .
To turn both Traction Control and Stability Control off, press and hold ESC
OFF button B (ESC OFF indicator will illuminate, and an alert sounds) .
REMINDERS:
•ESC is active by default at vehicle startup
•
The ESC Indicator Light in the instrument cluster will illuminate whenever the ESC is in operation
For more information on Electronic Stability Control (ESC) and its specific features and operation, please refer to your Owner’s Manual.
HAC does not replace the need to apply brakes while the vehicle is stopped on an incline.
Instrument Cluster Control
Press switch A up or down to
adjust display brightness of the
instrument panel illumination .
Hill-Start Assist Control (HAC)†9
The HAC system is designed to help prevent the vehicle from rolling
backward when accelerating from a stop while on a steep incline .
The HAC system automatically activates whether the ESC is OFF or ON but
does NOT activate when the ESC has malfunctioned .
REMINDERS:
•
The HAC system does not operate when the Rotary Dial Shifter Knob is in the P (Park) or the N (Neutral) position
•In the event of an HAC system malfunction, see an Authorized Kia Dealer for service
•
•When HAC is active (e .g ., accelerating from a stop on an incline), you may notice that the brakes will momentarily remain engaged after you depress the accelerator . This is normal HAC operation
•HAC provides a two-second delay before the vehicle may start rolling backward
QUICK TIPS
AUTO
OFF
(Buttons are located left of the Steering Wheel)
AUTO
OFF
BA
DRIVER'S PANEL
Page 29 of 54
27ALWAYS CHECK THE OWNER’S MANUAL FOR COMPLETE OPER ATING INFORMATION AND SAFET Y WARNINGS . *IF EQUIPPED †LEGAL DISCL AIMERS ON BACK INSIDE COVER
Bluetooth® Wireless Technology†6,20
Pairing a Phone
For instructions on how to pair a phone, refer to the Car Multimedia
System User's Manual or your vehicle’s Quick Start Guide .
How to Place a Call
•Option 1: Press the Receive/Place Call button C (displays the phone
screen with call history)
•Option 2: Press the Talk button B . Then say the command “Call
{name}” or “Dial {number}” followed by contact name or number
Voice Recognition Tips Video To view a video on your mobile device, snap this QR Code or visit the listed website .
Refer to page 2 for more information .
QR CODE
During the pairing process, be sure to accept the connection requests on the phone for contacts download and to allow acceptance of all future Bluetooth® connection requests .
QUICK TIP
When using the voice command feature, wait for the system BEEP before speaking the command .
QUICK TIP
www.youtube.com/KiaFeatureVideos
Voice Recognition and Phone Contact Tips
To help optimize the Bluetooth® Wireless
Technology Voice Recognition system, below
are some tips and reminders . Improve the
performance by making a few simple changes
to your phone contacts, listed below . To help
optimize the Bluetooth® Wireless Technology Voice
Recognition system, see other tips and reminders
under Quick Tips:
•Use full names (first and last names) vs . short
or single-syllable names (e .g ., “John Smith” vs .
“Dad," “Smith Residence” vs . “Home”)
•Avoid using special characters, emojis or
hyphenated names (e .g ., @, &, #, /, -, *, +, etc . )
•Avoid using acronyms (e .g ., “In Case of
Emergency” vs . “ICE”) or words with all
capital letters
•Spell words completely, no abbreviations
(e .g ., “Doctor Smith” vs . “Dr . Smith”)
• When placing a call, speak in a natural, moderate tone, with clear pronunciation . The system may have trouble recognizing commands if you speak too softly or too loudly
• Always wait for the beep before speaking any commands
• Close windows and turn off A /C – Open windows, weather (wind/rain), or an A /C fan operating at higher speeds can interfere with Voice Recognition
• Press the talk button and say “Help” to get a list of available commands
QUICK TIPS
STEERING WHEEL CONTROLS
Page 31 of 54
29ALWAYS CHECK THE OWNER’S MANUAL FOR COMPLETE OPER ATING INFORMATION AND SAFET Y WARNINGS . *IF EQUIPPED †LEGAL DISCL AIMERS ON BACK INSIDE COVER
(Type B shown)
(Distances are approximate and vary depending on vehicle speed)
STEERING WHEEL CONTROLS
Smart Cruise Control with Stop & Go Video
To view a video on your mobile device, snap this QR Code or visit the listed website . Refer to page 2 for more information .
www.youtube.com/KiaFeatureVideos
QR CODE
Smart Cruise Control
canceled
F
E
H
17 2 f t13 0 f t
82ft
10 6 f tC
A
B
DG
Smart Cruise Control (SCC) with Stop & Go*†7, 2 0
The Smart Cruise Control (SCC) system allows you to set the vehicle to maintain a speed
and predetermined distance from vehicles detected ahead by automatically adjusting the
driving speed as needed . When traffic is encountered, the vehicle may be slowed to help
maintain the set distance from vehicles detected ahead without the driver depressing
the brake pedal .
With the SCC on and activated, the vehicle-to-vehicle distance set, and the system
detects a vehicle slowing or stopping, the system can bring the vehicle to a complete
stop . When the vehicle ahead starts to move forward, the SCC system re-engages . If the
vehicle ahead stops for more than 3 seconds, the accelerator pedal or the RES+ button
must be pressed to start moving the vehicle .
To set/adjust SCC speed:
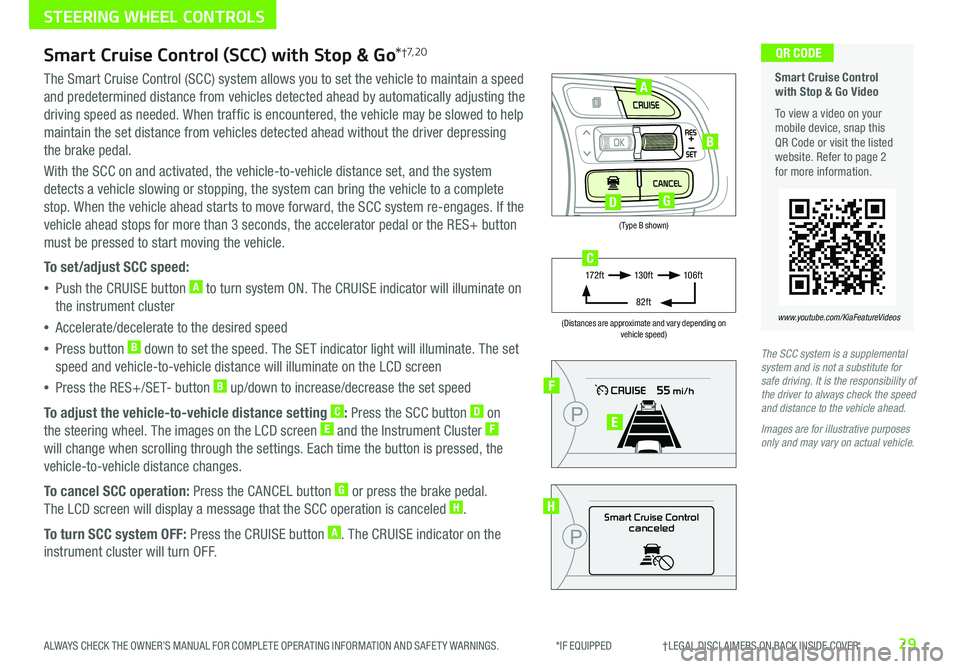
•Push the CRUISE button A to turn system ON . The CRUISE indicator will illuminate on
the instrument cluster
•Accelerate/decelerate to the desired speed
•Press button B down to set the speed . The SET indicator light will illuminate . The set
speed and vehicle-to-vehicle distance will illuminate on the LCD screen
•Press the RES+/SET- button B up/down to increase/decrease the set speed
To adjust the vehicle-to-vehicle distance setting C: Press the SCC button D on
the steering wheel . The images on the LCD screen E and the Instrument Cluster F
will change when scrolling through the settings . Each time the button is pressed, the
vehicle-to-vehicle distance changes .
To cancel SCC operation: Press the CANCEL button G or press the brake pedal .
The LCD screen will display a message that the SCC operation is canceled H .
To turn SCC system OFF: Press the CRUISE button A . The CRUISE indicator on the
instrument cluster will turn OFF .
The SCC system is a supplemental system and is not a substitute for safe driving. It is the responsibility of the driver to always check the speed and distance to the vehicle ahead.
Images are for illustrative purposes only and may vary on actual vehicle.
Page 34 of 54
AUDIO SYSTEMS
UVO link Activation†1
1 . Enter the activation screen on your vehicle’s head unit
a . Press SETUP key
b . Press UVO icon
c . Press UVO Activation
2 . Agree to Terms of Service and Privacy Policy and press
SUBMIT
3 . Enter smartphone number or email address to receive a
verification code, then press SUBMIT
4a. Follow these steps if using your phone number to
receive your verification code
a . Check your phone for a SMS (text message)
b . Open the link in your SMS . A page will open requesting that
you create your account
Note: If you already have a Kia Owners Portal account using the
phone number as your login ID, you will need to provide your
password prior to receiving the verification code .
c . Enter your first name, last name, email, phone number and
an account password, and click CRE ATE ACCOUNT . A page
will open displaying your verification code .
d . Enter the code in the head unit and press ACTIVATE
e . Go back to the page with your verification code and
press “I have entered my PIN” . A link will be provided to
download the Kia Access with UVO link app from your app
store . After installing the app, log in and enjoy
4b. Follow these steps if using your email to receive your verification code
a .
Check your email . The email will be from reset@notifications .myuvo .com
b . Open link inside email . A page will open requesting that you create your account .
Note: If you already have a Kia Owners Portal account using the email as your login
ID, you will need to provide your password prior to receiving the verification code .
c . Enter your first name, last name, email, phone number and an account password,
and click CRE ATE ACCOUNT . A page will open displaying your verification code
d . Enter the code in the head unit and press ACTIVATE
e . Go back to the page with your verification code and press “I have entered my PIN” .
A link will be provided to download the Kia Access with UVO link app from your app
store . After installing the app, log in and enjoy
Driving while distracted can result in a loss of vehicle control that may lead to an accident, severe bodily injury, and death. The driver’s primary responsibility is in the safe and legal operation of a vehicle, and any handheld devices, other equipment, or vehicle systems which take the driver’s eyes, attention and focus away from the safe operation of a vehicle or which are not permissible by law should never be used during operation of the vehicle.
For further UVO link operation, refer to the Car Multimedia System User's Manual. For further audio system operations, refer to pages 31-34.
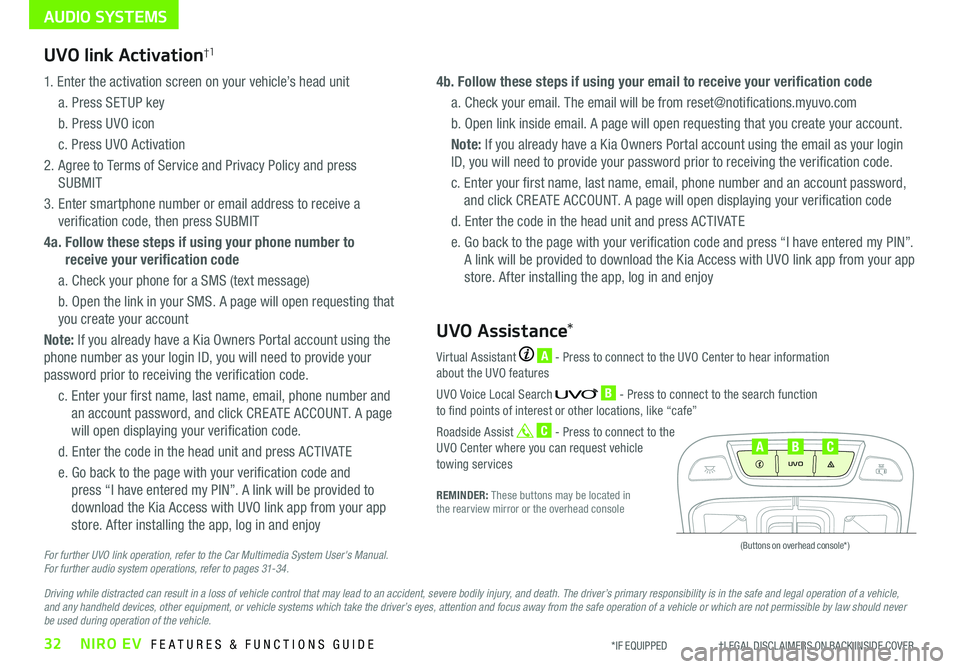
Virtual Assistant A - Press to connect to the UVO Center to hear information about the UVO features
UVO Voice Local Search B - Press to connect to the search function to find points of interest or other locations, like “cafe”
Roadside Assist C - Press to connect to the UVO Center where you can request vehicle towing services
REMINDER: These buttons may be located in the rearview mirror or the overhead console
UVO Assistance*
(Buttons on overhead console*)
UVO
FRONT REAR
ONOFFDOOR
CAB
32NIRO EV FEATURES & FUNCTIONS GUIDE*IF EQUIPPED †LEGAL DISCL AIMERS ON BACK INSIDE COVER
Page 35 of 54
33ALWAYS CHECK THE OWNER’S MANUAL FOR COMPLETE OPER ATING INFORMATION AND SAFET Y WARNINGS . *IF EQUIPPED †LEGAL DISCL AIMERS ON BACK INSIDE COVER
AUDIO SYSTEMS
UVO link Videos To view a video on your mobile device, snap this QR Code or visit the listed website . Refer to page 2 for more information .
QR CODE
www.youtube.com/KiaFeatureVideos
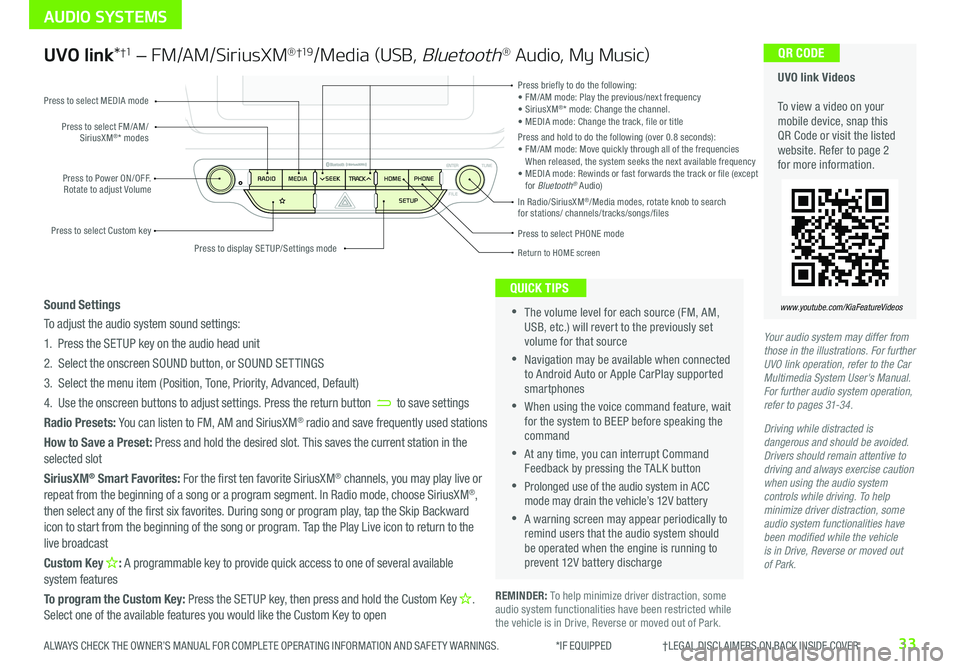
UVO link*†1 – FM/AM/SiriusXM® †19/Media (USB, Bluetooth® Audio, My Music)
•The volume level for each source (FM, AM, USB, etc .) will revert to the previously set volume for that source
•Navigation may be available when connected to Android Auto or Apple CarPlay supported smartphones
•When using the voice command feature, wait for the system to BEEP before speaking the command
•At any time, you can interrupt Command Feedback by pressing the TALK button
•Prolonged use of the audio system in ACC mode may drain the vehicle’s 12V battery
•A warning screen may appear periodically to remind users that the audio system should be operated when the engine is running to prevent 12V battery discharge
QUICK TIPS
Sound Settings
To adjust the audio system sound settings:
1 . Press the SETUP key on the audio head unit
2 . Select the onscreen SOUND button, or SOUND SET TINGS
3 . Select the menu item (Position, Tone, Priority, Advanced, Default)
4 . Use the onscreen buttons to adjust settings . Press the return button to save settings
Radio Presets: You can listen to FM, AM and SiriusXM® radio and save frequently used stations
How to Save a Preset: Press and hold the desired slot . This saves the current station in the selected slot
SiriusXM® Smart Favorites: For the first ten favorite SiriusXM® channels, you may play live or repeat from the beginning of a song or a program segment . In Radio mode, choose SiriusXM®,
then select any of the first six favorites . During song or program play, tap the Skip Backward icon to start from the beginning of the song or program . Tap the Play Live icon to return to the live broadcast
Custom Key H: A programmable key to provide quick access to one of several available system features
To program the Custom Key: Press the SETUP key, then press and hold the Custom Key H. Select one of the available features you would like the Custom Key to open
Your audio system may differ from those in the illustrations. For further UVO link operation, refer to the Car Multimedia System User's Manual. For further audio system operation, refer to pages 31-34.
Driving while distracted is dangerous and should be avoided. Drivers should remain attentive to driving and always exercise caution when using the audio system controls while driving. To help minimize driver distraction, some audio system functionalities have been modified while the vehicle is in Drive, Reverse or moved out of Park.
Press to select PHONE mode
Return to HOME screen
REMINDER: To help minimize driver distraction, some audio system functionalities have been restricted while the vehicle is in Drive, Reverse or moved out of Park .
Press briefly to do the following:• FM/AM mode: Play the previous/next frequency• SiriusXM®* mode: Change the channel .• MEDIA mode: Change the track, file or titlePress and hold to do the following (over 0 .8 seconds):• FM/AM mode: Move quickly through all of the frequencies When released, the system seeks the next available frequency• MEDIA mode: Rewinds or fast forwards the track or file (except for Bluetooth® Audio)Press to Power ON/OFF . Rotate to adjust Volume
Press to select Custom key
Press to select FM/AM/SiriusXM®* modes
Press to select MEDIA mode
Press to display SE TUP/Settings mode
In Radio/SiriusXM®/Media modes, rotate knob to search for stations/ channels/tracks/songs/files
Page 36 of 54
34NIRO EV FEATURES & FUNCTIONS GUIDE*IF EQUIPPED †LEGAL DISCL AIMERS ON BACK INSIDE COVER
ENTER
PWR VOL
FILE
TUNE
MAPN AV RADIOMEDIA SETUPSEEK
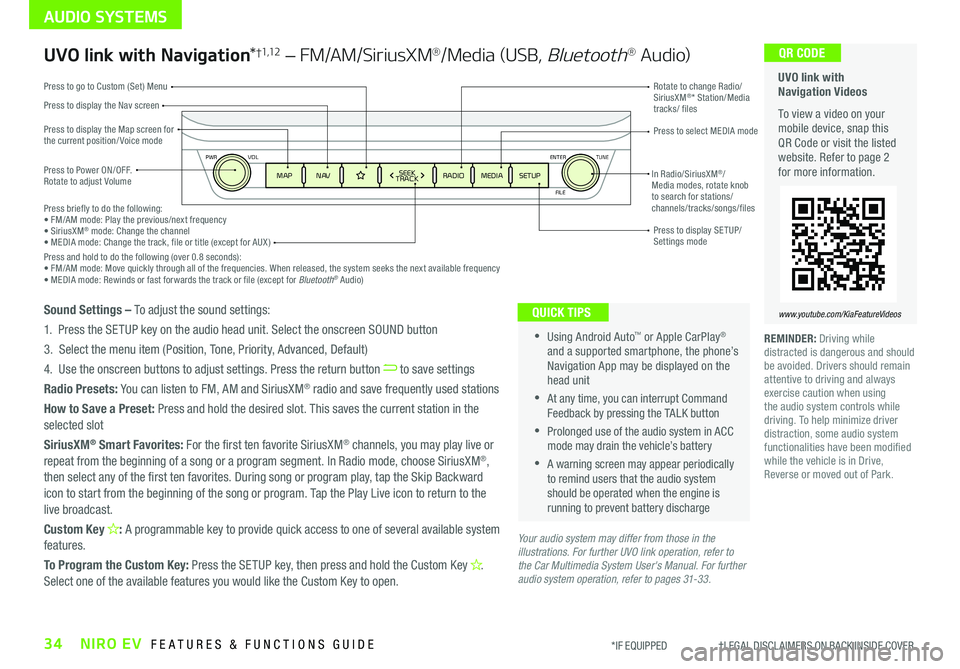
TRACKIn Radio/SiriusXM®/ Media modes, rotate knob to search for stations/ channels/tracks/songs/files Press briefly to do the following:• FM/AM mode: Play the previous/next frequency• SiriusXM® mode: Change the channel• MEDIA mode: Change the track, file or title (except for AUX )Press and hold to do the following (over 0 .8 seconds):• FM/AM mode: Move quickly through all of the frequencies . When released, the system seeks the next available frequency• MEDIA mode: Rewinds or fast forwards the track or file (except for Bluetooth® Audio)
Press to Power ON/OFF . Rotate to adjust Volume
Press to display the Nav screen
Press to display the Map screen for the current position/ Voice mode
Press to go to Custom (Set) Menu
Press to display SE TUP/Settings mode
Press to select MEDIA mode
Rotate to change Radio/SiriusXM®* Station/Media tracks/ files
AUDIO SYSTEMS
UVO link with Navigation Videos
To view a video on your mobile device, snap this QR Code or visit the listed website . Refer to page 2 for more information .
QR CODE
www.youtube.com/KiaFeatureVideos
UVO link with Navigation*†1,12 – FM/AM/SiriusXM®/Media (USB, Bluetooth® Au d io)
•Using Android Auto™ or Apple CarPlay® and a supported smartphone, the phone’s Navigation App may be displayed on the head unit
•At any time, you can interrupt Command Feedback by pressing the TALK button
•Prolonged use of the audio system in ACC mode may drain the vehicle’s battery
•A warning screen may appear periodically to remind users that the audio system should be operated when the engine is running to prevent battery discharge
QUICK TIPSSound Settings – To adjust the sound settings:
1 . Press the SETUP key on the audio head unit . Select the onscreen SOUND button
3 . Select the menu item (Position, Tone, Priority, Advanced, Default)
4 . Use the onscreen buttons to adjust settings . Press the return button to save settings
Radio Presets: You can listen to FM, AM and SiriusXM® radio and save frequently used stations
How to Save a Preset: Press and hold the desired slot . This saves the current station in the selected slot
SiriusXM® Smart Favorites: For the first ten favorite SiriusXM® channels, you may play live or repeat from the beginning of a song or a program segment . In Radio mode, choose SiriusXM®, then select any of the first ten favorites . During song or program play, tap the Skip Backward icon to start from the beginning of the song or program . Tap the Play Live icon to return to the live broadcast .
Custom Key H: A programmable key to provide quick access to one of several available system features .
To Program the Custom Key: Press the SETUP key, then press and hold the Custom Key H. Select one of the available features you would like the Custom Key to open .
Your audio system may differ from those in the illustrations. For further UVO link operation, refer to the Car Multimedia System User's Manual. For further audio system operation, refer to pages 31-33.
REMINDER: Driving while distracted is dangerous and should be avoided . Drivers should remain attentive to driving and always exercise caution when using the audio system controls while driving . To help minimize driver distraction, some audio system functionalities have been modified while the vehicle is in Drive, Reverse or moved out of Park .