reset KIA NIRO HYBRID EV 2021 Owner's Manual
[x] Cancel search | Manufacturer: KIA, Model Year: 2021, Model line: NIRO HYBRID EV, Model: KIA NIRO HYBRID EV 2021Pages: 667, PDF Size: 9.17 MB
Page 427 of 667
5101
Driving your vehicle
To temporarily accelerate with
the cruise control on:
If you want to speed up temporarily
when the cruise control is on,
depress the accelerator pedal.
Increased speed will not interfere
with cruise control operation or
change the set speed.
To return to the set speed, take your
foot off the accelerator pedal.
To cancel cruise control, do
one of the following:
Depress the brake pedal.
Shift into N (Neutral) if equipped
with an Dual clutch transmission.
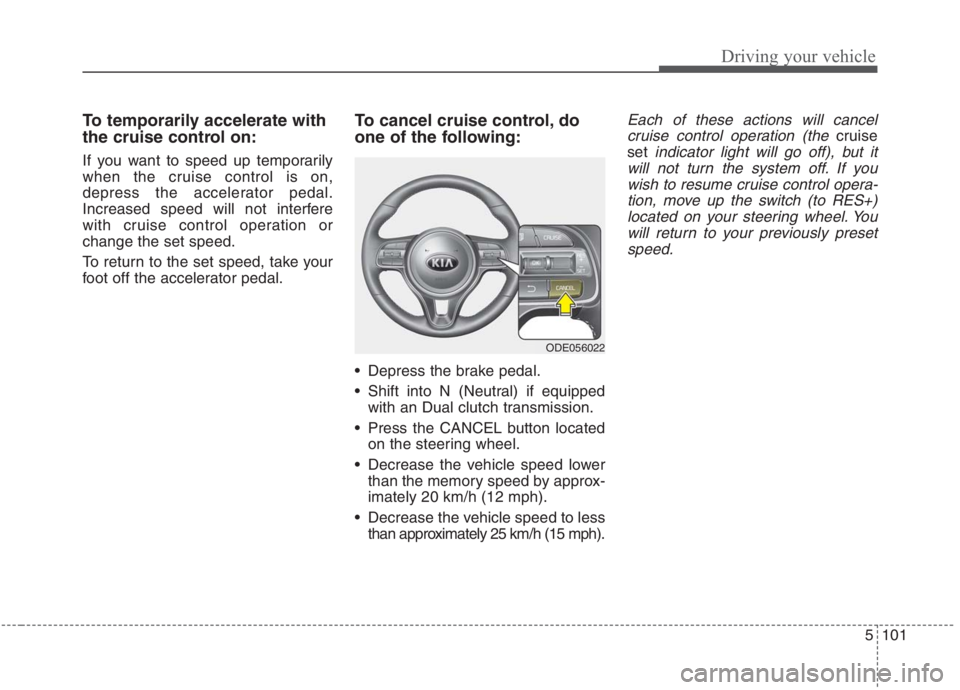
Press the CANCEL button located
on the steering wheel.
Decrease the vehicle speed lower
than the memory speed by approx-
imately 20 km/h (12 mph).
Decrease the vehicle speed to less
than approximately 25 km/h (15 mph).
Each of these actions will cancel
cruise control operation (the
cruise
set
indicator light will go off), but it
will not turn the system off. If you
wish to resume cruise control opera-
tion, move up the switch (to RES+)
located on your steering wheel. You
will return to your previously preset
speed.
ODE056022
Page 485 of 667
63
What to do in an emergency
If the engine stalls at a cross-
road or crossing
If the engine stalls at a crossroad or
crossing, set the shift lever in the N
(Neutral) position and then push the
vehicle to a safe place.
If you have a flat tire while
driving
If a tire goes flat while you are driv-
ing:
1. Take your foot off the accelerator
pedal and let the vehicle slow
down while driving straight ahead.
Do not apply the brakes immedi-
ately or attempt to pull off the road
as this may cause a loss of con-
trol. When the vehicle has slowed
to such a speed that it is safe to do
so, brake carefully and pull off the
road. Drive off the road as far as
possible and park on firm level
ground. If you are on a divided
highway, do not park in the median
area between the two traffic lanes.2. When the vehicle is stopped, turn
on your emergency hazard flash-
ers, set the parking brake and put
the transmission in P (Park).
3. Have all passengers get out of the
vehicle. Be sure they all get out on
the side of the vehicle that is away
from traffic.
4. When changing a flat tire, follow
the instruction provided later in
this section.
If the engine stalls while driv-
ing
1. Reduce your speed gradually,
keeping a straight line. Move cau-
tiously off the road to a safe place.
2. Turn on your emergency flashers.
3. Try to start the hybrid system
again. If your vehicle will not start,
contact an authorized Kia dealer
or seek other qualified assistance.
✽ ✽
NOTICE
If there was a check engine light and
loss of power or stall and if safe to do
so, wait at least 10 seconds to restart
the vehicle after it stalls. This may
reset the car so it will no longer run
at low power (limp home) condition.
IN CASE OF AN EMERGENCY WHILE DRIVING
Page 487 of 667
65
What to do in an emergency
EMERGENCY STARTING
Before Jump Starting
(For Hybrid)
Over discharge of 12V battery
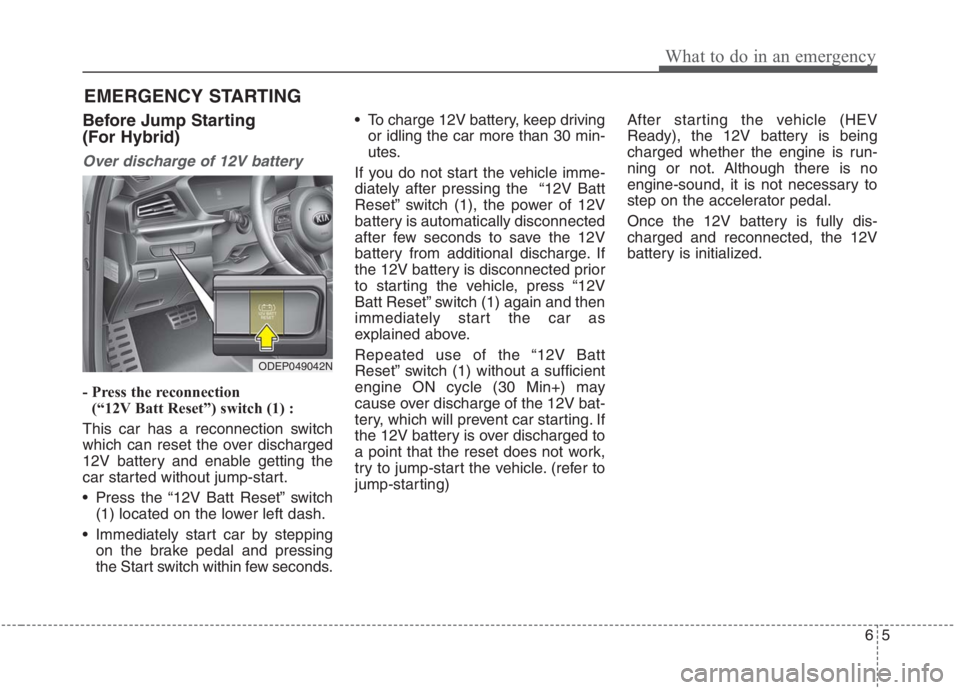
- Press the reconnection
(“12V Batt Reset”) switch (1) :
This car has a reconnection switch
which can reset the over discharged
12V battery and enable getting the
car started without jump-start.
Press the “12V Batt Reset” switch
(1) located on the lower left dash.
Immediately start car by stepping
on the brake pedal and pressing
the Start switch within few seconds. To charge 12V battery, keep driving
or idling the car more than 30 min-
utes.
If you do not start the vehicle imme-
diately after pressing the “12V Batt
Reset” switch (1), the power of 12V
battery is automatically disconnected
after few seconds to save the 12V
battery from additional discharge. If
the 12V battery is disconnected prior
to starting the vehicle, press “12V
Batt Reset” switch (1) again and then
immediately start the car as
explained above.
Repeated use of the “12V Batt
Reset” switch (1) without a sufficient
engine ON cycle (30 Min+) may
cause over discharge of the 12V bat-
tery, which will prevent car starting. If
the 12V battery is over discharged to
a point that the reset does not work,
try to jump-start the vehicle. (refer to
jump-starting)After starting the vehicle (HEV
Ready), the 12V battery is being
charged whether the engine is run-
ning or not. Although there is no
engine-sound, it is not necessary to
step on the accelerator pedal.
Once the 12V battery is fully dis-
charged and reconnected, the 12V
battery is initialized.
ODEP049042N
Page 488 of 667
What to do in an emergency
6 6
The following items should be reset
after the battery has been discharged
or the battery has been disconnected.
Auto up/down window
Sunroof
Trip computer
Climate control system
Driver position Memory System
Audio
As explained above, if the vehicle
cannot be started after pressing the
“12V Batt Reset” switch (1) due to
over discharge, try to jump-start
(refer to Jump-starting).Charging method for 12V battery
(A) It is recommended to charge the
12V battery by starting and run-
ning the vehicle (HEV Ready
Mode) for a minimum of 30 min-
utes if a 12V reset, or jump start
has been used.
(B) If you cannot start the vehicle :
After connecting the jumper cables
at the recommended locations, you
should press “12V batt Reset”
switch (1) to charge the battery.
The voltage range of the charger
should be 13.3~14V and its current
range should be less than 60A.
(13.8V is recommended).CAUTION
• The use of an improper charg-
er with a voltage and current
range higher than specified
may cause overheating and
damage to the 12V battery.
The use of an incorrect charg-
er will lead to a power shut-off
to save the 12V battery. Stop
using the incorrect charger
once the power of the vehicle
is shut off.
Page 527 of 667
Maintenance
7
Engine compartment . . . . . . . . . . . . . . . . . . . . . . . . 7-4
Maintenance services . . . . . . . . . . . . . . . . . . . . . . . . 7-5
• Owner’s responsibility . . . . . . . . . . . . . . . . . . . . . . . . . 7-5
• Owner maintenance precautions . . . . . . . . . . . . . . . . . 7-6
Owner maintenance . . . . . . . . . . . . . . . . . . . . . . . . . 7-7
• Owner maintenance schedule . . . . . . . . . . . . . . . . . . . 7-7
Scheduled maintenance service. . . . . . . . . . . . . . . . 7-9
Explanation of scheduled maintenance items . . . 7-15
Checking fluid levels . . . . . . . . . . . . . . . . . . . . . . . 7-18
Engine oil. . . . . . . . . . . . . . . . . . . . . . . . . . . . . . . . . 7-19
• Checking the engine oil level . . . . . . . . . . . . . . . . . . . 7-19
• Changing the engine oil and filter . . . . . . . . . . . . . . . 7-20
Coolant . . . . . . . . . . . . . . . . . . . . . . . . . . . . . . . . . . 7-21
• Checking the coolant level . . . . . . . . . . . . . . . . . . . . . 7-21
• Engine coolant . . . . . . . . . . . . . . . . . . . . . . . . . . . . . . 7-22
• Inverter coolant . . . . . . . . . . . . . . . . . . . . . . . . . . . . . . 7-22
• Recommended coolant . . . . . . . . . . . . . . . . . . . . . . . . 7-23
• Changing the coolant . . . . . . . . . . . . . . . . . . . . . . . . . 7-25
Brake fluid . . . . . . . . . . . . . . . . . . . . . . . . . . . . . . . 7-26
• Checking the brake fluid level . . . . . . . . . . . . . . . . . . 7-26
Engine clutch actuator fluid . . . . . . . . . . . . . . . . . 7-28
• Checking the engine clutch actuator fluid level . . . . 7-28
Washer fluid . . . . . . . . . . . . . . . . . . . . . . . . . . . . . . 7-30
• Checking the washer fluid level . . . . . . . . . . . . . . . . . 7-30
Parking brake . . . . . . . . . . . . . . . . . . . . . . . . . . . . . 7-31
• Checking the parking brake. . . . . . . . . . . . . . . . . . . . 7-31
Air cleaner. . . . . . . . . . . . . . . . . . . . . . . . . . . . . . . . 7-32
• Filter replacement . . . . . . . . . . . . . . . . . . . . . . . . . . . . 7-32
Climate control air filter . . . . . . . . . . . . . . . . . . . . 7-34
• Filter inspection . . . . . . . . . . . . . . . . . . . . . . . . . . . . . . 7-34
Wiper blades . . . . . . . . . . . . . . . . . . . . . . . . . . . . . . 7-36
• Blade inspection . . . . . . . . . . . . . . . . . . . . . . . . . . . . . . 7-36
• Blade replacement . . . . . . . . . . . . . . . . . . . . . . . . . . . . 7-36
Battery (Plug-in Hybrid) . . . . . . . . . . . . . . . . . . . . 7-39
• For best battery service . . . . . . . . . . . . . . . . . . . . . . . 7-39
• Recharging the battery . . . . . . . . . . . . . . . . . . . . . . . . 7-40
• Reset items . . . . . . . . . . . . . . . . . . . . . . . . . . . . . . . . . . 7-41
Tires and wheels . . . . . . . . . . . . . . . . . . . . . . . . . . . 7-42
• Tire care . . . . . . . . . . . . . . . . . . . . . . . . . . . . . . . . . . . . 7-42
• Recommended cold tire inflation pressures . . . . . . . 7-42
• Tire pressure . . . . . . . . . . . . . . . . . . . . . . . . . . . . . . . . 7-43
• Checking tire inflation pressure. . . . . . . . . . . . . . . . . 7-43
• Tire rotation . . . . . . . . . . . . . . . . . . . . . . . . . . . . . . . . . 7-44
• Wheel alignment and tire balance . . . . . . . . . . . . . . . 7-45
• Tire replacement . . . . . . . . . . . . . . . . . . . . . . . . . . . . . 7-46
• Wheel replacement . . . . . . . . . . . . . . . . . . . . . . . . . . . 7-46
• Tire traction . . . . . . . . . . . . . . . . . . . . . . . . . . . . . . . . . 7-47
• Tire maintenance . . . . . . . . . . . . . . . . . . . . . . . . . . . . 7-47
• Tire sidewall labeling . . . . . . . . . . . . . . . . . . . . . . . . . 7-47
Page 567 of 667
741
Maintenance
When recharging the battery,
observe the following precautions:
The battery must be removed from
the vehicle and placed in an area
with good ventilation.
Do not allow cigarettes, sparks, or
flame near the battery.
Watch the battery during charging,
and stop or reduce the charging
rate if the battery cells begin
gassing (boiling) violently or if the
temperature of the electrolyte of
any cell exceeds 49°C (120°F).
Wear eye protection when check-
ing the battery during charging.
Disconnect the battery charger in
the following order.
1. Turn off the battery charger main
switch.
2. Unhook the negative clamp from
the negative battery terminal.
3. Unhook the positive clamp from
the positive battery terminal. Before performing maintenance or
recharging the battery, turn off all
accessories and stop the engine.
The negative battery cable must be
removed first and installed last
when the battery is disconnected.Reset items
The following items should be reset
after the battery has been dis-
charged or the battery has been dis-
connected.
Auto up/down window
Sunroof
Trip computer
Climate control system
Driver position memory system
Audio
Page 571 of 667
745
Maintenance
Disc brake pads should be inspected
for wear whenever tires are rotated.
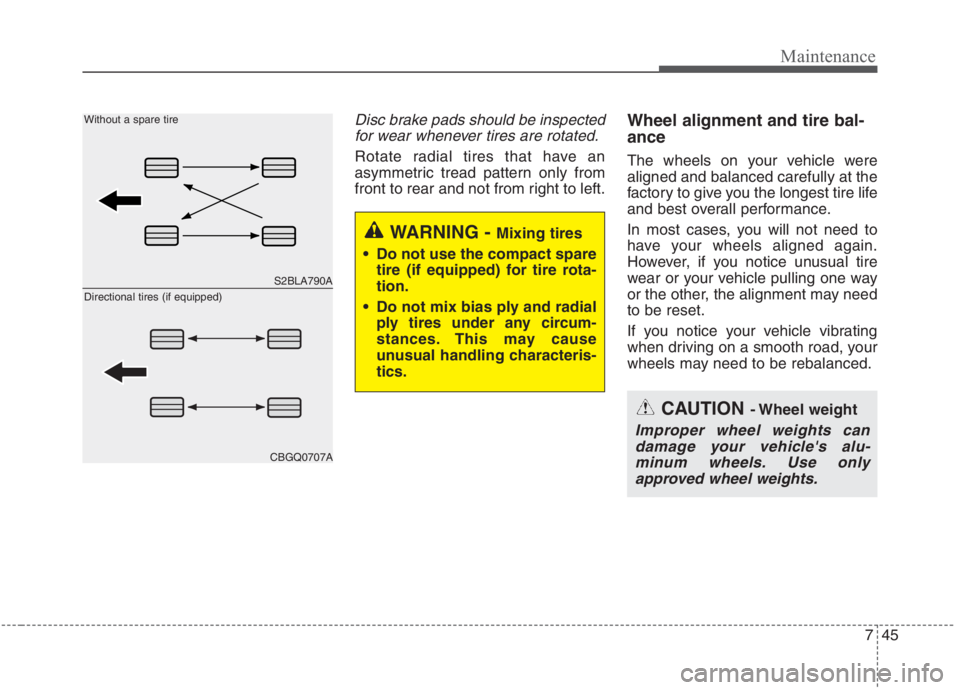
Rotate radial tires that have an
asymmetric tread pattern only from
front to rear and not from right to left.
Wheel alignment and tire bal-
ance
The wheels on your vehicle were
aligned and balanced carefully at the
factory to give you the longest tire life
and best overall performance.
In most cases, you will not need to
have your wheels aligned again.
However, if you notice unusual tire
wear or your vehicle pulling one way
or the other, the alignment may need
to be reset.
If you notice your vehicle vibrating
when driving on a smooth road, your
wheels may need to be rebalanced.
WARNING - Mixing tires
Do not use the compact spare
tire (if equipped) for tire rota-
tion.
Do not mix bias ply and radial
ply tires under any circum-
stances. This may cause
unusual handling characteris-
tics.
CAUTION - Wheel weight
Improper wheel weights can
damage your vehicle's alu-
minum wheels. Use only
approved wheel weights.
S2BLA790A
CBGQ0707A
Without a spare tire
Directional tires (if equipped)
Page 587 of 667
761
Maintenance
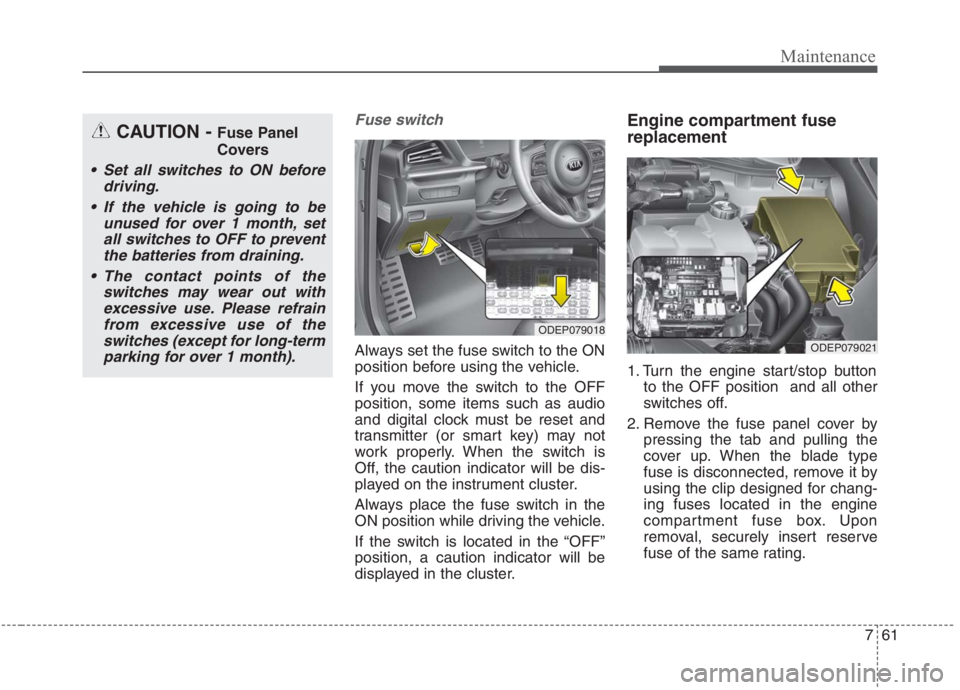
Fuse switch
Always set the fuse switch to the ON
position before using the vehicle.
If you move the switch to the OFF
position, some items such as audio
and digital clock must be reset and
transmitter (or smart key) may not
work properly. When the switch is
Off, the caution indicator will be dis-
played on the instrument cluster.
Always place the fuse switch in the
ON position while driving the vehicle.
If the switch is located in the “OFF”
position, a caution indicator will be
displayed in the cluster.
Engine compartment fuse
replacement
1. Turn the engine start/stop button
to the OFF position and all other
switches off.
2. Remove the fuse panel cover by
pressing the tab and pulling the
cover up. When the blade type
fuse is disconnected, remove it by
using the clip designed for chang-
ing fuses located in the engine
compartment fuse box. Upon
removal, securely insert reserve
fuse of the same rating.
ODEP079018
ODEP079021
CAUTION - Fuse Panel
Covers
Set all switches to ON before
driving.
If the vehicle is going to be
unused for over 1 month, set
all switches to OFF to prevent
the batteries from draining.
The contact points of the
switches may wear out with
excessive use. Please refrain
from excessive use of the
switches (except for long-term
parking for over 1 month).
Page 658 of 667
Index
2I
Air bag - advanced supplemental restraint system . . . . 3-47
Adding equipment to or modifying your
air bag-equipped vehicle . . . . . . . . . . . . . . . . . . . . 3-73
Air bag warning label. . . . . . . . . . . . . . . . . . . . . . . . 3-73
Air bag warning light . . . . . . . . . . . . . . . . . . . . . . . . 3-50
Curtain air bag . . . . . . . . . . . . . . . . . . . . . . . . . . . . . 3-67
Driver's and passenger's front air bag . . . . . . . . . . . 3-62
How does the air bag system operate? . . . . . . . . . . . 3-48
Occupant Detection System (ODS) . . . . . . . . . . . . . 3-54
Side air bag. . . . . . . . . . . . . . . . . . . . . . . . . . . . . . . . 3-65
SRS Care . . . . . . . . . . . . . . . . . . . . . . . . . . . . . . . . . 3-72
SRS components and functions . . . . . . . . . . . . . . . . 3-51
Air cleaner . . . . . . . . . . . . . . . . . . . . . . . . . . . . . . . . . . 7-32
Filter replacement. . . . . . . . . . . . . . . . . . . . . . . . . . . 7-32
Air conditioner compressor label . . . . . . . . . . . . . . . . . 8-12
Air conditioning system . . . . . . . . . . . . . . . . . . . . . . . . . 8-7
Appearance care . . . . . . . . . . . . . . . . . . . . . . . . . . . . . 7-104
Exterior care . . . . . . . . . . . . . . . . . . . . . . . . . . . . . . 7-104
Interior care . . . . . . . . . . . . . . . . . . . . . . . . . . . . . . 7-110
Automatic climate control system . . . . . . . . . . . . . . . 4-145
Automatic heating and air conditioning. . . . . . . . . 4-146
Automatic ventilation . . . . . . . . . . . . . . . . . . . . . . . 4-156
Checking the amount of air conditioner
refrigerant and compressor lubricant . . . . . . . . . . 4-159
Climate control air filter. . . . . . . . . . . . . . . . . . . . . 4-158
Manual heating and air conditioning . . . . . . . . . . . 4-148Recirculated air at washer fluid spray . . . . . . . . . . 4-157
Sunroof inside air recirculation . . . . . . . . . . . . . . . 4-157
System operation . . . . . . . . . . . . . . . . . . . . . . . . . . 4-154
Battery (Plug-in Hybrid). . . . . . . . . . . . . . . . . . . . . . . . 7-39
For best battery service . . . . . . . . . . . . . . . . . . . . . . 7-39
Recharging the battery . . . . . . . . . . . . . . . . . . . . . . . 7-40
Reset items . . . . . . . . . . . . . . . . . . . . . . . . . . . . . . . . 7-41
Before driving . . . . . . . . . . . . . . . . . . . . . . . . . . . . . . . . . 5-5
Before entering vehicle . . . . . . . . . . . . . . . . . . . . . . . 5-5
Before starting . . . . . . . . . . . . . . . . . . . . . . . . . . . . . . 5-5
Necessary inspections . . . . . . . . . . . . . . . . . . . . . . . . 5-5
Blind-Spot Collision Warning (BCW) . . . . . . . . . . . . . 5-79
System description . . . . . . . . . . . . . . . . . . . . . . . . . . 5-79
System setting and activation . . . . . . . . . . . . . . . . . . 5-80
Warning message and system control . . . . . . . . . . . 5-82
Brake fluid . . . . . . . . . . . . . . . . . . . . . . . . . . . . . . . . . . 7-26
Checking the brake fluid level . . . . . . . . . . . . . . . . . 7-26
Brake system. . . . . . . . . . . . . . . . . . . . . . . . . . . . . . . . . 5-30
Anti-lock Brake System (ABS) . . . . . . . . . . . . . . . . 5-44
Auto hold . . . . . . . . . . . . . . . . . . . . . . . . . . . . . . . . . 5-40
Electronic Parking Brake (EPB) . . . . . . . . . . . . . . . 5-34
Electronic Stability Control (ESC) . . . . . . . . . . . . . 5-46
Good braking practices . . . . . . . . . . . . . . . . . . . . . . 5-52
Hill-start Assist Control (HAC) . . . . . . . . . . . . . . . . 5-51
Parking brake – Foot type . . . . . . . . . . . . . . . . . . . . 5-32
A
B
Page 665 of 667
I9
Index
Smart Cruise Control (SCC). . . . . . . . . . . . . . . . . . . . 5-103
Detecting Sensor (front view camera/front radar) . 5-116
Limitations of the system . . . . . . . . . . . . . . . . . . . . 5-119
Set SCC Reaction . . . . . . . . . . . . . . . . . . . . . . . . . . 5-111
Smart cruise control switch . . . . . . . . . . . . . . . . . . 5-103
To convert to cruise control mode . . . . . . . . . . . . . 5-118
Vehicle to vehicle distance setting . . . . . . . . . . . . . 5-111
When the lane ahead is clear . . . . . . . . . . . . . . . . . 5-112
When there is a vehicle ahead of you in your lane. 5-113
Smart key . . . . . . . . . . . . . . . . . . . . . . . . . . . . . . . . . . . 4-11
Battery replacement . . . . . . . . . . . . . . . . . . . . . . . . . 4-15
Loss of the smart key . . . . . . . . . . . . . . . . . . . . . . . . 4-14
Mechanical key . . . . . . . . . . . . . . . . . . . . . . . . . . . . 4-14
Record your key number . . . . . . . . . . . . . . . . . . . . . 4-11
Smart key function . . . . . . . . . . . . . . . . . . . . . . . . . . 4-11
Smart key immobilizer system. . . . . . . . . . . . . . . . . 4-16
Smart key precautions . . . . . . . . . . . . . . . . . . . . . . . 4-14
Special driving conditions . . . . . . . . . . . . . . . . . . . . . 5-144
Driving at night . . . . . . . . . . . . . . . . . . . . . . . . . . . 5-147
Driving in flooded areas. . . . . . . . . . . . . . . . . . . . . 5-148
Driving in the rain . . . . . . . . . . . . . . . . . . . . . . . . . 5-147
Driving off-road . . . . . . . . . . . . . . . . . . . . . . . . . . . 5-148
Hazardous driving conditions . . . . . . . . . . . . . . . . 5-144
Highway driving . . . . . . . . . . . . . . . . . . . . . . . . . . . 5-148
Reducing the risk of a rollover. . . . . . . . . . . . . . . . 5-144
Rocking the vehicle . . . . . . . . . . . . . . . . . . . . . . . . 5-146
Smooth cornering . . . . . . . . . . . . . . . . . . . . . . . . . . 5-146Steering wheel . . . . . . . . . . . . . . . . . . . . . . . . . . . . . . . 4-47
Electric Power Steering (EPS) . . . . . . . . . . . . . . . . . 4-47
Heated steering wheel . . . . . . . . . . . . . . . . . . . . . . . 4-49
Horn . . . . . . . . . . . . . . . . . . . . . . . . . . . . . . . . . . . . . 4-50
Tilt and telescopic steering. . . . . . . . . . . . . . . . . . . . 4-48
Storage compartments . . . . . . . . . . . . . . . . . . . . . . . . 4-164
Center console storage . . . . . . . . . . . . . . . . . . . . . . 4-164
Glove box . . . . . . . . . . . . . . . . . . . . . . . . . . . . . . . . 4-164
Luggage box . . . . . . . . . . . . . . . . . . . . . . . . . . . . . . 4-166
Sunglass holder . . . . . . . . . . . . . . . . . . . . . . . . . . . 4-165
Sunroof . . . . . . . . . . . . . . . . . . . . . . . . . . . . . . . . . . . . . 4-42
Resetting the sunroof . . . . . . . . . . . . . . . . . . . . . . . . 4-45
Sliding the sunroof . . . . . . . . . . . . . . . . . . . . . . . . . . 4-43
Sunroof open warning . . . . . . . . . . . . . . . . . . . . . . . 4-46
Sunshade. . . . . . . . . . . . . . . . . . . . . . . . . . . . . . . . . . 4-45
Tilting the sunroof . . . . . . . . . . . . . . . . . . . . . . . . . . 4-44
Theft-alarm system . . . . . . . . . . . . . . . . . . . . . . . . . . . . 4-18
Armed stage . . . . . . . . . . . . . . . . . . . . . . . . . . . . . . . 4-18
Disarmed stage . . . . . . . . . . . . . . . . . . . . . . . . . . . . . 4-20
Theft-alarm stage . . . . . . . . . . . . . . . . . . . . . . . . . . . 4-19
Tire Pressure Monitoring System (TPMS) . . . . . . . . . . 6-13
Changing a tire with TPMS . . . . . . . . . . . . . . . . . . . 6-17
Check tire pressure . . . . . . . . . . . . . . . . . . . . . . . . . . 6-13
Low tire pressure position telltale . . . . . . . . . . . . . . 6-15
Low tire pressure telltale . . . . . . . . . . . . . . . . . . . . . 6-15
T