set KIA NIRO HYBRID EV 2021 Owners Manual
[x] Cancel search | Manufacturer: KIA, Model Year: 2021, Model line: NIRO HYBRID EV, Model: KIA NIRO HYBRID EV 2021Pages: 667, PDF Size: 9.17 MB
Page 13 of 667
H8
Scheduled Charging
(if equipped)
You can set reserved charging
using the Infotainment System.
Refer to the Infotainment System
for detailed information about set-
ting reserved charging.
Scheduled charging can only be
done when using a AC Charger or
the portable charging cable (ICCB:
In-Cable Control Box).
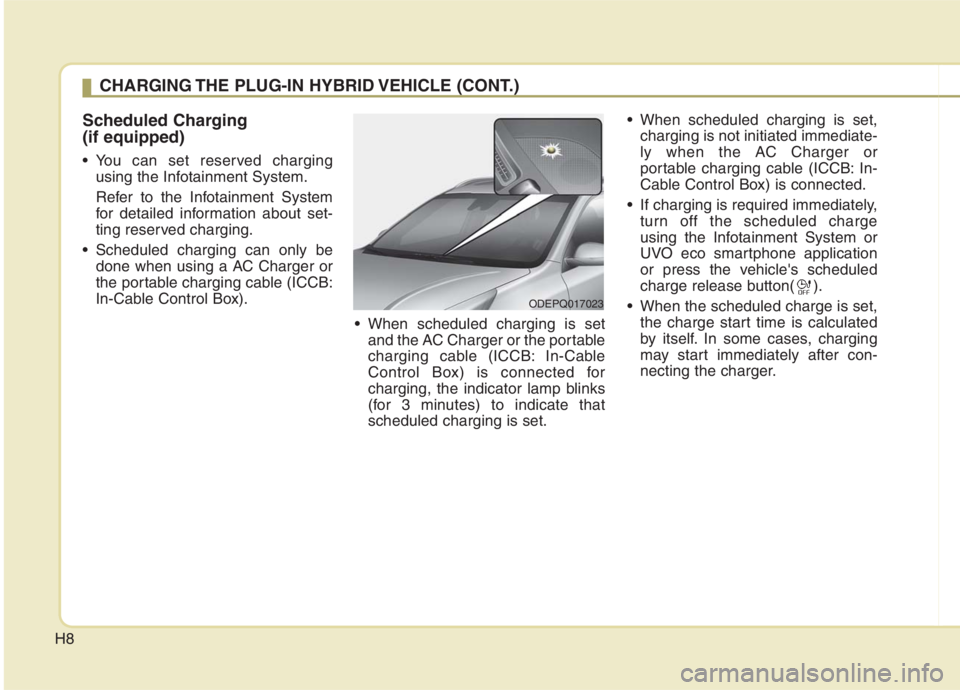
When scheduled charging is set
and the AC Charger or the portable
charging cable (ICCB: In-Cable
Control Box) is connected for
charging, the indicator lamp blinks
(for 3 minutes) to indicate that
scheduled charging is set. When scheduled charging is set,
charging is not initiated immediate-
ly when the AC Charger or
portable charging cable (ICCB: In-
Cable Control Box) is connected.
If charging is required immediately,
turn off the scheduled charge
using the Infotainment System or
UVO eco smartphone application
or press the vehicle's scheduled
charge release button( ).
When the scheduled charge is set,
the charge start time is calculated
by itself. In some cases, charging
may start immediately after con-
necting the charger.
CHARGING THE PLUG-IN HYBRID VEHICLE (CONT.)
ODEPQ017023
Page 14 of 667

H9
If you press the scheduled charging
deactivation ( ) button to immedi-
ately charge the battery, charging
must be initiated 3 minutes after the
charging cable has been connected.
When you press the scheduled
charging deactivation ( ) button
for immediate charging, the sched-
uled charge setting is not com-
pletely deactivated. If you need to
completely deactivate the sched-
uled charge setting, use the
Infotainment System to finalize the
deactivation.Refer to "AC Charge or Trickle
Charge" for details about connect-
ing the AC Charger and the
portable charger (ICCB: In-Cable
Control Box).
Charging Precautions
ODEPQ019022
OJFHPQ016021L
■AC Charger
WARNING
-
Fires caused by dust or
water
Do not connect the charging
cable connector plug to the vehi-
cle if there is water or dust on the
charging inlet. Connecting while
there is water or dust on the
charging cable connector and
plug may cause a fire or electric
shock.
Page 18 of 667
H13
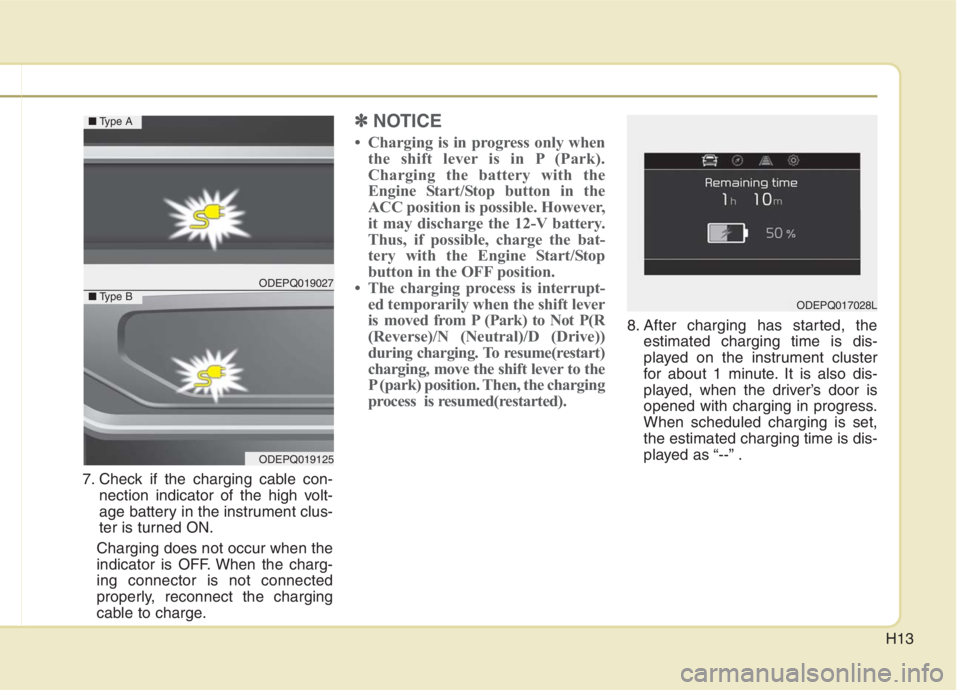
7. Check if the charging cable con-
nection indicator of the high volt-
age battery in the instrument clus-
ter is turned ON.
Charging does not occur when the
indicator is OFF. When the charg-
ing connector is not connected
properly, reconnect the charging
cable to charge.
✽ ✽
NOTICE
• Charging is in progress only when
the shift lever is in P (Park).
Charging the battery with the
Engine Start/Stop button in the
ACC position is possible. However,
it may discharge the 12-V battery.
Thus, if possible, charge the bat-
tery with the Engine Start/Stop
button in the OFF position.
• The charging process is interrupt-
ed temporarily when the shift lever
is moved from P (Park) to Not P(R
(Reverse)/N (Neutral)/D (Drive))
during charging. To resume(restart)
charging, move the shift lever to the
P (park) position. Then, the charging
process is resumed(restarted).
8. After charging has started, the
estimated charging time is dis-
played on the instrument cluster
for about 1 minute. It is also dis-
played, when the driver’s door is
opened with charging in progress.
When scheduled charging is set,
the estimated charging time is dis-
played as “--” .
ODEPQ017028L
ODEPQ019027
ODEPQ019125
■Type A
■Type B
Page 24 of 667

H19
10. Check if the charging cable con-
nection indicator of the high volt-
age battery in the instrument
cluster is turned ON.Charging does not occur when the
indicator is OFF. When the charg-
ing connector is not connected
properly, reconnect the charging
cable to charge.
✽ ✽
NOTICE
• The charging is in progress only
with the shift lever is in P (Park).
Charging the battery with the
Engine Start/Stop button in the
ACC position is possible. However,
it may discharge the 12-V battery.
Thus, if possible, charge the bat-
tery with the Engine Start/Stop
button in the OFF position.
• Moving the shift lever from P
(Park) to R (Reverse)/N(Neutral)/D
(Drive) stops the charging process.
To restart the charging process,
move the shift lever to P (Park),
press the Engine Start/Stop button
to the OFF position, and discon-
nect the charging cable. Then,
connect the charging cable and
restart the vehicle again.
11. After charging has started, the
estimated charging time is dis-
played on the instrument cluster
for about 1 minute. It is also dis-
played, when the driver’s door is
opened with charging in progress.
When scheduled charging is set,
the estimated charging time is dis-
played as "--".
ODEPQ019027
ODEPQ019125
■Type A
■Type BODEPQ017028L
Page 32 of 667
H27
Action to be taken when
charging stops abruptly
When the high voltage battery does
not charge, check the followings:
1. Check the charging setting for the
vehicle.
(e.g. When scheduled charging is
set, charging is not initiated imme-
diately when the AC charger or
portable charger (ICCB: In-Cable
Control Box) is connected.)
2. Check the operation status of AC
charger, portable charger.
(Charging Status Indicator Lamp
for Portable Charger, refer to
“Checking Charging Status” for
trickle charge in this chapter.)
❈Actual method for indicating the
charging status may vary in accor-
dance with the charger manufac-
turer.
3. When the vehicle does not charge
and a warning message appears
on the cluster, check the corre-
sponding message. Refer to “LCD
Display Messages”, in this chap-
ter.4. If the vehicle is properly charged
when charged with another nor-
mally working charger, contact the
charger manufacturer.
5. If the vehicle does not charge
when charged with another nor-
mally working charger, we recom-
mend that you contact an author-
ized Kia dealer.
Page 36 of 667
H31
Coasting guide (if equipped)
A chime will sound and the coasting
guide indicator will blink four times to
inform the driver when to take the foot
off from the accelerator by anticipat-
ing a decelerating event* based on
the analysis of driving routes and
road conditions according to the nav-
igation system. It encourages the
driver to remove foot from accelerator
pedal and allow coasting down the
road with EV motor only. This helps
prevent unnecessary fuel consump-
tion and increases fuel efficiency.
❈Examples of a deceleration events
is going down an extended hill,
slowing down while approaching a
toll booth, and approaching
reduced speed zones.
Press the Engine Start/Stop button
and put the shift lever in P(Park). In
the User Settings Mode, select
Driving Assist, Coasting Guide, and
then On to turn on the system.
Cancel the selection of coasting
guide to turn off the system. For the
explanation of the system, press and
hold the [OK] button.
To activate the system, take the fol-
lowing procedures. Enter your desti-
nation information on the navigation
and select the driving route. Then,
satisfy the following.
- The driving speed should be
between 60 km/h (37 mph) and 160
km/h (99 mph).
❈The operating speed may vary due
to difference between instrument
cluster and navigation effected by
tire inflation level.
✽ ✽
NOTICE
Coasting guide is only a supplemen-
tal system to assist with fuel-efficient
driving. Thus, the operating condi-
tions may be different in accordance
with traffic/road conditions (i.e.
driving in a traffic jam, driving on a
slope, driving on a curve). Thus,
take the actual driving conditions
into consideration, such as distances
from the vehicles ahead/ behind,
while referring to the coasting guide
system as guidance.
Page 43 of 667
H38
AUX. BATTERY SAVER+ (For
Plug-in Hybrid, if equipped)
The Aux. Battery Saver+ is a function
that monitors the charging status of
the 12V auxiliary battery.
If the auxiliary battery level is low, the
main high voltage battery charges
the auxiliary battery.
✽ ✽
NOTICE
The Aux. Battery Saver+ function will
be ON when the vehicle is delivered. If
the function is not needed, you may
turn it off in the Users Settings mode
on the LCD display. For more infor-
mation, refer to the "System setting"
on the following page.
Mode
When the vehicle is OFF with all
doors, hood and liftgate closed, the
Aux. Battery Saver+ periodically acti-
vates according to the auxiliary bat-
tery status.
When the engine start/stop button is
in the ON position with the charging
connector plugged in, this function
activates according to the auxiliary
battery status to prevent over-dis-
charge of the auxiliary battery.
✽ ✽
NOTICE
The Aux. Battery Saver+ activates
for a maximum of 20 minutes. If the
Aux. Battery Saver+ function acti-
vates more than 10 times consecu-
tively, in the Automatic Mode, this
function will stop activating, judg-
ing that there is a problem with the
auxiliary battery. In this case, drive
the vehicle for some period of time.
The function will start activating if
the auxiliary battery returns to nor-
mal.
✽ ✽
NOTICE
If the Aux. Battery Saver+ function
was activated, the high voltage bat-
tery level may have decreased.
CAUTION
The Aux. Battery Saver+ func-
tion cannot prevent battery dis-
charge if the auxiliary battery is
damaged, worn out, used as a
power supply or if unauthorized
electronic devices are used.
PLUG-IN HYBRID ENERGY FLOW
Page 44 of 667
H39
System setting
The driver can activate the Aux.
Battery Saver+ function by placing
the engine start/stop button to the
ON position and by selecting:
"User Settings ➞Other Features ➞
Aux. Battery Saver+"WARNING
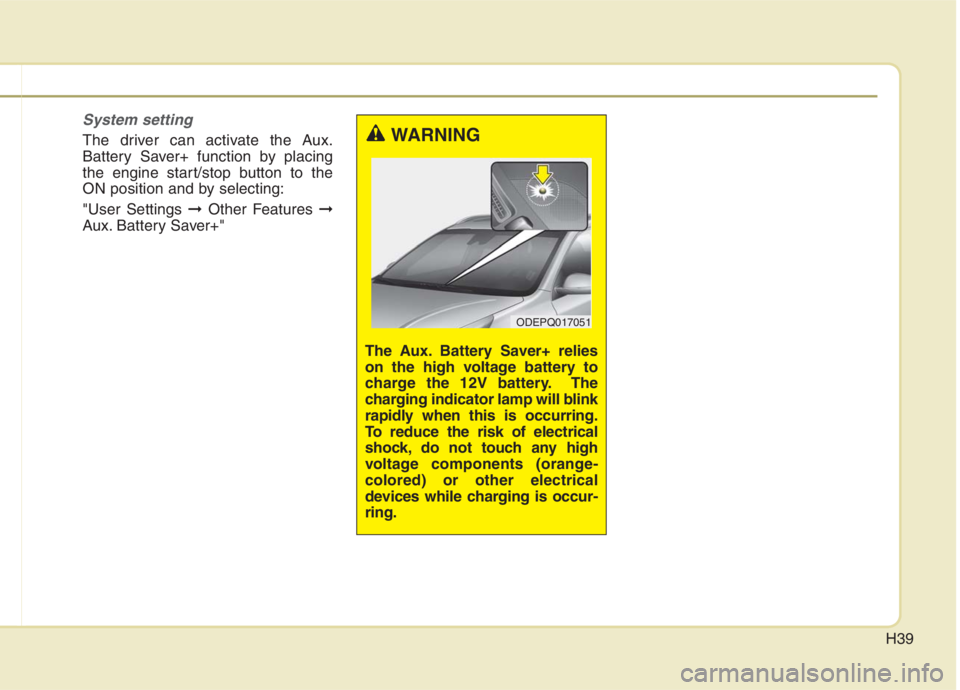
The Aux. Battery Saver+ relies
on the high voltage battery to
charge the 12V battery. The
charging indicator lamp will blink
rapidly when this is occurring.
To reduce the risk of electrical
shock, do not touch any high
voltage components (orange-
colored) or other electrical
devices while charging is occur-
ring.
ODEPQ017051
Page 55 of 667
H50
When the hybrid vehicle shuts
off
When the high voltage battery or 12-
volt battery discharges, or fuel tank is
empty, the hybrid system may not
operate.
If the Hybrid system stops operating
while the vehicle is moving, reduce
the vehicle speed gradually, pull your
vehicle off the road to a safe area,
and shift the transmission in to Park
(P) position and;
1. Turn on the hazard warning flashers.
2. Set the start button at OFF, and try
to start the Hybrid system by
applying the brake pedal and
pushing the start button.
3. If the Hybrid system will not oper-
ate, refer to "EMERGENCY
STARTING" in chapter 6.
Before you try to jump start the vehi-
cle, confirm the fuel level. If the fuel
level is low add more fuel before
attempting as emergency start.
WARNING
If submersion in water occurs:
If your vehicle was flooded and
has soaked carpeting or water
on the flooring, you should not
try to start the Hybrid system.
Never touch the high voltage
cables, connectors or package
modules, because an electrical
shock may occur causing injury
or death. High Voltage cables
are orange in color.
If this occurs. have the vehicle
towed to and inspected by an
authorized Kia dealer.
WARNING - Vehicle
Accident
Never touch electric wires or
cable. If exposed electric wires
or cables are visible inside or
outside of your vehicle, an elec-
tric shock may occur.
WARNING - Putting out
fire
Never use a small quantity of
water to put out a fire in your
vehicle. If a fire occurs, evacu-
ate the car immediately and
contact the fire department.
COMPONENTS OF THE HYBRID/PLUG-IN HYBRID VEHICLE (CONT.)
Page 65 of 667
Your vehicle at a glance
4 2
INTERIOR OVERVIEW
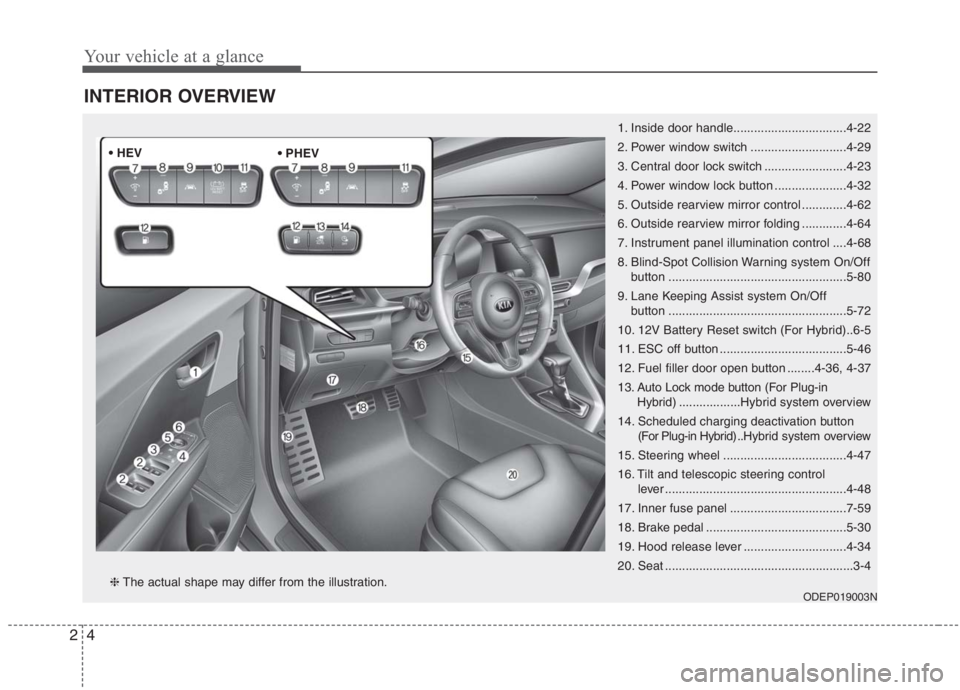
1. Inside door handle.................................4-22
2. Power window switch ............................4-29
3. Central door lock switch ........................4-23
4. Power window lock button .....................4-32
5. Outside rearview mirror control .............4-62
6. Outside rearview mirror folding .............4-64
7. Instrument panel illumination control ....4-68
8. Blind-Spot Collision Warning system On/Off
button ....................................................5-80
9. Lane Keeping Assist system On/Off
button ....................................................5-72
10. 12V Battery Reset switch (For Hybrid)..6-5
11. ESC off button .....................................5-46
12. Fuel filler door open button ........4-36, 4-37
13. Auto Lock mode button (For Plug-in
Hybrid)..................Hybrid system overview
14. Scheduled charging deactivation button
(For Plug-in Hybrid) ..Hybrid system overview
15. Steering wheel ....................................4-47
16. Tilt and telescopic steering control
lever .....................................................4-48
17. Inner fuse panel ..................................7-59
18. Brake pedal .........................................5-30
19. Hood release lever ..............................4-34
20. Seat .......................................................3-4
ODEP019003N❈The actual shape may differ from the illustration. • HEV