replacement KIA NIRO PHEV 2018 Owners Manual
[x] Cancel search | Manufacturer: KIA, Model Year: 2018, Model line: NIRO PHEV, Model: KIA NIRO PHEV 2018Pages: 616, PDF Size: 18.3 MB
Page 89 of 616
323
Safety features of your vehicle
Release the button to lock the
anchor into position. Try sliding the
height adjuster to make sure that it
has locked into position.
Improperly positioned seat belts can
cause serious injuries in an accident.Seat belts - Front passenger andrear seat 3-point system withcombination locking retractor
To fasten your seat belt:
Combination retractor type seat belts
are installed in the rear seat posi-
tions to help accommodate the
installation of child restraint systems.
Although a combination retractor is
also installed in the front passenger
seat position, it is strongly recom-
mended that children always be
seated in the rear seat. NEVER
place any infant restraint system in
the front seat of the vehicle.
This type of seat belt combines the
features of both an emergency lock-
ing retractor seat belt and an auto-
matic locking retractor seat belt. To
fasten your seat belt, pull it out of the
retractor and insert the metal tab into
the buckle. There will be an audible
"click" when the tab locks into the
buckle. When not securing a child
restraint, the seat belt operates in the
same way as the driver's seat belt
(Emergency Locking Retractor Type). It automatically adjusts to the proper
length only after the lap belt portion
of the seat belt is adjusted manually
so that it fits snugly around your hips.
When the seat belt is fully extended
from the retractor to allow the instal-
lation of a child restraint system, the
seat belt operation changes to allow
the belt to retract, but not to extend
(Automatic Locking Retractor Type).
Refer to “Using a child restraint sys-
tem” in this section.
✽ ✽
NOTICE
Although the combination retractor
provides the same level of protection
for seated passengers in either emer-
gency or automatic locking modes,
have the seated passengers use the
emergency locking feature for improv-
ed convenience. The automatic locking
function is intended to facilitate child
restraint installation. To convert from
the automatic locking feature to the
emergency locking operation mode,
allow the unbuckled seat belt to fully
retract.
WARNING- Shoulder belt
positioning
Verify the shoulder belt anchor
is locked into position at the
appropriate height. Never posi-
tion the shoulder belt across
your neck or face. Improperly
positioned seat belts can cause
serious injuries in an accident.
WARNING- Seat belt replacement
Replace your seat belts after
being in an accident. Failure to
replace seat belts after an acci-
dent could leave you with dam-
aged seat belts that will not pro-
vide protection in the event of
another collision.
Page 125 of 616
359
Safety features of your vehicle
Additionally, your vehicle is equipped
with an occupant detection system in
the front passenger's seat. The occu-
pant detection system detects the
presence of a passenger in the front
passenger's seat and will turn off the
front passenger's air bag under cer-
tain conditions. For more detail, see
"Occupant detection system" in this
chapter.
Modification to the seat structure can
cause the air bag to deploy at a dif-
ferent level than should be provided.
Manufacturers are required by gov-
ernment regulations to provide a
contact point concerning modifica-
tions to the vehicle for persons with
disabilities, which modifications may
affect the vehicle’s advanced air bag
system. That contact is Kia’s toll-free
Customer Assistance center at 1-
800-333-4Kia. However, Kia does
not endorse nor will it support any
changes to any part or structure of
the vehicle that could affect the
advanced air bag system, including
the occupant detection system.Advanced air bags are combined with
pre-tensioner seat belts to help pro-
vide enhanced occupant protection in
frontal crashes. Front air bags are not
intended to deploy in collisions in
which sufficient protection can be pro-
vided by the pre-tensioner seat belt.
✽ ✽
NOTICE
Air bags can only be used once –
have an authorized Kia dealer
replace the air bag immediately
after deployment.
Front air bags are not intended to
deploy in side-impact, rear-impact or
rollover crashes. However, when
frontal deployment threshold is satis-
fied at side-impact, front air bags
may deploy. In addition, front air bags
will not deploy in frontal crashes
below the deployment threshold.
WARNING- Replacement /
modifications
The front passenger seat, dash-
board or door should not be
replaced except by an author-
ized Kia dealer using original
Kia parts designed for this vehi-
cle and model. Any other such
replacement or modification
could adversely affect the oper-
ation of the occupant detection
system and your advanced air
bags.
WARNING- SRS Wiring
Do not tamper with or discon-
nect SRS wiring or other com-
ponents of the SRS system.
Doing so could result in injury,
due to accidental deployment of
the air bags or by rendering the
SRS inoperative.
Page 140 of 616
47
Features of your vehicle
When the transmitter does not workcorrectly, open and close the door
with the ignition key. If you have a
problem with the transmitter, con-
tact an authorized Kia dealer.
If the transmitter is in close proxim- ity to your mobile phone, the signal
could be blocked by your mobile
phones normal operational signals.
This is especially important when
the phone is active such as making
and receiving calls, text messag-
ing, and/or sending/receiving
emails. Avoid placing the transmit-
ter and your mobile phone in the
same pants or jacket pocket and
always try to maintain an adequate
distance between the two devices.
✽ ✽ NOTICE
If the keyless entry system is inoper-
ative due to exposure to water or liq-
uids, it will not be covered by your
manufacturer’s vehicle warranty.
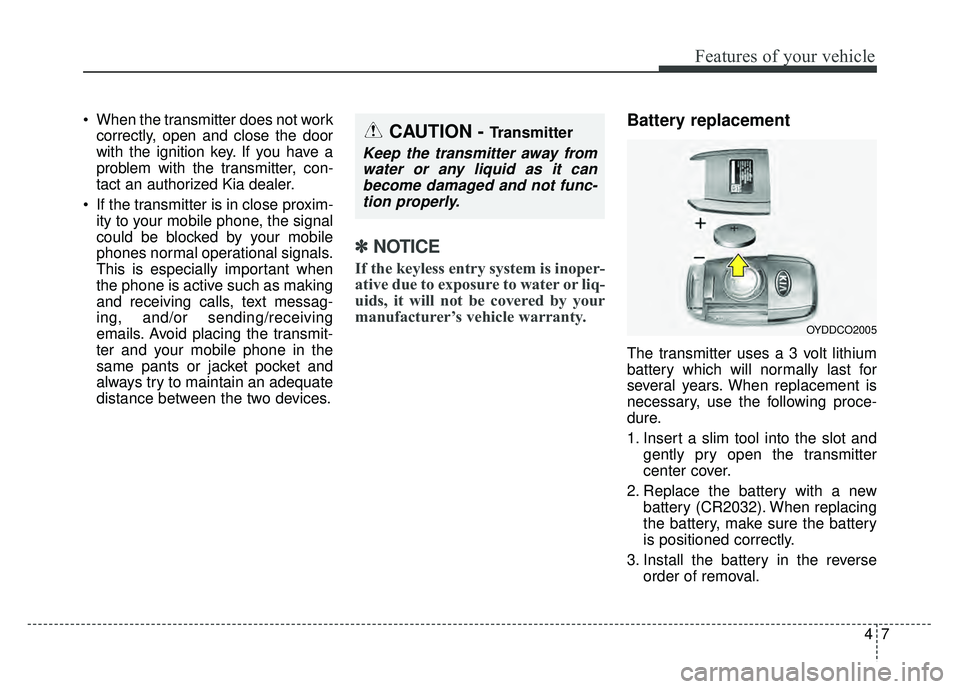
Battery replacement
The transmitter uses a 3 volt lithium
battery which will normally last for
several years. When replacement is
necessary, use the following proce-
dure.
1. Insert a slim tool into the slot and
gently pry open the transmitter
center cover.
2. Replace the battery with a new battery (CR2032). When replacing
the battery, make sure the battery
is positioned correctly.
3. Install the battery in the reverse order of removal.
OYDDCO2005
CAUTION - Transmitter
Keep the transmitter away fromwater or any liquid as it canbecome damaged and not func-tion properly.
Page 141 of 616
Features of your vehicle
84
For replacement transmitters, see an
authorized Kia dealer for transmitter
reprogramming.
The transmitter is designed to giveyou years of trouble-free use, how-
ever it can malfunction if exposed to
moisture or static electricity. If you
are unsure how to use your trans-
mitter or replace the battery, contact
an authorized Kia dealer.
Using the wrong battery can cause the transmitter to malfunction. Be
sure to use the correct battery.
To avoid damaging the transmitter, don't drop it, get it wet, or expose it
to heat or sunlight.
An inappropriately dis- posed battery can be
harmful to the environment
and may cause harm to
human health. Dispose the
battery according to your
local law(s) or regulation.Immobilizer system
Your vehicle is equipped with an
electronic engine immobilizer system
to reduce the risk of unauthorized
vehicle use.
Your immobilizer system is com-
prised of a small transponder in the
ignition key and electronic devices
inside the vehicle.
With the immobilizer system, when-
ever you insert your ignition key into
the ignition switch and turn it to ON,
verifies if the ignition key is valid.
If the key is determined to be valid,
the engine will start.
If the key is determined to be invalid,
the engine will not start.CAUTION - Transmitter
damage
Do not drop, wet or expose the keyless entry system transmit-ter to heat or sunlight.
Page 148 of 616
415
Features of your vehicle
Battery replacement
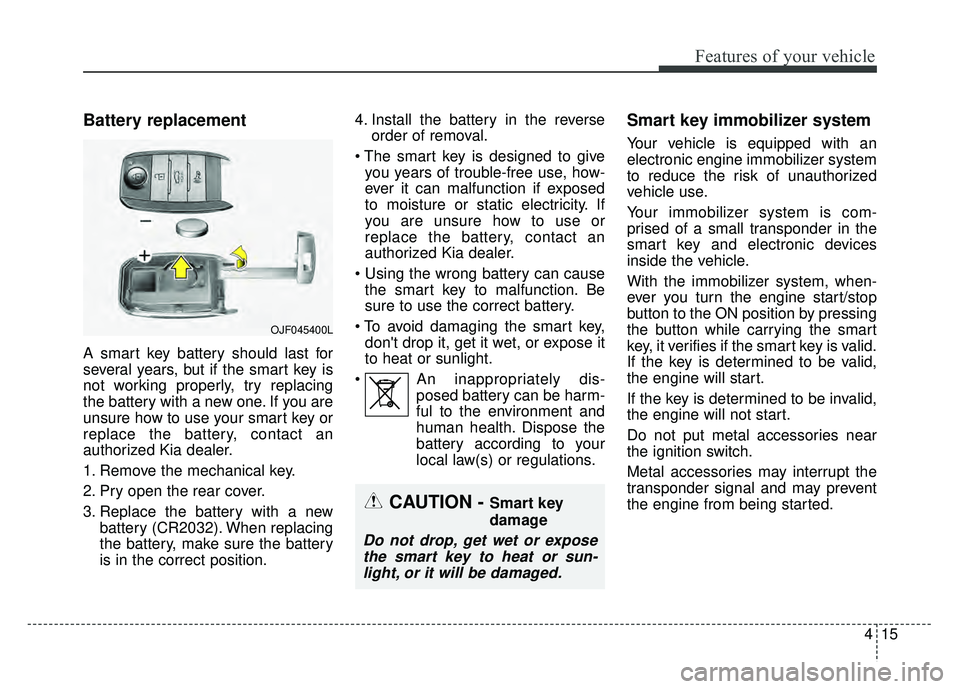
A smart key battery should last for
several years, but if the smart key is
not working properly, try replacing
the battery with a new one. If you are
unsure how to use your smart key or
replace the battery, contact an
authorized Kia dealer.
1. Remove the mechanical key.
2. Pry open the rear cover.
3. Replace the battery with a newbattery (CR2032). When replacing
the battery, make sure the battery
is in the correct position. 4. Install the battery in the reverse
order of removal.
you years of trouble-free use, how-
ever it can malfunction if exposed
to moisture or static electricity. If
you are unsure how to use or
replace the battery, contact an
authorized Kia dealer.
the smart key to malfunction. Be
sure to use the correct battery.
don't drop it, get it wet, or expose it
to heat or sunlight.
An inappropriately dis- posed battery can be harm-
ful to the environment and
human health. Dispose the
battery according to your
local law(s) or regulations.
Smart key immobilizer system
Your vehicle is equipped with an
electronic engine immobilizer system
to reduce the risk of unauthorized
vehicle use.
Your immobilizer system is com-
prised of a small transponder in the
smart key and electronic devices
inside the vehicle.
With the immobilizer system, when-
ever you turn the engine start/stop
button to the ON position by pressing
the button while carrying the smart
key, it verifies if the smart key is valid.
If the key is determined to be valid,
the engine will start.
If the key is determined to be invalid,
the engine will not start.
Do not put metal accessories near
the ignition switch.
Metal accessories may interrupt the
transponder signal and may prevent
the engine from being started.
OJF045400L
CAUTION - Smart key
damage
Do not drop, get wet or exposethe smart key to heat or sun-light, or it will be damaged.
Page 252 of 616
4119
Features of your vehicle
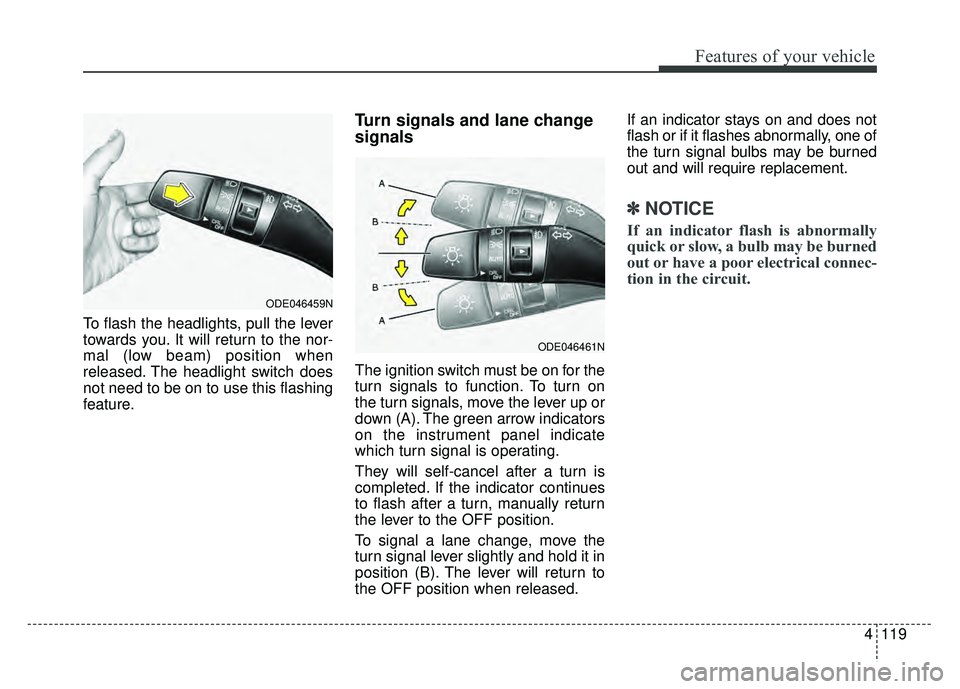
To flash the headlights, pull the lever
towards you. It will return to the nor-
mal (low beam) position when
released. The headlight switch does
not need to be on to use this flashing
feature.
Turn signals and lane change
signals
The ignition switch must be on for the
turn signals to function. To turn on
the turn signals, move the lever up or
down (A). The green arrow indicators
on the instrument panel indicate
which turn signal is operating.
They will self-cancel after a turn is
completed. If the indicator continues
to flash after a turn, manually return
the lever to the OFF position.
To signal a lane change, move the
turn signal lever slightly and hold it in
position (B). The lever will return to
the OFF position when released.If an indicator stays on and does not
flash or if it flashes abnormally, one of
the turn signal bulbs may be burned
out and will require replacement.
✽ ✽
NOTICE
If an indicator flash is abnormally
quick or slow, a bulb may be burned
out or have a poor electrical connec-
tion in the circuit.
ODE046459N
ODE046461N
Page 399 of 616
665
Driving your vehicle
- After an engine start, please stopfor several seconds. If system ini-
tialization is not completed, the
SCC does not normally operate.
- After an engine start, if any objects are not detected or the sensor
cover is obscured with foreign sub-
stances, there is a possibility that
the SCC system may not work.
- The following conditions may cause a malfunction: over-loading
the liftgate, suspension modifica-
tion, tire replacement with unau-
thorized tires or tires with different
tread wear and pressure levels. This device complies with Part 15
of the FCC rules.
Operation is subject to the following
three conditions:
1. This device may not cause harm-
ful interference, and
2. This device must accept any inter- ference received, including inter-
ference that may cause undesired
operation.
3. Changes or modifications not expressly approved by the party
responsible for compliance could
void the user’s authority to operate
the device. Radio frequency radiation expo-
sure information:
This equipment complies with FCC
radiation exposure limits set forth for
an uncontrolled environment.
This equipment should be installed
and operated with minimum distance
of 20 cm between the radiator
(antenna) and your body.
This transmitter must not be co-
located or operating in conjunction
with any other antenna or transmit-
ter.
Page 449 of 616
713
What to do in an emergency
Each tire, including the spare (if pro-
vided), should be checked monthly
when cold and inflated to the inflation
pressure recommended by the vehi-
cle manufacturer on the vehicle plac-
ard or tire inflation pressure label. (If
your vehicle has tires of a different
size than the size indicated on the
vehicle placard or tire inflation pres-
sure label, you should determine the
proper tire inflation pressure for
those tires.)
As an added safety feature, your
vehicle has been equipped with a tire
pressure monitoring system (TPMS)
that illuminates a low tire pressure
telltale when one or more of your
tires is significantly under-inflated.
Accordingly, when the low tire pres-
sure telltale illuminates, you should
stop and check your tires as soon as
possible, and inflate them to the
proper pressure. Driving on a signifi-
cantly under-inflated tire causes the
tire to overheat and can lead to tire
failure. Under-inflation also reduces
fuel efficiency and tire tread life, and
may affect the vehicle’s handling and
stopping ability.Please note that the TPMS is not a
substitute for proper tire maintenance,
and it is the driver’s responsibility to
maintain correct tire pressure, even if
under-inflation has not reached the
level to trigger illumination of the
TPMS low tire pressure telltale.
Your vehicle has also been equipped
with a TPMS malfunction indicator to
indicate when the system is not
operating properly. The TPMS mal-
function indicator is combined with
the low tire pressure telltale. When
the system detects a malfunction,
the telltale will flash for approximate-
ly one minute and then remain con-
tinuously illuminated. This sequence
will continue upon subsequent vehi-
cle start-ups as long as the malfunc-
tion exists. When the malfunction
indicator is illuminated, the system
may not be able to detect or signal
low tire pressure as intended. TPMS
malfunctions may occur for a variety
of reasons, including the installation
of replacement, alternate tires or
wheels on the vehicle that prevent
the TPMS from functioning properly.
Always check the TPMS malfunction
telltale after replacing one or more
tires or wheels on your vehicle to
ensure that the replacement or alter-
nate tires and wheels allow the TPMS
to continue to function properly.
Page 470 of 616
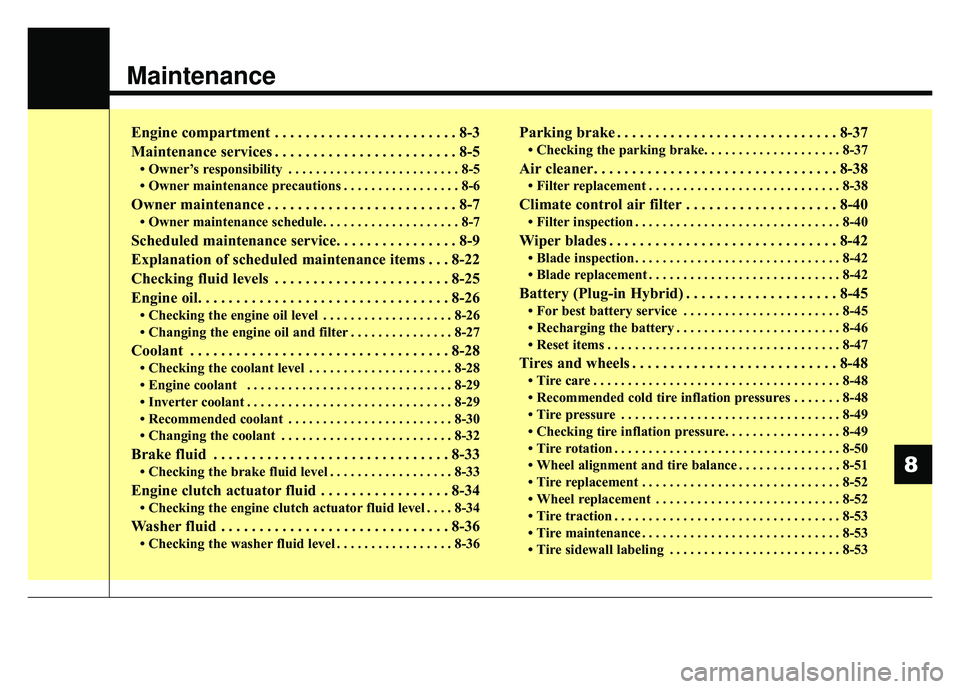
Maintenance
Engine compartment . . . . . . . . . . . . . . . . . . . . . . . . 8-3
Maintenance services . . . . . . . . . . . . . . . . . . . . . . . . 8-5
• Owner’s responsibility . . . . . . . . . . . . . . . . . . . . . . . . . 8-5
• Owner maintenance precautions . . . . . . . . . . . . . . . . . 8-6
Owner maintenance . . . . . . . . . . . . . . . . . . . . . . . . . 8-7
• Owner maintenance schedule. . . . . . . . . . . . . . . . . . . . 8-7
Scheduled maintenance service. . . . . . . . . . . . . . . . 8-9
Explanation of scheduled maintenance items . . . 8-22
Checking fluid levels . . . . . . . . . . . . . . . . . . . . . . . 8-25
Engine oil. . . . . . . . . . . . . . . . . . . . . . . . . . . . . . . . . 8-26
• Checking the engine oil level . . . . . . . . . . . . . . . . . . . 8-26
• Changing the engine oil and filter . . . . . . . . . . . . . . . 8-27
Coolant . . . . . . . . . . . . . . . . . . . . . . . . . . . . . . . . . . 8-28\
• Checking the coolant level . . . . . . . . . . . . . . . . . . . . . 8-28
• Engine coolant . . . . . . . . . . . . . . . . . . . . . . . . . . . . . . 8-29
• Inverter coolant . . . . . . . . . . . . . . . . . . . . . . . . . . . . . . 8-29
• Recommended coolant . . . . . . . . . . . . . . . . . . . . . . . . 8-30
• Changing the coolant . . . . . . . . . . . . . . . . . . . . . . . . . 8-32
Brake fluid . . . . . . . . . . . . . . . . . . . . . . . . . . . . . . . 8-33
• Checking the brake fluid level . . . . . . . . . . . . . . . . . . 8-33
Engine clutch actuator fluid . . . . . . . . . . . . . . . . . 8-34
• Checking the engine clutch actuator fluid level . . . . 8-34
Washer fluid . . . . . . . . . . . . . . . . . . . . . . . . . . . . . . 8-36
• Checking the washer fluid level . . . . . . . . . . . . . . . . . 8-36
Parking brake . . . . . . . . . . . . . . . . . . . . . . . . . . . . . 8-37
• Checking the parking brake. . . . . . . . . . . . . . . . . . . . 8-37
Air cleaner. . . . . . . . . . . . . . . . . . . . . . . . . . . . . . . . 8-38
• Filter replacement . . . . . . . . . . . . . . . . . . . . . . . . . . . . 8-38
Climate control air filter . . . . . . . . . . . . . . . . . . . . 8-40
• Filter inspection . . . . . . . . . . . . . . . . . . . . . . . . . . . . . . 8-40
Wiper blades . . . . . . . . . . . . . . . . . . . . . . . . . . . . . . 8-42
• Blade inspection . . . . . . . . . . . . . . . . . . . . . . . . . . . . . . 8-42
• Blade replacement . . . . . . . . . . . . . . . . . . . . . . . . . . . . 8-42
Battery (Plug-in Hybrid) . . . . . . . . . . . . . . . . . . . . 8-45
• For best battery service . . . . . . . . . . . . . . . . . . . . . . . 8-45
• Recharging the battery . . . . . . . . . . . . . . . . . . . . . . . . 8-46
• Reset items . . . . . . . . . . . . . . . . . . . . . . . . . . . . . . . . . . 8-47\
Tires and wheels . . . . . . . . . . . . . . . . . . . . . . . . . . . 8-48
• Tire care . . . . . . . . . . . . . . . . . . . . . . . . . . . . . . . . . . . . \
8-48
• Recommended cold tire inflation pressures . . . . . . . 8-48
• Tire pressure . . . . . . . . . . . . . . . . . . . . . . . . . . . . . . . . 8-49
• Checking tire inflation pressure. . . . . . . . . . . . . . . . . 8-49
• Tire rotation . . . . . . . . . . . . . . . . . . . . . . . . . . . . . . . . . 8-50
• Wheel alignment and tire balance . . . . . . . . . . . . . . . 8-51
• Tire replacement . . . . . . . . . . . . . . . . . . . . . . . . . . . . . 8-52
• Wheel replacement . . . . . . . . . . . . . . . . . . . . . . . . . . . 8-52
• Tire traction . . . . . . . . . . . . . . . . . . . . . . . . . . . . . . . . . 8-53
• Tire maintenance . . . . . . . . . . . . . . . . . . . . . . . . . . . . . 8-53
• Tire sidewall labeling . . . . . . . . . . . . . . . . . . . . . . . . . 8-53
8
Page 471 of 616
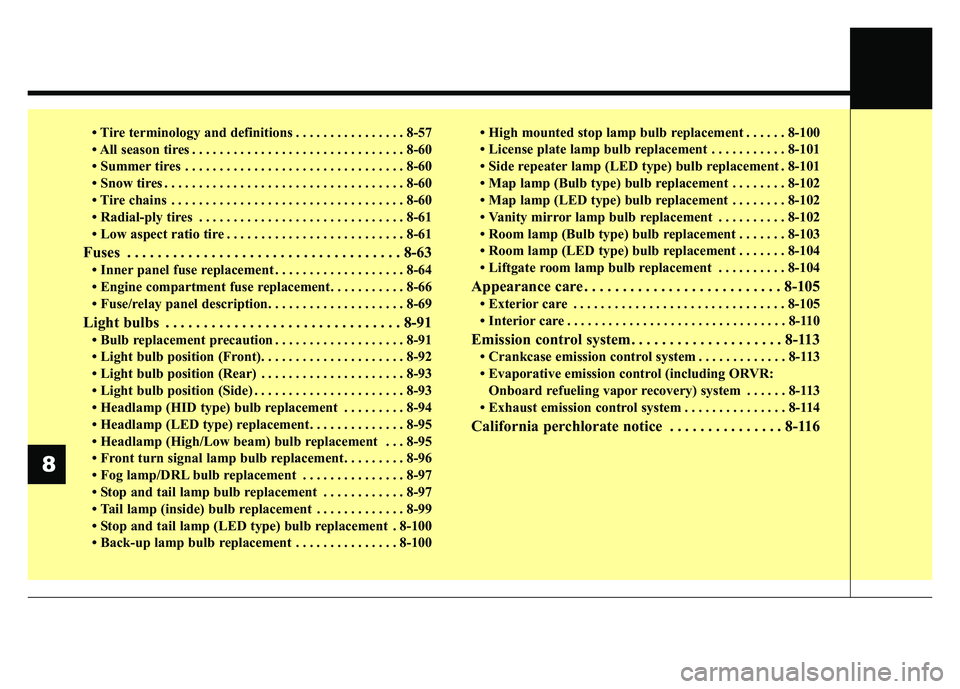
• Tire terminology and definitions . . . . . . . . . . . . . . . . 8-57
• All season tires . . . . . . . . . . . . . . . . . . . . . . . . . . . . . . . 8-60
• Summer tires . . . . . . . . . . . . . . . . . . . . . . . . . . . . . . . . 8-60
• Snow tires . . . . . . . . . . . . . . . . . . . . . . . . . . . . . . . . . . . 8-\
60
• Tire chains . . . . . . . . . . . . . . . . . . . . . . . . . . . . . . . . . . 8-60\
• Radial-ply tires . . . . . . . . . . . . . . . . . . . . . . . . . . . . . . 8-61
• Low aspect ratio tire . . . . . . . . . . . . . . . . . . . . . . . . . . 8-61
Fuses . . . . . . . . . . . . . . . . . . . . . . . . . . . . . . . . . . . . \
8-63
• Inner panel fuse replacement . . . . . . . . . . . . . . . . . . . 8-64
• Engine compartment fuse replacement. . . . . . . . . . . 8-66
• Fuse/relay panel description. . . . . . . . . . . . . . . . . . . . 8-69
Light bulbs . . . . . . . . . . . . . . . . . . . . . . . . . . . . . . . 8-91
• Bulb replacement precaution . . . . . . . . . . . . . . . . . . . 8-91
• Light bulb position (Front). . . . . . . . . . . . . . . . . . . . . 8-92
• Light bulb position (Rear) . . . . . . . . . . . . . . . . . . . . . 8-93
• Light bulb position (Side) . . . . . . . . . . . . . . . . . . . . . . 8-93
• Headlamp (HID type) bulb replacement . . . . . . . . . 8-94
• Headlamp (LED type) replacement. . . . . . . . . . . . . . 8-95
• Headlamp (High/Low beam) bulb replacement . . . 8-95
• Front turn signal lamp bulb replacement . . . . . . . . . 8-96
• Fog lamp/DRL bulb replacement . . . . . . . . . . . . . . . 8-97
• Stop and tail lamp bulb replacement . . . . . . . . . . . . 8-97
• Tail lamp (inside) bulb replacement . . . . . . . . . . . . . 8-99
• Stop and tail lamp (LED type) bulb replacement . 8-100
• Back-up lamp bulb replacement . . . . . . . . . . . . . . . 8-100• High mounted stop lamp bulb replacement . . . . . . 8-100
• License plate lamp bulb replacement . . . . . . . . . . . 8-101
• Side repeater lamp (LED type) bulb replacement . 8-101
• Map lamp (Bulb type) bulb replacement . . . . . . . . 8-102
• Map lamp (LED type) bulb replacement . . . . . . . . 8-102
• Vanity mirror lamp bulb replacement . . . . . . . . . . 8-102
• Room lamp (Bulb type) bulb replacement . . . . . . . 8-103
• Room lamp (LED type) bulb replacement . . . . . . . 8-104
• Liftgate room lamp bulb replacement . . . . . . . . . . 8-104
Appearance care . . . . . . . . . . . . . . . . . . . . . . . . . . 8-105
• Exterior care . . . . . . . . . . . . . . . . . . . . . . . . . . . . . . . 8-105
• Interior care . . . . . . . . . . . . . . . . . . . . . . . . . . . . . . . . 8-110
Emission control system. . . . . . . . . . . . . . . . . . . . 8-113
• Crankcase emission control system . . . . . . . . . . . . . 8-113
• Evaporative emission control (including ORVR:
Onboard refueling vapor recovery) system . . . . . . 8-113
• Exhaust emission control system . . . . . . . . . . . . . . . 8-114
California perchlorate notice . . . . . . . . . . . . . . . 8-116
8