Mirror KIA NIRO PHEV 2019 Owners Manual
[x] Cancel search | Manufacturer: KIA, Model Year: 2019, Model line: NIRO PHEV, Model: KIA NIRO PHEV 2019Pages: 611, PDF Size: 15.28 MB
Page 62 of 611

Your vehicle at a glance
22
EXTERIOR OVERVIEW
1. Hood ......................................................4-32
2. Head lamp (Features of your vehicle) ...4-116
Head lamp (Maintenance) .....................8-87
3. Day time running light (D.R.L) .............4-116
4. Fog lamp ....................................4-120, 8-90
5. Wheel and tire ................................8-41, 9-4
6. Outside rearview mirror .........................4-50
7. Sunroof ..................................................4-39
8. Front windshield wiper blades (Features of your vehicle)....................4-121
Front windshield wiper blades
(Maintenance) .......................................8-36
9. Windows ................................................4-27
10. Parking assist system .......................4-110
11. Roof rack ...........................................4-165
12. Charging door (plug-in).......................Intro
ODEP017001
■ Front view
❈ The actual shape may differ from the illustration.
Page 64 of 611
Your vehicle at a glance
42
INTERIOR OVERVIEW
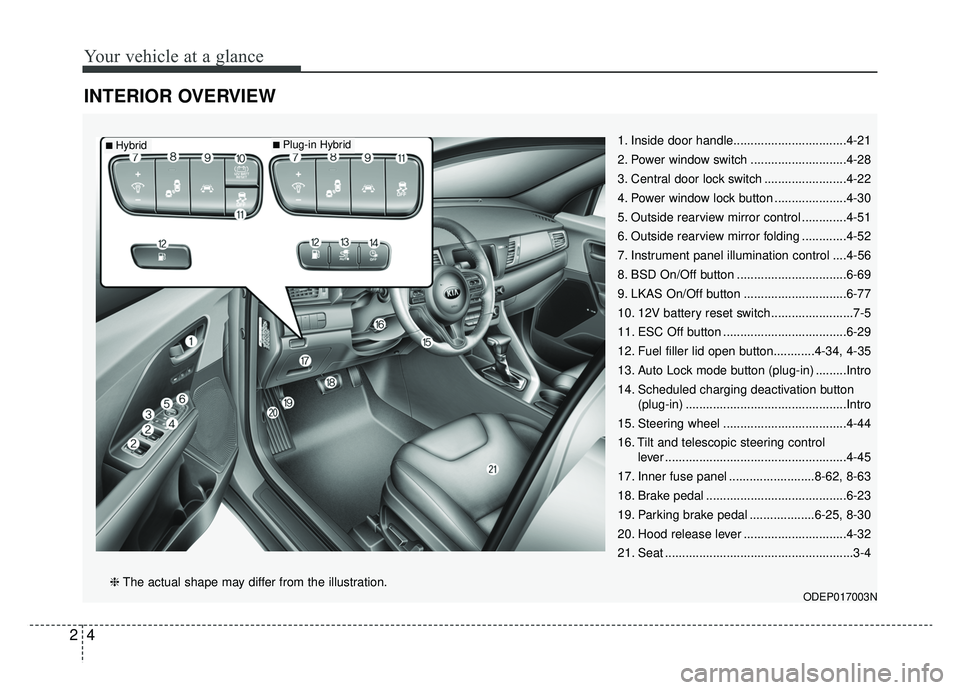
1. Inside door handle.................................4-21
2. Power window switch ............................4-28
3. Central door lock switch ........................4-22
4. Power window lock button .....................4-30
5. Outside rearview mirror control .............4-51
6. Outside rearview mirror folding .............4-52
7. Instrument panel illumination control ....4-56
8. BSD On/Off button ................................6-69
9. LKAS On/Off button ..............................6-77
10. 12V battery reset switch ........................7-5
11. ESC Off button ....................................6-29
12. Fuel filler lid open button............4-34, 4-35
13. Auto Lock mode button (plug-in) .........Intro
14. Scheduled charging deactivation button(plug-in) ...............................................Intro
15. Steering wheel ....................................4-44
16. Tilt and telescopic steering control lever .....................................................4-45
17. Inner fuse panel .........................8-62, 8-63
18. Brake pedal .........................................6-23
19. Parking brake pedal ...................6-25, 8-30
20. Hood release lever ..............................4-32
21. Seat .......................................................3-4
ODEP017003N❈ The actual shape may differ from the illustration.
■Plug-in Hybrid■Hybrid
Page 76 of 611
39
Safety features of your vehicle
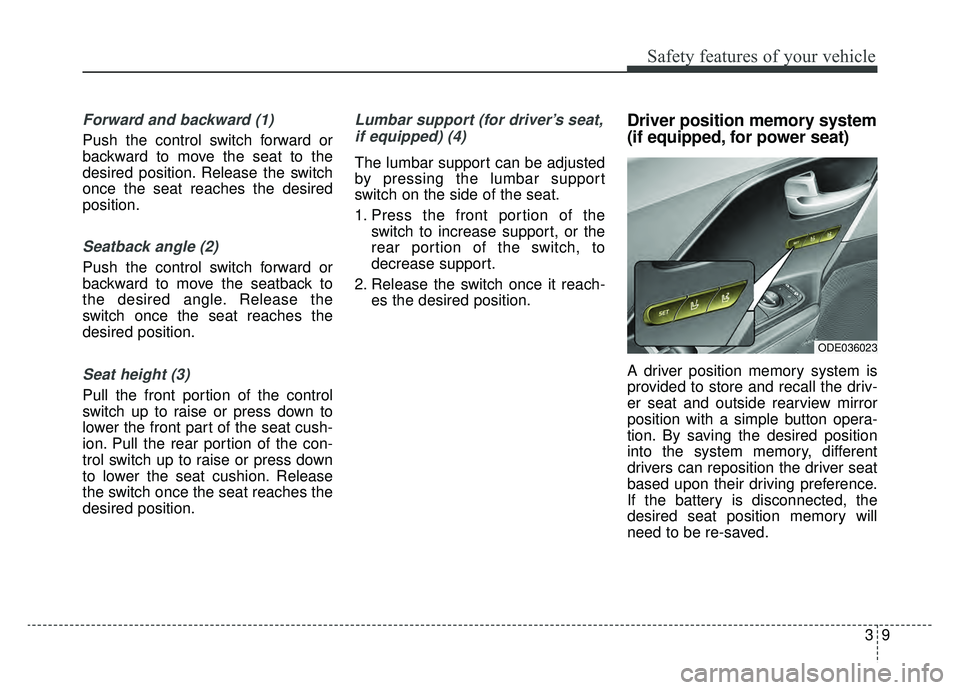
Forward and backward (1)
Push the control switch forward or
backward to move the seat to the
desired position. Release the switch
once the seat reaches the desired
position.
Seatback angle (2)
Push the control switch forward or
backward to move the seatback to
the desired angle. Release the
switch once the seat reaches the
desired position.
Seat height (3)
Pull the front portion of the control
switch up to raise or press down to
lower the front part of the seat cush-
ion. Pull the rear portion of the con-
trol switch up to raise or press down
to lower the seat cushion. Release
the switch once the seat reaches the
desired position.
Lumbar support (for driver’s seat,if equipped) (4)
The lumbar support can be adjusted
by pressing the lumbar support
switch on the side of the seat.
1. Press the front portion of the switch to increase support, or the
rear portion of the switch, to
decrease support.
2. Release the switch once it reach- es the desired position.
Driver position memory system
(if equipped, for power seat)
A driver position memory system is
provided to store and recall the driv-
er seat and outside rearview mirror
position with a simple button opera-
tion. By saving the desired position
into the system memory, different
drivers can reposition the driver seat
based upon their driving preference.
If the battery is disconnected, the
desired seat position memory will
need to be re-saved.
ODE036023
Page 77 of 611
Safety features of your vehicle
10
3
Storing positions into memory
using the buttons on the door
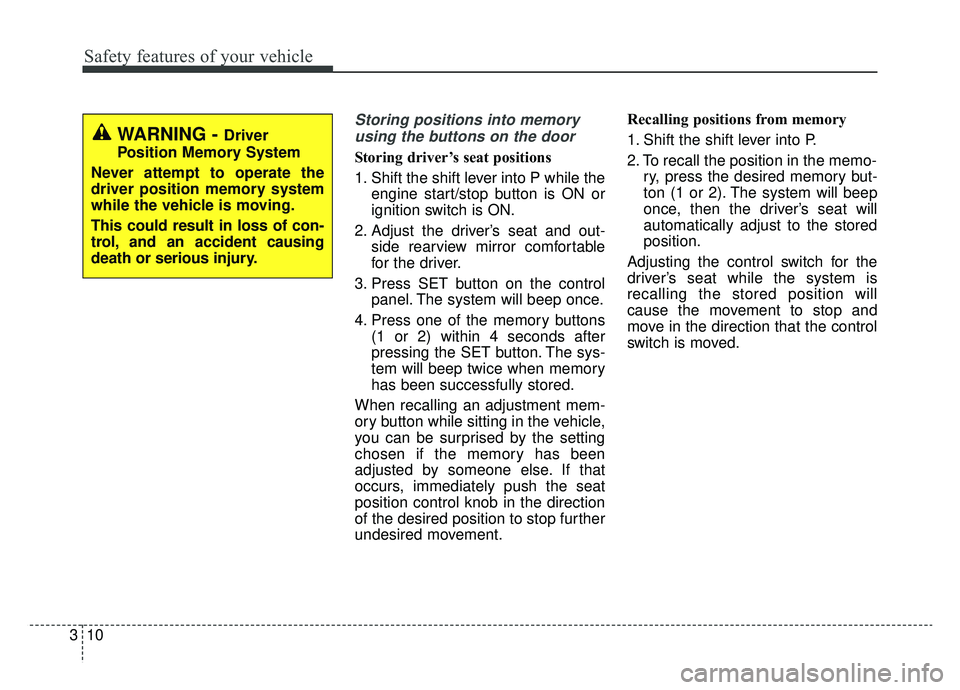
Storing driver’s seat positions
1. Shift the shift lever into P while the engine start/stop button is ON or
ignition switch is ON.
2. Adjust the driver’s seat and out- side rearview mirror comfortable
for the driver.
3. Press SET button on the control panel. The system will beep once.
4. Press one of the memory buttons (1 or 2) within 4 seconds after
pressing the SET button. The sys-
tem will beep twice when memory
has been successfully stored.
When recalling an adjustment mem-
ory button while sitting in the vehicle,
you can be surprised by the setting
chosen if the memory has been
adjusted by someone else. If that
occurs, immediately push the seat
position control knob in the direction
of the desired position to stop further
undesired movement. Recalling positions from memory
1. Shift the shift lever into P.
2. To recall the position in the memo-
ry, press the desired memory but-
ton (1 or 2). The system will beep
once, then the driver’s seat will
automatically adjust to the stored
position.
Adjusting the control switch for the
driver’s seat while the system is
recalling the stored position will
cause the movement to stop and
move in the direction that the control
switch is moved.
WARNING - Driver
Position Memory System
Never attempt to operate the
driver position memory system
while the vehicle is moving.
This could result in loss of con-
trol, and an accident causing
death or serious injury.
Page 136 of 611
Features of your vehicle
Folding key . . . . . . . . . . . . . . . . . . . . . . . . . . . . . . . . 4-4
• Record your key number . . . . . . . . . . . . . . . . . . . . . . . 4-4
. . . . . . . . . . . . . . . . . . . . . . . . . . . . . . . . 4-4
. . . . . . . . . . . . . . . . . . . . . . . . 4-6
. . . . . . . . . . . . . . . . . . . . . . . . . . . 4-7
. . . . . . . . . . . . . . . . . . . . . . . . . . . . 4-8
Smart key . . . . . . . . . . . . . . . . . . . . . . . . . . . . . . . . 4-11
. . . . . . . . . . . . . . . . . . . . . . 4-11
. . . . . . . . . . . . . . . . . . . . . . . . . . . 4-11
. . . . . . . . . . . . . . . . . . . . . . . . . 4-14
. . . . . . . . . . . . . . . . . . . . . . . . 4-14
. . . . . . . . . . . . . . . . . . . . . . . . . . 4-15
. . . . . . . . . . . . . . . . . . 4-15
Theft-alarm system . . . . . . . . . . . . . . . . . . . . . . . . 4-17
. . . . . . . . . . . . . . . . . . . . . . . . . . . . . . . . . 4-17
. . . . . . . . . . . . . . . . . . . . . . . . . . . . 4-18
Door locks . . . . . . . . . . . . . . . . . . . . . . . . . . . . . . . . 4-20
. . . . 4-20
. . . . . . 4-21
. . . . . . . . . . . . . . . . . 4-23
Liftgate . . . . . . . . . . . . . . . . . . . . . . . . . . . . . . . . . . 4-25\
. . . . . . . . . . . . . . . . . . . . . . . . . . . 4-25
Windows . . . . . . . . . . . . . . . . . . . . . . . . . . . . . . . . . 4-27
. . . . . . . . . . . . . . . . . . . . . . . . . . . . . . 4-28
Hood. . . . . . . . . . . . . . . . . . . . . . . . . . . . . . . . . . . . \
. 4-32
. . . . . . . . . . . . . . . . . . . . . . . . . . . . 4-32
. . . . . . . . . . . . . . . . . . . . . . . . . . . 4-33
. . . . . . . . . . . . . . . . . . . . . . . . . . . . . 4-33
Fuel filler lid lid . . . . . . . . . . . . . . . . . . . . . . . . . . . . . . . 4-34
. . . . . . . . . . . . . . . . . . . . . . . 4-34
Fuel filler lid (Plug-in Hybrid) . . . . . . . . . . . . . . . 4-35
. . . . . . . . . . . . . . . . . . . . . . 4-35
Sunroof . . . . . . . . . . . . . . . . . . . . . . . . . . . . . . . . . . 4-39\
. . . . . . . . . . . . . . . . . . . . . . . . . . . 4-40
. . . . . . . . . . . . . . . . . . . . . . . . . . . . 4-42
. . . . . . . . . . . . . . . . . . . . . . . . . 4-43
Steering wheel . . . . . . . . . . . . . . . . . . . . . . . . . . . . . 4-44
. . . . . . . . . . . . . . . . 4-44
. . . . . . . . . . . . . . . . . . . . 4-45
. . . . . . . . . . . . . . . . . . . . . . . . . 4-46
. . . . . . . . . . . . . . . . . . . . . . . . . . . . . . . . . . . . \
. . . 4-47
Mirrors . . . . . . . . . . . . . . . . . . . . . . . . . . . . . . . . . . 4-48\
. . . . . . . . . . . . . . . . . . . . . . . . 4-48
. . . . . . . . . . . . . . . . . . . . . . . 4-50
4
Page 183 of 611
Features of your vehicle
48
4
MIRRORS
Inside rearview mirror
Adjust the rearview mirror so that the
center view through the rear window
is seen. Make this adjustment before
you start driving.
Do not place objects in the rear seat
or cargo area which would interfere
with your vision through the rear win-
dow.
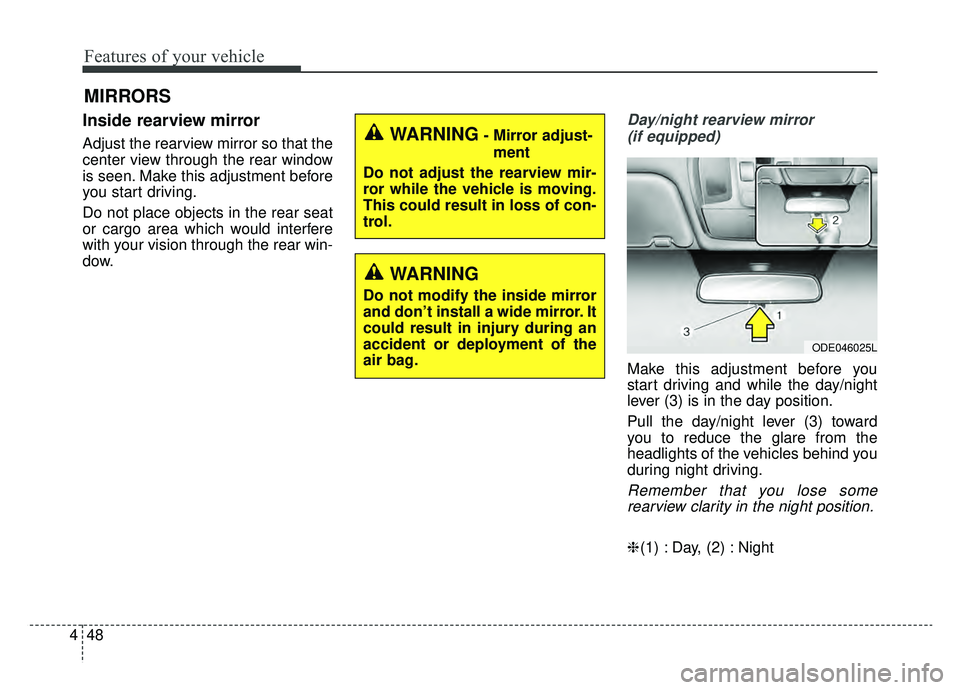
Day/night rearview mirror
(if equipped)
Make this adjustment before you
start driving and while the day/night
lever (3) is in the day position.
Pull the day/night lever (3) toward
you to reduce the glare from the
headlights of the vehicles behind you
during night driving.
Remember that you lose somerearview clarity in the night position.
❈ (1) : Day, (2) : Night
WARNING- Mirror adjust-
ment
Do not adjust the rearview mir-
ror while the vehicle is moving.
This could result in loss of con-
trol.
WARNING
Do not modify the inside mirror
and don’t install a wide mirror. It
could result in injury during an
accident or deployment of the
air bag.
ODE046025L
Page 184 of 611
449
Features of your vehicle
Electric chromatic mirror (ECM) (if equipped)
The electric rearview mirror automat-
ically controls the glare from the
headlights of the vehicles behind you
in nighttime or low light driving condi-
tions. The sensor mounted in the mir-
ror senses the light level around the
vehicle and automatically controls
the headlight glare from the vehicles
behind you.
When the engine is running, the
glare is automatically controlled by
the sensor mounted in the rearview
mirror.
Whenever the shift lever is shifted
into reverse (R), the mirror will auto-
matically go to the brightest setting in
order to improve the driver's view
behind the vehicle. To operate the electric rearview mirror:
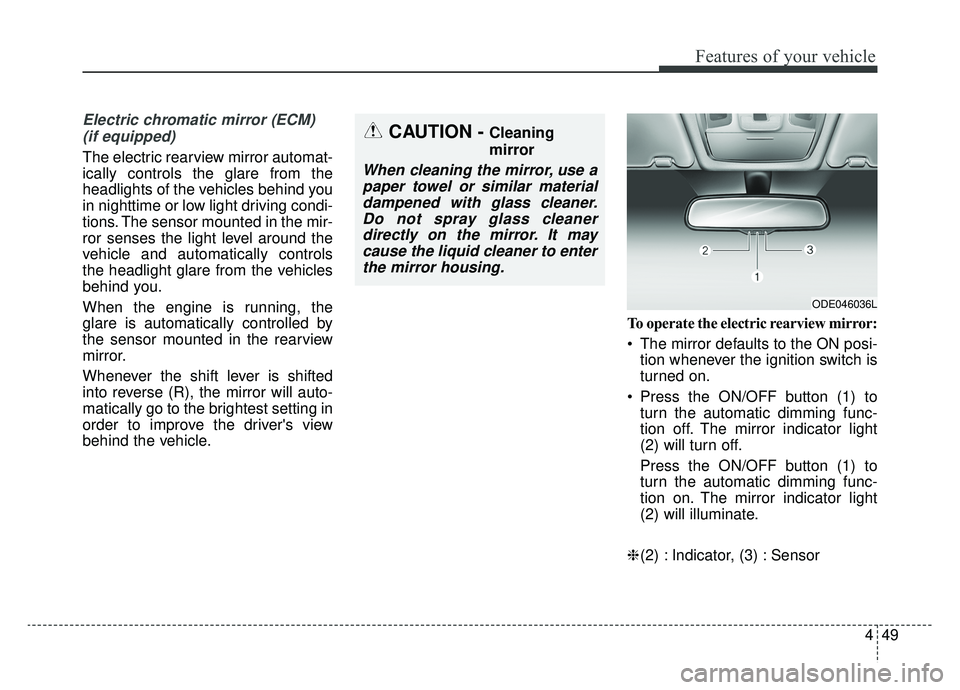
The mirror defaults to the ON posi-
tion whenever the ignition switch is
turned on.
Press the ON/OFF button (1) to turn the automatic dimming func-
tion off. The mirror indicator light
(2) will turn off.
Press the ON/OFF button (1) to
turn the automatic dimming func-
tion on. The mirror indicator light
(2) will illuminate.
❈ (2) : Indicator, (3) : Sensor
CAUTION - Cleaning
mirror
When cleaning the mirror, use a
paper towel or similar materialdampened with glass cleaner.Do not spray glass cleanerdirectly on the mirror. It maycause the liquid cleaner to enterthe mirror housing.
ODE046036L
Page 185 of 611
Features of your vehicle
50
4
Electric chromatic mirror (ECM)
with UVO service (if equipped)
The electric rearview mirror automat-
ically controls the glare from the
headlights of the vehicles behind you
in nighttime or low light driving condi-
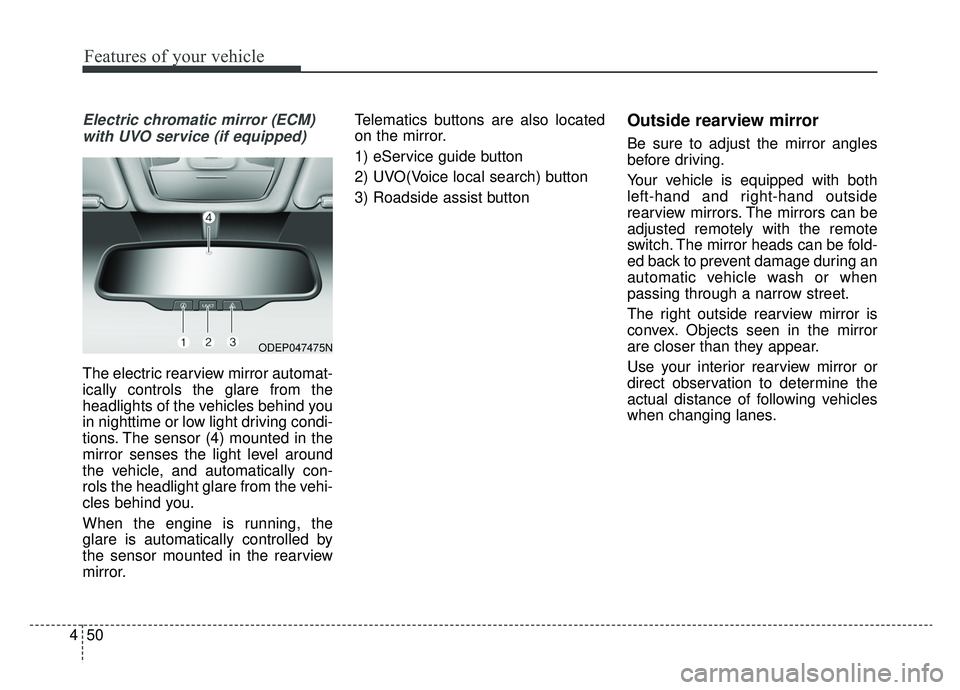
tions. The sensor (4) mounted in the
mirror senses the light level around
the vehicle, and automatically con-
rols the headlight glare from the vehi-
cles behind you.
When the engine is running, the
glare is automatically controlled by
the sensor mounted in the rearview
mirror. Telematics buttons are also located
on the mirror.
1) eService guide button
2) UVO(Voice local search) button
3) Roadside assist button
Outside rearview mirror
Be sure to adjust the mirror angles
before driving.
Your vehicle is equipped with both
left-hand and right-hand outside
rearview mirrors. The mirrors can be
adjusted remotely with the remote
switch. The mirror heads can be fold-
ed back to prevent damage during an
automatic vehicle wash or when
passing through a narrow street.
The right outside rearview mirror is
convex. Objects seen in the mirror
are closer than they appear.
Use your interior rearview mirror or
direct observation to determine the
actual distance of following vehicles
when changing lanes.
ODEP047475N
Page 186 of 611
451
Features of your vehicle
If the mirror is jammed with ice, do
not adjust the mirror by force. Use an
approved spray de-icer (not radiator
antifreeze) to release the frozen
mechanism or move the vehicle to a
warm place and allow the ice to melt.
Adjusting outside rearview mirror
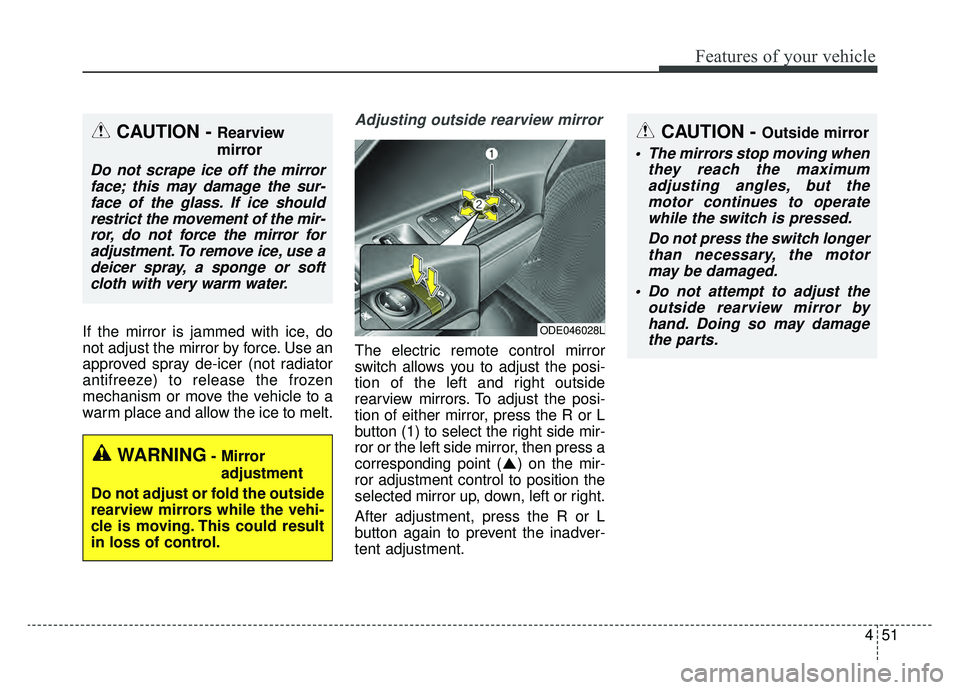
The electric remote control mirror
switch allows you to adjust the posi-
tion of the left and right outside
rearview mirrors. To adjust the posi-
tion of either mirror, press the R or L
button (1) to select the right side mir-
ror or the left side mirror, then press a
corresponding point ( ) on the mir-
ror adjustment control to position the
selected mirror up, down, left or right.
After adjustment, press the R or L
button again to prevent the inadver-
tent adjustment.
CAUTION - Outside mirror
The mirrors stop moving whenthey reach the maximumadjusting angles, but themotor continues to operatewhile the switch is pressed.
Do not press the switch longerthan necessary, the motormay be damaged.
Do not attempt to adjust the outside rearview mirror byhand. Doing so may damagethe parts.
ODE046028L
WARNING- Mirror
adjustment
Do not adjust or fold the outside
rearview mirrors while the vehi-
cle is moving. This could result
in loss of control.
CAUTION - Rearview
mirror
Do not scrape ice off the mirror face; this may damage the sur-face of the glass. If ice shouldrestrict the movement of the mir-ror, do not force the mirror foradjustment. To remove ice, use adeicer spray, a sponge or softcloth with very warm water.
Page 187 of 611
Features of your vehicle
52
4
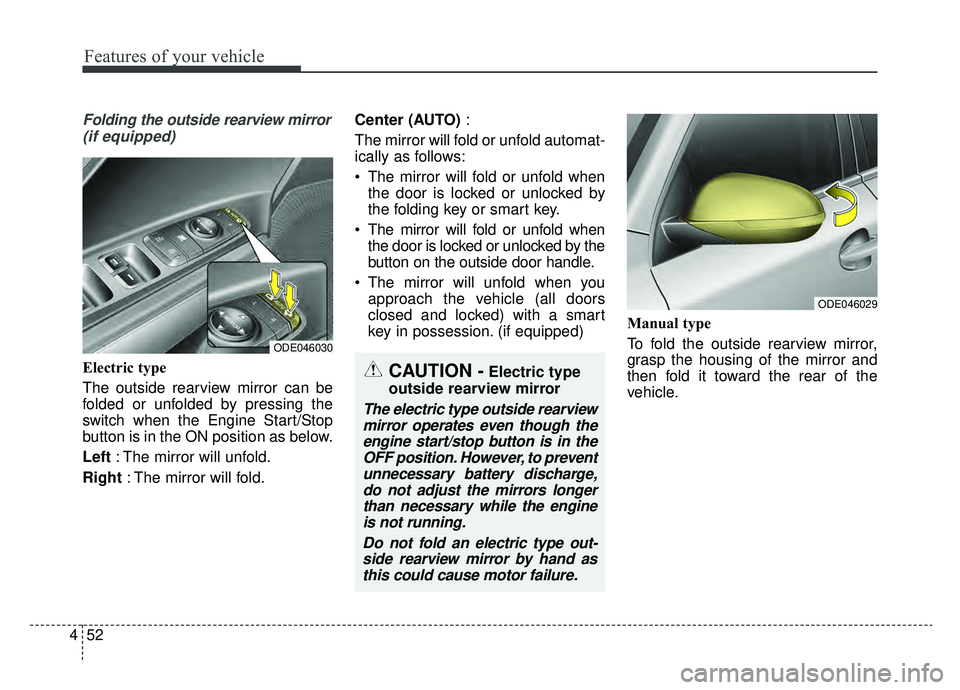
Folding the outside rearview mirror
(if equipped)
Electric type
The outside rearview mirror can be
folded or unfolded by pressing the
switch when the Engine Start/Stop
button is in the ON position as below.
Left : The mirror will unfold.
Right : The mirror will fold. Center (AUTO)
:
The mirror will fold or unfold automat-
ically as follows:
The mirror will fold or unfold when the door is locked or unlocked by
the folding key or smart key.
The mirror will fold or unfold when the door is locked or unlocked by the
button on the outside door handle.
The mirror will unfold when you approach the vehicle (all doors
closed and locked) with a smart
key in possession. (if equipped) Manual type
To fold the outside rearview mirror,
grasp the housing of the mirror and
then fold it toward the rear of the
vehicle.
ODE046029
CAUTION -Electric type
outside rearview mirror
The electric type outside rearview mirror operates even though theengine start/stop button is in theOFF position. However, to preventunnecessary battery discharge,do not adjust the mirrors longerthan necessary while the engineis not running.
Do not fold an electric type out-side rearview mirror by hand asthis could cause motor failure.
ODE046030