stop start KIA NIRO PHEV 2020 User Guide
[x] Cancel search | Manufacturer: KIA, Model Year: 2020, Model line: NIRO PHEV, Model: KIA NIRO PHEV 2020Pages: 687, PDF Size: 11.43 MB
Page 51 of 687

H49
After parking the vehicle, shift thetransmission into "P" position. Turn
off the hybrid system by pushing
the Engine Start/Stop button.
For your safety, do not touch high voltage cables, connectors and
package modules. High Voltage
components are orange in color.
Exposed cables or wires may be visible inside or outside of the vehi-
cle. Never touch the wires or
cables, because an electrical
shock may occur causing injury or
death. If a vehicle accident occurs:
1.Stop the vehicle and shift the trans-
mission into "P" position and then
depress the parking brake.
2.Turn off the Hybrid system by pushing the Engine Start/Stop
Button.
3.Step away from the vehicle and go to a safe place.
4.Call emergency services for help and let them know the vehicle is a
Hybrid vehicle.
Do not touch high voltage cables,
connectors and package modules.
High voltage components are
orange in color.
Exposed cables or wires may be vis-
ible inside or outside of the vehicle.
Never touch the wires or cables,
because an electrical shock may
occur causing injury or death.
WARNING
If a small scale fire occurs, use a fire extinguisher (ABC,
BC) that is meant for electrical
fires.
If it is impossible to extin-
guish the fire in the early
stage, remain a safe distance
from the vehicle and immedi-
ately call your local fire emer-
gency responders. Also,
advise them that a hybrid
vehicle is involved.
If the fire spreads to the high
voltage battery, large amount
of water is needed to put out
the fire.
Using small amount of water
or fire extinguishers not
meant for electrical fires
could cause serious injury or
death from electrical shocks.
If you need towing, refer to chapter 6.
Page 52 of 687

H50
When the hybrid vehicle shuts
off
When the high voltage battery or 12-
volt battery discharges, or fuel tank is
empty, the hybrid system may not
operate.
If the Hybrid system stops operating
while the vehicle is moving, reduce
the vehicle speed gradually, pull your
vehicle off the road to a safe area,
and shift the transmission in to Park
(P) position and;
1. Turn on the hazard warning flashers.
2. Set the start button at OFF, and tryto start the Hybrid system by
applying the brake pedal and
pushing the start button.
3. If the Hybrid system will not oper- ate, refer to "EMERGENCY
STARTING" in chapter 6.
Before you try to jump start the vehi-
cle, confirm the fuel level. If the fuel
level is low add more fuel before
attempting as emergency start.
WARNING
If submersion in water occurs:
If your vehicle was flooded and
has soaked carpeting or water
on the flooring, you should not
try to start the Hybrid system.
Never touch the high voltage
cables, connectors or package
modules, because an electrical
shock may occur causing injury
or death. High Voltage cables
are orange in color.
If this occurs. have the vehicle
towed to and inspected by an
authorized Kia dealer.
WARNING - Vehicle
Accident
Never touch electric wires or
cable. If exposed electric wires
or cables are visible inside or
outside of your vehicle, an elec-
tric shock may occur.
WARNING - Putting out
fire
Never use a small quantity of
water to put out a fire in your
vehicle. If a fire occurs, evacu-
ate the car immediately and
contact the fire department.
COMPONENTS OF THE HYBRID/PLUG-IN HYBRID VEHICLE (CONT.)
Page 63 of 687

25
Your vehicle at a glance
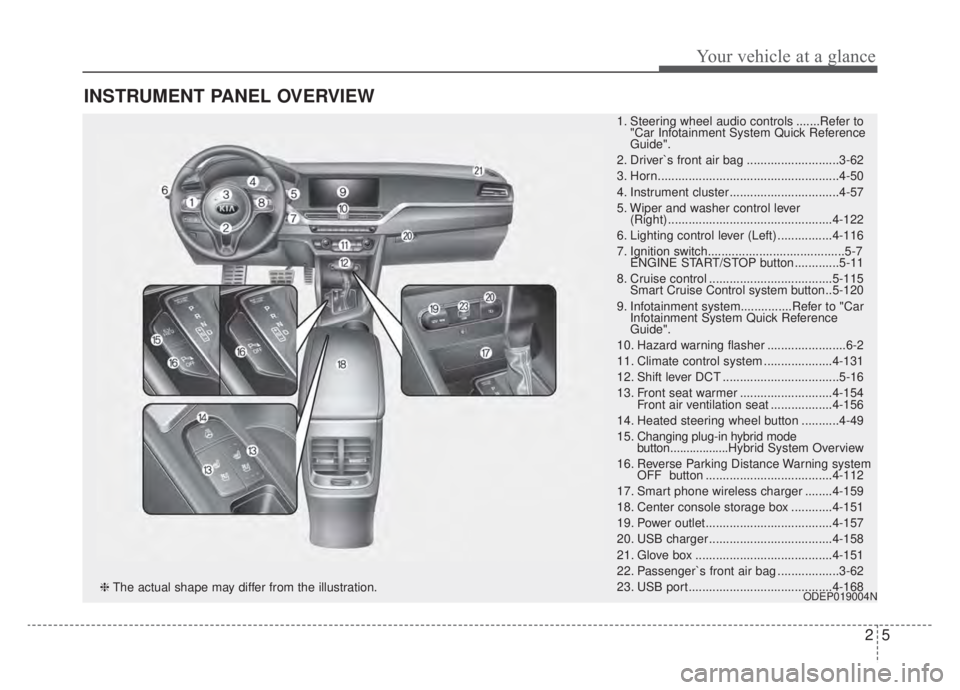
INSTRUMENT PANEL OVERVIEW
1. Steering wheel audio controls .......Refer to"Car Infotainment System Quick Reference
Guide".
2. Driver`s front air bag ...........................3-62
3. Horn.....................................................4-50
4. Instrument cluster ................................4-57
5. Wiper and washer control lever (Right) ................................................4-122
6. Lighting control lever (Left) ................4-116
7. Ignition switch........................................5-7 ENGINE START/STOP button .............5-11
8. Cruise control ....................................5-115 Smart Cruise Control system button ..5-120
9. Infotainment system...............Refer to "Car Infotainment System Quick Reference
Guide".
10. Hazard warning flasher .......................6-2
11. Climate control system ....................4-131
12. Shift lever DCT ..................................5-16
13. Front seat warmer ...........................4-154 Front air ventilation seat ..................4-156
14. Heated steering wheel button ...........4-49
15. Changing plug-in hybrid mode button.................. Hybrid System Overview
16. Reverse Parking Distance Warning system OFF button .....................................4-112
17. Smart phone wireless charger ........4-159
18. Center console storage box ............4-151
19. Power outlet.....................................4-157
20. USB charger ....................................4-158
21. Glove box ........................................4-151
22. Passenger`s front air bag ..................3-62
23. USB port..........................................4-168
ODEP019004N❈ The actual shape may differ from the illustration.
Page 75 of 687

311
Safety features of your vehicle
Storing positions into memoryusing the buttons on the door
Storing driver’s seat positions
1. Shift the shift lever into P while the engine start/stop button is ON or
ignition switch is ON.
2. Adjust the driver’s seat and out- side rearview mirror comfortable
for the driver.
3. Press SET button on the control panel. The system will beep once.
4. Press one of the memory buttons (1 or 2) within 4 seconds after
pressing the SET button. The sys-
tem will beep twice when memory
has been successfully stored.
When recalling an adjustment mem-
ory button while sitting in the vehicle,
you can be surprised by the setting
chosen if the memory has been
adjusted by someone else. If that
occurs, immediately push the seat
position control knob in the direction
of the desired position to stop further
undesired movement. Recalling positions from memory
1. Shift the shift lever into P.
2. To recall the position in the memo-
ry, press the desired memory but-
ton (1 or 2). The system will beep
once, then the driver’s seat will
automatically adjust to the stored
position.
Adjusting the control switch for the
driver’s seat while the system is
recalling the stored position will
cause the movement to stop and
move in the direction that the control
switch is moved.
WARNING - Driver
Position Memory System
Never attempt to operate the
driver position memory system
while the vehicle is moving.
This could result in loss of con-
trol, and an accident causing
death or serious injury.
Page 76 of 687

Safety features of your vehicle
12
3
Easy access function (if equipped)
The system will move the driver's
seat automatically as follows:
Without smart key system
- It will move the driver’s seat rear-ward when the ignition key is
removed and front driver’s door is
opened.
- It will move the driver’s seat forward when the ignition key is inserted.
With smart key system - It will move the driver’s seat rear-ward when the engine start/stop
button is changed to the OFF
position.
- It will move the driver’s seat for- ward when the engine start/stop
button is changed to the ACC or
START position.
- It will move the driver's seat for- ward when you get in your vehicle
with the smart key after closing
the driver's door.
You can activate or deactivate this
feature. Refer to "User settings" in
chapter 4.
Headrest (for front seat)
The driver's and front passenger's
seats are equipped with a headrest
for the occupant's safety and comfort.
The headrest not only provides com-
fort for the driver and front passenger,
but also helps protect the head and
neck in the event of a rear collision.
For maximum effectiveness in case
of an accident, the headrest should
be adjusted so the middle of the
headrest is at the same height of the
center of gravity of an occupant's
head. Generally, the center of gravity
of most people's head is similar with
the height of the top of their eyes. Also, adjust the headrest as close to
your head as possible. For this rea-
son, the use of a cushion that holds
the body away from the seatback is
not recommended.
WARNING- Headrest
removal/adjustment
Do not operate the vehicle with the headrests removed.
Headrests can provide critical
neck and head support in a
crash.
Do not adjust the headrest height while the vehicle is in
motion. Driver may lose con-
trol of the vehicle.
ODE036074L
Page 94 of 687

Safety features of your vehicle
30
3
❈ The actual position of seat belt pre-
tensioner system components may dif-
fer from the illustration.
The seat belt pre-tensioner system
consists mainly of the following com-
ponents. Their locations are shown in
the illustration:
(1) SRS air bag warning light
(2) Retractor pre-tensioner assembly
(3) SRS control module
(4) Emergency fastening device (EFD)
✽ ✽ NOTICE
• Both the driver's and front pas-
senger's seat belt pre-tensioner sys-
tem may be activated not only in
certain frontal collisions but also in
certain side collisions or rollovers,
if the vehicle is equipped with a
side or curtain air bag.
• Because the sensor that activates the SRS air bag is connected with
the pre-tensioner seat belt, the
SRS air bag warning light on
the instrument panel will illumi-
nate for approximately 6 seconds
after engine start/stop button has
been changed to ON position, and
then it should turn off.WARNING - Skin Irritation
Wash all exposed skin areas
thoroughly after an accident in
which the pre-tensioner seat
belts were activated. The fine
dust from the pre-tensioner
activation may cause skin irrita-
tion and should not be breathed
for prolonged periods.
ODMESA2024
Page 95 of 687

331
Safety features of your vehicle
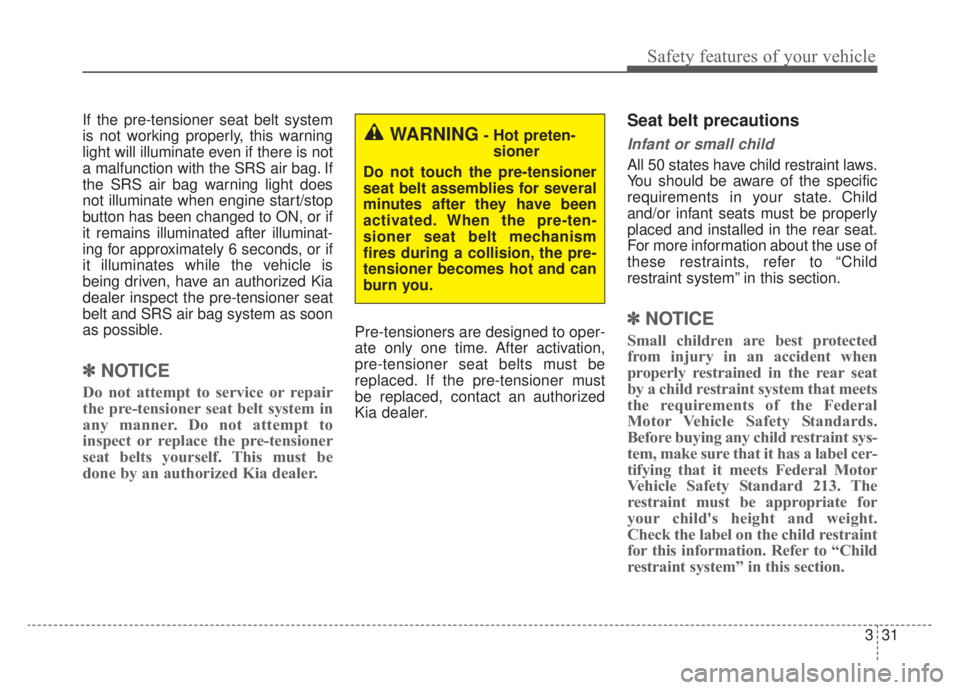
If the pre-tensioner seat belt system
is not working properly, this warning
light will illuminate even if there is not
a malfunction with the SRS air bag. If
the SRS air bag warning light does
not illuminate when engine start/stop
button has been changed to ON, or if
it remains illuminated after illuminat-
ing for approximately 6 seconds, or if
it illuminates while the vehicle is
being driven, have an authorized Kia
dealer inspect the pre-tensioner seat
belt and SRS air bag system as soon
as possible.
✽ ✽NOTICE
Do not attempt to service or repair
the pre-tensioner seat belt system in
any manner. Do not attempt to
inspect or replace the pre-tensioner
seat belts yourself. This must be
done by an authorized Kia dealer.
Pre-tensioners are designed to oper-
ate only one time. After activation,
pre-tensioner seat belts must be
replaced. If the pre-tensioner must
be replaced, contact an authorized
Kia dealer.
Seat belt precautions
Infant or small child
All 50 states have child restraint laws.
You should be aware of the specific
requirements in your state. Child
and/or infant seats must be properly
placed and installed in the rear seat.
For more information about the use of
these restraints, refer to “Child
restraint system” in this section.
✽ ✽NOTICE
Small children are best protected
from injury in an accident when
properly restrained in the rear seat
by a child restraint system that meets
the requirements of the Federal
Motor Vehicle Safety Standards.
Before buying any child restraint sys-
tem, make sure that it has a label cer-
tifying that it meets Federal Motor
Vehicle Safety Standard 213. The
restraint must be appropriate for
your child's height and weight.
Check the label on the child restraint
for this information. Refer to “Child
restraint system” in this section.
WARNING- Hot preten-
sioner
Do not touch the pre-tensioner
seat belt assemblies for several
minutes after they have been
activated. When the pre-ten-
sioner seat belt mechanism
fires during a collision, the pre-
tensioner becomes hot and can
burn you.
Page 112 of 687

Safety features of your vehicle
48
3
How does the air bag system
operate?
Air bags are activated (able to
inflate if necessary) only when the
ignition switch is turned to the ON
or START position or when engine
start/stop button has been
changed to ON position.
The appropriate air bags inflate instantly in the event of a serious
frontal collision or side collision in
order to help protect the occupants
from serious physical injury.
There is no single speed at which the air bags will inflate.
Generally, air bags are designed to
inflate based upon the severity of a
collision and its direction. These
two factors determine whether the
sensors produce an electronic
deployment/ inflation signal.
Air bag deployment depends on a number of factors including vehicle
speed, angles of impact, and, the
density and stiffness of the vehi-
cles or objects which your vehicle
hits in the collision. The determin-
ing factors are not limited to those
mentioned above. The front air bags will completely
inflate and deflate in an instant.
It is virtually impossible for you to
see the air bags inflate during an
accident.
It is much more likely that you will
simply see the deflated air bags
hanging out of their storage com-
partments after the collision.
In addition to inflating in serious side collisions, side and/or curtain
air bags will inflate if the sensing
system detects a rollover.
When a rollover is detected, side and/or curtain air bags will remain
inflated longer to help provide pro-
tection from ejection, especially
when used in conjunction with the
seat belts. In order to help provide protection,
the air bags must inflate rapidly.
The speed of the air bag inflation is
a consequence of extremely short
time in which to inflate the air bag
between the occupant and the
vehicle structures before the occu-
pant impacts those structures. This
speed of inflation reduces the risk
of serious or life-threatening
injuries and is thus a necessary
part of the air bag design.
However, air bag inflation can also
cause injuries which can include
facial abrasions, bruises and bro-
ken bones because the inflation
speed also causes the air bags to
expand with a great deal of force.
There are even circumstances under which contact with the
steering wheel or passenger air
bag can cause fatal injuries,
especially if the occupant is
positioned excessively close to
the steering wheel or passenger
air bag.
Page 115 of 687

351
Safety features of your vehicle
SRS components and functions
❈The actual position of SRS compo-
nents may differ from the illustration.
The SRS consists of the following
components:
1. Driver's front air bag module
2. Passenger's front air bag module
3. Side air bag modules
4. Curtain air bag modules
5. Retractor pre-tensioner assemblies
6. Air bag warning light
7. SRS control module (SRSCM) 8. Front impact sensors
9. Side impact sensors
10. Side pressure sensors
11. Occupant detection system
(Front passenger’s seat only)
12. Front passenger’s seat belt buckle sensor
13. Retractor pre-tensioner assem- blies*
*: if equipped If the air bag warning light is illumi-
nated for more than 6 seconds after
engine start/stop button has been
changed to ON, or of it illuminates
during vehicle operation, an SRS
component may not be functioning
properly and you should have your
vehicle checked by an authorized Kia
dealer.
W7-147
ODE036078N
Page 116 of 687

Safety features of your vehicle
52
3
If any of the following conditions
occur, this indicates a malfunction in
the air bag system. Have an author-
ized Kia dealer inspect the air bag
system as soon as possible.
The light does not turn on briefly
when you change engine start/stop
button to ON.
The light stays on after illuminating for approximately 6 seconds.
The light comes on while the vehi- cle is in motion.
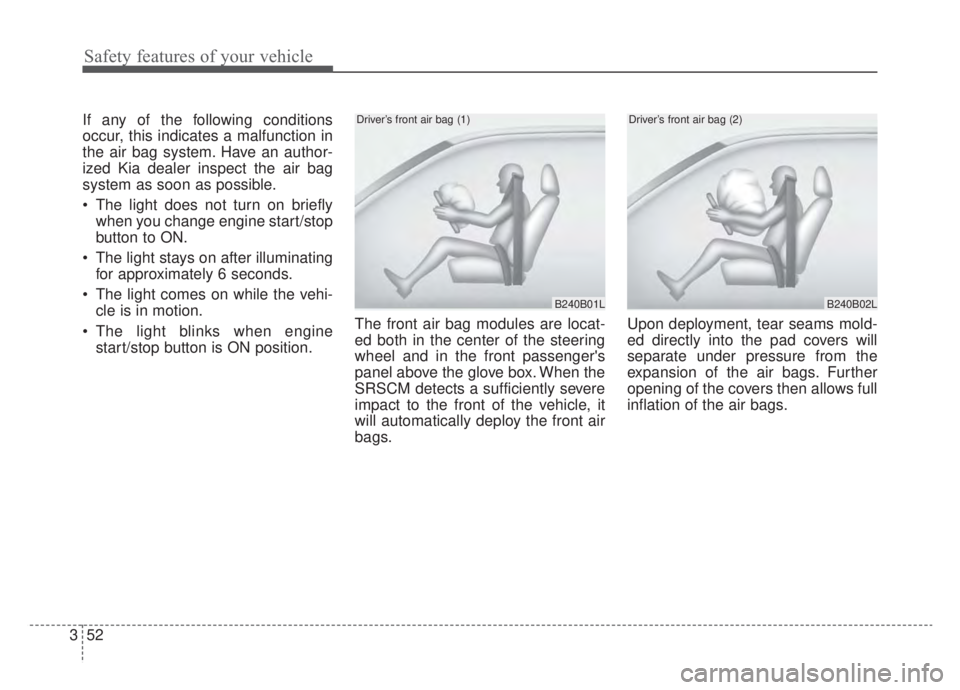
The light blinks when engine start/stop button is ON position. The front air bag modules are locat-
ed both in the center of the steering
wheel and in the front passenger's
panel above the glove box. When the
SRSCM detects a sufficiently severe
impact to the front of the vehicle, it
will automatically deploy the front air
bags. Upon deployment, tear seams mold-
ed directly into the pad covers will
separate under pressure from the
expansion of the air bags. Further
opening of the covers then allows full
inflation of the air bags.
B240B01L
Driver’s front air bag (1)
B240B02L
Driver’s front air bag (2)