check oil KIA NIRO PHEV 2022 User Guide
[x] Cancel search | Manufacturer: KIA, Model Year: 2022, Model line: NIRO PHEV, Model: KIA NIRO PHEV 2022Pages: 710, PDF Size: 10.35 MB
Page 579 of 710

Maintenance
16
7
Vacuum crankcase ventilation
hoses
Inspect the surface of hoses for evi-
dence of heat and/or mechanical
damage. Hard and brittle rubber,
cracking, tears, cuts, abrasions, and
excessive swelling indicate deterio-
ration. Particular attention should be
paid to examine those hose surfaces
nearest to high heat sources, such
as the exhaust manifold.
Inspect the hose routing to assure
that the hoses do not come in con-
tact with any heat source, sharp
edges or moving component which
might cause heat damage or
mechanical wear. Inspect all hose
connections, such as clamps and
couplings, to make sure they are
secure, and that no leaks are pres-
ent. Hoses should be replaced
immediately if there is any evidence
of deterioration or damage.
Air cleaner filter
A Genuine Kia air cleaner filter is
recommended when the filter is
replaced.
Spark plugs
Make sure to install new spark plugs
of the correct heat range.
When assembling parts, be sure to
wipe the inside and outside of the
boot bottom of the ignition coil and
the insulator of the spark plug with a
soft cloth to prevent contamination of
the spark plug insulator.
Cooling system
Check the cooling system compo-
nents, such as the radiator, coolant
reservoir, hoses and connections for
leakage and damage. Replace any
damaged parts.
Coolant (Engine / Inverter)
The coolant should be changed at
the intervals specified in the mainte-
nance schedule.
Dual clutch transmission Fluid
Inspect the dual clutch transmission
fluid according to the maintenance
schedule.
Brake hoses and lines
Visually check for proper installation,
chafing, cracks, deterioration and
any leakage. Replace any deteriorat-
ed or damaged parts immediately.
Page 581 of 710
Maintenance
18
7
Exhaust pipe and muffler
Visually inspect the exhaust pipes,
muffler and hangers for cracks, dete-
rioration, or damage. Start the
engine and listen carefully for any
exhaust gas leakage. Tighten con-
nections or replace parts as neces-
sary.
Suspension mounting bolts
Check the suspension connections
for looseness or damage. Retighten
to the specified torque.
Steering gear box, linkage &
boots/lower arm ball joint
With the vehicle stopped and engine
off, check for excessive free-play in
the steering wheel.
Check the linkage for bends or dam-
age. Check the dust boots and ball
joints for deterioration, cracks, or
damage. Replace any damaged
parts.
Drive shafts and boots
Check the drive shafts, boots and
clamps for cracks, deterioration, or
damage. Replace any damaged
parts and, if necessary, repack the
grease.
Air conditioning refrigerant
Check the air conditioning lines and
connections for leakage and dam-
age. When checking engine oil, engine
coolant, brake fluid, and washer fluid,
always be sure to clean the area
around any filler plug, drain plug, or
dipstick before checking or draining
any lubricant or fluid. This is espe-
cially important in dusty or sandy
areas and when the vehicle is used
on unpaved roads. Cleaning the plug
and dipstick areas will prevent dirt
and grit from entering the engine and
other mechanisms that could be
damaged.
CHECKING FLUID LEVELS
Page 582 of 710

719
Maintenance
ENGINE OIL
Checking the engine oil level
Engine oil is used for lubricating,
cooling, and operating various
hydraulic components in the engine.
Engine oil consumption while driving
is normal, and it is necessary to
check and refill the engine oil regu-
larly. Also, check and refill the oil
level within the recommended main-
tenance schedule to prevent deterio-
ration of oil performance.
Check the engine oil following the
below procedure.1. Be sure the vehicle is on level
ground.
2. Start the engine and allow it to reach normal operating tempera-
ture. 3. Turn the engine off, remove the oil
filler cap and pull the dipstick out.
Wait for 15 minutes for the oil to
return to the oil pan.
4. Wipe the dipstick clean and rein- sert it fully.
5. Pull the dipstick out again and check the level. Check if the oil
level is between the F-L line, and if
it is below the L line, add enough
oil to bring the level to F line.
CAUTION
When you wipe the oil levelgauge, you should wipe it with aclean cloth.
When mixed with debris, it cancause engine damage.
WARNING- Radiator hose
Be very careful not to touch the
radiator hose when checking or
adding engine oil as it may be
hot enough to burn you.
ODE076002
■(Gasoline) 1.6 GDi
Page 583 of 710

Maintenance
20
7
Use a funnel to help prevent oil
from being spilled on engine com-
ponents.
Use only the specified engine oil.
(Refer to “Recommended lubricantsand capacities” in chapter 8.)
Do not spill engine oil when adding or changing engine oil. Wipe off
spilled oil immediately.
The engine oil consumption may increase while you break in a new
vehicle and it will be stabilized after
driving 4,000 miles (6,000 km).
The engine oil consumption can be affected by driving habits, climate
conditions, traffic conditions, oil
quality, etc. Therefore, it is recom-
mended that you inspect the
engine oil level regularly and refill it
if necessary.Changing the engine oil and
filter
Have engine oil and filter changed by
an authorized Kia dealer according
to the Maintenance Schedule at the
beginning of this chapter.
If the maintenance schedule toreplace engine oil is exceeded, the
engine oil performance may deterio-
rate, and the engine condition may
be affected. Therefore, replace the
engine oil according to the mainte-
nance schedule.
To keep the engine in optimal condi- tion, use the recommended engine
oil and filter. If the recommended
engine oil and filter are not used
replace it according to the mainte-
nance schedule under severe usage
conditions.
The purpose of the maintenance schedule for engine oil replace-
ment is to prevent oil deterioration
and it is irrelevant to oil consump-
tion. Check and refill engine oil reg-
ularly.
ODEP071003
■(Gasoline) 1.6 GDi
Page 590 of 710

727
Maintenance
BRAKE FLUID
Checking the brake fluid level
Check the fluid level in the reservoir
periodically. The fluid level should be
between MAX (Maximum) and MIN
(Minimum) marks on the side of the
reservoir.
Before removing the reservoir cap
and adding brake fluid, clean the
area around the reservoir cap thor-
oughly to prevent brake fluid contam-
ination.Periodically check that the fluid level
in the brake fluid reservoir is
between MIN and MAX. The level will
fall with accumulated mileage. This is
a normal condition associated with
the wear of brake linings. If the fluid
level is excessively low, have the
brake system checked by an author-
ized Kia dealer.
Use only the specified brake fluid.
(Refer to “Recommended lubricantsand capacities” in chapter 8.)
Never mix different types of fluid.
In the event the brake system
requires frequent additions of fluid,
the vehicle should be inspected by
an authorized Kia dealer.
When changing and adding brake
fluid, handle it carefully. Do not let it
come in contact with your eyes. If
brake fluid should come in contact
with your eyes, immediately flush
them with a large quantity of fresh
tap water. Have your eyes examined
by a doctor as soon as possible.
Brake fluid, which has been exposed
to open air for an extended time
should never be used as its quality
cannot be guaranteed. It should be
disposed of properly.
CAUTION - Brake fluid
Do not allow brake fluid to con-tact the vehicle's body paint, aspaint damage will result.
CAUTION - Proper fluid
Only use brake fluid in brakesystem. Small amounts ofimproper fluids (such as engineoil) can cause damage to thebrake system.
ODEP079008
Page 592 of 710

729
Maintenance
ENGINE CLUTCH ACTUATOR FLUID
Checking the engine clutch
actuator fluid level
In normal driving conditions, the
actuator fluid level does not go down
rapidly. However, oil consumption
rate may rise as vehicle mileage
increases, and leakage in actuator
related parts may result in increased
consumption of the engine clutch
actuator oil. Regularly check and
make sure the engine clutch actuator
oil fluid level is between [MIN] and
[MAX] marks.
If the oil level is below [MIN] mark,
we recommend that your vehicle be
checked by an authorized Kia dealer.If the fluid level is excessively low, we
recommend that the system be
checked by an authorized Kia dealer.
Use only the specified engine clutch
actuator fluid.
(Refer to “Recommended lubricants
or capacities” in chapter 8.)
Never mix different types of fluid.
✽ ✽
NOTICE - Loss of engine
clutch actuator fluid
In the event the engine clutch actua-
tor requires frequent additions of
fluid, we recommend that the system
be inspected by an authorized Kia
dealer.
WARNING- Engine clutch actuator fluid
When changing and adding
engine clutch actuator fluid,
handle it carefully. Do not let it
come in contact with your eyes.
If engine clutch actuator fluid
should come in contact with
your eyes, immediately flush
them with a large quantity of
fresh water, and seek medical
attention as soon as possible.
ODE076057
Page 605 of 710

Maintenance
42
7
When recharging the battery,
observe the following precautions:
The battery must be removed from
the vehicle and placed in an area
with good ventilation.
Do not allow cigarettes, sparks, or flame near the battery.
Watch the battery during charging, and stop or reduce the charging
rate if the battery cells begin
gassing (boiling) violently or if the
temperature of the electrolyte of
any cell exceeds 120°F (49°C).
Wear eye protection when check- ing the battery during charging.
Disconnect the battery charger in the following order.
1. Turn off the battery charger main switch.
2. Unhook the negative clamp from the negative battery terminal.
3. Unhook the positive clamp from the positive battery terminal. Before performing maintenance or
recharging the battery, turn off all
accessories and stop the engine.
The negative battery cable must be removed first and installed last
when the battery is disconnected.Reset items
The following items should be reset
after the battery has been dis-
charged or the battery has been dis-
connected.
Auto up/down window
Sunroof
Trip computer
Climate control system
Driver position memory system
Audio
Page 622 of 710
759
Maintenance
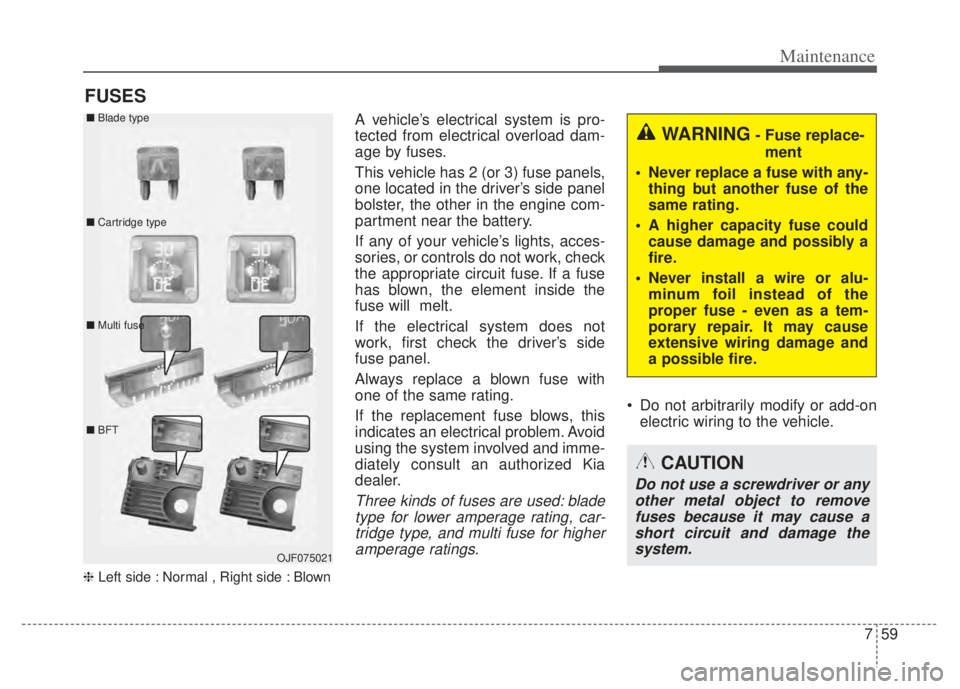
FUSES
❈Left side : Normal , Right side : Blown
A vehicle’s electrical system is pro-
tected from electrical overload dam-
age by fuses.
This vehicle has 2 (or 3) fuse panels,
one located in the driver’s side panel
bolster, the other in the engine com-
partment near the battery.
If any of your vehicle’s lights, acces-
sories, or controls do not work, check
the appropriate circuit fuse. If a fuse
has blown, the element inside the
fuse will melt.
If the electrical system does not
work, first check the driver’s side
fuse panel.
Always replace a blown fuse with
one of the same rating.
If the replacement fuse blows, this
indicates an electrical problem. Avoid
using the system involved and imme-
diately consult an authorized Kia
dealer.
Three kinds of fuses are used: blade
type for lower amperage rating, car-tridge type, and multi fuse for higheramperage ratings.
Do not arbitrarily modify or add-on electric wiring to the vehicle.
WARNING- Fuse replace-
ment
Never replace a fuse with any- thing but another fuse of the
same rating.
A higher capacity fuse could cause damage and possibly a
fire.
Never install a wire or alu- minum foil instead of the
proper fuse - even as a tem-
porary repair. It may cause
extensive wiring damage and
a possible fire.
CAUTION
Do not use a screwdriver or anyother metal object to removefuses because it may cause ashort circuit and damage thesystem.
OJF075021
■
Blade type
■ Cartridge type
■ Multi fuse
■ BFT
Page 674 of 710

7111
Maintenance
When cleaning lower door panels,rocker panels and frame members,
be sure that drain holes are kept
open so that moisture can escape
and not be trapped inside to accel-
erate corrosion.
Keep your garage dry
Don't park your vehicle in a damp,
poorly ventilated garage. This cre-
ates a favorable environment for cor-
rosion. This is particularly true if you
wash your vehicle in the garage or
drive it into the garage when it is still
wet or covered with snow, ice or
mud. Even a heated garage can con-
tribute to corrosion unless it is well
ventilated so moisture is dispersed. Keep paint and trim in good con-
dition
Scratches or chips in the finish
should be covered with "touch-up"
paint as soon as possible to reduce
the possibility of corrosion. If bare
metal is showing through, the atten-
tion of a qualified body and paint
shop is recommended.
Bird droppings : Bird droppings are
highly corrosive and may damage
painted surfaces in just a few hours.
Always remove bird droppings as
soon as possible.
Don't neglect the interior
Moisture can collect under the floor
mats and carpeting and cause corro-
sion. Check under the mats periodi-
cally to be sure the carpeting is dry.
Use particular care if you carry fertil-
izers, cleaning materials or chemi-
cals in the vehicle.
These should be carried only in prop-
er containers and any spills or leaks
should be cleaned up, flushed with
clean water and thoroughly dried.Interior care
Interior general precautions
Prevent chemicals such as perfume,
cosmetic oil, sun cream, hand clean-
er, and air freshener from contacting
the interior parts because they may
cause damage or discoloration. If
they do contact the interior parts,
wipe them off immediately. If neces-
sary, use a vinyl cleaner, see product
instructions for correct usage.
Page 702 of 710

Index
4I
Leading Vehicle Departure Alert . . . . . . . . . . . . . . 5-112
Leading Vehicle Departure Alert function . . . . . . . 5-107
Dual Clutch Transmission (DCT). . . . . . . . . . . . . . . . . 5-16 Dual clutch transmission operation . . . . . . . . . . . . . 5-16
Good driving practices . . . . . . . . . . . . . . . . . . . . . . . 5-26
Economical operation . . . . . . . . . . . . . . . . . . . . . . . . . 5-181
Electrical Equipment (U.S. only) . . . . . . . . . . . . . . . . . 8-16 Installation of a mobile two-way radio system . . . . 8-16
Emergency starting . . . . . . . . . . . . . . . . . . . . . . . . . . . . . 6-5 Before Jump Starting (For Hybrid) . . . . . . . . . . . . . . 6-5
Jump starting . . . . . . . . . . . . . . . . . . . . . . . . . . . . . . . 6-8
Method to disconnect the (-) cable for regularmaintenance (For Hybrid) . . . . . . . . . . . . . . . . . . . . 6-7
Push-starting . . . . . . . . . . . . . . . . . . . . . . . . . . . . . . . 6-10
Emission control system . . . . . . . . . . . . . . . . . . . . . . . 7-115 Crankcase emission control system . . . . . . . . . . . . 7-115
Evaporative emission control (including ORVR:Onboard Refueling Vapor Recovery) system. . . . 7-115
Exhaust emission control system . . . . . . . . . . . . . . 7-116
Engine . . . . . . . . . . . . . . . . . . . . . . . . . . . . . . . . . . . . \
. . 8-2
Engine clutch actuator fluid . . . . . . . . . . . . . . . . . . . . . 7-29 Checking the engine clutch actuator fluid level. . . . 7-29
Engine compartment . . . . . . . . . . . . . . . . . . . . . . . . 2-6, 7-4
Engine number . . . . . . . . . . . . . . . . . . . . . . . . . . . . . . . 8-11 Engine oil . . . . . . . . . . . . . . . . . . . . . . . . . . . . . . . . . . . 7-\
19
Changing the engine oil and filter . . . . . . . . . . . . . . 7-20
Checking the engine oil level . . . . . . . . . . . . . . . . . . 7-19
ENGINE START/STOP button . . . . . . . . . . . . . . . . . . 5-11 ENGINE START/STOP button position . . . . . . . . . 5-11
Illuminated ENGINE START/STOP button . . . . . . 5-11
Starting the hybrid system . . . . . . . . . . . . . . . . . . . . 5-13
Explanation of scheduled maintenance items . . . . . . . 7-15
Exterior features . . . . . . . . . . . . . . . . . . . . . . . . . . . . . 4-176 Roof rack . . . . . . . . . . . . . . . . . . . . . . . . . . . . . . . . 4-176
Exterior overview . . . . . . . . . . . . . . . . . . . . . . . . . . . . . . 2-2
Folding key . . . . . . . . . . . . . . . . . . . . . . . . . . . . . . . . . . . 4-\
4 Battery replacement . . . . . . . . . . . . . . . . . . . . . . . . . . 4-7
Immobilizer system . . . . . . . . . . . . . . . . . . . . . . . . . . 4-8
Key operations . . . . . . . . . . . . . . . . . . . . . . . . . . . . . . 4-4
Record your key number . . . . . . . . . . . . . . . . . . . . . . 4-4
Transmitter precautions . . . . . . . . . . . . . . . . . . . . . . . 4-6
Forward Collision-Avoidance Assist (FCA) (Front view camera only) . . . . . . . . . . . . . . . . . . . . 5-54
Brake operation . . . . . . . . . . . . . . . . . . . . . . . . . . . . 5-58
Detecting sensor (Front view camera) . . . . . . . . . . . 5-59
Forward Collision-Avoidance Assist malfunction . . 5-61
Forward Collision-Avoidance Assist setting and activation . . . . . . . . . . . . . . . . . . . . . . . . . . . . . . . . 5-54
E
F