door lock KIA NIRO PHEV 2022 Owner's Guide
[x] Cancel search | Manufacturer: KIA, Model Year: 2022, Model line: NIRO PHEV, Model: KIA NIRO PHEV 2022Pages: 710, PDF Size: 10.35 MB
Page 167 of 710

427
Features of your vehicle
You can activate or deactivate the
ROA from the User Settings mode in
the cluster LCD display.
The option can be found under the
following menu:
1. Press the MODE button ( ) sev-eral times on the steering
wheel until 'User Settings' menu
appears on the LCD.
2. Select 'Convenience Rear
Occupant Alert‘ with the MOVE
switch ( / ) and the OK button
on the steering wheel.
WARNING
The Rear Occupant Alert (ROA)
system does not actually detect
objects or people in the rear
seat. By using a rear door
opened and closed history, the
system informs the driver that
there may be something in the
rear seat.
WARNING
The door lock system may not
work if the electrical system is
compromised. Accordingly,
please train children passen-
gers regarding how to open the
car door manually before an
emergency situation arises. That
way, they would be able to open
the door manually in the event
an emergency situation arises.
CAUTION
The Rear Occupant Alert (ROA) system uses a rear door openedand closed history.
The history is reset after thedriver turns off ignition normal-ly, exits the vehicle and locksthe door remotely using theremote keyless entry. So even ifa rear door does not reopen, theROA system alert can occur.
For example, after the ROA sys-tem alert occurs, if the driverdoes not lock the door, anddrives again, the alert can occur.
Page 168 of 710

Features of your vehicle
28
4
Opening the liftgate
The liftgate is locked or unlocked
when all doors are locked or
unlocked with the transmitter (or
smart key) or central door lock
switch.
If unlocked, the liftgate can be opened by pressing the handle
switch and then pulling the handle
up.
Only the liftgate is unlocked if the liftgate unlock button on the trans-
mitter or smart key is pressed for
approximately 1 second.
Once the liftgate is opened and then closed, the liftgate locks auto-
matically.
✽ ✽ NOTICE
In cold and wet climates, door lock
and door mechanisms may not work
properly due to freezing conditions.
Closing the liftgate
To close the liftgate, lower and push
down the liftgate firmly. Make sure
that the liftgate is securely latched.
Make sure your hands, feet and other
parts of your body are safely out of
the way before closing the liftgate.
LIFTGATE
ODEP041007LODEP041008L
CAUTION - Liftgate lift
Make certain that you close the
liftgate before driving your vehi-cle. Possible damage may occurto the liftgate gas lifters andattached hardware if the liftgateis not closed prior to driving.
WARNING
The liftgate swings upward.
Make sure no objects or people
are near the rear of the vehicle
when opening the liftgate.
Page 171 of 710
431
Features of your vehicle
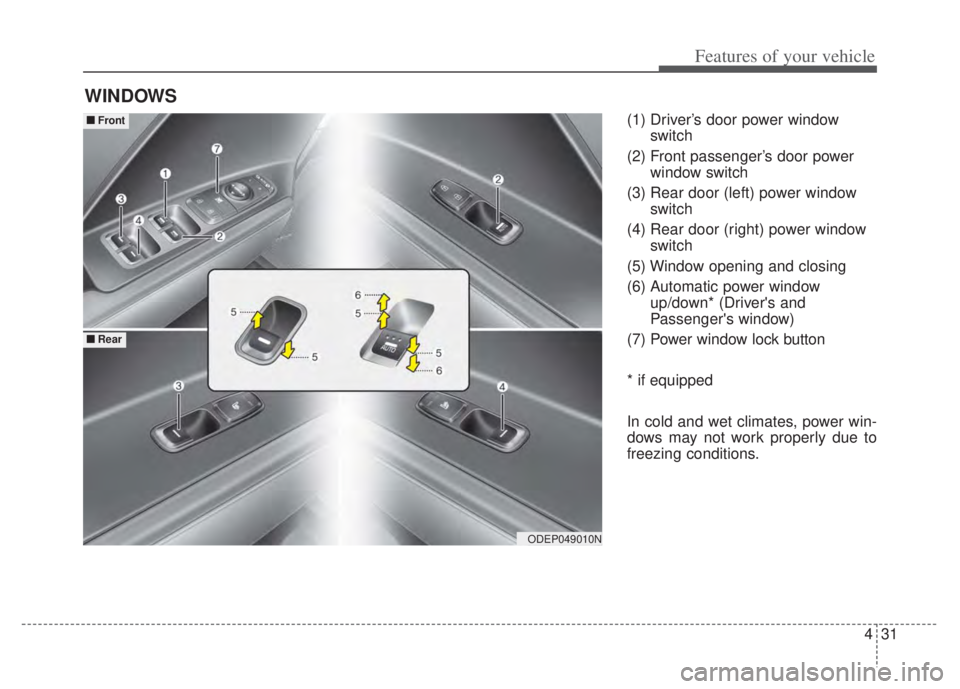
(1) Driver’s door power windowswitch
(2) Front passenger’s door power window switch
(3) Rear door (left) power window switch
(4) Rear door (right) power window switch
(5) Window opening and closing
(6) Automatic power window up/down* (Driver's and
Passenger's window)
(7) Power window lock button
* if equipped
In cold and wet climates, power win-
dows may not work properly due to
freezing conditions.
WINDOWS
ODEP049010N
■ ■ Front
■ ■Rear
Page 172 of 710
Features of your vehicle
32
4
Power windows
The ignition switch or ENGINE
START/STOP button must be in the
ON position for power windows to
operate.
Each door has a power window
switch that controls the door's win-
dow. The driver has a power window
lock button which can block the oper-
ation of rear passenger windows.
The power windows can be operated
for approximately 30 seconds after
the engine is turned off.
However, if the front doors are
opened, the power windows cannot
be operated even within the 30 sec-
ond period.
The driver’s door has a master power
window switch that controls all the
windows in the vehicle.
If the window cannot be closed
because it is blocked by objects,
remove the objects and close the
window.
✽ ✽
NOTICE
While driving with the rear windows
down or with the sunroof (if
equipped) in an open (or partially
open) position, your vehicle may
demonstrate a wind buffeting or
pulsation noise. This noise is a nor-
mal occurrence and can be reduced
or eliminated by taking the follow-
ing actions. If the noise occurs with
one or both of the rear windows
down, partially lower both front
windows approximately 1 inch (2.5
cm). If you experience the noise with
the sunroof open, slightly reduce the
size of the sunroof opening.
Window opening and closing
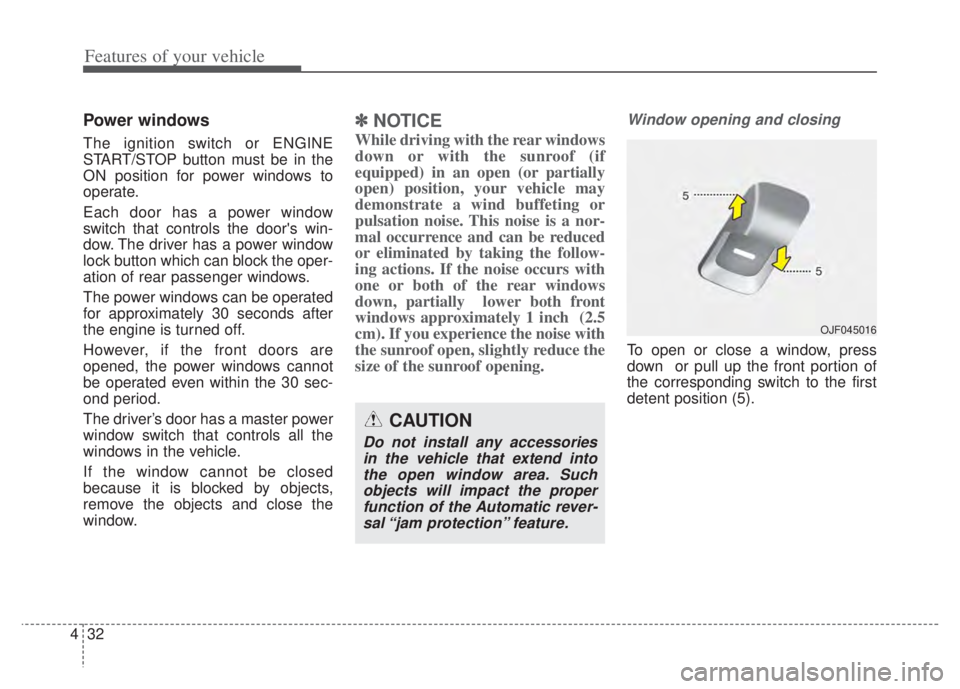
To open or close a window, press
down or pull up the front portion of
the corresponding switch to the first
detent position (5).
OJF045016
CAUTION
Do not install any accessories
in the vehicle that extend intothe open window area. Suchobjects will impact the properfunction of the Automatic rever-sal “jam protection” feature.
Page 174 of 710
Features of your vehicle
34
4
If the power window switch is pulled
up continuously again within 5 sec-
onds after the window is lowered by
the automatic window reversal fea-
ture, the automatic window reversal
will not operate.
The automatic reverse feature for the
driver’s window is only active when
the “auto up” feature is used by fully
pulling up the switch. The automatic
reverse feature will not operate if the
window is raised using the halfway
position on the power window switch.Power window lock button
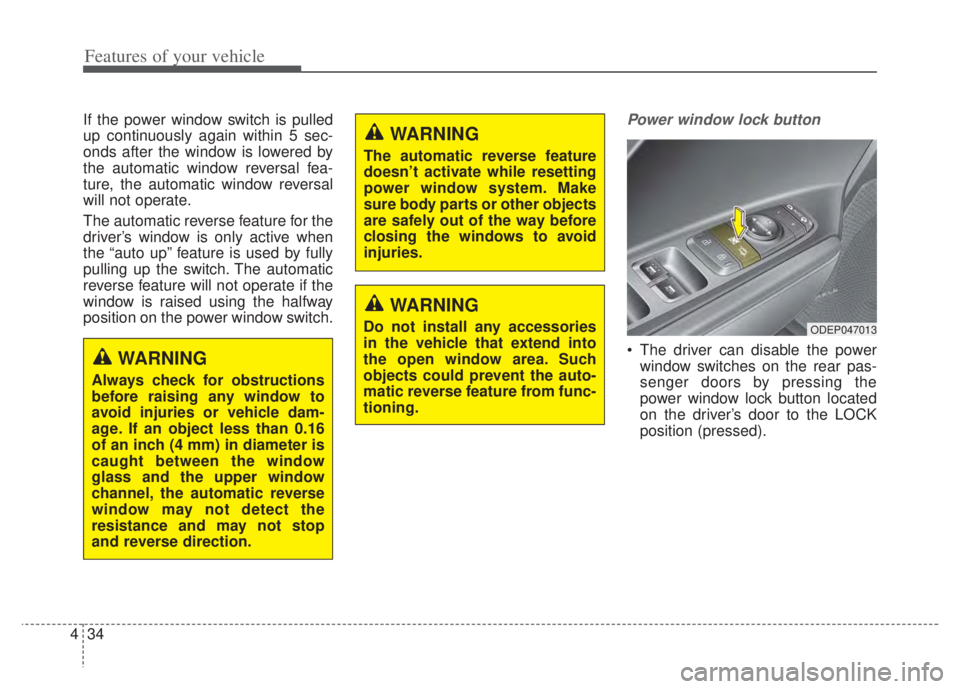
The driver can disable the power
window switches on the rear pas-
senger doors by pressing the
power window lock button located
on the driver’s door to the LOCK
position (pressed).
ODEP047013
WARNING
Always check for obstructions
before raising any window to
avoid injuries or vehicle dam-
age. If an object less than 0.16
of an inch (4 mm) in diameter is
caught between the window
glass and the upper window
channel, the automatic reverse
window may not detect the
resistance and may not stop
and reverse direction.
WARNING
The automatic reverse feature
doesn’t activate while resetting
power window system. Make
sure body parts or other objects
are safely out of the way before
closing the windows to avoid
injuries.
WARNING
Do not install any accessories
in the vehicle that extend into
the open window area. Such
objects could prevent the auto-
matic reverse feature from func-
tioning.
Page 175 of 710

435
Features of your vehicle
When the power window lock
button is pressed :
- The driver's master control can
operate all the power windows.
- The front passenger's control can operate the front passenger's
power window.
- The rear passenger's control can- not operate the rear passenger's
power window.
Always double check to make sure
all arms, hands, head and other
obstructions are safely out of the way
before closing a window. If the window cannot be closed
because it is blocked by objects,
remove the objects and close the
window.CAUTION- Opening /clos-
ing Window
To prevent possible damage tothe power window system, donot open or close two windowsor more at the same time. Thiswill also ensure the longevity ofthe fuse.
WARNING- Power win-
dows
Do not allow children to play with the power windows. Keep
the power window lock button
(on the driver's door) in the
LOCK (pressed) position.
Do not extend a face or arms outside through the window
opening while driving.
Page 178 of 710

Features of your vehicle
38
4
Opening the fuel filler door
The fuel filler door must be opened
from inside the vehicle by pressing
the fuel filler door opener button.
If the fuel filler door does not open
because ice has formed around it,
tap lightly or push on the lid to break
the ice and release the lid. Do not pry
on the lid. If necessary, spray around
the lid with an approved de-icer fluid
(do not use radiator anti-freeze) or
move the vehicle to a warm place
and allow the ice to melt. 1. Stop the engine.
2. To open the fuel filler door, push
the fuel filler door opener button.
3. Pull open the fuel filler door (1).
4. To remove the cap, turn the fuel filler cap (2) counterclockwise.
5. Refuel as needed.
FUEL FILLER DOOR (HYBRID)
ODEP041017L
ODEP049585L
WARNING
Before refueling, be sure to
check what type of fuel is used
for your vehicle.
If you put diesel fuel into a
gasoline-powered vehicle or
gasoline into a diesel-powered
vehicle, it may affect the fuel
system and cause serious dam-
age to the vehicle.
Page 179 of 710

439
Features of your vehicle
Closing the fuel filler door
1. To install the cap, turn it clockwiseuntil it “clicks” once. This indicates
that the cap is securely tightened.
2. Close the fuel filler door and push it in lightly making sure that it is
securely closed.
✽ ✽NOTICE
• There may be an intermittent
noise near the refueling hole while
the engine is idling if the fuel cap is
not closed securely. This occurs
normally with the OBD system.
• When refueling on unlevel ground, the fuel gauge may not
point to the F position.
It is not a malfunction. If you
move your vehicle to a level
ground, the fuel gauge will move
to the full position.
• Tighten the cap until it clicks once, otherwise the fuel cap open warn-
ing indicator light will illumi-
nate.
Page 180 of 710

Features of your vehicle
40
4
Opening the fuel filler door
The fuel filler door must be opened
from inside the vehicle by pushing
the fuel filler door button.
✽ ✽
NOTICE
If the fuel filler door does not open
because ice has formed around it,
tap lightly or push on the lid to break
the ice and release the lid. Do not pry
on the lid. If necessary, spray around
the lid with an approved de-icer fluid
(do not use radiator anti-freeze) or
move the vehicle to a warm place
and allow the ice to melt.
Wait until the fuel tank is depressur-
ized. The message is displayed when
the fuel filler door opens after the fuel
tank is depressurized.
✽ ✽NOTICE
• It may take up to 20 seconds to
open fuel filler door.
• When the fuel filler door is frozen and does not open after 20 seconds
at freezing temperature, slightly
tap the fuel filler door and then
attempt to open it.
1. Stop the engine.
2. To open the fuel filler door, push
the fuel filler door opener button.
3. Pull open the fuel filler door (1).
4. To remove the cap, turn the fuel filler cap (2) counterclockwise.
5. Refuel as needed.
FUEL FILLER DOOR (PLUG-IN HYBRID)
ODEP041523L
OJFHP048601L
OJFHP048602LODEP049585L
Page 181 of 710
441
Features of your vehicle
✽ ✽NOTICE
• Add fuel into the fuel tank within
20 minutes after opening the fuel
filler door. After 20 minutes, the
fuel tank may shut off, causing
fuel to overflow. In this case, re-
press the fuel filler door opening
button.
• Do not leave the fuel filler door opened for an extended period of
time. It may discharge the battery.
• Close the fuel filler door after fuel- ing the vehicle. If you start the
vehicle with the fuel filler door
opened, the message, “Check fuel
door”, illuminates on the LCD dis-
play.
Closing the fuel filler door
1. To install the cap, turn it clockwise
until it “clicks”. This indicates that
the cap is securely tightened.
2. Close the fuel filler door and push it lightly and make sure that it is
securely closed.
Always check that the fuel cap is
installed securely to prevent fuel
spillage in the event of an accident.
✽ ✽ NOTICE
• There may be an intermittent
noise near the refueling hole while
the engine is idling if the fuel cap is
not closed securely. This occurs
normally with the OBD system.
• When refueling on unlevel ground, the fuel gauge may not
point to the F position.
It is not a malfunction. If you
move your vehicle to a level
ground, the fuel gauge will move
to the full position.
• Tighten the cap until it clicks once, otherwise the fuel cap open warn-
ing indicator light will illumi-
nate.
WARNING - For Plug-in
Hybrid
Avoid refueling the vehicle
while charging the (high-volt-
age) hybrid battery. It may
cause a fire or an explosion due
to static electricity.
WARNING
Before refueling, be sure to
check what type of fuel is used
for your vehicle.
If you put diesel fuel into a
gasoline-powered vehicle or
gasoline into a diesel-powered
vehicle, it may affect the fuel
system and cause serious dam-
age to the vehicle.