light KIA NIRO PHEV 2022 Workshop Manual
[x] Cancel search | Manufacturer: KIA, Model Year: 2022, Model line: NIRO PHEV, Model: KIA NIRO PHEV 2022Pages: 710, PDF Size: 10.35 MB
Page 194 of 710
Features of your vehicle
54
4
Day/night rearview mirror with
Telematics function (if equipped)
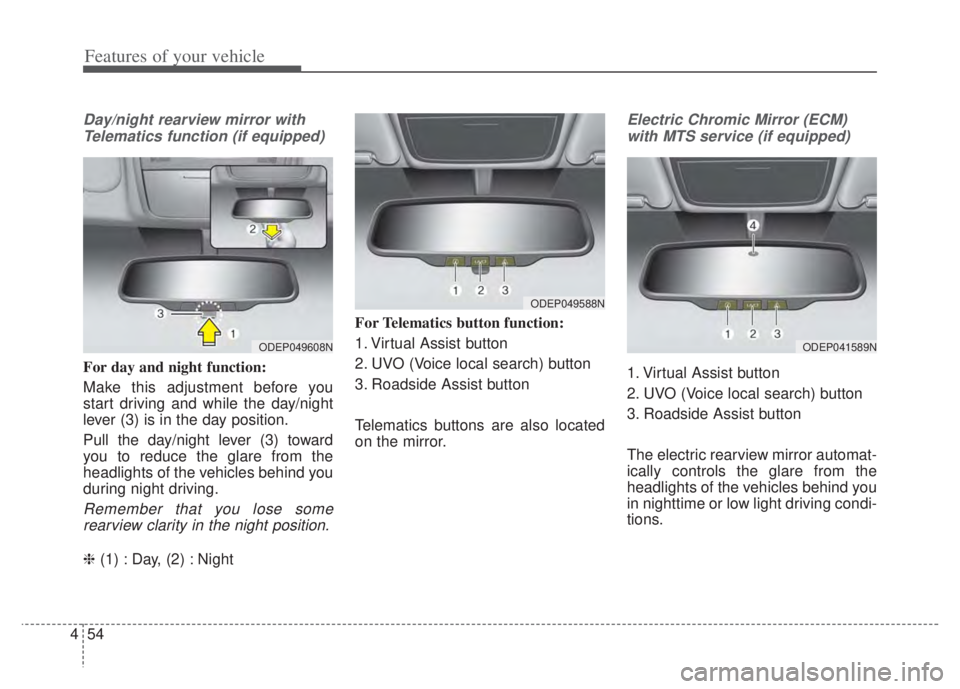
For day and night function:
Make this adjustment before you
start driving and while the day/night
lever (3) is in the day position.
Pull the day/night lever (3) toward
you to reduce the glare from the
headlights of the vehicles behind you
during night driving.
Remember that you lose somerearview clarity in the night position.
❈ (1) : Day, (2) : Night For Telematics button function:
1. Virtual Assist button
2. UVO (Voice local search) button
3. Roadside Assist button
Telematics buttons are also located
on the mirror.
Electric Chromic Mirror (ECM)
with MTS service (if equipped)
1. Virtual Assist button
2. UVO (Voice local search) button
3. Roadside Assist button
The electric rearview mirror automat-
ically controls the glare from the
headlights of the vehicles behind you
in nighttime or low light driving condi-
tions.
ODEP049608N
ODEP049588N
ODEP041589N
Page 195 of 710
455
Features of your vehicle
The sensor (4) mounted in the mirror
senses the light level around the
vehicle, and automatically controls
the headlight glare from the vehicles
behind you.
When the engine is running, the
glare is automatically controlled by
the sensor mounted in the rearview
mirror.
Telematics buttons are also located
on the mirror.Electric chromic mirror (ECM)with HomeLink®system
Your vehicle may be equipped with a
Gentex Automatic-Dimming Mirror
and an Integrated HomeLink
®
Wireless Control System.
During nighttime driving, this feature
will automatically detect and reduce
rearview mirror glare while the com-
pass indicates the direction the vehi-
cle is pointed. The HomeLink
®
Universal Transceiver allows you to
activate your garage door(s), electric
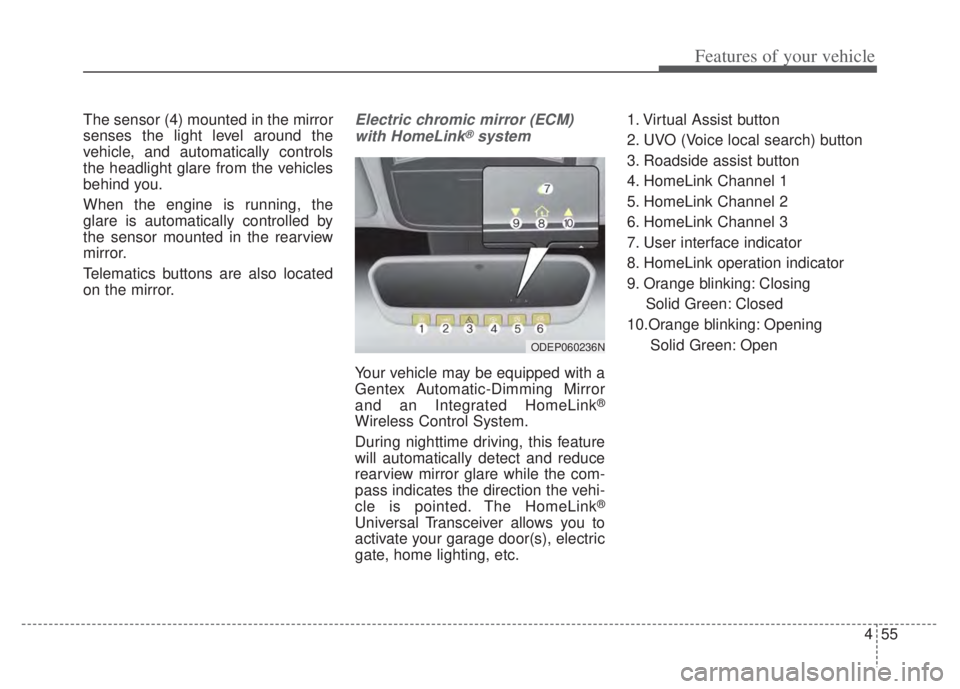
gate, home lighting, etc. 1. Virtual Assist button
2. UVO (Voice local search) button
3. Roadside assist button
4. HomeLink Channel 1
5. HomeLink Channel 2
6. HomeLink Channel 3
7. User interface indicator
8. HomeLink operation indicator
9. Orange blinking: Closing
Solid Green: Closed
10.Orange blinking: Opening Solid Green: Open
ODEP060236N
Page 196 of 710
Features of your vehicle
56
4
Automatic-Dimming Night Vision
Safety™ (NVS®) Mirror
The NVS
®Mirror in your vehicle is
designed to reduce annoying glare in
the rearview mirror during any driv-
ing situation. For more information
regarding NVS
®mirrors and other
applications, please refer to the
Gentex website:
www.gentex.com
❈ Night Vision Safety™ is a registered
trademark of Gentex Corporation. Automatic-dimming function
Your mirror will automatically dim
upon detecting glare from the vehi-
cles traveling behind you.✽ ✽
NOTICE
The mirror defaults to the ON posi-
tion each time the vehicle is started.
Integrated HomeLink®Wireless
Control System
The HomeLink
®Wireless Control
System provides a convenient way to
replace up to three hand-held radio-
frequency (RF) transmitters with a
single built-in device. This innovative
feature will learn the radio frequency
codes of most current transmitters to
operate devices such as gate opera-
tors, garage door openers, entry
door locks, security systems, even
home lighting. Both standard and
rolling code-equipped transmitters
can be programmed by following the
outlined procedures. Additional
HomeLink
®information can be found
at: www.homelink.com or by calling
1-800-355-3515.
❈ HomeLink
®is a registered trade-
mark of Gentex Corporation.
CAUTION
The NVS®Mirror automatically
reduces glare during driving conditions based upon light lev-els monitored in front of thevehicle and from the rear of thevehicle. These light sensors arevisible through openings in thefront and rear of the mirror case.Any object that obstructs eitherlight sensor will degrade theautomatic dimming control fea-ture.
Page 199 of 710
459
Features of your vehicle
Gate operator & Canadian pro-
gramming
During programming, your handheld-
transmitter may automatically stop
transmitting. Continue to press the
Integrated HomeLink
®Wireless
Control System button while you
press and re-press (“cycle”) your
handheld transmitter every two sec-
onds until the frequency signal has
been learned. The indicator light will
flash slowly and then rapidly after
several seconds upon successful
training. Operating HomeLink
®
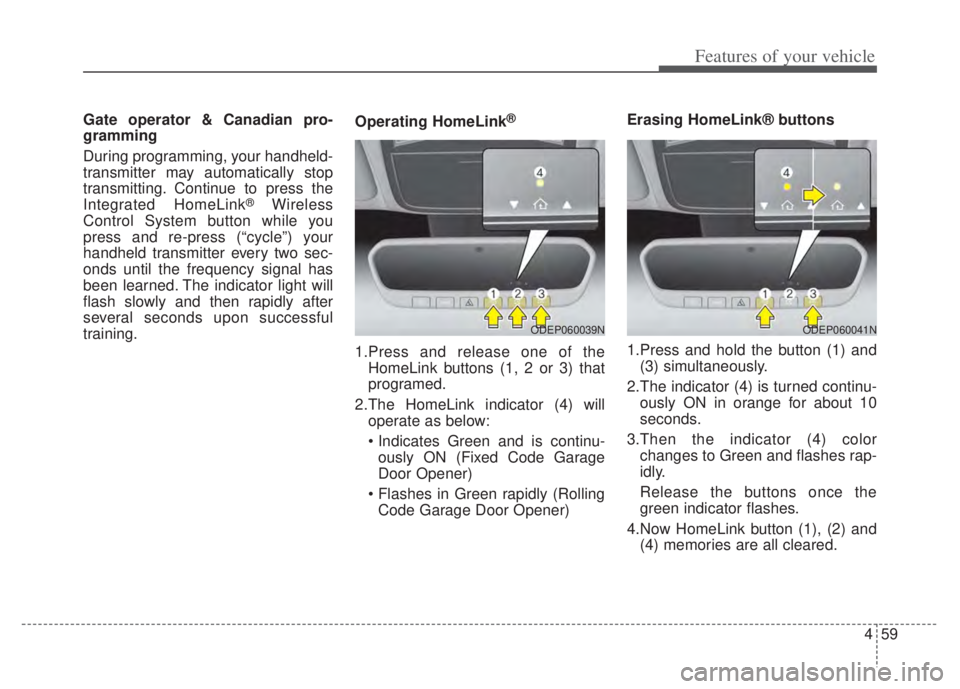
1.Press and release one of the
HomeLink buttons (1, 2 or 3) that
programed.
2.The HomeLink indicator (4) will operate as below:
ously ON (Fixed Code Garage
Door Opener)
Code Garage Door Opener) Erasing HomeLink® buttons
1.Press and hold the button (1) and
(3) simultaneously.
2.The indicator (4) is turned continu- ously ON in orange for about 10
seconds.
3.Then the indicator (4) color changes to Green and flashes rap-
idly.
Release the buttons once the
green indicator flashes.
4.Now HomeLink button (1), (2) and (4) memories are all cleared.
ODEP060039NODEP060041N
Page 207 of 710

467
Features of your vehicle
INSTRUMENT CLUSTER
1. Hybrid system gauge
2. Fuel gauge
3. Speedometer
4. Warning and indicator lights
5. LCD display
6. Battery SOC (State of Charge) gauge
7. Distance To Empty
ODEP049100N/ODEP049538N
■ ■Type A for Hybrid
❈For more details, refer to the “Gauges” in
this chapter.
■ ■
Type B for Hybrid
❈ The actual cluster and contents of the LCD display in the vehicle may differ from the illustration.
Page 208 of 710

Features of your vehicle
68
4
1. Hybrid system gauge
2. Fuel gauge
3. Speedometer
4. Warning and indicator lights
5. LCD display
6. Battery SOC (State of Charge) gauge
7. Distance To Empty
ODEP049182N/ODEP049183N
■ ■
Type A for Plug-in Hybrid
❈For more details, refer to the “Gauges” in
this chapter.
■ ■
Type B for Plug-in Hybrid
❈ The actual cluster and contents of the LCD display in the vehicle may differ from the illustration.
Page 209 of 710

469
Features of your vehicle
Instrument Cluster Control
Adjusting Instrument ClusterIllumination
The brightness of the instrument
panel illumination is changed by
pressing the illumination control but-
ton (“+” or “-”) when the ignition
switch or ENGINE START/STOP but-
ton is ON, or the taillights are turned
on. If you hold the illumination control
button (“+” or “-”), the brightness
will be changed continuously.
If the brightness reaches to the maximum or minimum level, an
alarm will sound.
Gauges
Speedometer
The speedometer indicates the
speed of the vehicle and is calibrated
in miles per hour (mph) and/or kilo-
meters per hour (km/h).
ODEP041545N
ODEP049543L
ODEP049105N
ODEP049539N
■
Type A
■Type B
Page 213 of 710

473
Features of your vehicle
✽ ✽NOTICE
• The fuel tank capacity is given in
chapter 8.
• The fuel gauge is supplemented by a low fuel warning light which will
illuminate when the fuel tank is
nearly empty.
• On inclines or curves, the fuel gauge pointer may fluctuate or the
low fuel warning light may come
on earlier than usual due to the
movement of fuel in the tank.
✽ ✽ NOTICE - Fuel gauge
Running out of fuel can expose vehi-
cle occupants to danger. You must
obtain additional fuel as soon as pos-
sible after the warning light comes
on or when the gauge indicator
comes close to the “E (Empty)”
level.
✽ ✽NOTICE
Fuel display may not be accurate if
vehicle is being fueled while in an
incline.
Distance to empty
The distance to empty is the esti-
mated distance the vehicle can be
driven with the remaining fuel.
- Distance range : 1 ~ 9,999 mi. or
1 ~ 9,999 km
CAUTION- Low fuel
Avoid driving with an extremelylow fuel level. Running out offuel could cause the engine tomisfire, damaging the catalyticconverter.ODEP049142N
ODEP049561N
■ Type B
■ Type A
Page 218 of 710
Features of your vehicle
78
4
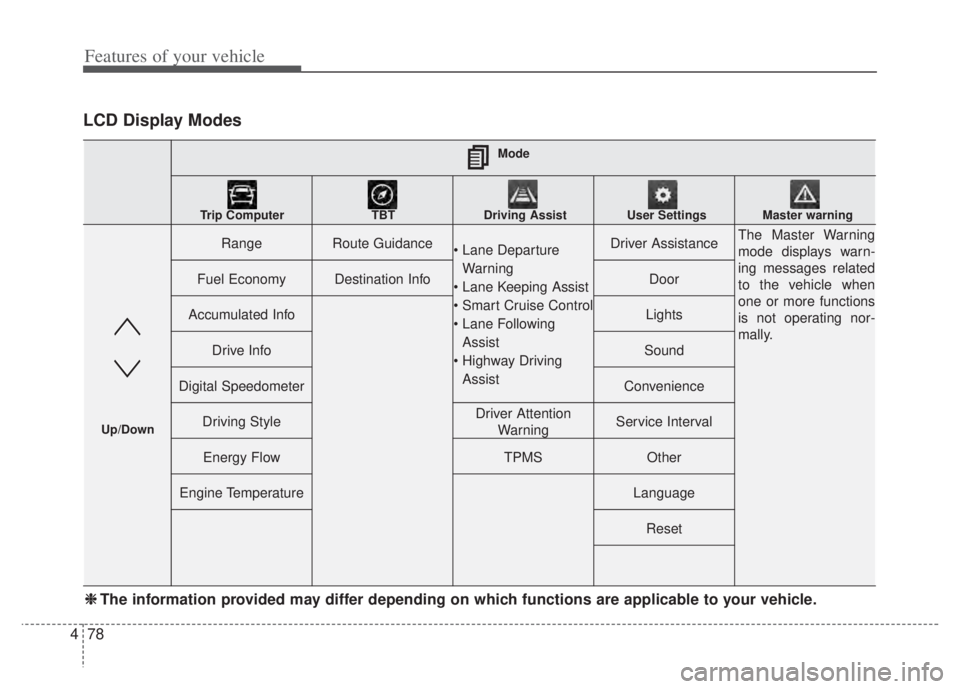
LCD Display Modes
RangeRoute Guidance
Warning
Assist
AssistDriver AssistanceThe Master Warning
mode displays warn-
ing messages related
to the vehicle when
one or more functions
is not operating nor-
mally.
Fuel EconomyDestination InfoDoor
Accumulated InfoLights
Drive InfoSound
Digital SpeedometerConvenience
Driving StyleDriver Attention WarningService Interval
Energy FlowTPMSOther
Engine TemperatureLanguage
Reset
Mode
Trip Computer TBT Driving Assist User Settings Master warning
Up/Down
❈ ❈ The information provided may differ depending on which functions are applicable to your vehicle.
Page 220 of 710
Features of your vehicle
80
4
Tire Pressure
❈ For more details, refer to “Tire
Pressure Monitoring System
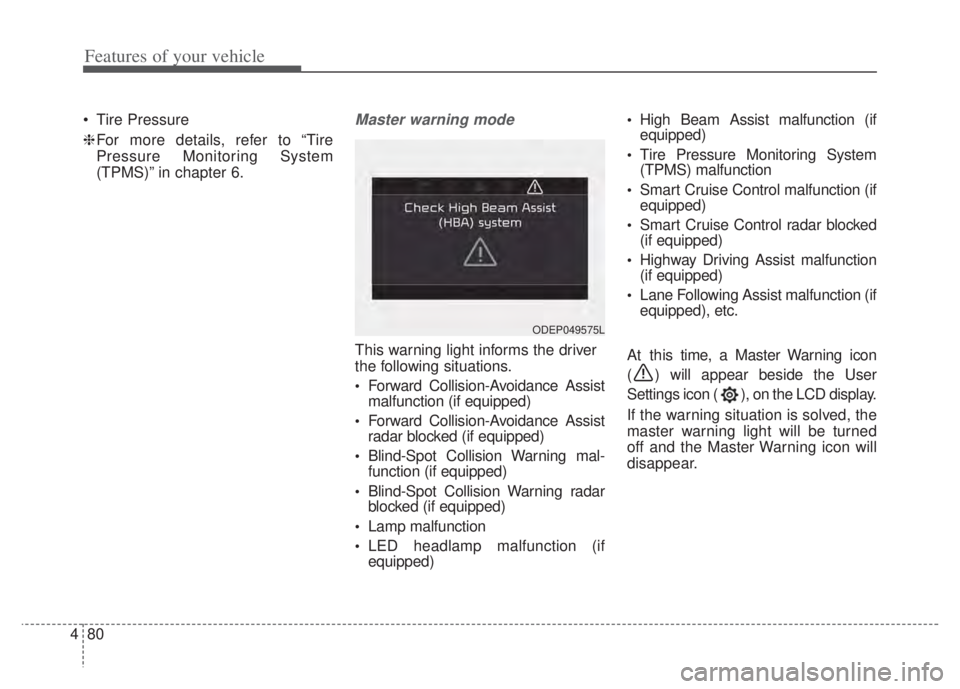
(TPMS)” in chapter 6.Master warning mode
This warning light informs the driver
the following situations.
Forward Collision-Avoidance Assist
malfunction (if equipped)
Forward Collision-Avoidance Assist
radar blocked (if equipped)
Blind-Spot Collision Warning mal-
function (if equipped)
Blind-Spot Collision Warning radar
blocked (if equipped)
Lamp malfunction
LED headlamp malfunction (if
equipped)
High Beam Assist malfunction (if
equipped)
Tire Pressure Monitoring System
(TPMS) malfunction
Smart Cruise Control malfunction (if
equipped)
Smart Cruise Control radar blocked
(if equipped)
Highway Driving Assist malfunction
(if equipped)
Lane Following Assist malfunction (if
equipped), etc.
At this time, a Master Warning icon
( ) will appear beside the User
Settings icon ( ), on the LCD display.
If the warning situation is solved, the
master warning light will be turned
off and the Master Warning icon will
disappear.
ODEP049575L