wheel KIA NIRO PLUG-IN HYBRID 2018 Manual PDF
[x] Cancel search | Manufacturer: KIA, Model Year: 2018, Model line: NIRO PLUG-IN HYBRID, Model: KIA NIRO PLUG-IN HYBRID 2018Pages: 616, PDF Size: 18.98 MB
Page 449 of 616
713
What to do in an emergency
Each tire, including the spare (if pro-
vided), should be checked monthly
when cold and inflated to the inflation
pressure recommended by the vehi-
cle manufacturer on the vehicle plac-
ard or tire inflation pressure label. (If
your vehicle has tires of a different
size than the size indicated on the
vehicle placard or tire inflation pres-
sure label, you should determine the
proper tire inflation pressure for
those tires.)
As an added safety feature, your
vehicle has been equipped with a tire
pressure monitoring system (TPMS)
that illuminates a low tire pressure
telltale when one or more of your
tires is significantly under-inflated.
Accordingly, when the low tire pres-
sure telltale illuminates, you should
stop and check your tires as soon as
possible, and inflate them to the
proper pressure. Driving on a signifi-
cantly under-inflated tire causes the
tire to overheat and can lead to tire
failure. Under-inflation also reduces
fuel efficiency and tire tread life, and
may affect the vehicle’s handling and
stopping ability.Please note that the TPMS is not a
substitute for proper tire maintenance,
and it is the driver’s responsibility to
maintain correct tire pressure, even if
under-inflation has not reached the
level to trigger illumination of the
TPMS low tire pressure telltale.
Your vehicle has also been equipped
with a TPMS malfunction indicator to
indicate when the system is not
operating properly. The TPMS mal-
function indicator is combined with
the low tire pressure telltale. When
the system detects a malfunction,
the telltale will flash for approximate-
ly one minute and then remain con-
tinuously illuminated. This sequence
will continue upon subsequent vehi-
cle start-ups as long as the malfunc-
tion exists. When the malfunction
indicator is illuminated, the system
may not be able to detect or signal
low tire pressure as intended. TPMS
malfunctions may occur for a variety
of reasons, including the installation
of replacement, alternate tires or
wheels on the vehicle that prevent
the TPMS from functioning properly.
Always check the TPMS malfunction
telltale after replacing one or more
tires or wheels on your vehicle to
ensure that the replacement or alter-
nate tires and wheels allow the TPMS
to continue to function properly.
Page 452 of 616
What to do in an emergency
16
7
Changing a tire with TPMS
If you have a flat tire, the Low Tire
Pressure telltale will come on. Have
the flat tire repaired by an authorized
Kia dealer as soon as possible or
replace the flat tire with the spare
tire.
Each wheel is equipped with a tire
pressure sensor mounted inside the
tire behind the valve stem. You must
use TPMS specific wheels. It is rec-
ommended that you always have
your tires serviced by an authorized
Kia dealer. Even if you replace the low pressure
tire with the spare tire, the Low Tire
Pressure telltale will remain on until
the low pressure tire is repaired and
placed on the vehicle.
After you replace the low pressure
tire with the spare tire, the TPMS
malfunction indicator may illuminate
after a few minutes because the
TPMS sensor mounted on the spare
wheel is not initiated.
Once the low pressure tire is inflated
again to the recommended pressure
and installed on the vehicle or the
TPMS sensor mounted on the
replaced spare wheel is initiated by
an authorized Kia dealer, the TPMS
malfunction indicator and the low tire
pressure telltale will turn off within a
few minutes of driving.
If the indicator has not disappeared
after a few minutes of driving, please
visit an authorized Kia dealer.
If an original mounted tire is replaced
with the spare tire, the TPMS sensor
on the replaced spare wheel should
be initiated and the TPMS sensor on
the original mounted wheel should be
deactivated. If the TPMS sensor on
the original mounted wheel located in
the spare tire carrier still activates,
the tire pressure monitoring system
may not operate properly. Have the
tire with TPMS serviced or replaced
by an authorized Kia dealer.
CAUTION- Repair
Agents
Never use a puncture-repairing
agent not approved by Kia torepair and/or inflate a low pres-sure tire. The sealant notapproved by Kia may damagethe tire pressure sensor.
Page 455 of 616
719
What to do in an emergency
With the Tire Mobility Kit you stay
mobile even after experiencing a tire
puncture.
The system of compressor and seal-
ing compound effectively and com-
fortably seals most punctures in a
passenger car tire caused by nails or
similar objects and reinflates the tire.
After you ensured that the tire is prop-
erly sealed you can drive cautiously
on the tire (up to 120 miles (200 km))
at a max. speed of 50 mph (80 km/h)
in order to reach a service station or
tire dealer to have the tire replace-
ment.
It is possible that some tires, espe-
cially with larger punctures or damage
to the sidewall, cannot be sealed
completely.
Air pressure loss in the tire may
adversely affect tire performance.
For this reason, you should avoid
abrupt steering or other driving
maneuvers, especially if the vehicle is
heavily loaded or if a trailer is in use.
The Tire Mobility Kit is not designed
or intended as a permanent tire
repair method and is to be used for
one tire only.This instruction shows you step by
step procedure to temporarily seal
the puncture.
Read the section “Notes on the safe
use of the Tire Mobility Kit”.Notes on the safe use of the
Tire Mobility Kit
Park your car at the side of the
road so that you can work with the
Tire Mobility Kit away from moving
traffic.
To be sure your vehicle will not move, even when you're on fairly
level ground, always set your park-
ing brake.
Only use the Tire Mobility Kit for sealing/inflation passenger car
tires. Only punctured areas located
within the tread region of the tire
can be sealed using the Tire
Mobility Kit.
Do not use on motorcycles, bicy- cles or any other type of tires.
When the tire and wheel are dam- aged, do not use Tire Mobility Kit
for your safety.
Page 456 of 616
What to do in an emergency
20
7
Use of the Tire Mobility Kit may not
be effective for tire damage larger
than approximately 0.24 in (6 mm).
Please contact the nearest Kia
dealership if the tire cannot be
made roadworthy with the Tire
Mobility Kit.
Do not use the Tire Mobility Kit if a tire is severely damaged by driving
run flat or with insufficient air pres-
sure.
Do not remove any foreign objects such as nails or screws that have
penetrated the tire.
Provided the car is outdoors, leave the engine running. Otherwise
operating the compressor may
eventually drain the car battery.
Never leave the Tire Mobility Kit unattended while it is being used.
Do not leave the compressor run- ning for more than 10 min. at a time
or it may overheat.
Do not use the Tire Mobility Kit if the ambient temperature is below -
22°F (-30°C).✽ ✽ NOTICE
• If the sealant gets on your skin,
wash it with a large amount of
water. If skin irritation continues,
visit a doctor for examination.
• If the sealant gets into your eyes, raise your eyelid and wash for at
least 15 minutes. If eye irritation
continues, visit a doctor for exam-
ination.
• If you have drank the sealant, wash the mouth and drink a large
amount of water. However, do not
give anything to an unconscious
person and see the doctor immedi-
ately.
Exposure to the sealant for a long
time may cause damage to the
bodily tissues.
✽ ✽ NOTICE
The sealant container and insert
hose (3) cannot be reused. Purchase
an extra after use.
WARNING
Do not use the Tire sealant after
the sealant has expired (i.e.
past the expiration date on the
sealant container). This can
increase the risk of tire failure.
CAUTION
When repairing a flat tire with
the Tire Mobility Kit (TMK),quickly remove the sealant onthe tire pressure sensor andwheel. When installing therepaired tire and wheel, tightenthe wheel nut to a torque valueof 11 ~ 13 kgf·m.
WARNING - Sealant
Keep out of reach of children.
Avoid contact with eyes.
Do not swallow.
Page 457 of 616
721
What to do in an emergency
■for 18 inch tireODE067044■for 16 inch tireODE066039L
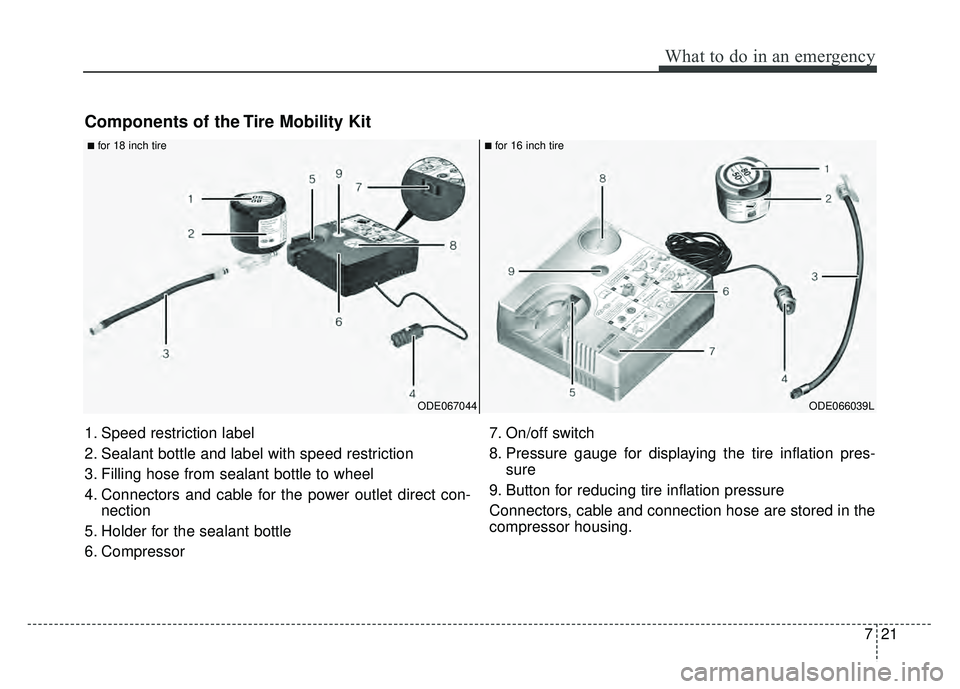
1. Speed restriction label
2. Sealant bottle and label with speed restriction
3. Filling hose from sealant bottle to wheel
4. Connectors and cable for the power outlet direct con-nection
5. Holder for the sealant bottle
6. Compressor 7. On/off switch
8. Pressure gauge for displaying the tire inflation pres-
sure
9. Button for reducing tire inflation pressure
Connectors, cable and connection hose are stored in the
compressor housing.
Components of the Tire Mobility Kit
Page 458 of 616
What to do in an emergency
22
7
✽
✽
NOTICE
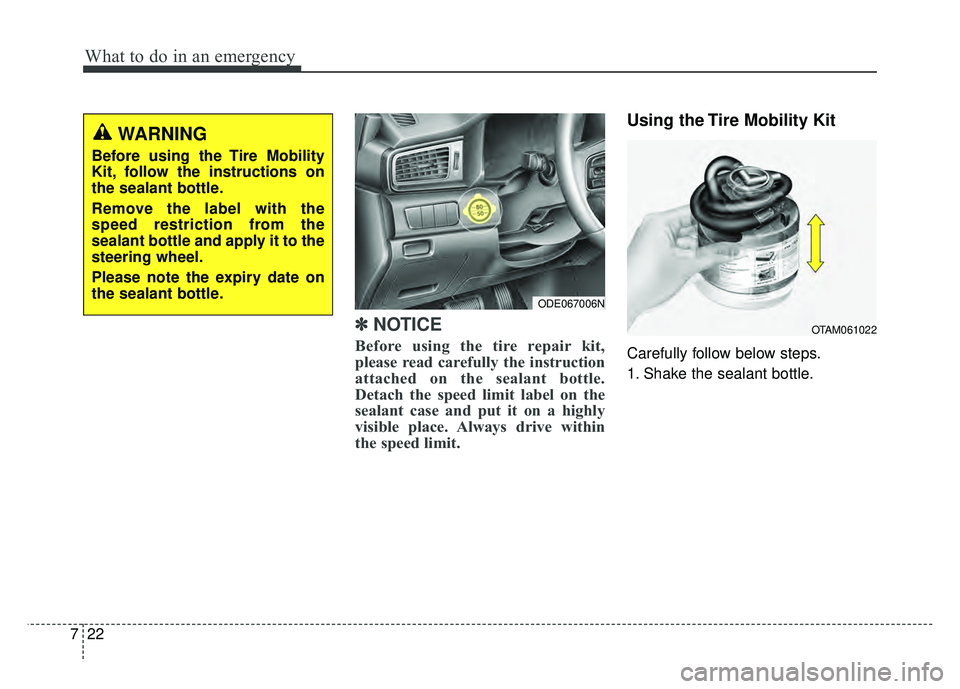
Before using the tire repair kit,
please read carefully the instruction
attached on the sealant bottle.
Detach the speed limit label on the
sealant case and put it on a highly
visible place. Always drive within
the speed limit.
Using the Tire Mobility Kit
Carefully follow below steps.
1. Shake the sealant bottle.
ODE067006N
OTAM061022
WARNING
Before using the Tire Mobility
Kit, follow the instructions on
the sealant bottle.
Remove the label with the
speed restriction from the
sealant bottle and apply it to the
steering wheel.
Please note the expiry date on
the sealant bottle.
Page 459 of 616
723
What to do in an emergency
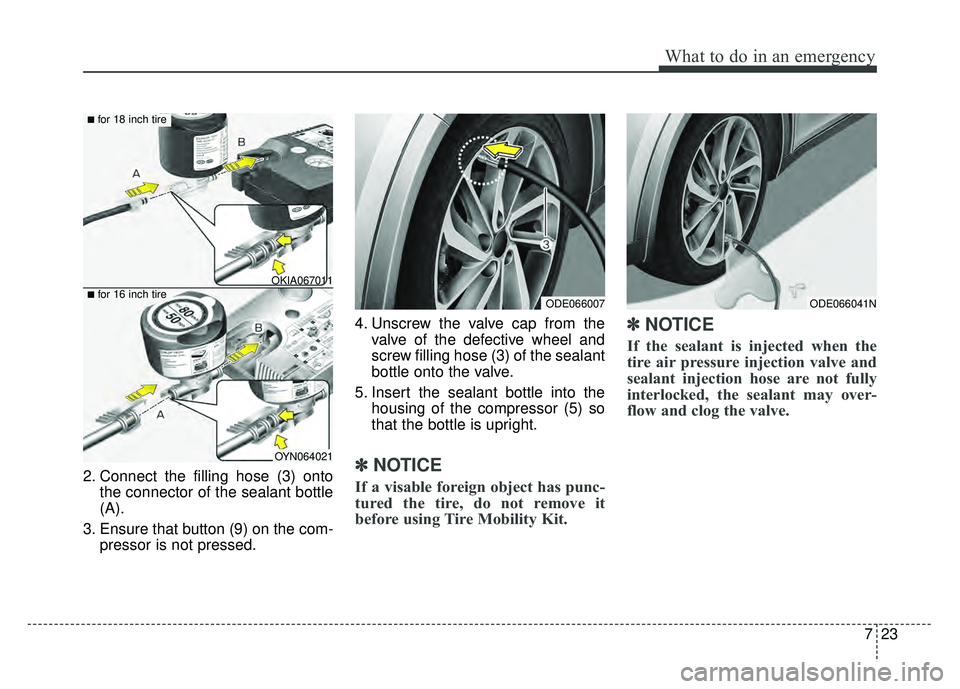
2. Connect the filling hose (3) ontothe connector of the sealant bottle
(A).
3. Ensure that button (9) on the com- pressor is not pressed. 4. Unscrew the valve cap from the
valve of the defective wheel and
screw filling hose (3) of the sealant
bottle onto the valve.
5. Insert the sealant bottle into the housing of the compressor (5) so
that the bottle is upright.✽ ✽NOTICE
If a visable foreign object has punc-
tured the tire, do not remove it
before using Tire Mobility Kit.
✽ ✽NOTICE
If the sealant is injected when the
tire air pressure injection valve and
sealant injection hose are not fully
interlocked, the sealant may over-
flow and clog the valve.
OKIA067011
OYN064021
■for 16 inch tire
■for 18 inch tire
ODE066007ODE066041N
Page 460 of 616
What to do in an emergency
24
7
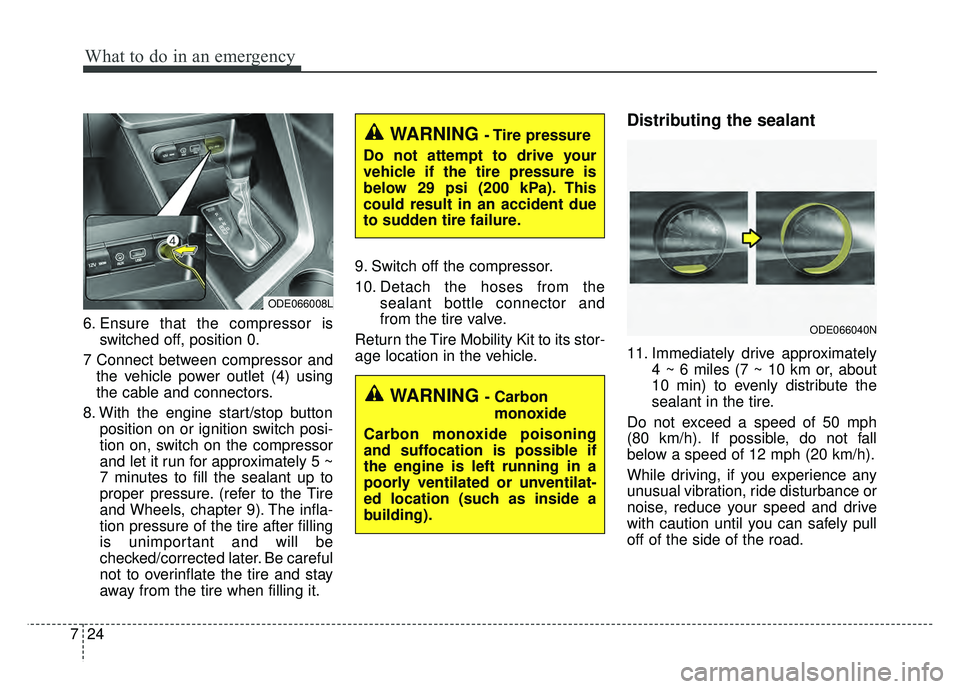
6. Ensure that the compressor is
switched off, position 0.
7 Connect between compressor and the vehicle power outlet (4) using
the cable and connectors.
8. With the engine start/stop button position on or ignition switch posi-
tion on, switch on the compressor
and let it run for approximately 5 ~
7 minutes to fill the sealant up to
proper pressure. (refer to the Tire
and Wheels, chapter 9). The infla-
tion pressure of the tire after filling
is unimportant and will be
checked/corrected later. Be careful
not to overinflate the tire and stay
away from the tire when filling it. 9. Switch off the compressor.
10. Detach the hoses from the
sealant bottle connector and
from the tire valve.
Return the Tire Mobility Kit to its stor-
age location in the vehicle.
Distributing the sealant
11. Immediately drive approximately 4 ~ 6 miles (7 ~ 10 km or, about
10 min) to evenly distribute the
sealant in the tire.
Do not exceed a speed of 50 mph
(80 km/h). If possible, do not fall
below a speed of 12 mph (20 km/h).
While driving, if you experience any
unusual vibration, ride disturbance or
noise, reduce your speed and drive
with caution until you can safely pull
off of the side of the road.
ODE066008L
WARNING - Carbon monoxide
Carbon monoxide poisoning
and suffocation is possible if
the engine is left running in a
poorly ventilated or unventilat-
ed location (such as inside a
building).
ODE066040N
WARNING - Tire pressure
Do not attempt to drive your
vehicle if the tire pressure is
below 29 psi (200 kPa). This
could result in an accident due
to sudden tire failure.
Page 461 of 616
725
What to do in an emergency
Call for road side service or towing.
When you use the Tire Mobility Kit,
the tire pressure sensors and wheel
may be stained by sealant. Therefore,
remove the tire pressure sensors and
wheel stained by sealant and have
your vehicle inspected by an author-
ized Kia dealer.Checking the tire inflation
pressure
1. After driving approximately 4 ~ 6miles (7 ~ 10 km or about 10 min),
stop at a safe location.
2. Connect the filling hose (3) of the compressor (clip mounted side)
directly and then connect the fill
ing hose (3) (opposite side) to the
tire valve.
3. Connect between compressor and the vehicle power outlet using the
cable and connectors.
4. Adjust the tire inflation pressure to the recomended tire inflation.
With the ignition switch on, pro- ceed as follows.
- To increase the inflation pres- sure : Switch on the compressor,
position I. To check the current
inflation pressure setting, briefly
switch off the compressor.
✽ ✽ NOTICE
The pressure gauge may show high-
er than actual reading when the
compressor is running. To get an
accurate tire reading, the compres-
sor needs to be turned off.
Page 462 of 616
What to do in an emergency
26
7
- To reduce the inflation pres-
sure: Press the button (9) on the
compressor.
CAUTION - Tire pressure
sensor
When you use the Tire MobilityKit including sealant notapproved by Kia, the tire pres-sure sensors may be damagedby sealant. The sealant on thetire pressure sensor and wheelshould be removed when youreplace the tire with a new oneand inspect the tire pressuresensors at an authorized dealer.