check engine KIA Opirus 2004 1.G Owner's Guide
[x] Cancel search | Manufacturer: KIA, Model Year: 2004, Model line: Opirus, Model: KIA Opirus 2004 1.GPages: 296, PDF Size: 29.34 MB
Page 216 of 296
63
In case of an emergency
OVERHEATING If your temperature gauge indicates
overheating, if you experience a loss
of power, or if you hear a loud knock-
ing or pinging noise, the engine has
probably overheated. Should any of
these symptoms occur, use the fol-
lowing procedure:
1. Turn on the hazard warning flash-er, then drive to the nearest safe
location and stop your vehicle; set
the automatic transaxle in P (Park)
and apply the parking brake.
2. Make sure the air conditioner is off.
3. If coolant or steam is boiling out of the radiator, stop the engine and
call an Authorized Kia Dealer for
assistance. If coolant is not boiling out, allow
the engine to idle and open the
hood to permit the engine to cool
gradually.
If the temperature does not go
down with the engine idling, stop
the engine and allow sufficient
time for it to cool.
4. The coolant level should then be checked. If the level in the reser-
voir is low, look for leaks at the
radiator hoses and connections,
heater hoses and connections,
radiator, and water pump. If you
find a major leak or another prob-
lem that may have caused the
engine to overheat, do not operate
the engine until it has been cor-
rected. Call an Authorized Kia
Dealer for assistance. If you do not
find a leak or other problem, care-
fully add coolant to the reservoir.
If the engine frequently overheats,have the cooling system checkedand repaired by an Authorized KiaDealer.
1
2
3
4
5
6
7
8
9
WARNING
- Removing
radiator cap
Do not remove the radiator cap
when the engine and radiator
are hot. Scalding hot coolant
and steam may blow out under
pressure. This could cause seri-
ous injury.
Opirus CAN 6-1.qxd 7/8/03 2:22 PM Page 3
Page 219 of 296
In case of an emergency66Jump starting procedure 1. Make sure the booster battery is12-volt and that its negative termi-
nal is grounded.
2. If the booster battery is in another vehicle, do not allow the vehicles
to touch.
3. Turn off all unnecessary electrical loads.
4. Connect the jumper cables in the exact sequence shown in the pre-
vious illustration. First connect one
end of a jumper cable to the posi-
tive terminal of the discharged bat-
tery (
➀), then connect the other
end to the positive terminal on the
booster battery (
➁). Proceed to
connect one end of the other
jumper cable to the negative ter-
minal of the booster battery (
➂),
then the other end to a solid, sta-
tionary, metallic point (for exam-
ple, the engine lifting bracket)
away from the battery (
➃). Do not
connect it to or near any part that
moves when the engine is
cranked. Do not connect the
jumper cable from the negative
terminal of the booster battery to
the negative terminal of the dis-
charged battery. Do not allow the jumper cables to
contact anything except the cor-
rect battery terminals or the cor-
rect ground. Do not lean over the
battery when making connections.
5. Start the engine of the vehicle with the booster battery and let it run at
2,000 rpm, then start the engine of
the vehicle with the discharged
battery.
If the cause of your battery discharg-ing is not apparent, you should haveyour vehicle checked by anAuthorized Kia Dealer.
Refer to illustration on page 6-5.
Push-starting Vehicles equipped with automatic
transaxle cannot be push-started.
Follow the directions in this section
for jump-starting.
1
2
3
4
5
6
7
8
9
CAUTION
Never tow a vehicle to start itbecause the sudden surge for-ward when the engine startscould cause a collision with thetow vehicle.
Opirus CAN 6-1.qxd 7/8/03 2:22 PM Page 6
Page 220 of 296
67
In case of an emergency
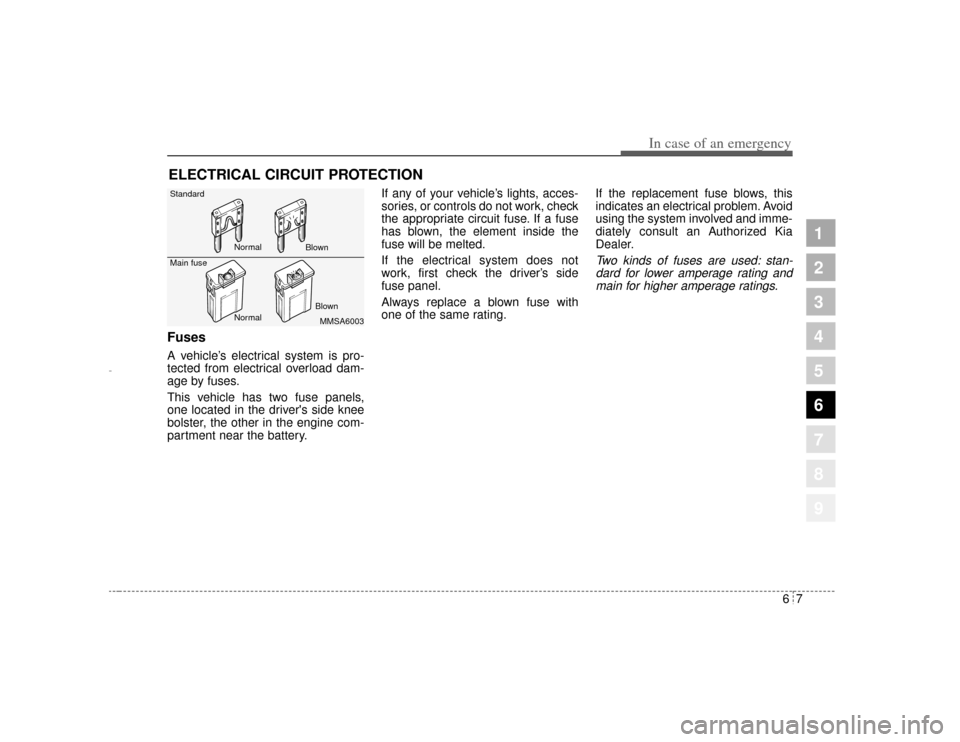
ELECTRICAL CIRCUIT PROTECTION Fuses A vehicle’s electrical system is pro-
tected from electrical overload dam-
age by fuses.
This vehicle has two fuse panels,
one located in the driver's side knee
bolster, the other in the engine com-
partment near the battery.If any of your vehicle’s lights, acces-
sories, or controls do not work, check
the appropriate circuit fuse. If a fuse
has blown, the element inside the
fuse will be melted.
If the electrical system does not
work, first check the driver’s side
fuse panel.
Always replace a blown fuse with
one of the same rating.
If the replacement fuse blows, this
indicates an electrical problem. Avoid
using the system involved and imme-
diately consult an Authorized Kia
Dealer.
Two kinds of fuses are used: stan-
dard for lower amperage rating andmain for higher amperage ratings.
1
2
3
4
5
6
7
8
9
MMSA6003
Standard
Main fuse
Normal Normal Blown
Blown
Opirus CAN 6-1.qxd 7/8/03 2:22 PM Page 7
Page 221 of 296
In case of an emergency86Fuse replacement
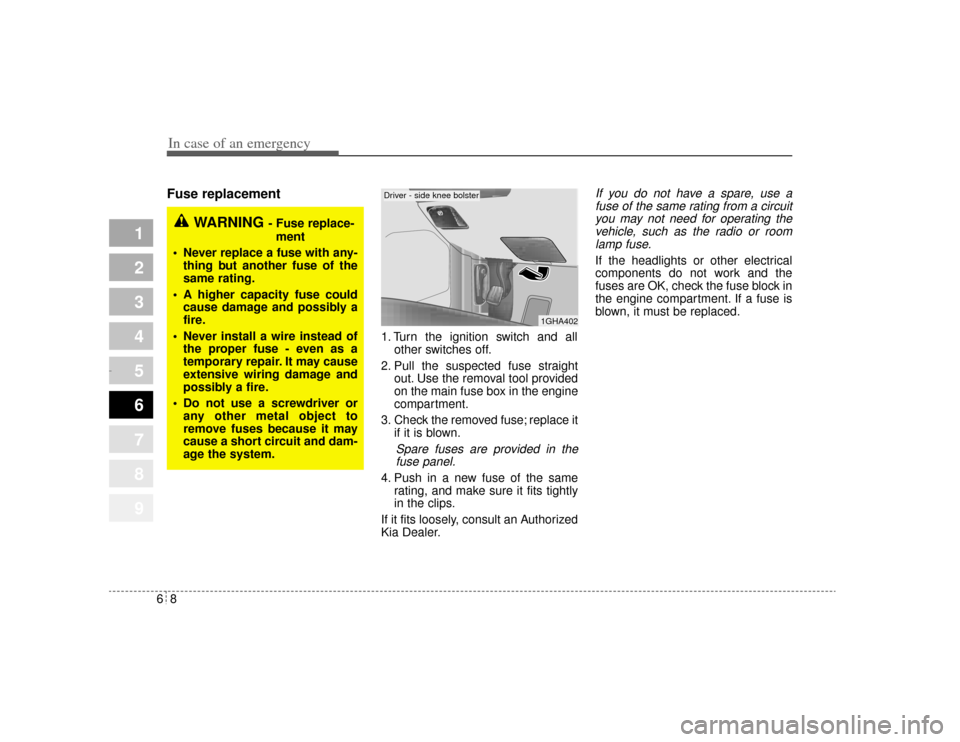
1. Turn the ignition switch and allother switches off.
2. Pull the suspected fuse straight out. Use the removal tool provided
on the main fuse box in the engine
compartment.
3. Check the removed fuse; replace it if it is blown.
Spare fuses are provided in thefuse panel.
4. Push in a new fuse of the same rating, and make sure it fits tightly
in the clips.
If it fits loosely, consult an Authorized
Kia Dealer.
If you do not have a spare, use a fuse of the same rating from a circuityou may not need for operating thevehicle, such as the radio or roomlamp fuse.If the headlights or other electrical
components do not work and the
fuses are OK, check the fuse block in
the engine compartment. If a fuse is
blown, it must be replaced.
1
2
3
4
5
6
7
8
9
1GHA402
WARNING
- Fuse replace-
ment
Never replace a fuse with any- thing but another fuse of the
same rating.
A higher capacity fuse could cause damage and possibly a
fire.
Never install a wire instead of the proper fuse - even as a
temporary repair. It may cause
extensive wiring damage and
possibly a fire.
Do not use a screwdriver or any other metal object to
remove fuses because it may
cause a short circuit and dam-
age the system.
Driver - side knee bolster
Opirus CAN 6-1.qxd 7/8/03 2:22 PM Page 8
Page 222 of 296
69
In case of an emergency
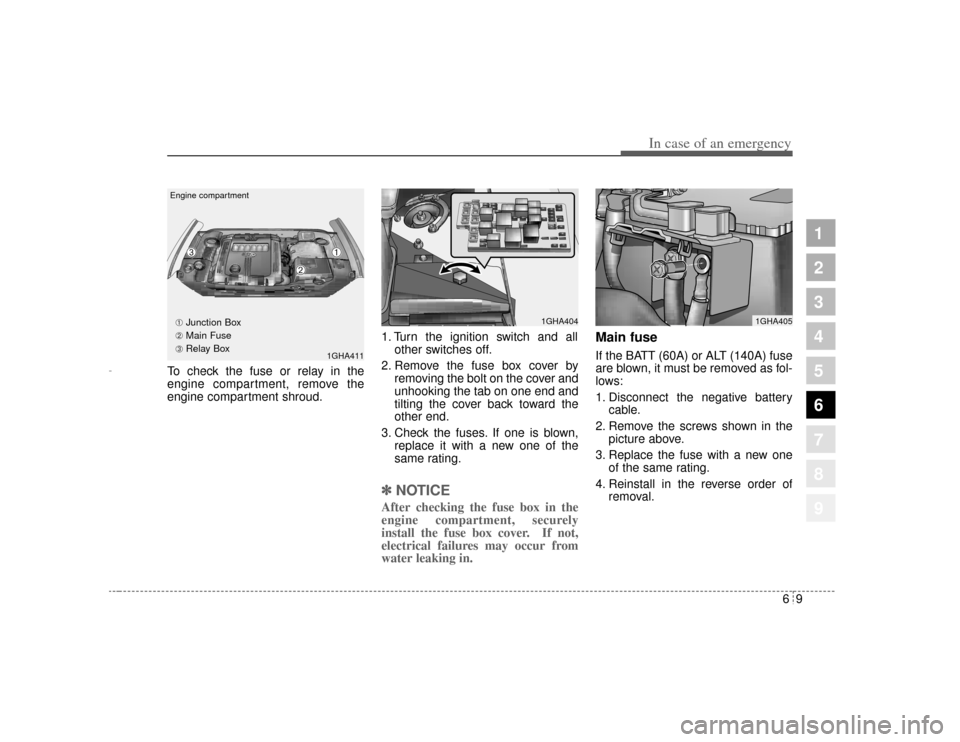
To check the fuse or relay in the
engine compartment, remove the
engine compartment shroud.1. Turn the ignition switch and all
other switches off.
2. Remove the fuse box cover by removing the bolt on the cover and
unhooking the tab on one end and
tilting the cover back toward the
other end.
3. Check the fuses. If one is blown, replace it with a new one of the
same rating.
✽ ✽NOTICEAfter checking the fuse box in the
engine compartment, securely
install the fuse box cover. If not,
electrical failures may occur from
water leaking in.
Main fuseIf the BATT (60A) or ALT (140A) fuse
are blown, it must be removed as fol-
lows:
1. Disconnect the negative battery
cable.
2. Remove the screws shown in the picture above.
3. Replace the fuse with a new one of the same rating.
4. Reinstall in the reverse order of removal.
1
2
3
4
5
6
7
8
9
1GHA404
1GHA411
1GHA405
Engine compartment
➀
➁
➂➀
Junction Box
➁ Main Fuse
➂ Relay Box
Opirus CAN 6-1.qxd 7/8/03 2:22 PM Page 9
Page 244 of 296
77
Maintenance
1
2
3
4
5
6
7
8
9
Chart symbols:I- Inspect these items and their related parts. If necessary, correct, clean, refill, adjust of replace.
R- Replace or change
L- Lubricate.(1) Refer to the lubricant and coolant specifications in the Owner’s Manual
(2) More frequent maintenance is required if driving under dusty conditions.
(3) More frequent maintenance is required if the vehicle is operated under any of the following conditions: a. Short-distance driving
b. Driving on dusty roads.
c. Extensive idling or slow-speed driving in stop-and-go traffic.
(4) If necessary, rotate and balance the wheels.
* Note: Check the engine oil and coolant levels every week.
Opirus CAN 7-1.qxd 7/8/03 2:25 PM Page 7
Page 245 of 296
Maintenance87
1
2
3
4
5
6
7
8
9
OWNER MAINTENANCE Owner maintenance schedule The following lists are vehicle checks
and inspections that should be per-
formed by the owner or qualified
service technician at the frequencies
indicated to help ensure safe,
dependable operation of your vehi-
cle.
Any adverse conditions should be
brought to the attention of your deal-
er or qualified service technician or
service advice as soon as possible.
These Owner Maintenance Checks
are generally not covered by war-
ranties and you may be charged for
labor, parts and lubricants used.
When you stop for fuel: Check the engine oil level.
Check coolant level in coolantreservoir.
Check the windshield washer fluid level.
Look for low or under-inflated tires.
While operating your vehicle: Note any changes in the sound of the exhaust or any smell of
exhaust fumes in the vehicle.
Check for vibrations in the steering wheel. Notice any increased steer-
ing effort or looseness in the steer-
ing wheel, or change in its straight-
ahead position.
Notice if your vehicle constantly turns slightly or “pulls” to one side
when traveling on smooth, level
road.
When stopping, listen and check for strange sounds, pulling to one
side, increased brake pedal travel
or “hard-to-push” brake pedal.
If any slipping or changes in the operation of your transaxle occurs,
check the transaxle fluid level.
Check automatic transaxle P (Park) function.
Check parking brake.
Check for fluid leaks under your vehicle (water dripping from the air
conditioning system after use is
normal).
WARNING
Be careful when checking your
engine coolant level when the
engine is hot. Scalding hot
coolant and steam may blow out
under pressure. This could
cause serious injury.
Opirus CAN 7-1.qxd 7/8/03 2:25 PM Page 8
Page 249 of 296
Maintenance12
7
1
2
3
4
5
6
7
8
9
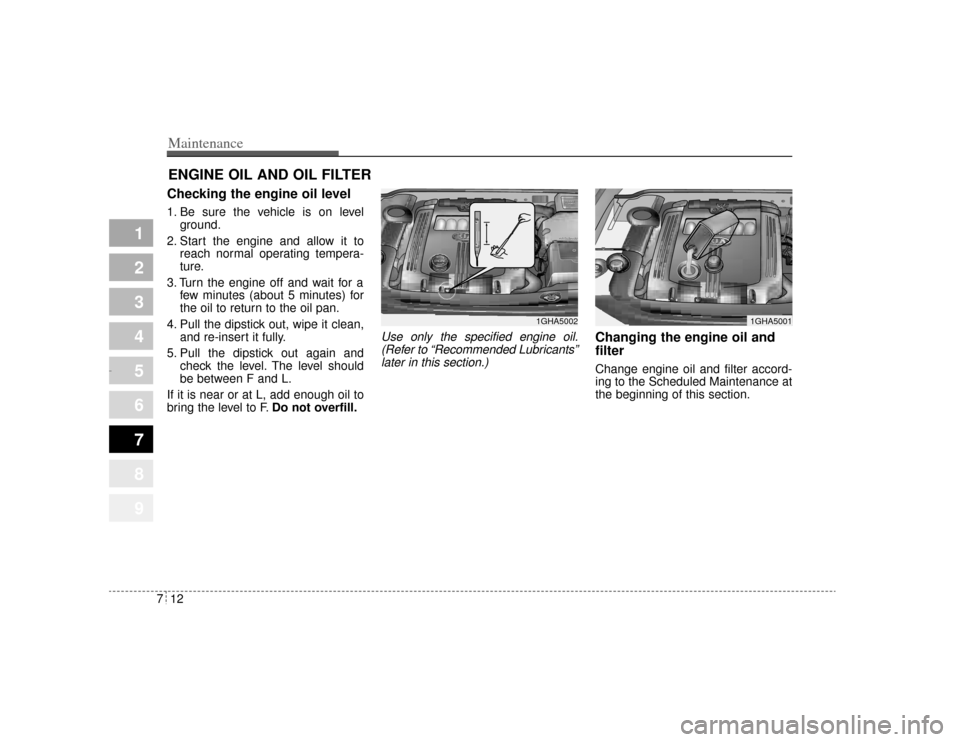
ENGINE OIL AND OIL FILTERChecking the engine oil level 1. Be sure the vehicle is on level
ground.
2. Start the engine and allow it to reach normal operating tempera-
ture.
3. Turn the engine off and wait for a few minutes (about 5 minutes) for
the oil to return to the oil pan.
4. Pull the dipstick out, wipe it clean, and re-insert it fully.
5. Pull the dipstick out again and check the level. The level should
be between F and L.
If it is near or at L, add enough oil to
bring the level to F. Do not overfill.
Use only the specified engine oil.
(Refer to “Recommended Lubricants”later in this section.)
Changing the engine oil and
filterChange engine oil and filter accord-
ing to the Scheduled Maintenance at
the beginning of this section.
1GHA5001
1GHA5002
Opirus CAN 7-1.qxd 7/8/03 2:25 PM Page 12
Page 250 of 296
713
Maintenance
1
2
3
4
5
6
7
8
9
1. Warm the engine up for a few min-utes and then turn it off. Remove
the oil filler cap.
2. Drain the oil into a suitable con- tainer by removing the oil drain
plug. 3. Remove the engine oil filter with
an oil filter wrench.
✽ ✽NOTICEDo not allow the oil filter gasket to
remain on the oil filter mounting
surface. This will cause oil leakage
and engine damage. Remove the old
gasket completely so that a new gas-
ket may be properly seated. 4. Use a clean rag to clean the oil fil-
ter mounting surface on the
engine.
5. Apply a small amount of engine oil to the new oil filter O-ring seal. 6. Install the oil filter and tighten it.
(Refer to the oil filter caution label
for tightening instructions.)
7. Install a new washer on the drain plug. Don’t use an old washer
repeatedly.
8. Replace the drain plug after the oil has thoroughly drained. Torque the
plug to 3.5~4.5 kgm (26~32 lbft,
35~44 Nm).
9. Refill the engine with new oil to the F mark on the dipstick. Do not
overfill.
10. Reinstall the oil filler cap secure- ly.
11. Start the engine and inspect around the oil filter seal for leaks.
Stop the engine.
12. Check the oil level and fill to the F mark as necessary.
PROPOSITION 65
WARNING
Used engine oil may cause irri-
tation or cancer of the skin if left
in contact with the skin for pro-
longed periods of time. Used
engine oil contains chemicals
that have caused cancer in lab-
oratory animals. Always protect
your skin by washing your
hands thoroughly with soap and
warm water as soon as possible
after handling used oil.
CAUTION
Both the oil and engine arehot. Do not burn yourself.
Keep all engine oil out of the reach of children.
Opirus CAN 7-1.qxd 7/8/03 2:25 PM Page 13
Page 252 of 296
715
Maintenance
1
2
3
4
5
6
7
8
9
ENGINE COOLING SYSTEM The high-pressure cooling system
has a reservoir filled with year-round
antifreeze coolant. The reservoir is
filled at the factory.
Check the antifreeze protection and
coolant level at least once a year, at
the beginning of the winter season,
and before traveling to a colder cli-
mate.
Checking the coolant level
WARNING
- Removing
radiator cap
Never attempt to remove the radiator cap while the engine
is operating or hot. Doing so
might lead to cooling system
and engine damage and could
result in serious personal
injury from escaping hot
coolant or steam.
Turn the engine off and wait until it cools down. Even then,
use extreme care when
removing the radiator cap.
Wrap a thick towel around it,
and turn it counterclockwise
slowly to the first stop. Step
back while the pressure is
released from the cooling sys-
tem. When you are sure all the
pressure has been released,
press down on the cap, using
a thick towel, and continue
turning counterclockwise to
remove it.
(Continued)
(Continued)
Even if the engine is not oper-ating, do not remove the radi-
ator cap or the drain plug
while the engine and radiator
are hot. Hot coolant and steam
may still blow out under pres-
sure, causing serious injury.
Opirus CAN 7-1.qxd 7/8/03 2:25 PM Page 15