stop start KIA Optima 2008 2.G User Guide
[x] Cancel search | Manufacturer: KIA, Model Year: 2008, Model line: Optima, Model: KIA Optima 2008 2.GPages: 289, PDF Size: 4.78 MB
Page 168 of 289
Driving your vehicle32 4Immobilizer indicator
(if equipped)This light illuminates when the immobiliz-
er key is inserted and turned to the ON
position to start the engine.
At this time, you can start the engine. The
light goes out after the engine is running.
In case this light goes out before you
start the engine, you must turn to the
LOCK position and restart the engine.
If this light blinks when the ignition switch
is in the ON position before starting the
engine, have the system checked by an
authorized Kia dealer.
Parking brake & brake
fluid warning Parking brake warning This light is illuminated when the parking
brake is applied with the ignition switch in
the START or ON position. The warning
light should go off when the parking
brake is released.Low brake fluid level warningIf the warning light remains on, it may
indicate that the brake fluid level in the
reservoir is low.
If the warning light remains on:
1. Drive carefully to the nearest safe
location and stop your vehicle.
2. With the engine stopped, check the
brake fluid level immediately and add
fluid as required. Then check all brake
components for fluid leaks.
3. Do not drive the vehicle if leaks are
found, the warning light remains on or
the brakes do not operate properly.
Have it towed to any authorized Kia
dealer for a brake system inspection
and necessary repairs.To check bulb operation, check whether
the parking brake and brake fluid warning
light illuminates when the ignition switch
is in the ON position.
WARNING
Driving the vehicle with a brake
warning light on is dangerous. If the
brake warning light remains on,
have the brakes checked and
repaired immediately by an author-
ized Kia dealer.
Page 180 of 289
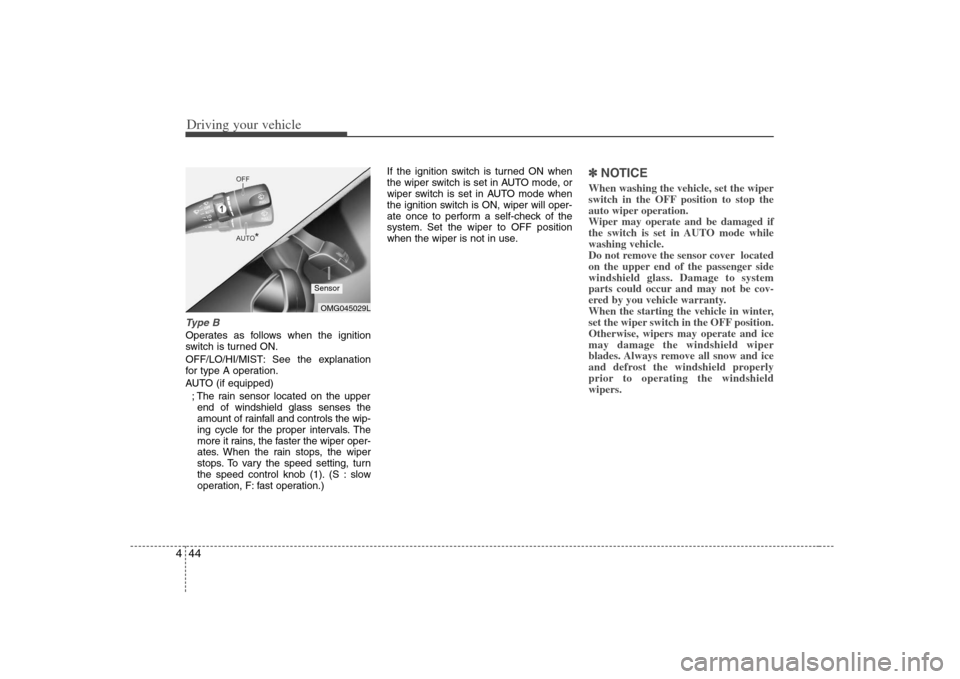
Driving your vehicle44 4Type BOperates as follows when the ignition
switch is turned ON.
OFF/LO/HI/MIST: See the explanation
for type A operation.
AUTO (if equipped)
; The rain sensor located on the upper
end of windshield glass senses the
amount of rainfall and controls the wip-
ing cycle for the proper intervals. The
more it rains, the faster the wiper oper-
ates. When the rain stops, the wiper
stops. To vary the speed setting, turn
the speed control knob (1). (S : slow
operation, F: fast operation.)If the ignition switch is turned ON when
the wiper switch is set in AUTO mode, or
wiper switch is set in AUTO mode when
the ignition switch is ON, wiper will oper-
ate once to perform a self-check of the
system. Set the wiper to OFF position
when the wiper is not in use.
✽ ✽
NOTICEWhen washing the vehicle, set the wiper
switch in the OFF position to stop the
auto wiper operation.
Wiper may operate and be damaged if
the switch is set in AUTO mode while
washing vehicle.
Do not remove the sensor cover located
on the upper end of the passenger side
windshield glass. Damage to system
parts could occur and may not be cov-
ered by you vehicle warranty.
When the starting the vehicle in winter,
set the wiper switch in the OFF position.
Otherwise, wipers may operate and ice
may damage the windshield wiper
blades. Always remove all snow and ice
and defrost the windshield properly
prior to operating the windshield
wipers.
OMG045029LSensor
Page 205 of 289
53
Driving tips
Carbon monoxide can be present with
other exhaust fumes. Therefore, if you
smell exhaust fumes of any kind inside
your vehicle, have it inspected and
repaired immediately. If you ever sus-
pect exhaust fumes are coming into
your vehicle, drive it only with all the
windows fully open. Have your vehicle
checked and repaired immediately.
Do not operate the engine in confined
or closed areas (such as garages) any
more than what is necessary to move
the vehicle in or out of the area.
When the vehicle is stopped in an
open area for more than a short time
with the engine running, adjust the
ventilation system (as needed) to draw
outside air into the vehicle.
Never sit in a parked or stopped vehi-
cle for any extended time with the
engine running.
When the engine stalls or fails to start,
excessive attempts to re-start the
engine may cause damage to the
emission control system.
Operating precautions for catalytic
converters Your vehicle is equipped with a catalytic
converter emission control device.
Therefore, the following precautions
must be observed:
Use only UNLEADED FUEL for gaso-
line engine (unleaded).
Do not operate the vehicle when there
are signs of engine malfunction, such
as misfire or a noticeable loss of per-
formance.
Do not misuse or abuse the engine.
Examples of misuse are coasting with
the ignition off and descending steep
grades in gear with the ignition off. Do not operate the engine at high idle
speed for extended periods (5 minutes
or more).
Do not modify or tamper with any part
of the engine or emission control sys-
tem. All inspections and adjustments
must be made by an authorized Kia
dealer.
Failure to observe these precautions
could result in damage to the catalytic
converter and to your vehicle.
Additionally, such actions could void your
warranties.
WARNING
- Fire
A hot exhaust system can ignite
flammable items under your vehi-
cle. Do not park the vehicle over or
near flammable objects, such as
grass, vegetation, paper, leaves,
etc.
Page 209 of 289
57
Driving tips
Driving at night Because night driving presents more
hazards than driving in the daylight, here
are some important tips to remember:
Slow down and keep more distance
between you and other vehicles, as it
may be more difficult to see at night,
especially in areas where there may
not be any street lights.
Adjust your mirrors to reduce the glare
from other driver's headlights.
Keep your headlights clean and prop-
erly aimed on vehicles not equipped
with the automatic headlight aiming
feature. Dirty or improperly aimed
headlights will make it much more diffi-
cult to see at night.
Avoid staring directly at the headlights
of oncoming vehicles. You could be
temporarily blinded, and it will take
several seconds for your eyes to read-
just to the darkness.
Driving in the rain Rain and wet roads can make driving
dangerous, especially if you’re not pre-
pared for the slick pavement. Here are a
few things to consider when driving in the
rain:
A heavy rainfall will make it harder to
see and will increase the distance
needed to stop your vehicle, so slow
down.
Keep your windshield wiping equip-
ment in good shape. Replace your
windshield wiper blades when they
show signs of streaking or missing
areas on the windshield.
If your tires are not in good condition,
making a quick stop on wet pavement
can cause a skid and possibly lead to
an accident. Be sure your tires are in
good shape.
Turn on your headlights to make it eas-
ier for others to see you.
Driving too fast through large puddles
can affect your brakes. If you must go
through puddles, try to drive through
them slowly.
If you believe you may have gotten
your brakes wet, apply them lightly
while driving until normal braking oper-
ation returns.
Winter driving We recommend that you carry emer-
gency equipment, including a window
scraper, windshield de-icer, a bag of
sand or salt, flares, a small shovel and
jumper cables.
Make sure you have sufficient ethyl-
ene-glycol coolant in the radiator.
Check the battery condition and
cables. Cold temperatures reduce the
output capability of any battery, so it
must be in excellent condition to pro-
vide enough winter starting power.
Make sure the engine oil viscosity is
suitable for cold weather.
Check the ignition system for loose
connections and damage.
Use antifreeze-formulated windshield
washer fluid. (Do not use engine
coolant antifreeze.)
Do not use the parking brake if it might
freeze. When parking, shift to 1 (First)
or R (Reverse) with a manual transaxle
or P (Park) with an automatic transaxle
and block the rear wheels.
Page 213 of 289
511
Driving tips
Driving with a trailer Towing a trailer requires experience. You
must gain that experience slowly and
carefully which practicing with an
unloaded or lightly loaded trailer. Before
setting out for the open road, you must
get to know your trailer. Acquaint yourself
with the feel of handling and braking with
the trailer. And always keep in mind that
the vehicle you are driving is now a good
deal longer and not nearly so responsive
as your vehicle is by itself.
Before you start, check the trailer hitch
and platform, safety chains, electrical
connector(s), lights, tires and mirror
adjustment. If the trailer has brakes, fol-
low the trailer manufacturer’s instructions
as to how to check the brakes before you
start driving.
During your trip, stop every hour or so to
be sure that the load is secure, and that
the lights and any trailer brakes are work-
ing.Following distance Stay at least twice as far behind the vehi-
cle ahead as you would when driving
your vehicle without a trailer. This can
help you avoid situations that require
heavy braking and sudden turns.
Passing You’ll need more passing distance up
ahead when you’re towing a trailer. And,
because of the increased vehicle length,
you’ll need to go much farther beyond the
passed vehicle before you can return to
your lane.Backing up The trailer will go in the opposite direc-
tion of the rear of your vehicle when
backing up. This is very difficult for an
inexperienced trailer driver to get used
to. To help you avoid mistakes, hold the
bottom of the steering wheel with one
hand. Then, to move the trailer to the left,
just hold the steering wheel firmly and
move your hand to the left. To move the
trailer to the right, move your hand to the
right. Always back up slowly and, if pos-
sible, have someone guide you.Making turns When you’re turning with a trailer, make
wider turns than normal. Do this so your
trailer won’t strike soft shoulders, curbs,
road signs, trees, or other objects. Avoid
jerky or sudden maneuvers. Signal well
in advance.
Turn signals when towing a trailer When you tow a trailer, your vehicle has
to have a different turn signal flasher and
extra wiring. The green arrows on your
instrument panel will flash whenever you
signal a turn or lane change. Properly
connected, the trailer lights will also flash
to alert other drivers you’re about to turn,
change lanes, or stop.
When towing a trailer, the green arrows
on your instrument panel will flash for
turns even if the bulbs on the trailer are
burned out. Thus, you may think drivers
behind you are seeing your signals
when, in fact, they are not. It’s important
to check occasionally to be sure the trail-
er bulbs are still working. You must also
check the lights every time you discon-
nect and then reconnect the wires.
Do not connect a trailer lighting system
directly to your vehicle’s lighting system.
Use only an approved trailer wiring har-
ness.
Your Authorized Kia Dealer can assist
you in installing the wiring harness.
WARNING -
Trailer wiring
harness
Failure to use an approved trailer
wiring harness could result in an
accident due to the failure of the
trailer lights to operate.
Page 214 of 289
Driving tips12 5✽
✽
NOTICEFailure to sue a trailer wiring harness
can damage your vehicle’s electrical sys-
tem.Driving on grades Reduce speed and shift to a lower gear
before you start down a long or steep
downgrade. If you don’t shift down, you
might have to use your brakes so much
that they would get hot and no longer
operate efficiently.
On a long uphill grade, shift down and
reduce your speed to around 70 km/h (45
mph) to reduce the possibility of engine
and transaxle overheating.
Operating your vehicle in D (Drive) when
towing a trailer will minimize heat build up
and extend the life of your transaxle.
Parking on hills Generally, you should not park your vehi-
cle, with a trailer attached, on a hill.
People can be seriously or fatally injured,
and both your vehicle and the trailer can
be damaged if they begin a downhill.
However, if you ever have to park your
trailer on a hill, here’s how to do it:1. Apply your brakes, but don’t shift into
gear.
2. Have someone place chocks (blocks
of wood or metal intended for this pur-
pose) under the downhill sides of the
trailer wheels.
3. When the wheel chocks are in place,
release the brakes until the chocks
absorb the load.
4. Reapply the brakes. Apply your park-
ing brake, and then shift to P (Park) for
an automatic transaxle.
5. Release the brakes.
CAUTION
When towing a trailer on steep
grades (in excess of 6%) pay close
attention to the engine coolant tem-
perature gauge to ensure the
engine does not overheat. If the
needle of the coolant temperature
gauge moves across the dial
towards “H” (HOT), pull over and
stop as soon as it is safe to do so,
and allow the engine to idle until it
cools down. You may proceed once
the engine has cooled sufficiently.
WARNING
- Parking on a
hill
Parking your vehicle on a hill with a
trailer attached is dangerous. It
could cause serious injury or death,
should the trailer break lose, or
should the trailer drag the vehicle
downhill.
WARNING
- Parking brake
It can be dangerous to get out of
your vehicle if the parking brake is
not firmly set or if the engine is still
running.
In either case the vehicle can move
suddenly. You or others could be
seriously or fatally injured.
Page 215 of 289
513
Driving tips
When you are ready to leave after
parking on a hill 1. With the automatic transaxle in P
(Park), apply your brakes and hold the
brake pedal down while you:
and
2. Slowly remove your foot from the
brake pedal.
3. Drive slowly forward until the trailer is
clear of the chocks.
4. Stop and have someone pick up and
store the chocks.Maintenance when trailer towing Your vehicle will need service more often
when you regularly pull a trailer.
Important items to pay particular atten-
tion to include engine oil, automatic
transaxle fluid, axle lubricant and cooling
system fluid. Brake condition is another
important item to frequently check. Each
item is covered in this manual, and the
Index will help you find them quickly. If
you’re trailering, it’s a good idea to review
these sections before you start your trip.Don’t forget to also maintain your trailer
and hitch. Follow the maintenance
schedule that accompanied your trailer
and check it periodically. Preferably, con-
duct the check at the start of each day’s
driving. Most importantly, all hitch nuts
and bolts should be tight.
✽ ✽
NOTICE• Due to higher load during trailer
usage, overheating might occur in hot
days or during uphill driving. If the
coolant gauge indicates over-heating,
switch off the A/C and stop the vehicle
in a safe area to cool down the engine.
• When towing check transaxle fluid
more frequently.
• If your vehicle is not equipped with
the air conditioner, you should install
a condenser fan to improve engine
performance when towing a trailer.
If you do decide to pull a trailerHere are some important points if you
decide to pull a trailer:
Consider using a sway control. You can
ask a hitch dealer about sway control.
After your odometer indicates 800 km
(500 miles) or more, you can tow a
trailer. For the first 800 km (500 miles)
that you tow a trailer, don’t drive over
80 km/h (50 mph) and don’t make
starts at full throttle. This helps your
engine and other parts of your vehicle
“wear” in at the heavier loads.
Always drive your vehicle at a moder-
ate speed (less than 100 km/h (60
mph)).
On a long uphill grade, do not exceed
70 km/h (45 mph) or the posted towing
speed limit, whichever is lower.
The important considerations have to
do with weight:
Weight of the trailer
How heavy can a trailer safely be? It
should never weigh more than the maxi-
mum trailer weight with trailer brakes. But
even that can be too heavy. If you feel that
the trailer is adversely affecting the move-
ment of your vehicle, reduce your speed,
avoid uneven or winding roads, avoid
roads with steep grades, and/or lighten
your trailer load.
Page 229 of 289
611
In case of an emergency
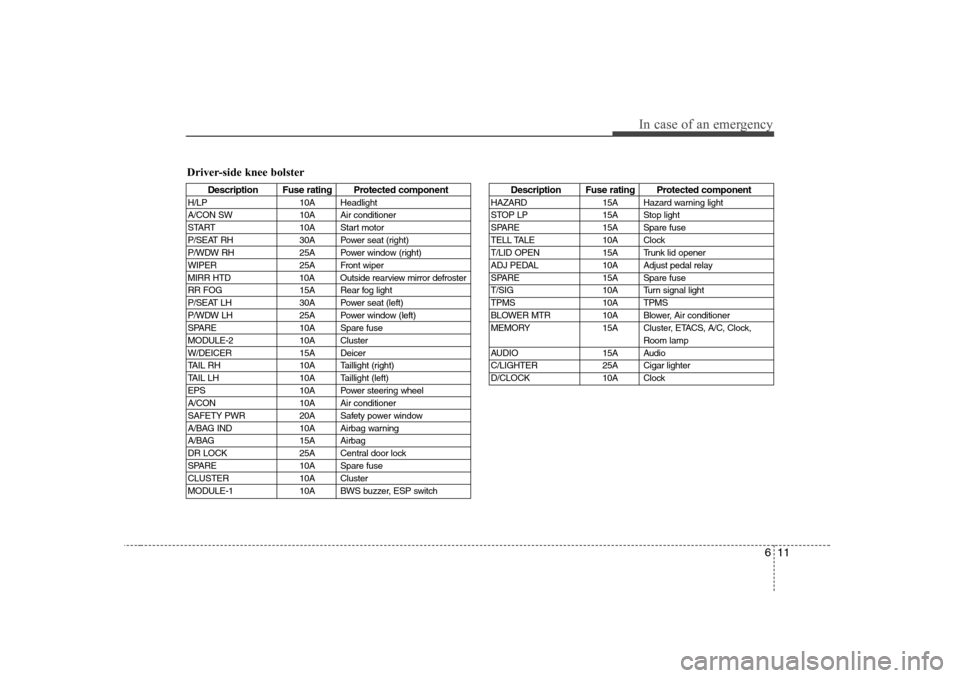
Driver-side knee bolster
Description Fuse rating Protected component
H/LP 10A Headlight
A/CON SW 10A Air conditioner
START 10A Start motor
P/SEAT RH 30A Power seat (right)
P/WDW RH 25A Power window (right)
WIPER 25A Front wiper
MIRR HTD 10A Outside rearview mirror defroster
RR FOG 15A Rear fog light
P/SEAT LH 30A Power seat (left)
P/WDW LH 25A Power window (left)
SPARE 10A Spare fuse
MODULE-2 10A Cluster
W/DEICER 15A Deicer
TAIL RH 10A Taillight (right)
TAIL LH 10A Taillight (left)
EPS 10A Power steering wheel
A/CON 10A Air conditioner
SAFETY PWR 20A Safety power window
A/BAG IND 10A Airbag warning
A/BAG 15A Airbag
DR LOCK 25A Central door lock
SPARE 10A Spare fuse
CLUSTER 10A Cluster
MODULE-1 10A BWS buzzer, ESP switch
Description Fuse rating Protected component
HAZARD 15A Hazard warning light
STOP LP 15A Stop light
SPARE 15A Spare fuse
TELL TALE 10A Clock
T/LID OPEN 15A Trunk lid opener
ADJ PEDAL 10A Adjust pedal relay
SPARE 15A Spare fuse
T/SIG 10A Turn signal light
TPMS 10A TPMS
BLOWER MTR 10A Blower, Air conditioner
MEMORY 15A Cluster, ETACS, A/C, Clock,
Room lamp
AUDIO 15A Audio
C/LIGHTER 25A Cigar lighter
D/CLOCK 10A Clock