engine KIA Optima 2008 2.G Owner's Guide
[x] Cancel search | Manufacturer: KIA, Model Year: 2008, Model line: Optima, Model: KIA Optima 2008 2.GPages: 289, PDF Size: 4.78 MB
Page 95 of 289
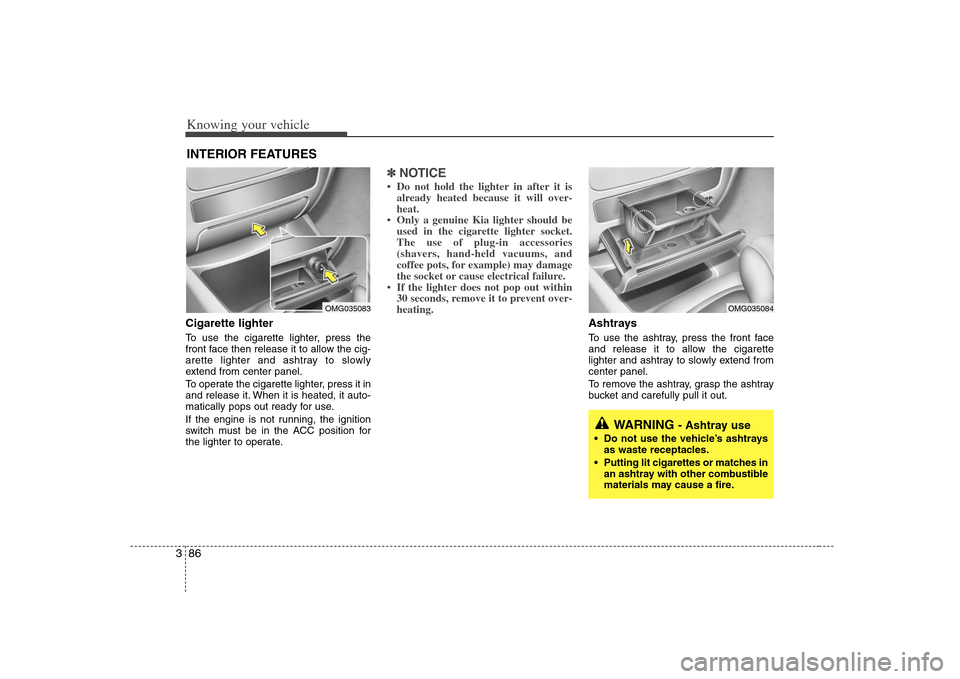
Knowing your vehicle86 3Cigarette lighterTo use the cigarette lighter, press the
front face then release it to allow the cig-
arette lighter and ashtray to slowly
extend from center panel.
To operate the cigarette lighter, press it in
and release it. When it is heated, it auto-
matically pops out ready for use.
If the engine is not running, the ignition
switch must be in the ACC position for
the lighter to operate.
✽ ✽
NOTICE• Do not hold the lighter in after it is
already heated because it will over-
heat.
• Only a genuine Kia lighter should be
used in the cigarette lighter socket.
The use of plug-in accessories
(shavers, hand-held vacuums, and
coffee pots, for example) may damage
the socket or cause electrical failure.
• If the lighter does not pop out within
30 seconds, remove it to prevent over-
heating.
Ashtrays To use the ashtray, press the front face
and release it to allow the cigarette
lighter and ashtray to slowly extend from
center panel.
To remove the ashtray, grasp the ashtray
bucket and carefully pull it out.
INTERIOR FEATURES
WARNING
- Ashtray use
Do not use the vehicle’s ashtrays
as waste receptacles.
Putting lit cigarettes or matches in
an ashtray with other combustible
materials may cause a fire.
OMG035083
OMG035084
Page 97 of 289
Knowing your vehicle88 3SunvisorUse the sunvisor to shield direct light
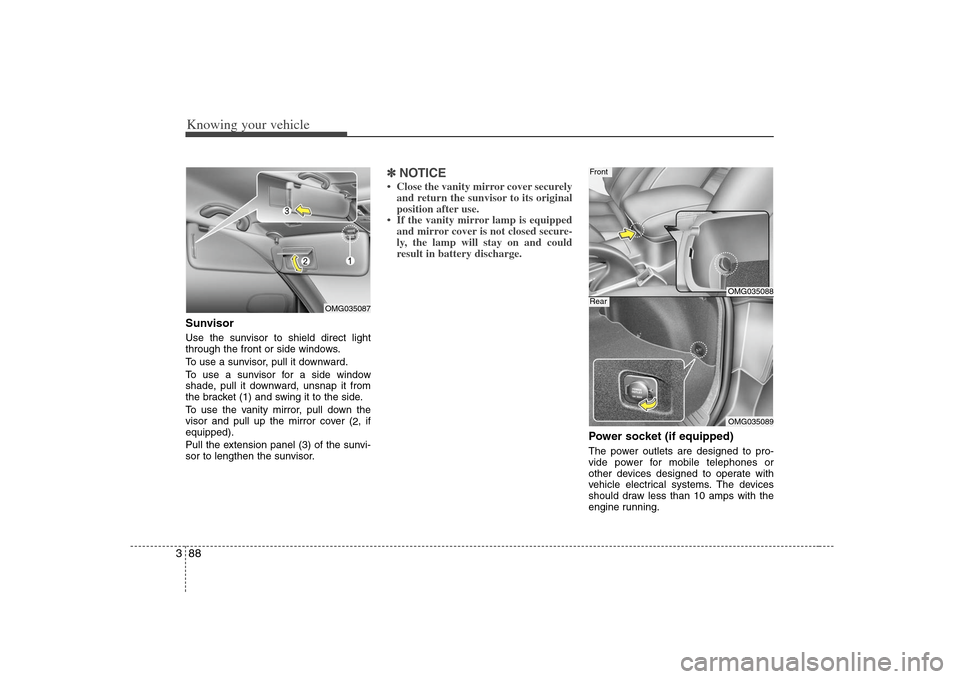
through the front or side windows.
To use a sunvisor, pull it downward.
To use a sunvisor for a side window
shade, pull it downward, unsnap it from
the bracket (1) and swing it to the side.
To use the vanity mirror, pull down the
visor and pull up the mirror cover (
2, if
equipped).
Pull the extension panel (3) of the sunvi-
sor to lengthen the sunvisor.
✽ ✽
NOTICE• Close the vanity mirror cover securely
and return the sunvisor to its original
position after use.
• If the vanity mirror lamp is equipped
and mirror cover is not closed secure-
ly, the lamp will stay on and could
result in battery discharge.
Power socket (if equipped)The power outlets are designed to pro-
vide power for mobile telephones or
other devices designed to operate with
vehicle electrical systems. The devices
should draw less than 10 amps with the
engine running.
OMG035087
OMG035088OMG035089
FrontRear
Page 98 of 289
389
Knowing your vehicle
✽ ✽
NOTICE• Use the power outlet when the engine
is running, and remove a plug from
the power outlet after using the elec-
tric appliance. Using the power outlet
excessively or while the engine is not
running or leaving appliances plugged
into the power outlet when not in use
will cause battery discharge
• Only use the electric appliances which
are less than 12V and 10A in electric
capacity.
• Adjust the air-conditioner or heater to
the lowest operation level when you
have to use the power socket while
using air-conditioner or heater.
• Close the cover when not in use.
• Some electronic devices can cause
electronic interference when plugged
into a vehicle’s power outlet. These
devices may cause excessive audio
static and malfunctions in other elec-
tronic systems or devices used in your
vehicle.
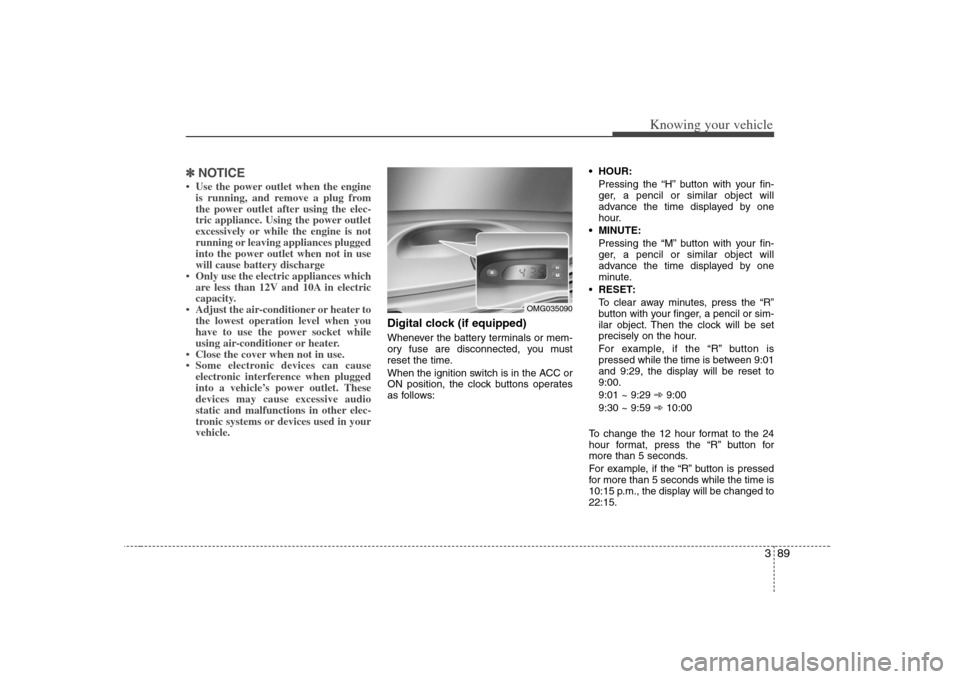
Digital clock (if equipped)Whenever the battery terminals or mem-
ory fuse are disconnected, you must
reset the time.
When the ignition switch is in the ACC or
ON position, the clock buttons operates
as follows: HOUR:
Pressing the “H” button with your fin-
ger, a pencil or similar object will
advance the time displayed by one
hour.
MINUTE:
Pressing the “M” button with your fin-
ger, a pencil or similar object will
advance the time displayed by one
minute.
RESET:
To clear away minutes, press the “R”
button with your finger, a pencil or sim-
ilar object. Then the clock will be set
precisely on the hour.
For example, if the “R” button is
pressed while the time is between 9:01
and 9:29, the display will be reset to
9:00.
9:01 ~ 9:29 ➾9:00
9:30 ~ 9:59 ➾10:00
To change the 12 hour format to the 24
hour format, press the “R” button for
more than 5 seconds.
For example, if the “R” button is pressed
for more than 5 seconds while the time is
10:15 p.m., the display will be changed to
22:15.
OMG035090
Page 104 of 289
395
Knowing your vehicle
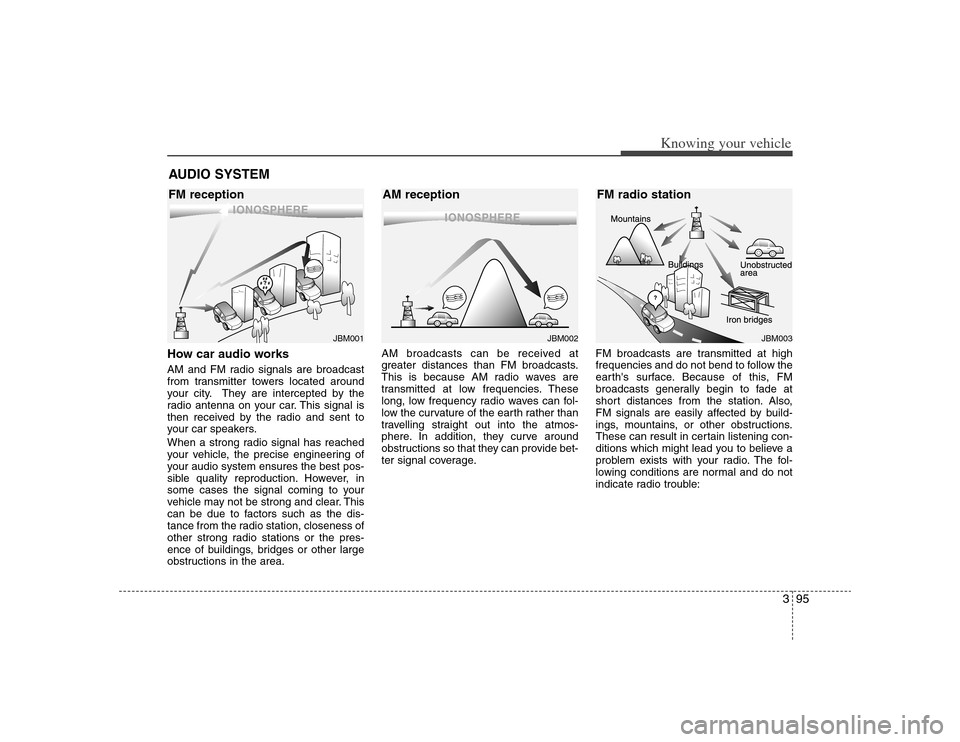
How car audio worksAM and FM radio signals are broadcast
from transmitter towers located around
your city. They are intercepted by the
radio antenna on your car. This signal is
then received by the radio and sent to
your car speakers.
When a strong radio signal has reached
your vehicle, the precise engineering of
your audio system ensures the best pos-
sible quality reproduction. However, in
some cases the signal coming to your
vehicle may not be strong and clear. This
can be due to factors such as the dis-
tance from the radio station, closeness of
other strong radio stations or the pres-
ence of buildings, bridges or other large
obstructions in the area.AM broadcasts can be received at
greater distances than FM broadcasts.
This is because AM radio waves are
transmitted at low frequencies. These
long, low frequency radio waves can fol-
low the curvature of the earth rather than
travelling straight out into the atmos-
phere. In addition, they curve around
obstructions so that they can provide bet-
ter signal coverage.FM broadcasts are transmitted at high
frequencies and do not bend to follow the
earth's surface. Because of this, FM
broadcasts generally begin to fade at
short distances from the station. Also,
FM signals are easily affected by build-
ings, mountains, or other obstructions.
These can result in certain listening con-
ditions which might lead you to believe a
problem exists with your radio. The fol-
lowing conditions are normal and do not
indicate radio trouble:AUDIO SYSTEM
¢¢¢
JBM001
¢¢¢
¢¢¢JBM002
JBM003
FM reception AM reception FM radio station
Page 137 of 289
4
Ignition switch / 4-2
Starting the engine / 4-3
Manual transaxle / 4-4
Automatic transaxle / 4-6
Brake system / 4-10
Steering wheel / 4-16
Cruise control system / 4-18
Electronic stability control / 4-21
Instrument cluster / 4-24
Gauges / 4-25
Warnings and indicators / 4-30
Compass - Z-Nav™ compass / 4-36
Rear parking assist system / 4-37
Lighting / 4-40
Wipers and washers / 4-43
Defroster / 4-46
Hazard warning flasher / 4-47
Manual climate control system / 4-48
Automatic climate control / 4-55
Windshield defrosting and defogging / 4-63
Driving your vehicle
Page 138 of 289
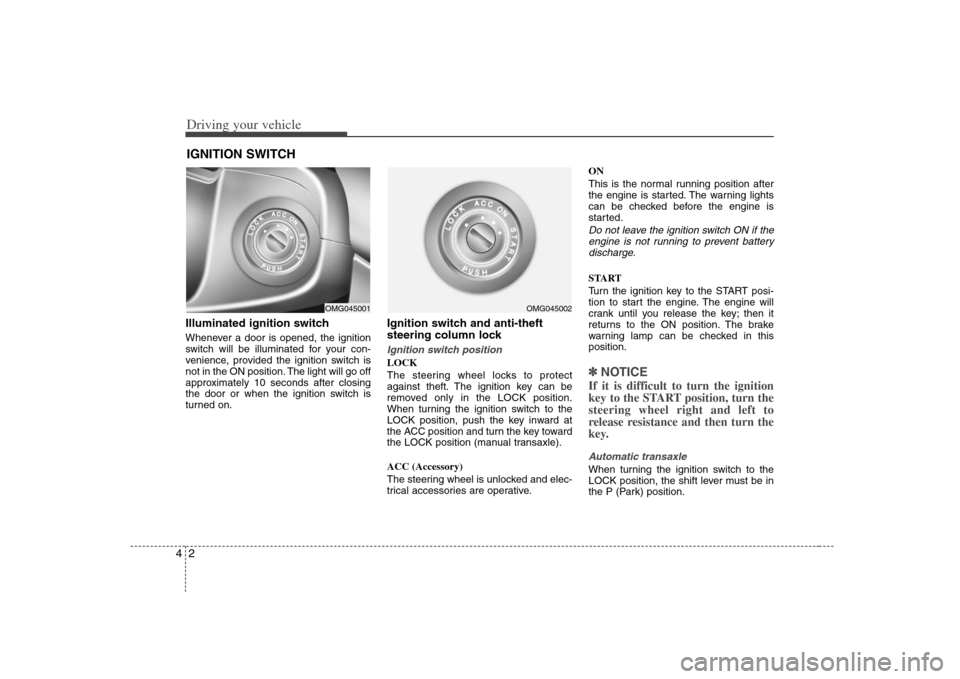
Driving your vehicle2 4Illuminated ignition switchWhenever a door is opened, the ignition
switch will be illuminated for your con-
venience, provided the ignition switch is
not in the ON position. The light will go off
approximately 10 seconds after closing
the door or when the ignition switch is
turned on.
Ignition switch and anti-theft
steering column lock Ignition switch positionLOCK
The steering wheel locks to protect
against theft. The ignition key can be
removed only in the LOCK position.
When turning the ignition switch to the
LOCK position, push the key inward at
the ACC position and turn the key toward
the LOCK position (manual transaxle).
ACC (Accessory)
The steering wheel is unlocked and elec-
trical accessories are operative.ON
This is the normal running position after
the engine is started. The warning lights
can be checked before the engine is
started.
Do not leave the ignition switch ON if the
engine is not running to prevent battery
discharge.START
Turn the ignition key to the START posi-
tion to start the engine. The engine will
crank until you release the key; then it
returns to the ON position. The brake
warning lamp can be checked in this
position.✽ ✽
NOTICEIf it is difficult to turn the ignition
key to the START position, turn the
steering wheel right and left to
release resistance and then turn the
key.Automatic transaxleWhen turning the ignition switch to the
LOCK position, the shift lever must be in
the P (Park) position.
IGNITION SWITCH
OMG045001
OMG045002
Page 139 of 289
43
Driving your vehicle
STARTING THE ENGINE 1. Make sure the parking brake is
applied.
2.Manual Transaxle- Depress the
clutch pedal fully and shift the
transaxle into Neutral. Keep the clutch
pedal depressed while turning the
ignition switch to the start position.
The starter will not operate if the
clutch pedal is not fully depressed.
Automatic Transaxle- Place the
transaxle shift lever in P (Park).
Depress the brake pedal fully.
You can also start the engine when
the shift lever is in the N (Neutral)
position.
3. Turn the ignition switch to START and
hold it there until the engine starts (a
maximum of 10 seconds), then
release the key.
4. In extremely cold weather (below
0°F / -18°C) or after the vehicle has
not been operated for several days, let
the engine warm up without depress-
ing the accelerator.
Whether the engine is cold or warm, it
should be started without depressing
the accelerator.✽ ✽
NOTICEDo not engage the starter for more than
10 seconds. If the engine stalls or fails to
start, wait 5 to 10 seconds before re-
engaging the starter. Excessive or
improper use of the starter may damage
it. The starter will not operate if:
Manual Transaxle- the clutch pedal is
not fully depressed.
Automatic Transaxle- the shift lever
is NOT in the P (Park) or N (Neutral)
position.
WARNING
- Ignition key
• Never turn the ignition switch to
LOCK or ACC while the vehicle is
moving. This would result in loss
of directional control and braking
function, which could cause an
accident or collision.
Before leaving the driver’s seat,
always make sure the shift lever
is engaged in 1
stgear for manual
transaxle or P (Park) for automat-
ic transaxle. Then, set the parking
brake fully and shut the engine
off. Unexpected and sudden vehi-
cle movement may occur if these
precautions are not taken.
Never reach for the ignition
switch, or any other controls
through the steering wheel while
the vehicle is in motion. The pres-
ence of your hand or arm in this
area could cause a loss of vehicle
control, an accident and serious
bodily injury or death.
Do not place any movable objects
around the driver’s seat as they
may move while driving, interfere
with the driver and lead to an
accident.
CAUTION -
Stall
If the engine stalls while you are in
motion, do not attempt to move the
shift lever to the P (Park) position. If
traffic and road conditions permit,
you may put the shift lever in the N
(Neutral) position while the vehicle
is still moving and turn the ignition
switch to the START position in an
attempt to restart the engine.
WARNING
Always wear appropriate shoes
when operating your vehicle.
Unsuitable shoes (high heels, ski
boots,etc.) may interfere with your
ability to use the brake and acceler-
ator pedal, and the clutch (if
equipped).
Page 140 of 289
Driving your vehicle4 4
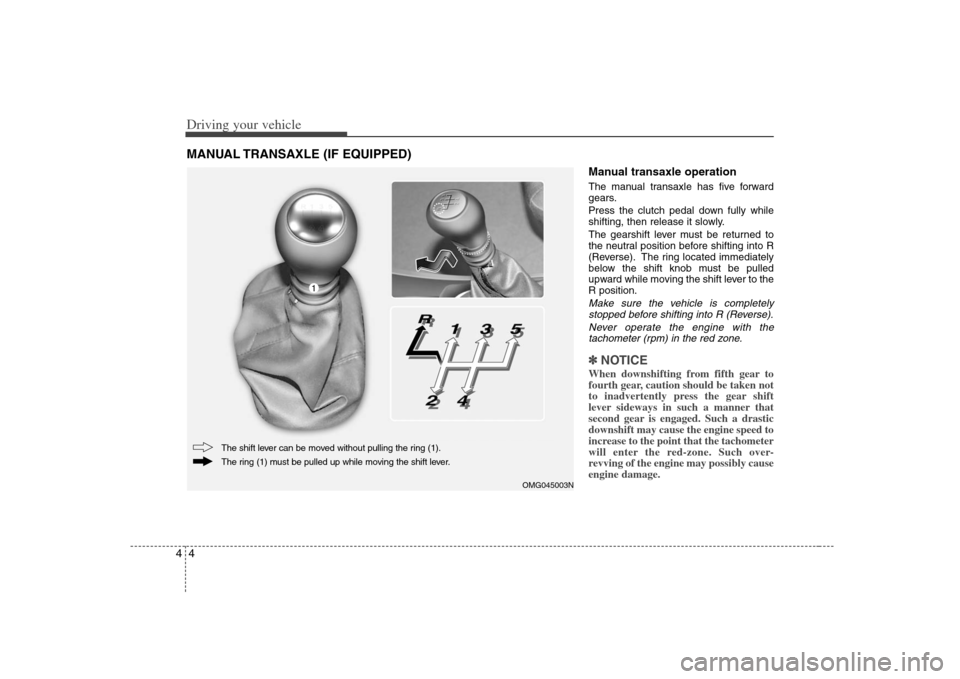
Manual transaxle operationThe manual transaxle has five forward
gears.
Press the clutch pedal down fully while
shifting, then release it slowly.
The gearshift lever must be returned to
the neutral position before shifting into R
(Reverse). The ring located immediately
below the shift knob must be pulled
upward while moving the shift lever to the
R position.Make sure the vehicle is completely
stopped before shifting into R (Reverse).
Never operate the engine with the
tachometer (rpm) in the red zone.✽ ✽
NOTICEWhen downshifting from fifth gear to
fourth gear, caution should be taken not
to inadvertently press the gear shift
lever sideways in such a manner that
second gear is engaged. Such a drastic
downshift may cause the engine speed to
increase to the point that the tachometer
will enter the red-zone. Such over-
revving of the engine may possibly cause
engine damage.
MANUAL TRANSAXLE (IF EQUIPPED)
OMG045003N
The ring (1) must be pulled up while moving the shift lever. The shift lever can be moved without pulling the ring (1).
1
Page 141 of 289
45
Driving your vehicle
To shift into reverse, rest the lever in
neutral for at least 3 seconds after your
car is completely stopped. Then move
the lever into the reverse position.
During cold weather, shifting may be
difficult until the transaxle lubricant has
warmed up. This is normal and not
harmful to the transaxle.
If you've come to a complete stop and
it's hard to shift into 1st or R (Reverse),
put the shift lever in N (Neutral) posi-
tion and release the clutch. Press the
clutch pedal back down, and then shift
into 1st or R (Reverse) gear position.
✽ ✽
NOTICETo avoid premature clutch wear and
damage, do not drive with your foot
resting on the clutch pedal. Also, don’t
use the clutch to hold the vehicle
stopped on an uphill grade, while wait-
ing for a traffic light, etc.
DownshiftingWhen you must slow down in heavy traf-
fic or while driving up steep hills, down-
shift before the engine starts to labor.
Downshifting reduces the chance of
stalling and gives better acceleration
when you again need to increase your
speed. When the vehicle is traveling
down steep hills, downshifting helps
maintain safe speed and prolongs brake
life.
WARNING
- Manual
transaxle
Before leaving the driver’s seat,
always set the parking brake fully
and shut the engine off. Then make
sure the transaxle is shifted into 1
st
gear when the vehicle is parked on
a level or uphill grade, and shifted
into R (Reverse) on a downhill
grade. Unexpected and sudden
vehicle movement can occur if
these precautions are not followed
in the order identified.
Page 142 of 289
Driving your vehicle6 4
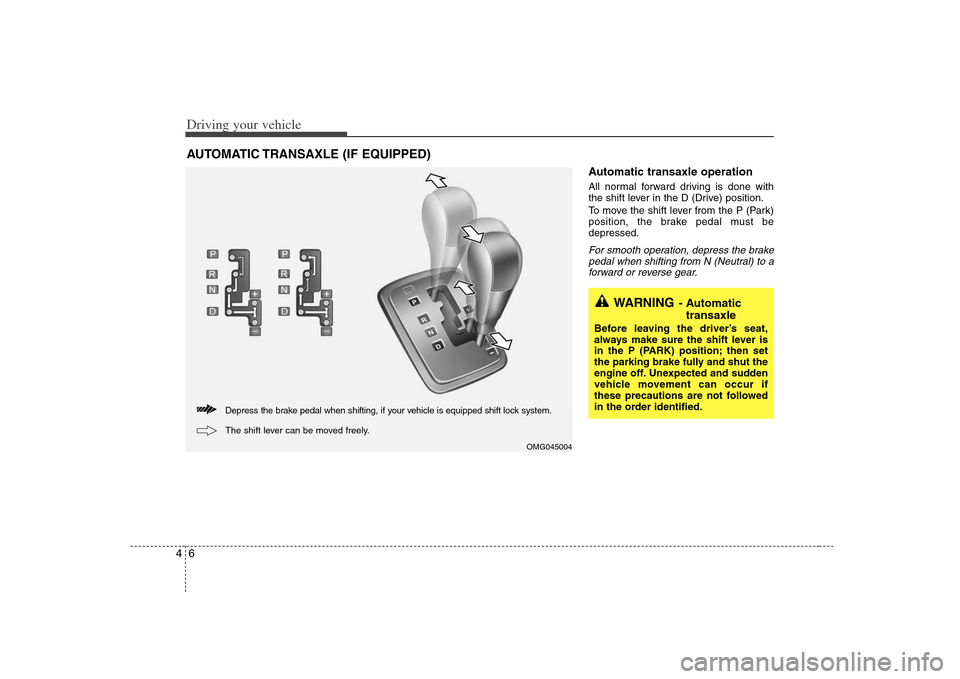
Automatic transaxle operationAll normal forward driving is done with
the shift lever in the D (Drive) position.
To move the shift lever from the P (Park)
position, the brake pedal must be
depressed.For smooth operation, depress the brake
pedal when shifting from N (Neutral) to a
forward or reverse gear.
AUTOMATIC TRANSAXLE (IF EQUIPPED)
WARNING
- Automatic
transaxle
Before leaving the driver’s seat,
always make sure the shift lever is
in the P (PARK) position; then set
the parking brake fully and shut the
engine off. Unexpected and sudden
vehicle movement can occur if
these precautions are not followed
in the order identified.
OMG045004
Depress the brake pedal when shifting, if your vehicle is equipped shift lock system.
The shift lever can be moved freely.