seat adjustment KIA Optima 2015 4.G Owner's Manual
[x] Cancel search | Manufacturer: KIA, Model Year: 2015, Model line: Optima, Model: KIA Optima 2015 4.GPages: 487, PDF Size: 13.4 MB
Page 16 of 487
Safety features of your vehicle
Seat. . . . . . . . . . . . . . . . . . . . . . . . . . . . . . . . . . . . \
. . . 3-2
• Front seat adjustment - manual. . . . . . . . . . . . . . . . . . 3-4
. . . . . . . . . . . . . . . . . . . 3-6
. . . . . . . . . . . . . . . . . . . . . . . . . . . 3-12
. . . . . . . . . . . . . . . . . . . . . . . . . . . . . . 3-13
. . . . . . . . . . . . . . . . . . . . . . . . . 3-14
. . . . . . . . . . . . . . . . . . . . . . . . . . . 3-15
. . . . . . . . . . . . . . . . . . . . . . . . . . . . . . . . . . . . \
. 3-16
. . . . . . . . . . . . . . . . . . . . . . . . . . 3-16
Seat belts . . . . . . . . . . . . . . . . . . . . . . . . . . . . . . . . . 3-18
. . . . . . . . . . . . . . . . . . . . . . 3-18
. . . . . . . . . . . . . . . . . . . . . . . . 3-24
. . . . . . . . . . . . . . . . . . . . . . . . . . 3-26
. . . . . . . . . . . . . . . . . . . . . . . . . . . . . 3-28
Child restraint system . . . . . . . . . . . . . . . . . . . . . . 3-29
. . . . . . . . . . . . . . . . . . 3-30
. . . . . . . . . . . . . . . . . . . . . . 3-33
. . . . . . . . . . . . . . . . . . . . . . . . . 3-34
Air bag - advanced supplemental restraint system . . . . . . . . . . . . . . . . . . . . . . . . . . . . . . . . . . 3-36\
. . . . . . . . . . . . 3-37
. . . . . . . . . . . . . . . . . . . . . . . . . 3-39
. . . . . . . . . . . . . . . . . 3-40
. . . . . . . . . . . . . . . . . . . . . 3-42 . . . . . . . . . . . 3-47
. . . . . . . . . . . . . . . . . . . . . . . . . . . . . . . . . 3-50
. . . . . . . . . . . . . . . . . . . . . . . . . . . . . . 3-51
. . 3-52
. . . . . . . . . . . . . . . . . . . . . . . . . . . . . . . . . . . 3-\
57
. . . . . . . . . . . . . . . . . . . . . . . . . 3-58
3
Page 17 of 487
Safety features of your vehicle
23
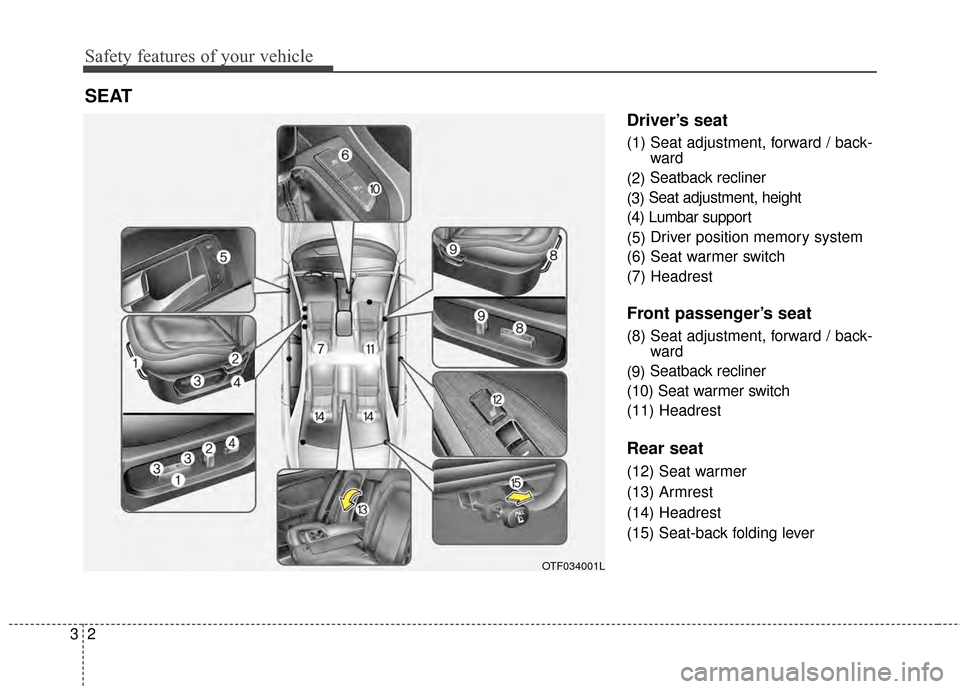
Driver’s seat
(1) Seat adjustment, forward / back-ward
(2) Seatback recliner
(3) Seat adjustment, height
(4) Lumbar support
(5) Driver position memory system
(6) Seat warmer switch
(7) Headrest
Front passenger’s seat
(8) Seat adjustment, forward / back- ward
(9) Seatback recliner
(10) Seat warmer switch
(11) Headrest
Rear seat
(12) Seat warmer
(13) Armrest
(14) Headrest
(15) Seat-back folding lever
SEAT
OTF034001L
Page 19 of 487
Safety features of your vehicle
43
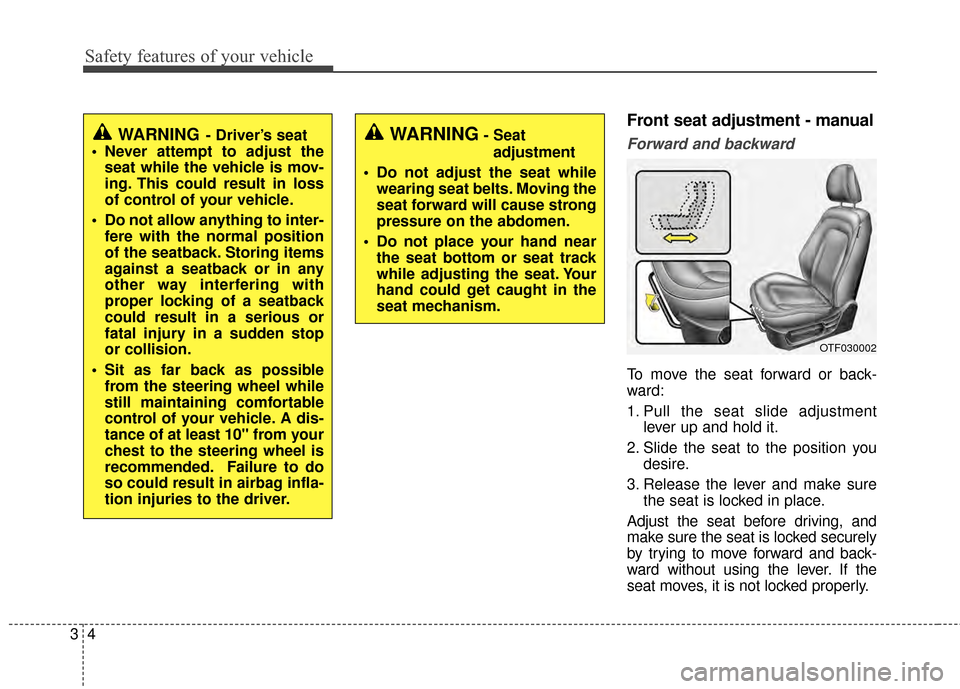
Front seat adjustment - manual
Forward and backward
To move the seat forward or back-
ward:
1. Pull the seat slide adjustmentlever up and hold it.
2. Slide the seat to the position you desire.
3. Release the lever and make sure the seat is locked in place.
Adjust the seat before driving, and
make sure the seat is locked securely
by trying to move forward and back-
ward without using the lever. If the
seat moves, it is not locked properly.
WARNING- Driver’s seat
Never attempt to adjust the seat while the vehicle is mov-
ing. This could result in loss
of control of your vehicle.
Do not allow anything to inter- fere with the normal position
of the seatback. Storing items
against a seatback or in any
other way interfering with
proper locking of a seatback
could result in a serious or
fatal injury in a sudden stop
or collision.
Sit as far back as possible from the steering wheel while
still maintaining comfortable
control of your vehicle. A dis-
tance of at least 10" from your
chest to the steering wheel is
recommended. Failure to do
so could result in airbag infla-
tion injuries to the driver.WARNING- Seat
adjustment
Do not adjust the seat while wearing seat belts. Moving the
seat forward will cause strong
pressure on the abdomen.
Do not place your hand near the seat bottom or seat track
while adjusting the seat. Your
hand could get caught in the
seat mechanism.
OTF030002
Page 21 of 487
Safety features of your vehicle
63
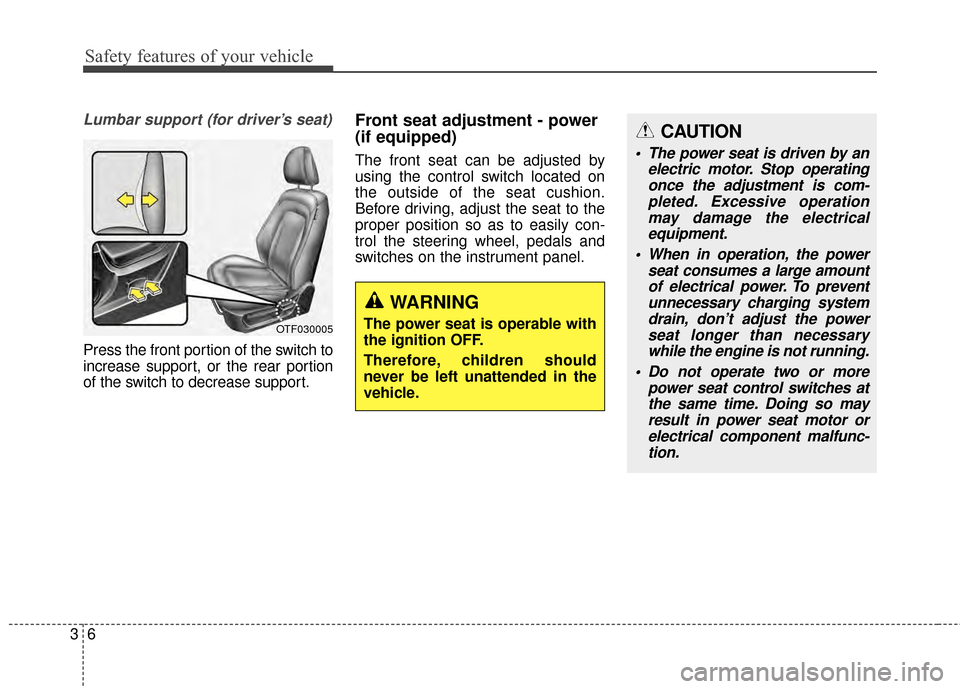
Lumbar support (for driver’s seat)
Press the front portion of the switch to
increase support, or the rear portion
of the switch to decrease support.
Front seat adjustment - power
(if equipped)
The front seat can be adjusted by
using the control switch located on
the outside of the seat cushion.
Before driving, adjust the seat to the
proper position so as to easily con-
trol the steering wheel, pedals and
switches on the instrument panel.
OTF030005
WARNING
The power seat is operable with
the ignition OFF.
Therefore, children should
never be left unattended in the
vehicle.
CAUTION
The power seat is driven by anelectric motor. Stop operatingonce the adjustment is com-pleted. Excessive operationmay damage the electricalequipment.
When in operation, the power seat consumes a large amountof electrical power. To preventunnecessary charging systemdrain, don’t adjust the powerseat longer than necessarywhile the engine is not running.
Do not operate two or more power seat control switches atthe same time. Doing so mayresult in power seat motor orelectrical component malfunc-tion.
Page 23 of 487
Safety features of your vehicle
83
Lumbar support (for driver’s seat, if equipped)
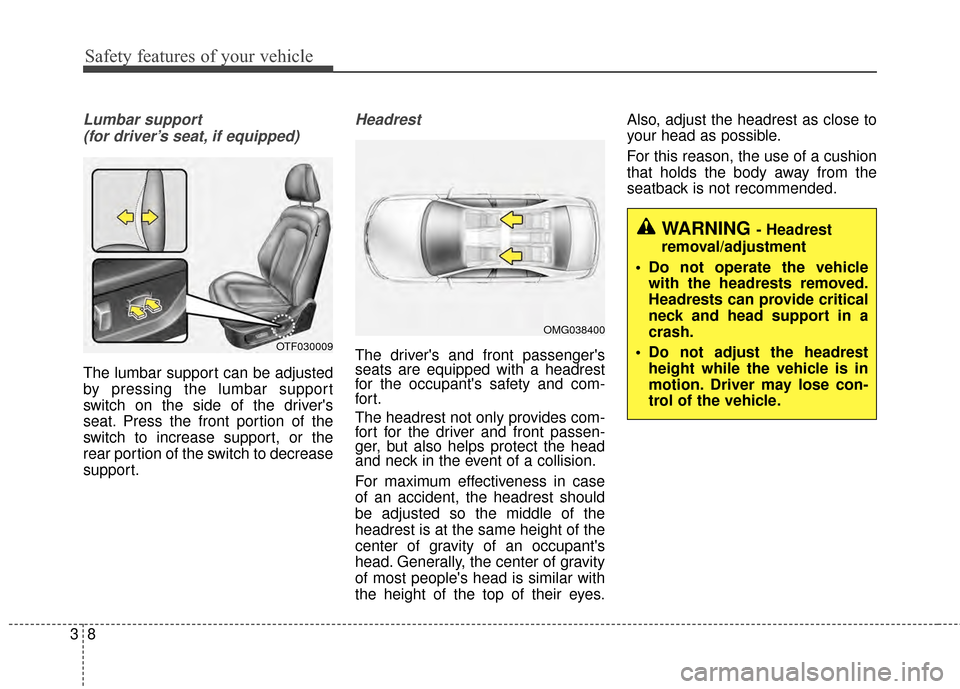
The lumbar support can be adjusted
by pressing the lumbar support
switch on the side of the driver's
seat. Press the front portion of the
switch to increase support, or the
rear portion of the switch to decrease
support.
Headrest
The driver's and front passenger's
seats are equipped with a headrest
for the occupant's safety and com-
for t.
The headrest not only provides com-
fort for the driver and front passen-
ger, but also helps protect the head
and neck in the event of a collision.
For maximum effectiveness in case
of an accident, the headrest should
be adjusted so the middle of the
headrest is at the same height of the
center of gravity of an occupant's
head. Generally, the center of gravity
of most people's head is similar with
the height of the top of their eyes. Also, adjust the headrest as close to
your head as possible.
For this reason, the use of a cushion
that holds the body away from the
seatback is not recommended.OTF030009
OMG038400
WARNING - Headrest
removal/adjustment
Do not operate the vehicle with the headrests removed.
Headrests can provide critical
neck and head support in a
crash.
Do not adjust the headrest height while the vehicle is in
motion. Driver may lose con-
trol of the vehicle.
Page 24 of 487
39
Safety features of your vehicle
Forward and backward adjustment
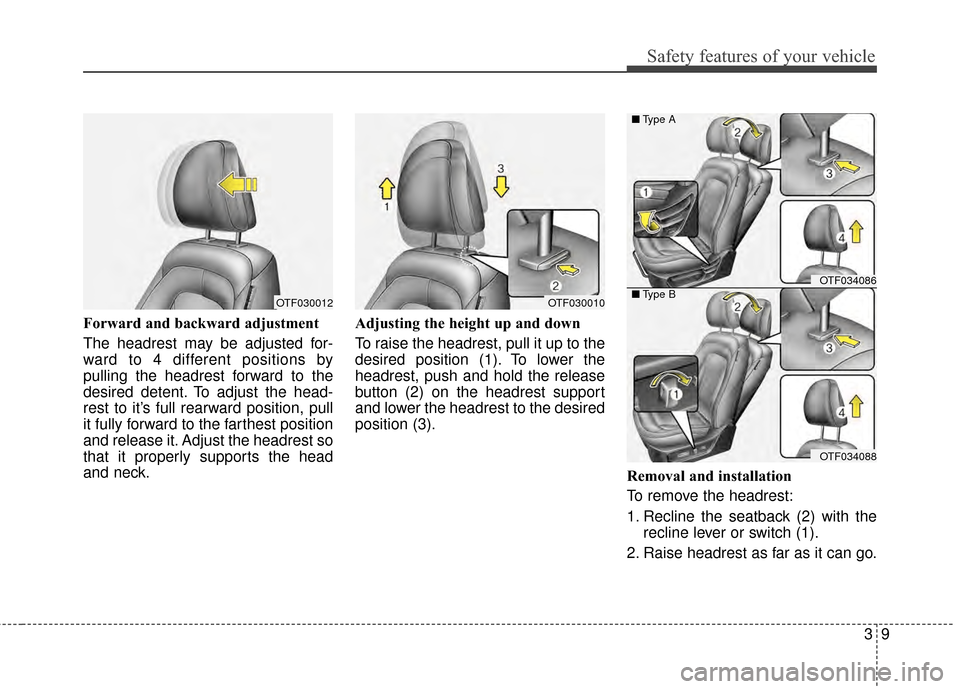
The headrest may be adjusted for-
ward to 4 different positions by
pulling the headrest forward to the
desired detent. To adjust the head-
rest to it’s full rearward position, pull
it fully forward to the farthest position
and release it. Adjust the headrest so
that it properly supports the head
and neck.Adjusting the height up and down
To raise the headrest, pull it up to the
desired position (1). To lower the
headrest, push and hold the release
button (2) on the headrest support
and lower the headrest to the desired
position (3).
Removal and installation
To remove the headrest:
1. Recline the seatback (2) with therecline lever or switch (1).
2. Raise headrest as far as it can go.
OTF030012OTF030010
OTF034086
OTF034088
■
Type A
■ Type B
Page 29 of 487
Safety features of your vehicle
14
3
Rear seat adjustment
Headrest
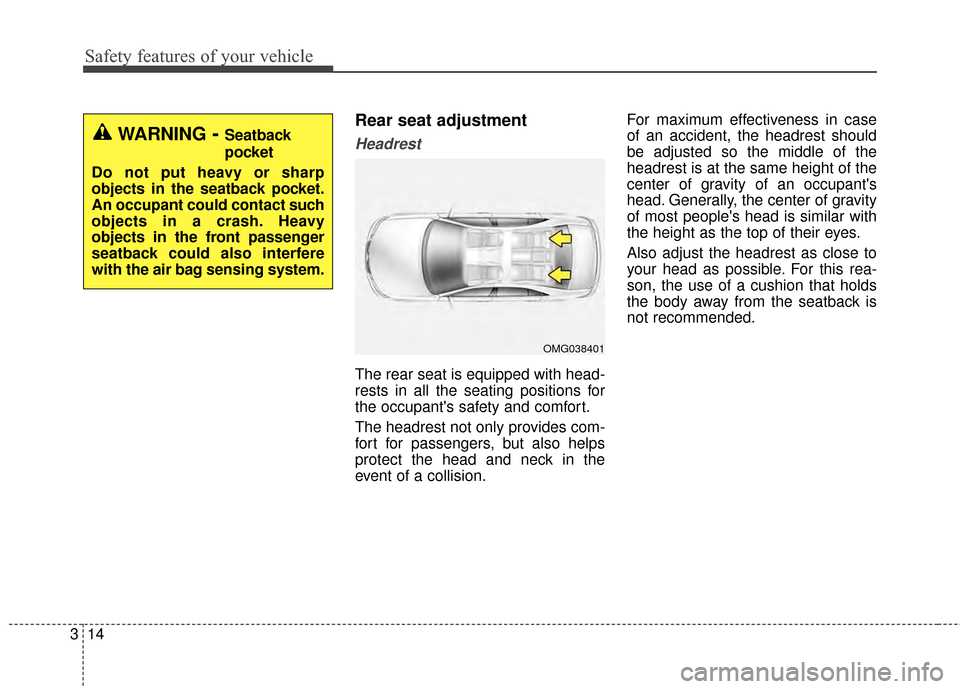
The rear seat is equipped with head-
rests in all the seating positions for
the occupant's safety and comfort.
The headrest not only provides com-
fort for passengers, but also helps
protect the head and neck in the
event of a collision. For maximum effectiveness in case
of an accident, the headrest should
be adjusted so the middle of the
headrest is at the same height of the
center of gravity of an occupant's
head. Generally, the center of gravity
of most people's head is similar with
the height as the top of their eyes.
Also adjust the headrest as close to
your head as possible. For this rea-
son, the use of a cushion that holds
the body away from the seatback is
not recommended.
WARNING- Seatback
pocket
Do not put heavy or sharp
objects in the seatback pocket.
An occupant could contact such
objects in a crash. Heavy
objects in the front passenger
seatback could also interfere
with the air bag sensing system.
OMG038401
Page 37 of 487
Safety features of your vehicle
22
3
It will also lock if you try to lean for-
ward too quickly.
If you are unable to pull out the seat
belt from the retractor, firmly pull the
belt out and release it. Then you will
be able to pull the belt out smoothly.
Height adjustment
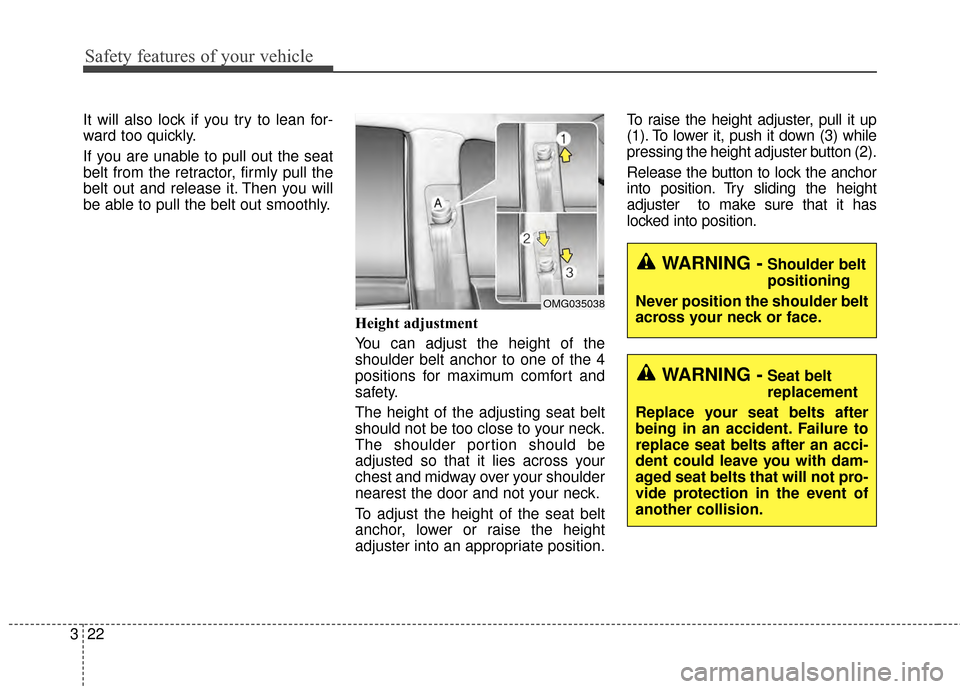
You can adjust the height of the
shoulder belt anchor to one of the 4
positions for maximum comfort and
safety.
The height of the adjusting seat belt
should not be too close to your neck.
The shoulder portion should be
adjusted so that it lies across your
chest and midway over your shoulder
nearest the door and not your neck.
To adjust the height of the seat belt
anchor, lower or raise the height
adjuster into an appropriate position.To raise the height adjuster, pull it up
(1). To lower it, push it down (3) while
pressing the height adjuster button (2).
Release the button to lock the anchor
into position. Try sliding the height
adjuster to make sure that it has
locked into position.
WARNING -Shoulder belt
positioning
Never position the shoulder belt
across your neck or face.
WARNING -Seat belt
replacement
Replace your seat belts after
being in an accident. Failure to
replace seat belts after an acci-
dent could leave you with dam-
aged seat belts that will not pro-
vide protection in the event of
another collision.
OMG035038
Page 118 of 487
445
Features of your vehicle
Inside rearview mirror
Adjust the rearview mirror so that the
center view through the rear window
is seen. Make this adjustment before
you start driving.
Do not place objects in the rear seat
which would interfere with your vision
through the rear window.
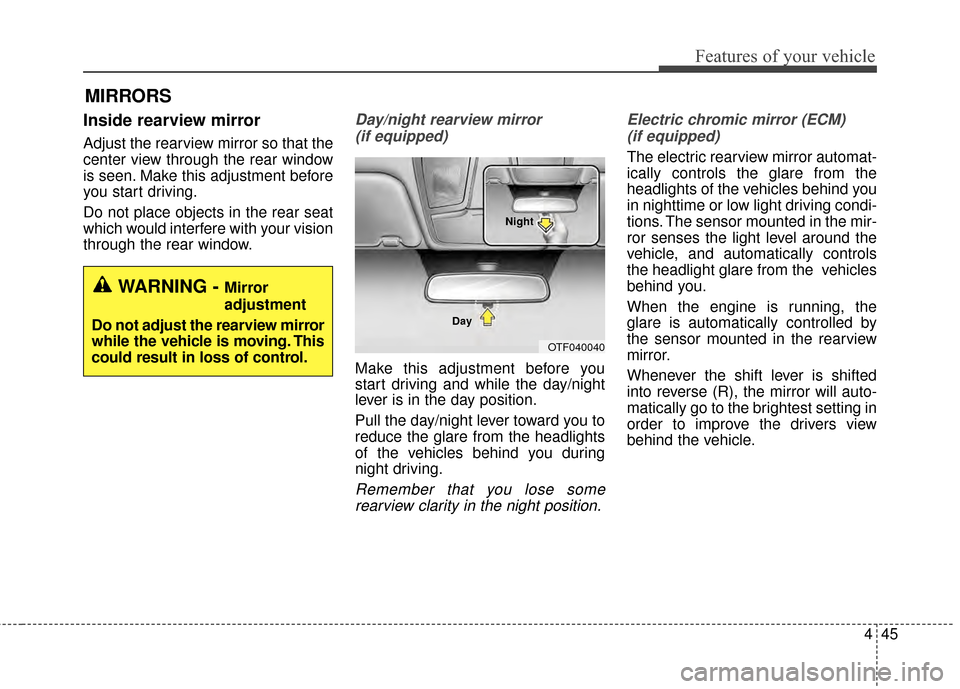
Day/night rearview mirror (if equipped)
Make this adjustment before you
start driving and while the day/night
lever is in the day position.
Pull the day/night lever toward you to
reduce the glare from the headlights
of the vehicles behind you during
night driving.
Remember that you lose somerearview clarity in the night position. Electric chromic mirror (ECM)
(if equipped)
The electric rearview mirror automat-
ically controls the glare from the
headlights of the vehicles behind you
in nighttime or low light driving condi-
tions. The sensor mounted in the mir-
ror senses the light level around the
vehicle, and automatically controls
the headlight glare from the vehicles
behind you.
When the engine is running, the
glare is automatically controlled by
the sensor mounted in the rearview
mirror.
Whenever the shift lever is shifted
into reverse (R), the mirror will auto-
matically go to the brightest setting in
order to improve the drivers view
behind the vehicle.
MIRRORS
WARNING - Mirror
adjustment
Do not adjust the rearview mirror
while the vehicle is moving. This
could result in loss of control.
OTF040040
Day Night
Page 484 of 487
Index
6I
Front fog light . . . . . . . . . . . . . . . . . . . . . . . . . . . . 4-104
Headlight escort function . . . . . . . . . . . . . . . . . . . . . 4-99
Headlight leveling device . . . . . . . . . . . . . . . . . . . . . 4-99
High beam operation . . . . . . . . . . . . . . . . . . . . . . . 4-102
Lighting control . . . . . . . . . . . . . . . . . . . . . . . . . . . 4-100
Turn signals and lane change signals . . . . . . . . . . . 4-103
Luggage volume . . . . . . . . . . . . . . . . . . . . . . . . . . . . . . . 8-3
Maintenance services . . . . . . . . . . . . . . . . . . . . . . . . . . . 7-4 Owner maintenance precautions . . . . . . . . . . . . . . . . 7-5
Owner’s responsibility . . . . . . . . . . . . . . . . . . . . . . . . 7-4
Manual climate control system. . . . . . . . . . . . . . . . . . 4-113 Climate control air filter. . . . . . . . . . . . . . . . . . . . . 4-121
Heating and air conditioning . . . . . . . . . . . . . . . . . 4-114
System operation . . . . . . . . . . . . . . . . . . . . . . . . . . 4-119
Mirrors . . . . . . . . . . . . . . . . . . . . . . . . . . . . . . . . . . . . \
. 4-45 Inside rearview mirror . . . . . . . . . . . . . . . . . . . . . . . 4-45
Outside rearview mirror . . . . . . . . . . . . . . . . . . . . . 4-55
Owner maintenance . . . . . . . . . . . . . . . . . . . . . . . . . . . . 7-6 Owner maintenance schedule. . . . . . . . . . . . . . . . . . . 7-6 Parking brake . . . . . . . . . . . . . . . . . . . . . . . . . . . . . . . . 7-36
Checking the parking brake . . . . . . . . . . . . . . . . . . . 7-36
Rear camera display . . . . . . . . . . . . . . . . . . . . . . . . . . . 4-97
Recommended lubricants and capacities . . . . . . . . . . . . 8-6 Recommended sae viscosity number . . . . . . . . . . . . . 8-8
Remote keyless entry . . . . . . . . . . . . . . . . . . . . . . . . . . . 4-9 Battery replacement . . . . . . . . . . . . . . . . . . . . . . . . . 4-11
Immobilizer system . . . . . . . . . . . . . . . . . . . . . . . . . 4-12
Remote keyless entry system operations . . . . . . . . . . 4-9
Transmitter precautions . . . . . . . . . . . . . . . . . . . . . . 4-10
Road warning . . . . . . . . . . . . . . . . . . . . . . . . . . . . . . . . . 6-2 Hazard warning flasher . . . . . . . . . . . . . . . . . . . . . . . 6-2
Scheduled maintenance service . . . . . . . . . . . . . . . . . . . 7-8
Seat . . . . . . . . . . . . . . . . . . . . . . . . . . . . . . . . . . . . \
. . . . . 3-2 Air ventilation seat . . . . . . . . . . . . . . . . . . . . . . . . . . 3-12
Armrest . . . . . . . . . . . . . . . . . . . . . . . . . . . . . . . . . . . 3-\
16
Folding the rear seat . . . . . . . . . . . . . . . . . . . . . . . . . 3-16
Front seat adjustment - manual . . . . . . . . . . . . . . . . . 3-4
Front seat adjustment - power . . . . . . . . . . . . . . . . . . 3-6
Rear seat adjustment . . . . . . . . . . . . . . . . . . . . . . . . 3-14
M
O
P
R
S