tires KIA OPTIMA 2019 Features and Functions Guide
[x] Cancel search | Manufacturer: KIA, Model Year: 2019, Model line: OPTIMA, Model: KIA OPTIMA 2019Pages: 50, PDF Size: 4.87 MB
Page 7 of 50
5
0
1 2
3
4
5
6
7
8
20 40
60
80
100
120
140
160
0
MPH
km/h
0
20
40 60
80
100
120
140
160
180
200
220
240
260
x1000rpm
ECO
AUTO
EPBCHE F
SPORT
Tire Pressure Monitoring System Video To view a video on your mobile device, snap this QR Code or visit the listed website
.
Refer to page 2 for more information .
www.youtube.com/KiaFeatureVideos
QR CODE
(Type B cluster screen shown)
(Indicator located on Instrument Cluster)
A
ALWAYS CHECK THE OWNER’S MANUAL FOR COMPLETE OPER ATING INFORMATION AND SAFET Y WARNINGS *IF EQUIPPED †LEGAL DISCL AIMERS ON BACK INSIDE COVER
Tire Pressure Monitoring System (TPMS)*†2 5
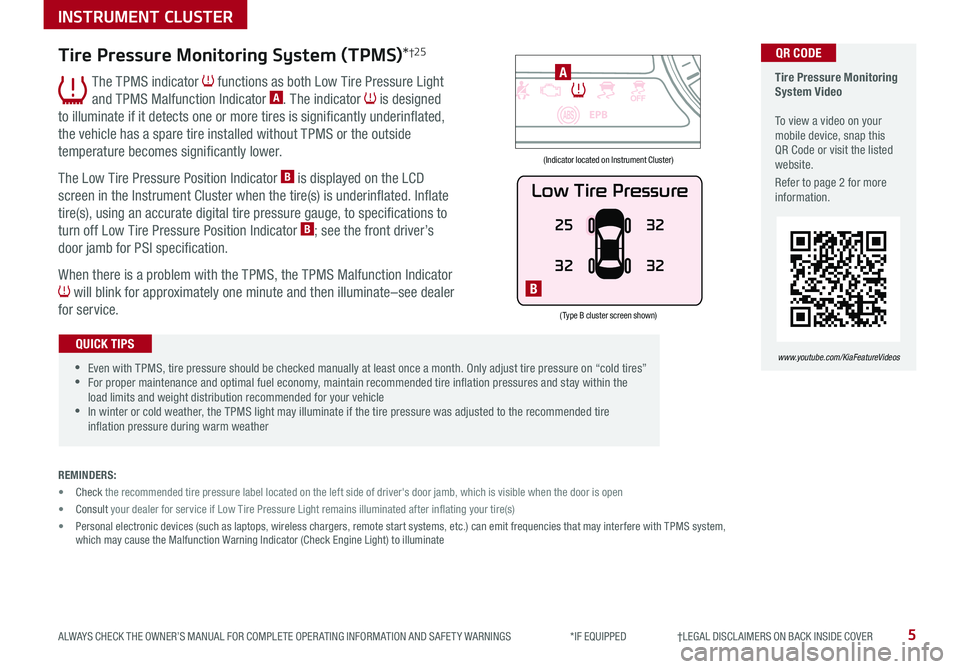
The TPMS indicator functions as both Low Tire Pressure Light
and TPMS Malfunction Indicator A . The indicator is designed
to illuminate if it detects one or more tires is significantly underinflated,
the vehicle has a spare tire installed without TPMS or the outside
temperature becomes significantly lower .
The Low Tire Pressure Position Indicator B is displayed on the LCD
screen in the Instrument Cluster when the tire(s) is underinflated . Inflate
tire(s), using an accurate digital tire pressure gauge, to specifications to
turn off Low Tire Pressure Position Indicator B; see the front driver’s
door jamb for PSI specification .
When there is a problem with the TPMS, the TPMS Malfunction Indicator
will blink for approximately one minute and then illuminate–see dealer
for service .
•Even with TPMS, tire pressure should be checked manually at least once a month . Only adjust tire pressure on “cold tires” •For proper maintenance and optimal fuel economy, maintain recommended tire inflation pressures and stay within the load limits and weight distribution recommended for your vehicle •In winter or cold weather, the TPMS light may illuminate if the tire pressure was adjusted to the recommended tire inflation pressure during warm weather
QUICK TIPS
REMINDERS:
• Check the recommended tire pressure label located on the left side of driver's door jamb, which is visible when the door is open
• Consult your dealer for service if Low Tire Pressure Light remains illuminated after inflating your tire(s)
• Personal electronic devices (such as laptops, wireless chargers, remote start systems, etc .) can emit frequencies that may interfere with TPMS system, which may cause the Malfunction Warning Indicator (Check Engine Light) to illuminate
INSTRUMENT CLUSTER
Low Tire Pressure
25
32 32
32
B
Page 9 of 50
7ALWAYS CHECK THE OWNER’S MANUAL FOR COMPLETE OPER ATING INFORMATION AND SAFET Y WARNINGS . *IF EQUIPPED
Instant Fuel Consumption Mode
INSTRUMENT CLUSTER
There are several factors that contribute
to your vehicle’s fuel economy, including
maintenance of your vehicle, driving style,
environmental conditions, vehicle weight
and vehicle aerodynamics . Below are tips
on how to help improve fuel economy:
•Keep your vehicle in good condition
with regular maintenance
•Don’t let the engine idle longer than
necessary
•Drive at a moderate speed,
accelerating smoothly and at a
moderate rate
•Keep tires inflated to the
recommended pressure
•Travel lightly, without carrying
unnecessary weight in your vehicle
•Avoid placing large or heavy items on roof racks
•Avoid hilly, winding or poorly maintained roads
For more information on Fuel Economy, you can snap the QR Code above to view a video or refer to the Owner's Manual.
Fuel Economy Video To view a video on your mobile device, snap this QR Code or visit the listed website .
Refer to page 2 for more information .
www.youtube.com/KiaFeatureVideos
QR CODE
( Type A - Buttons located on Steering Wheel)
A
B
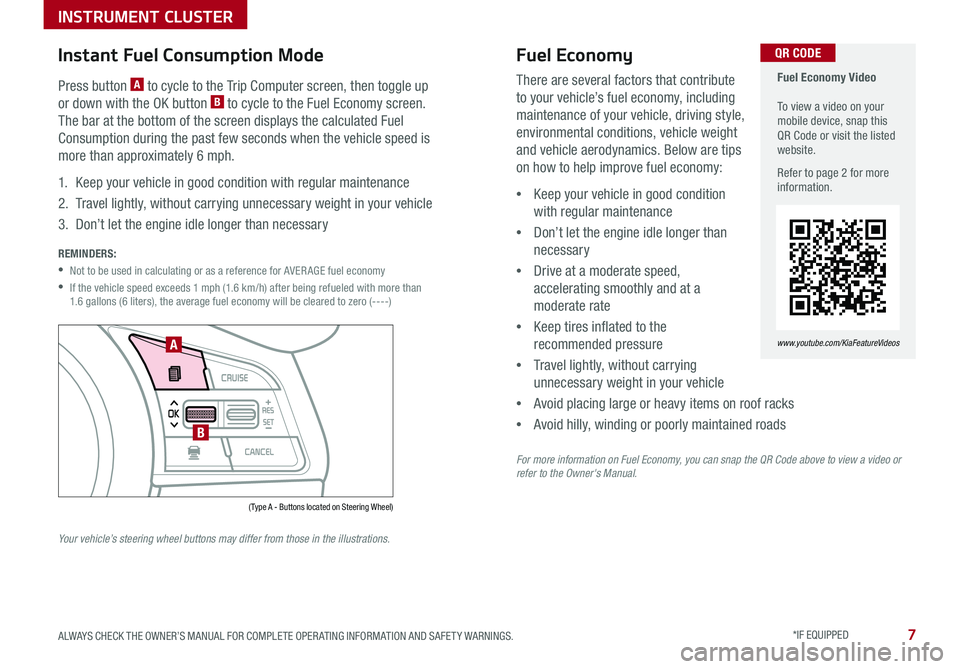
Press button A to cycle to the Trip Computer screen, then toggle up
or down with the OK button B to cycle to the Fuel Economy screen .
The bar at the bottom of the screen displays the calculated Fuel
Consumption during the past few seconds when the vehicle speed is
more than approximately 6 mph .
1 . Keep your vehicle in good condition with regular maintenance
2 . Travel lightly, without carrying unnecessary weight in your vehicle
3 . Don’t let the engine idle longer than necessary
REMINDERS:
•Not to be used in calculating or as a reference for AVER AGE fuel economy
•
If the vehicle speed exceeds 1 mph (1 .6 km/h) after being refueled with more than 1 .6 gallons (6 liters), the average fuel economy will be cleared to zero (----)
Your vehicle’s steering wheel buttons may differ from those in the illustrations.
Fuel Economy
Page 11 of 50
9
ALWAYS CHECK THE OWNER’S MANUAL FOR COMPLETE OPERATING INFORMATION AND SAFETY WARNINGS .
*IF EQUIPPED
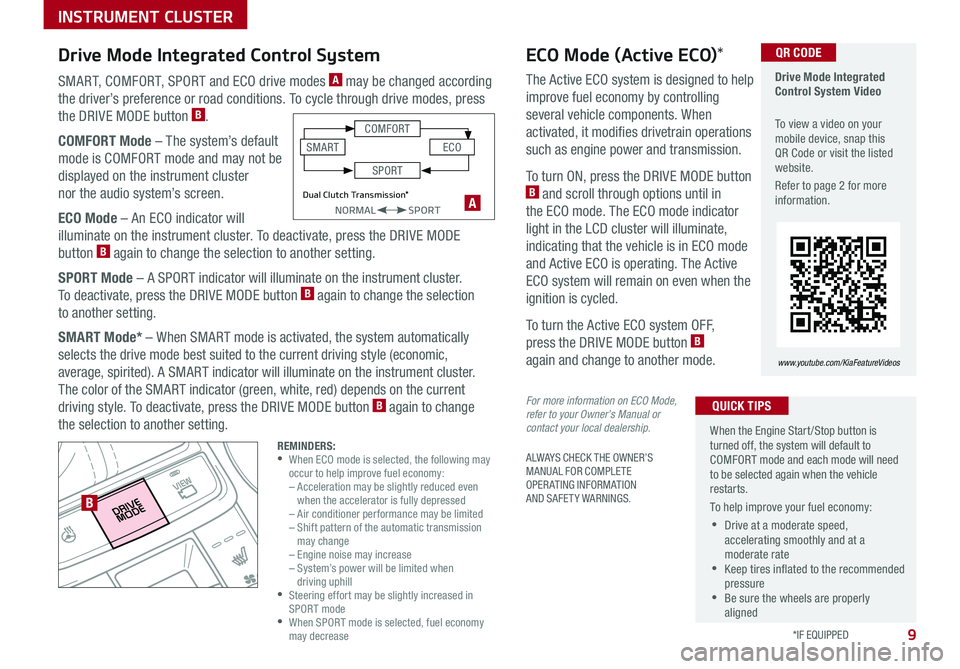
SMART, COMFORT, SPORT and ECO drive modes A may be changed according
the driver’s preference or road conditions . To cycle through drive modes, press
the DRIVE MODE button B .
COMFORT Mode – The system’s default
mode is COMFORT mode and may not be
displayed on the instrument cluster
nor the audio system’s screen .
ECO Mode – An ECO indicator will
illuminate on the instrument cluster . To deactivate, press the DRIVE MODE
button B again to change the selection to another setting .
SPORT Mode – A SPORT indicator will illuminate on the instrument cluster .
To deactivate, press the DRIVE MODE button B again to change the selection
to another setting .
SMART Mode* – When SMART mode is activated, the system automatically
selects the drive mode best suited to the current driving style (economic,
average, spirited) . A SMART indicator will illuminate on the instrument cluster .
The color of the SMART indicator (green, white, red) depends on the current
driving style . To deactivate, press the DRIVE MODE button B again to change
the selection to another setting .
Drive Mode Integrated Control System Video
To view a video on your mobile device, snap this QR Code or visit the listed website .
Refer to page 2 for more information .
www.youtube.com/KiaFeatureVideos
B
QR CODEECO Mode (Active ECO)*
A
The Active ECO system is designed to help
improve fuel economy by controlling
several vehicle components . When
activated, it modifies drivetrain operations
such as engine power and transmission .
To turn ON, press the DRIVE MODE button B and scroll through options until in
the ECO mode . The ECO mode indicator
light in the LCD cluster will illuminate,
indicating that the vehicle is in ECO mode
and Active ECO is operating . The Active
ECO system will remain on even when the
ignition is cycled .
To turn the Active ECO system OFF,
press the DRIVE MODE button B
again and change to another mode .
For more information on ECO Mode, refer to your Owner’s Manual or contact your local dealership.
When the Engine Start/Stop button is turned off, the system will default to COMFORT mode and each mode will need to be selected again when the vehicle restarts .
To help improve your fuel economy:
•Drive at a moderate speed, accelerating smoothly and at a moderate rate •Keep tires inflated to the recommended pressure •Be sure the wheels are properly aligned
QUICK TIPS
Drive Mode Integrated Control System
REMINDERS: •
When ECO mode is selected, the following may occur to help improve fuel economy: – Acceleration may be slightly reduced even when the accelerator is fully depressed – Air conditioner performance may be limited – Shift pattern of the automatic transmission may change – Engine noise may increase – System’s power will be limited when driving uphill •
Steering effort may be slightly increased in SPORT mode •
When SPORT mode is selected, fuel economy may decrease
Dual Clutch Transmission*NORMALSPORT
COMFORT
ECOSMART
SPORT
INSTRUMENT CLUSTER
Page 43 of 50
41ALWAYS CHECK THE OWNER’S MANUAL FOR COMPLETE OPER ATING INFORMATION AND SAFET Y WARNINGS *IF EQUIPPED †LEGAL DISCL AIMERS ON BACK INSIDE COVER
A
B
Tire Mobility Kit Video To view a video on your mobile device, snap this QR Code or visit the listed website .
Refer to page 2 for more information .
QR CODE
www.youtube.com/KiaFeatureVideos
(Navigation screen display shown)
P
R
N
DSHIFTL OCK
RELEASE
Rear-Camera Display†6
The Rear-Camera Display system is a supplemental system that displays
the view behind the vehicle through the audio control unit screens while
the vehicle is in Reverse .
The Rear-Camera Display activates when the:
•Engine Start /Stop button* is in the ON position
•Gear Shift Lever is in the R (Reverse) position
REMINDERS:
•The Rear-Camera Display is ON by default when ignition is cycled
•
The screen image above is for illustration purposes only . The actual image or graphics may differ in your vehicle
The Rear-Camera Display is not a substitute for proper and safe backing-up procedures. The Rear-Camera Display may not display every object behind the vehicle. Always drive safely and use caution when backing up.
Tire Mobility Kit*
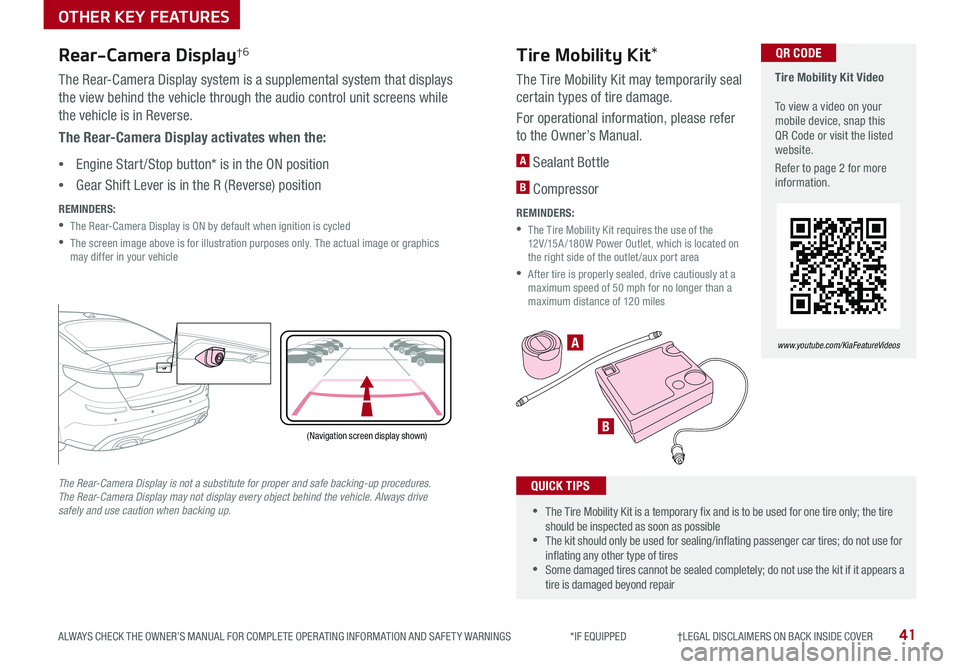
The Tire Mobility Kit may temporarily seal
certain types of tire damage .
For operational information, please refer
to the Owner’s Manual .
A Sealant Bottle
B Compressor
REMINDERS:
•
The Tire Mobility Kit requires the use of the 12V/15A /180W Power Outlet, which is located on the right side of the outlet /aux port area
•
After tire is properly sealed, drive cautiously at a maximum speed of 50 mph for no longer than a maximum distance of 120 miles
•The Tire Mobility Kit is a temporary fix and is to be used for one tire only; the tire should be inspected as soon as possible •The kit should only be used for sealing/inflating passenger car tires; do not use for inflating any other type of tires •Some damaged tires cannot be sealed completely; do not use the kit if it appears a tire is damaged beyond repair
QUICK TIPS
OTHER KEY FEATURES
Page 46 of 50
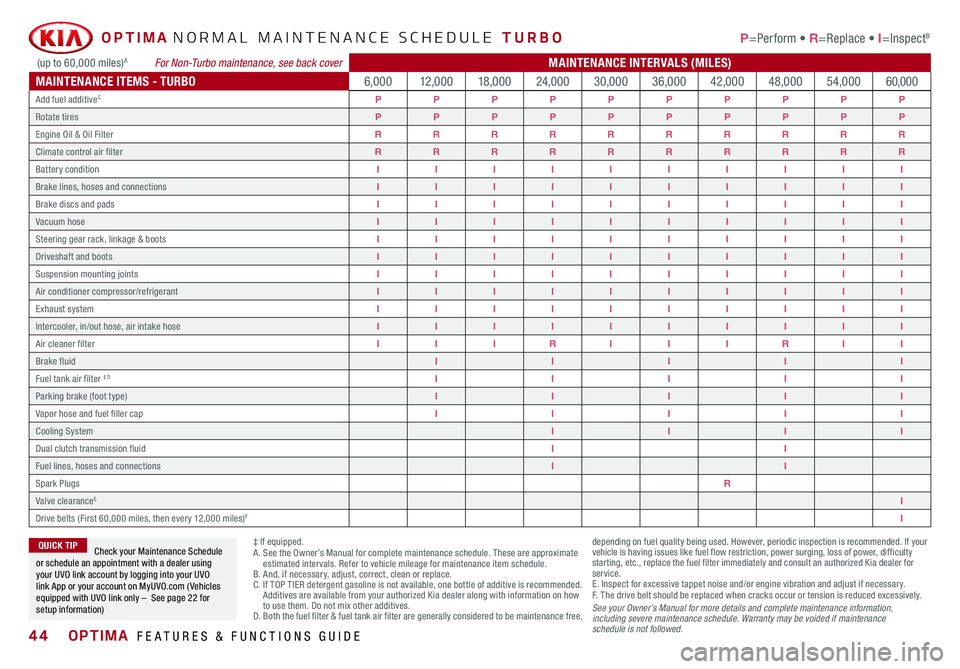
44OPTIMA FEATURES & FUNCTIONS GUIDE
OPTIMA NORMAL MAINTENANCE SCHEDULE TURBO P=Perform • R=Replace • I=InspectB
‡ If equipped .A . See the Owner’s Manual for complete maintenance schedule . These are approximate estimated intervals . Refer to vehicle mileage for maintenance item schedule . B . And, if necessary, adjust, correct, clean or replace .C . If TOP TIER detergent gasoline is not available, one bottle of additive is recommended . Additives are available from your authorized Kia dealer along with information on how to use them . Do not mix other additives .D . Both the fuel filter & fuel tank air filter are generally considered to be maintenance free,
depending on fuel quality being used . However, periodic inspection is recommended . If your vehicle is having issues like fuel flow restriction, power surging, loss of power, difficulty starting, etc ., replace the fuel filter immediately and consult an authorized Kia dealer for service .E . Inspect for excessive tappet noise and/or engine vibration and adjust if necessary .F . T he drive belt should be replaced when cracks occur or tension is reduced excessively .See your Owner’s Manual for more details and complete maintenance information, including severe maintenance schedule. Warranty may be voided if maintenance schedule is not followed.
Check your Maintenance Schedule or schedule an appointment with a dealer using your UVO link account by logging into your UVO link App or your account on MyUVO .com ( Vehicles equipped with UVO link only – See page 22 for setup information)
QUICK TIP
(up to 60,000 miles)A For Non-Turbo maintenance, see back coverMAINTENANCE INTERVALS (MILES)
MAINTENANCE ITEMS - TURBO6,00012,00018,00024,00030,00036,00042,00048,00054,00060,000
Add fuel additiveCPPPPPPPPPP
Rotate tiresPPPPPPPPPP
Engine Oil & Oil FilterRRRRRRRRRR
Climate control air filterRRRRRRRRRR
Battery conditionIIIIIIIIII
Brake lines, hoses and connectionsIIIIIIIIII
Brake discs and padsIIIIIIIIII
Vacuum hoseIIIIIIIIII
Steering gear rack, linkage & bootsIIIIIIIIII
Driveshaft and bootsIIIIIIIIII
Suspension mounting jointsIIIIIIIIII
Air conditioner compressor/refrigerantIIIIIIIIII
Exhaust systemIIIIIIIIII
Intercooler, in/out hose, air intake hoseIIIIIIIIII
Air cleaner filterIIIRIIIRII
Brake fluidIIIII
Fuel tank air filter
Page 50 of 50
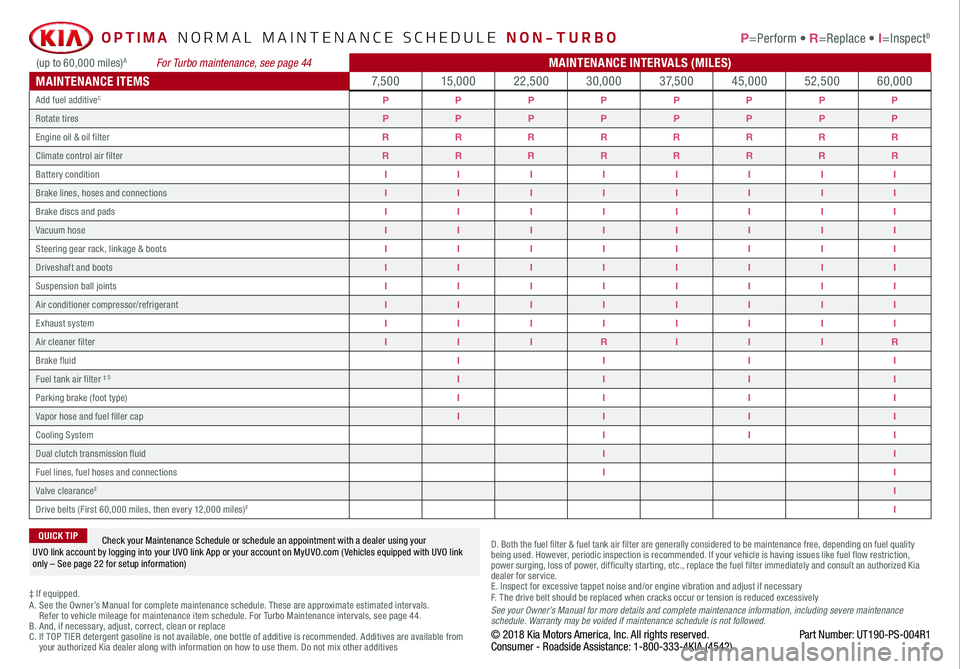
*IF EQUIPPED
OPTIMA NORMAL MAINTENANCE SCHEDULE NON-TURBO P=Perform • R=Replace • I=InspectB
‡ If equipped.A . See the Owner’s Manual for complete maintenance schedule. These are approximate estimated intervals. Refer to vehicle mileage for maintenance item schedule. For Turbo Maintenance intervals, see page 44.B. And, if necessary, adjust, correct, clean or replaceC. If TOP TIER detergent gasoline is not available, one bottle of additive is recommended. Additives are available from your authorized Kia dealer along with information on how to use them. Do not mix other additives
D. Both the fuel filter & fuel tank air filter are generally considered to be maintenance free, depending on fuel quality being used. However, periodic inspection is recommended. If your vehicle is having issues like fuel flow restriction, power surging, loss of power, difficulty starting, etc., replace the fuel filter immediately and consult an authorized Kia dealer for service.E. Inspect for excessive tappet noise and/or engine vibration and adjust if necessaryF. T he drive belt should be replaced when cracks occur or tension is reduced excessivelySee your Owner’s Manual for more details and complete maintenance information, including severe maintenance schedule. Warranty may be voided if maintenance schedule is not followed.© 2018 Kia Motors America, Inc. All rights reserved. Part Number: UT190-PS-004R1Consumer - Roadside Assistance: 1-800-333-4KIA (4542)
Check your Maintenance Schedule or schedule an appointment with a dealer using your UVO link account by logging into your UVO link App or your account on MyUVO.com ( Vehicles equipped with UVO link only – See page 22 for setup information)
QUICK TIP
(up to 60,000 miles)A For Turbo maintenance, see page 44MAINTENANCE INTERVALS (MILES)
MAINTENANCE ITEMS7, 5 0 015,00022,50030,0003 7, 5 0 045,00052,50060,000
Add fuel additiveCPPPPPPPP
Rotate tiresPPPPPPPP
Engine oil & oil filterRRRRRRRR
Climate control air filterRRRRRRRR
Battery conditionIIIIIIII
Brake lines, hoses and connectionsIIIIIIII
Brake discs and padsIIIIIIII
Vacuum hoseIIIIIIII
Steering gear rack, linkage & bootsIIIIIIII
Driveshaft and bootsIIIIIIII
Suspension ball jointsIIIIIIII
Air conditioner compressor/refrigerantIIIIIIII
Exhaust systemIIIIIIII
Air cleaner filterIIIRIIIR
Brake fluidIIII
Fuel tank air filter ‡ DIIII
Parking brake (foot type)IIII
Vapor hose and fuel filler capIIII
Cooling SystemIII
Dual clutch transmission fluidII
Fuel lines, fuel hoses and connectionsII
Valve clearanceEI
Drive belts (First 60,000 miles, then every 12,000 miles)FI