ignition KIA Optima Hybrid 2012 3.G Service Manual
[x] Cancel search | Manufacturer: KIA, Model Year: 2012, Model line: Optima Hybrid, Model: KIA Optima Hybrid 2012 3.GPages: 394, PDF Size: 8.63 MB
Page 164 of 394
493
Features of your vehicle
Do not use the interior lights for extended
periods when the engine is not running.
It may cause battery discharge.
Automatic turn off function
(if equipped)
The interior lights automatically turn off
approximately 20 minutes after the igni-
tion switch is turned off.
If your vehicle is equipped with the theft
alarm system, the interior lights automat-
ically turns off approximately 3 seconds
after the system is armed stage.
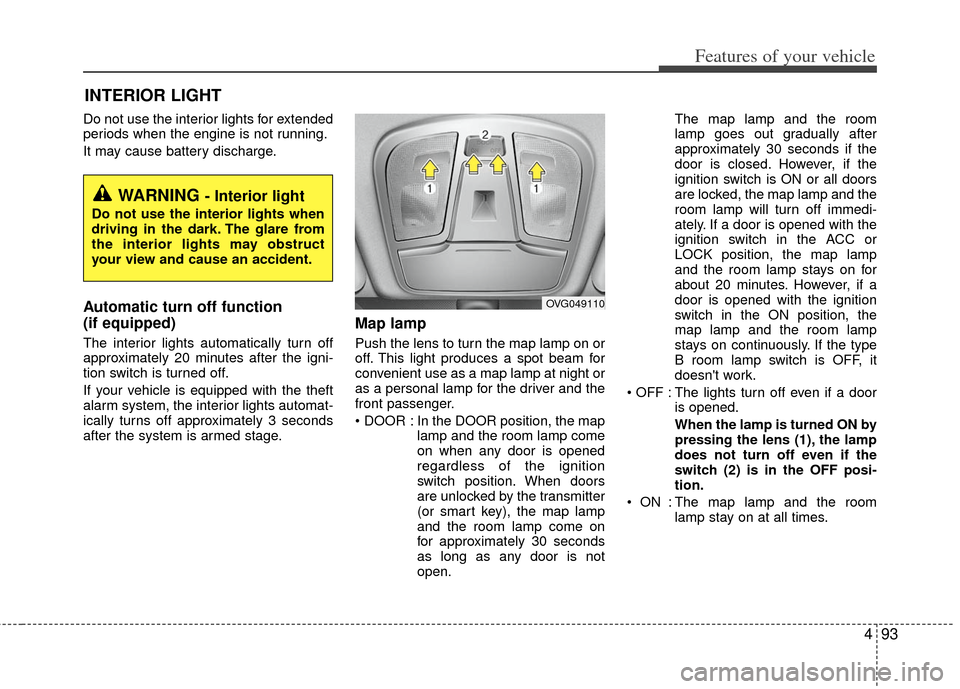
Map lamp
Push the lens to turn the map lamp on or
off. This light produces a spot beam for
convenient use as a map lamp at night or
as a personal lamp for the driver and the
front passenger.
In the DOOR position, the maplamp and the room lamp come
on when any door is opened
regardless of the ignition
switch position. When doors
are unlocked by the transmitter
(or smart key), the map lamp
and the room lamp come on
for approximately 30 seconds
as long as any door is not
open. The map lamp and the room
lamp goes out gradually after
approximately 30 seconds if the
door is closed. However, if the
ignition switch is ON or all doors
are locked, the map lamp and the
room lamp will turn off immedi-
ately. If a door is opened with the
ignition switch in the ACC or
LOCK position, the map lamp
and the room lamp stays on for
about 20 minutes. However, if a
door is opened with the ignition
switch in the ON position, the
map lamp and the room lamp
stays on continuously. If the type
B room lamp switch is OFF, it
doesn't work.
: The lights turn off even if a door is opened.
When the lamp is turned ON by
pressing the lens (1), the lamp
does not turn off even if the
switch (2) is in the OFF posi-
tion.
: The map lamp and the room lamp stay on at all times.
INTERIOR LIGHT
WARNING - Interior light
Do not use the interior lights when
driving in the dark. The glare from
the interior lights may obstruct
your view and cause an accident.
OVG049110
Page 167 of 394
Features of your vehicle
96
4
If you want to defrost and defog the front
windshield, refer to “Windshield
Defrosting and Defogging” in this section.
Rear window defroster
The defroster heats the window to
remove frost, fog and thin ice from the
interior and exterior of the rear window,
while the engine is running.
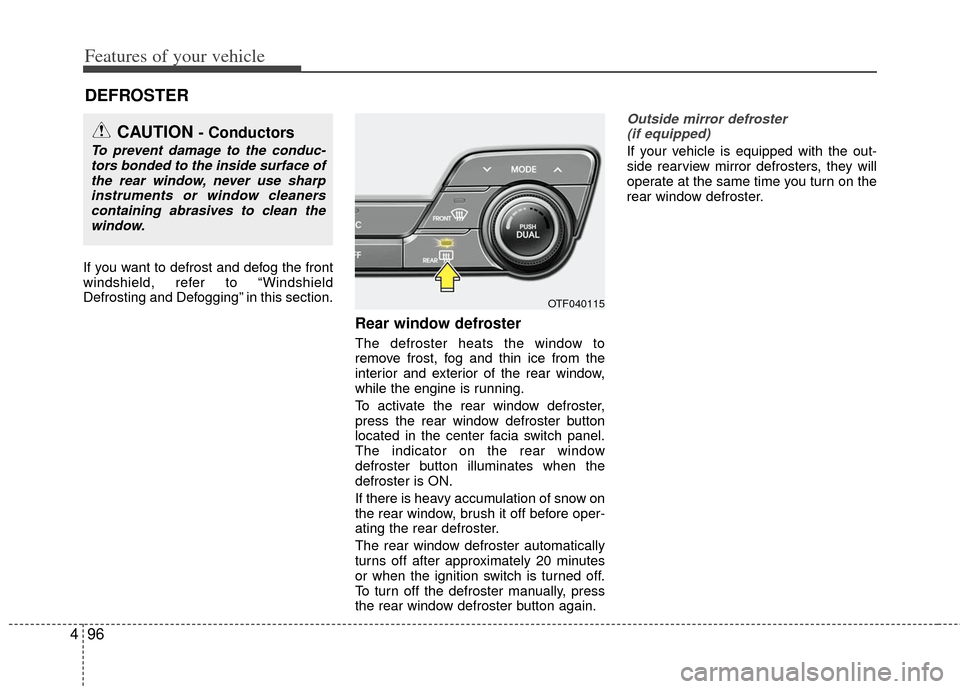
To activate the rear window defroster,
press the rear window defroster button
located in the center facia switch panel.
The indicator on the rear window
defroster button illuminates when the
defroster is ON.
If there is heavy accumulation of snow on
the rear window, brush it off before oper-
ating the rear defroster.
The rear window defroster automatically
turns off after approximately 20 minutes
or when the ignition switch is turned off.
To turn off the defroster manually, press
the rear window defroster button again.
Outside mirror defroster
(if equipped)
If your vehicle is equipped with the out-
side rearview mirror defrosters, they will
operate at the same time you turn on the
rear window defroster.
DEFROSTER
CAUTION - Conductors
To prevent damage to the conduc- tors bonded to the inside surface ofthe rear window, never use sharpinstruments or window cleanerscontaining abrasives to clean the window.
OTF040115
Page 186 of 394
4115
Features of your vehicle
Digital clock
Whenever the battery terminals or relat-
ed fuses are disconnected, you must
reset the time.
When the ignition switch is in the ACC or
ON position, the clock buttons operate as
follows:
Pressing the H button will advance the
time display by one hour.
Pressing the M button will advance the
time display by one minute.
To change the 12 hour format to the 24
hour format, press the H and M button
at the same time for more than 5 sec-
onds.
For example, if the time is 10:15 p.m.,
the display will change to 22:15.
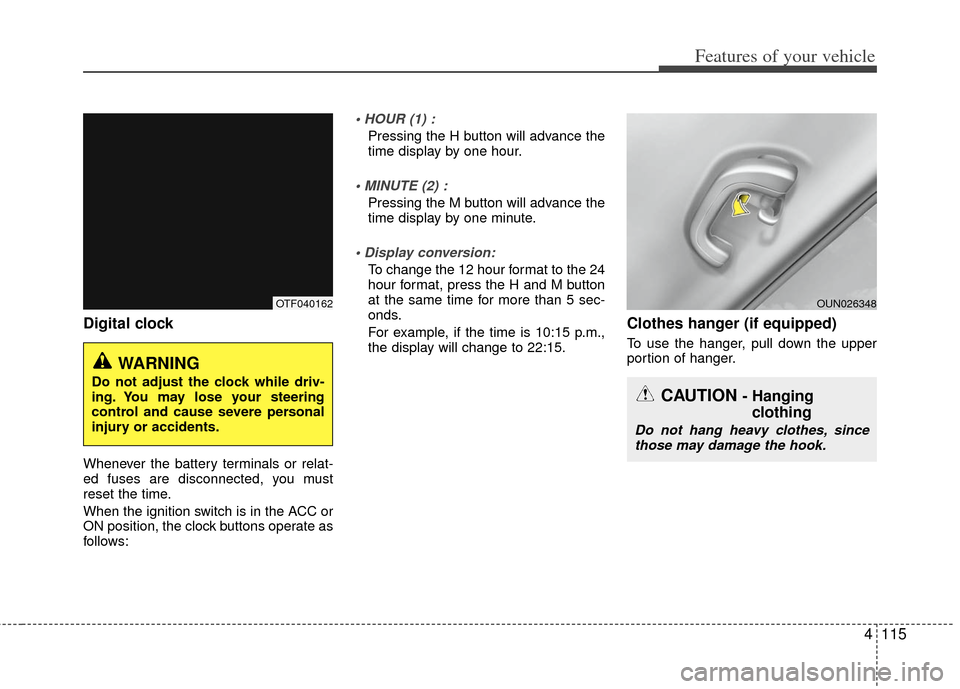
Clothes hanger (if equipped)
To use the hanger, pull down the upper
portion of hanger.
WARNING
Do not adjust the clock while driv-
ing. You may lose your steering
control and cause severe personal
injury or accidents.CAUTION - Hanging clothing
Do not hang heavy clothes, since
those may damage the hook.
OUN026348OTF040162
Page 188 of 394
4117
Features of your vehicle
✽
✽NOTICE
If you install an after market HID head
lamp, your vehicle’s audio and electron-
ic device may malfunction.
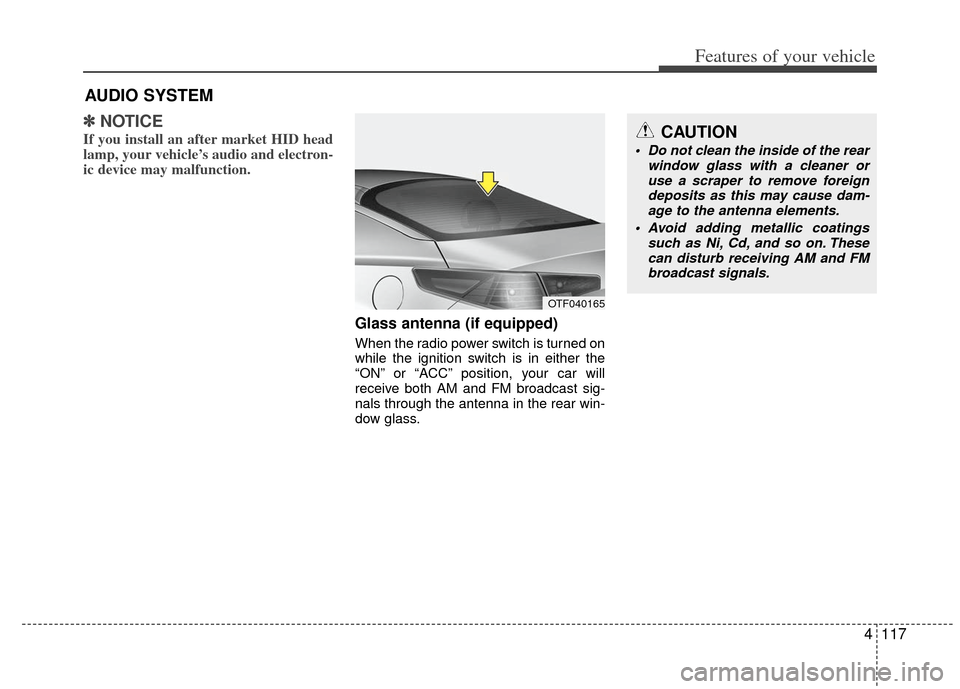
Glass antenna (if equipped)
When the radio power switch is turned on
while the ignition switch is in either the
“ON” or “ACC” position, your car will
receive both AM and FM broadcast sig-
nals through the antenna in the rear win-
dow glass.
AUDIO SYSTEM
OTF040165
CAUTION
• Do not clean the inside of the rear
window glass with a cleaner oruse a scraper to remove foreign deposits as this may cause dam-age to the antenna elements.
Avoid adding metallic coatings such as Ni, Cd, and so on. Thesecan disturb receiving AM and FMbroadcast signals.
Page 189 of 394
Features of your vehicle
118
4
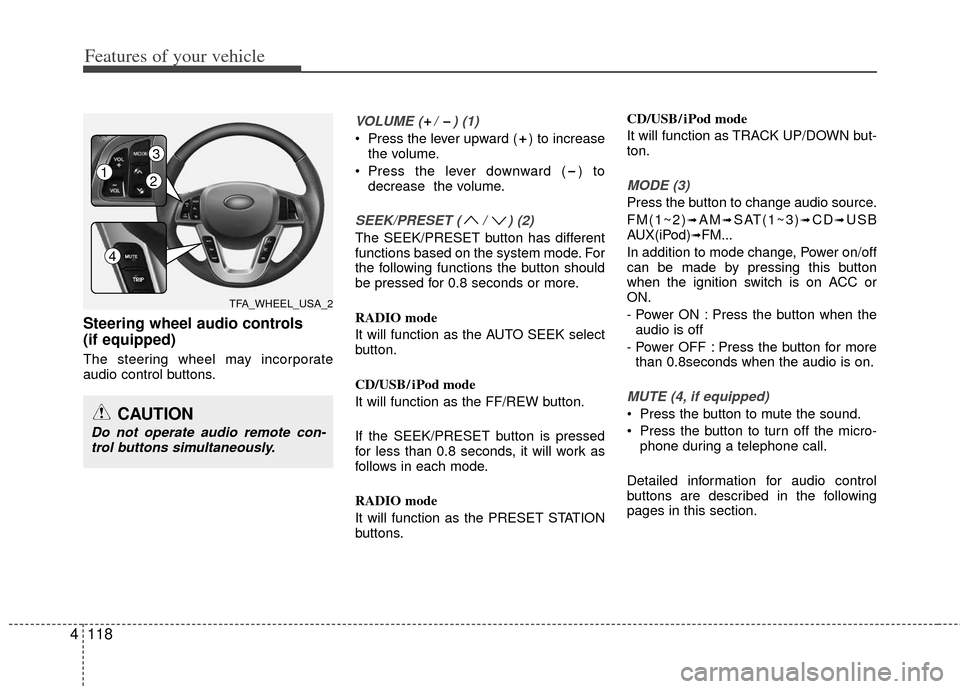
Steering wheel audio controls
(if equipped)
The steering wheel may incorporate
audio control buttons.
VOLUME ( / ) (1)
Press the lever upward ( ) to increase
the volume.
Press the lever downward ( ) to decrease the volume.
SEEK/PRESET ( / ) (2)
The SEEK/PRESET button has different
functions based on the system mode. For
the following functions the button should
be pressed for 0.8 seconds or more.
RADIO mode
It will function as the AUTO SEEK select
button.
CD/USB/ iPod mode
It will function as the FF/REW button.
If the SEEK/PRESET button is pressed
for less than 0.8 seconds, it will work as
follows in each mode.
RADIO mode
It will function as the PRESET STATION
buttons. CD/USB/ iPod mode
It will function as TRACK UP/DOWN but-
ton.
MODE (3)
Press the button to change audio source.
FM(1~2)
➟AM➟SAT(1~3)➟CD➟USB
AUX(iPod)➟FM...
In addition to mode change, Power on/off
can be made by pressing this button
when the ignition switch is on ACC or
ON.
- Power ON : Press the button when the audio is off
- Power OFF : Press the button for more than 0.8seconds when the audio is on.
MUTE (4, if equipped)
Press the button to mute the sound.
Press the button to turn off the micro- phone during a telephone call.
Detailed information for audio control
buttons are described in the following
pages in this section.CAUTION
Do not operate audio remote con- trol buttons simultaneously.
TFA_WHEEL_USA_2
12
3
4
Page 195 of 394
Features of your vehicle
124
4
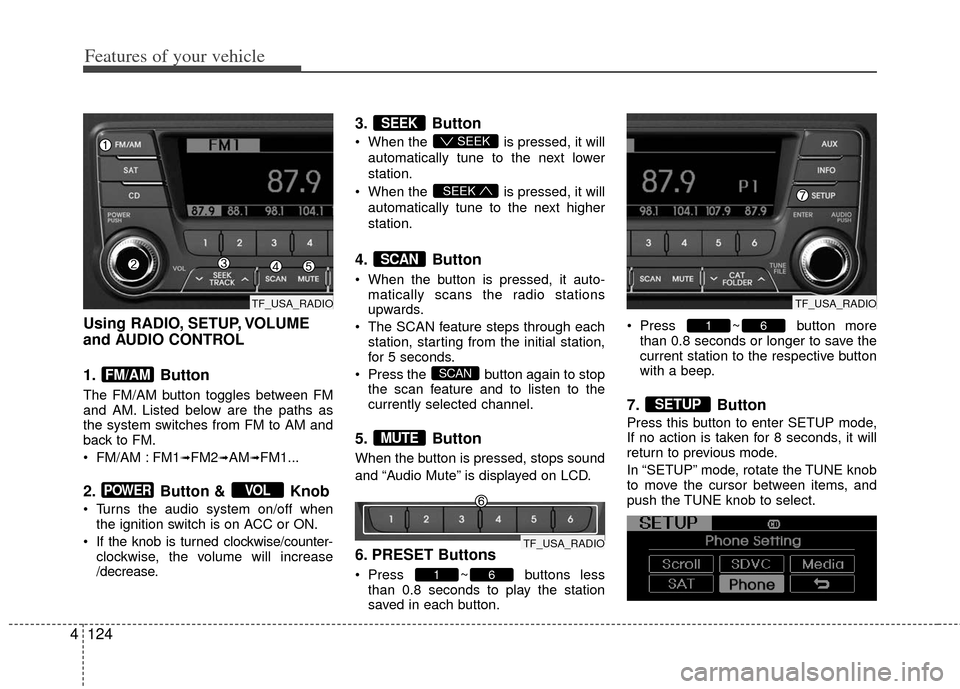
Using RADIO, SETUP, VOLUME
and AUDIO CONTROL
1. Button
The FM/AM button toggles between FM
and AM. Listed below are the paths as
the system switches from FM to AM and
back to FM.
FM/AM : FM1
➟FM2➟AM➟FM1...
2. Button & Knob
Turns the audio system on/off when
the ignition switch is on ACC or ON.
If the knob is turned clockwise/counter- clockwise, the volume will increase
/decrease.
3. Button
When the is pressed, it will
automatically tune to the next lower
station.
When the is pressed, it will
automatically tune to the next higher
station.
4. Button
When the button is pressed, it auto- matically scans the radio stations
upwards.
The SCAN feature steps through each station, starting from the initial station,
for 5 seconds.
Press the button again to stop the scan feature and to listen to the
currently selected channel.
5. Button
When the button is pressed, stops sound
and “Audio Mute” is displayed on LCD.
6. PRESET Buttons
Press ~ buttons lessthan 0.8 seconds to play the station
saved in each button. Press ~ button more
than 0.8 seconds or longer to save the
current station to the respective button
with a beep.
7. Button
Press this button to enter SETUP mode,
If no action is taken for 8 seconds, it will
return to previous mode.
In “SETUP” mode, rotate the TUNE knob
to move the cursor between items, and
push the TUNE knob to select.
SETUP
61
61
MUTE
SCAN
SCAN
SEEK
SEEK
SEEK
VOLPOWER
FM/AM
TF_USA_RADIOTF_USA_RADIO
TF_USA_RADIO
Page 198 of 394
4127
Features of your vehicle
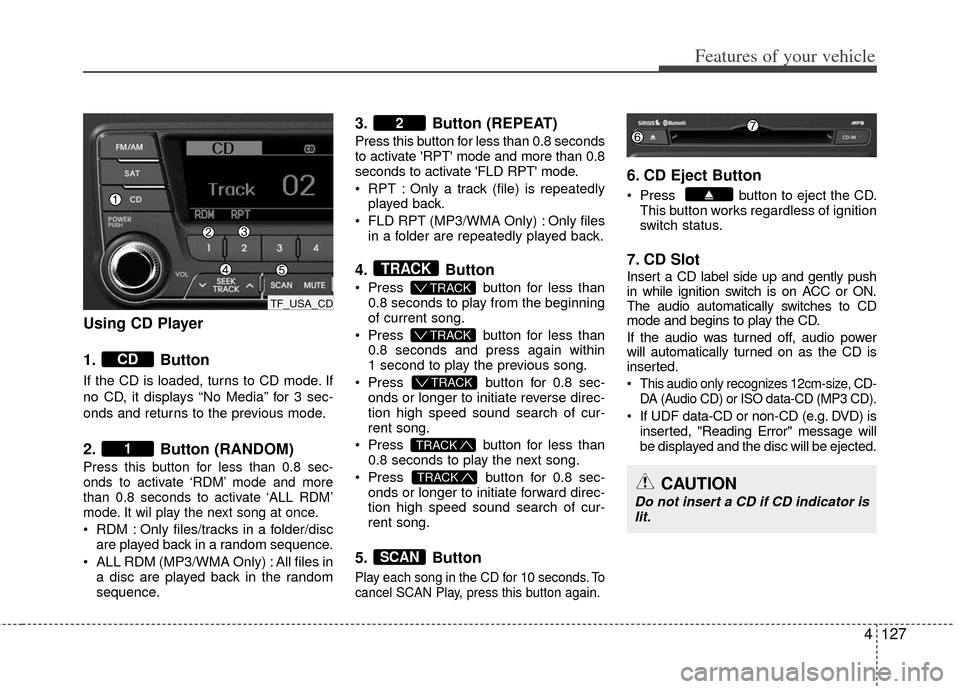
Using CD Player
1. Button
If the CD is loaded, turns to CD mode. If
no CD, it displays “No Media” for 3 sec-
onds and returns to the previous mode.
2. Button (RANDOM)
Press this button for less than 0.8 sec-
onds to activate ‘RDM’ mode and more
than 0.8 seconds to activate ‘ALL RDM’
mode. It wil play the next song at once.
RDM : Only files/tracks in a folder/discare played back in a random sequence.
ALL RDM (MP3/WMA Only) : All files in a disc are played back in the random
sequence.
3. Button (REPEAT)
Press this button for less than 0.8 seconds
to activate 'RPT' mode and more than 0.8
seconds to activate 'FLD RPT' mode.
RPT : Only a track (file) is repeatedlyplayed back.
FLD RPT (MP3/WMA Only) : Only files in a folder are repeatedly played back.
4. Button
Press button for less than
0.8 seconds to play from the beginning
of current song.
Press button for less than
0.8 seconds and press again within
1 second to play the previous song.
Press button for 0.8 sec-
onds or longer to initiate reverse direc-
tion high speed sound search of cur-
rent song.
Press button for less than
0.8 seconds to play the next song.
Press button for 0.8 sec-
onds or longer to initiate forward direc-
tion high speed sound search of cur-
rent song.
5. Button
Play each song in the CD for 10 seconds. To
cancel SCAN Play, press this button again.
6. CD Eject Button
Press button to eject the CD. This button works regardless of ignition
switch status.
7. CD Slot
Insert a CD label side up and gently push
in while ignition switch is on ACC or ON.
The audio automatically switches to CD
mode and begins to play the CD.
If the audio was turned off, audio power
will automatically turned on as the CD is
inserted.
This audio only recognizes 12cm-size, CD- DA (Audio CD) or ISO data-CD (MP3 CD).
If UDF data-CD or non-CD (e.g. DVD) isinserted, "Reading Error" message will
be displayed and the disc will be ejected.
SCAN
TRACK
TRACK
T TRACK
T TRACK
T TRACK
TRACK
2
1
CD
CAUTION
Do not insert a CD if CD indicator is
lit.
TF_USA_CD
Page 224 of 394
53
Driving your vehicle
Before entering vehicle
• Be sure that all windows, outside mir-ror(s), and outside lights are clean.
Check the condition of the tires.
Check under the vehicle for any sign of leaks.
Be sure there are no obstacles behind you if you intend to back up.
Necessary inspections
Fluid levels, such as engine oil, engine
coolant, brake fluid, and washer fluid
should be checked on a regular basis,
with the exact interval depending on the
fluid. Further details are provided in
Section 7, “Maintenance”.
Before starting
Close and lock all doors.
Position the seat so that all controls areeasily reached.
Buckle your seat belt.
Adjust the inside and outside rearview mirrors.
Be sure that all lights work.
Check all gauges.
Check the operation of warning lights when the ignition switch is turned to
the ON position.
Release the parking brake and make sure the brake warning light goes out.
For safe operation, be sure you are famil-
iar with your vehicle and its equipment.
BEFORE DRIVING
WARNING - Distracted
driving
Focus on the road while driving.
The driver's primary responsibility
is in the safe and legal operation of
the vehicle. Use of any handled
devices, other equipment or vehicle
systems that distract the drive
should not be used during vehicle
operation.
WARNING - Check
surrounding
Always check the surrounding
areas near your vehicle for people,
especially children, before putting a
vehicle into D (Drive) or R
(Reverse).
Page 231 of 394
Driving your vehicle
10
5
For smooth operation, depress the brake
pedal when shifting from N (Neutral) to aforward or reverse gear.
When stopped on an upgrade, do not
hold the vehicle with engine power. Use
the service brake or the parking brake.
Transaxle ranges
The indicator light in the instrument clus-
ter displays the shift lever position when
the ignition switch is in the ON position.
P (Park)
Always come to a complete stop before
shifting into P (Park). This position locks
the transaxle and prevents the front
wheels from rotating.
Shifting into P (Park) while the vehicle is
in motion will cause the drive wheels to
lock which will cause you to lose control
of the vehicle.
WARNING - Automatic
transaxle
Before leaving the driver’s seat,
always make sure the shift lever is
in the P (Park) position; then set the
parking brake fully and shut the
engine off. Do not use the P posi-
tion in place of the parking brake.
Always make sure the shift lever is
latched in the P position and set the
parking brake fully. Unexpected
and sudden vehicle movement can
occur if these precautions are not
followed.
CAUTION - Transaxle
To avoid damage to your transaxle,do not accelerate the engine in R(Reverse) or any forward gear posi-tion with the brakes on. Thetransaxle may be damaged if you shift into P (Park) while the vehicleis in motion.
Page 233 of 394
Driving your vehicle
12
5
Up (+) : Push the lever forward once to
shift up one gear.
Down (-) : Pull the lever backwards once to shift down one gear.
In sports mode, the driver must exe- cute upshifts in accordance with road
conditions, taking care to keep the
engine speed below the red zone.
In sports mode, only the 6 forward gears can be selected. To reverse or
park the vehicle, move the shift lever to
the R (Reverse) or P (Park) position as
required.
In sports mode, downshifts are made automatically when the vehicle slows
down. When the vehicle stops, 1st gear
is automatically selected.
In sports mode, when the engine rpm approaches the red zone shift points
are varied to upshift automatically. To maintain the required levels of vehi-
cle performance and safety, the system
may not execute certain gearshifts
when the shift lever is operated.
When driving on a slippery road, push the shift lever forward into the +(up)
position. This causes the transaxle to
shift into the 2nd gear which is better
for smooth driving on a slippery road.
Push the shift lever to the -(down) side
to shift back to the 1st gear.Shift lock system (if equipped)
For your safety, the automatic transaxle
has a shift lock system which prevents
shifting the transaxle out of P (Park)
unless the brake pedal is depressed.
To shift the transaxle from P (Park) into R
(Reverse):
1. Depress and hold the brake pedal.
2. Start the engine or turn the ignitionswitch to the ON position.
3. Move the shift lever.
If the brake pedal is repeatedly
depressed and released with the shift
lever in the P (Park) position, a chattering
noise near the shift lever may be heard.
This is a normal condition.
WARNING - Shifting from
park
Always fully depress the brake
pedal before and while shifting out
of the P (Park) position into anoth-
er position to avoid inadvertent
motion of the vehicle.