warning KIA OPTIMA HYBRID 2015 Features and Functions Guide
[x] Cancel search | Manufacturer: KIA, Model Year: 2015, Model line: OPTIMA HYBRID, Model: KIA OPTIMA HYBRID 2015Pages: 50, PDF Size: 8.34 MB
Page 18 of 50
16
AUTO HOLD temporarily maintains the
vehicle at a standstill even if the brake pedal
is released . AUTO HOLD can be turned ON/
OFF using the AUTO HOLD switch B on
the driver’s panel . Before AUTO HOLD will
operate, the driver’s door, engine hood and
trunk must be closed, and the driver’s seat
belt must be fastened .
The AUTO HOLD indicator has four states:
White: Standby - With vehicle at a standstill,
and AUTO HOLD switch B turned ON, the
indicator will illuminate white . While driving
the vehicle (vehicle is not at a standstill), the
AUTO HOLD indicator will remain white .
Yellow: Malfunction - When the indicator
is illuminated yellow, there may be a system
malfunction . Take your vehicle to a local Kia dealer .
Green: Engaged - When coming to a complete stop by depressing the brake
pedal, the AUTO HOLD indicator changes from white to green .
OFF (not illuminated) - The indicator will turn OFF when the AUTO HOLD
switch B is manually turned OFF or when the EPB is manually turned ON .
REMINDERS:
• As a bulb check, the EPB malfunction indicator will illuminate for approximately 3 seconds when the ignition switch is turned ON
• If the warning light does not illuminate temporarily, or continues to remain lit, take your vehicle to an authorized Kia dealer and have the system checked
•The EPB should not be operated while the vehicle is moving
• A click or electric brake motor sound may be heard while operating or releasing the EPB, but these conditions are normal and indicate that the EPB is functioning properly
Electric Parking Brake (EPB)*
The Electric Parking Brake (EPB) system utilizes
an electric motor to engage the parking brake .
Applying the Parking Brake
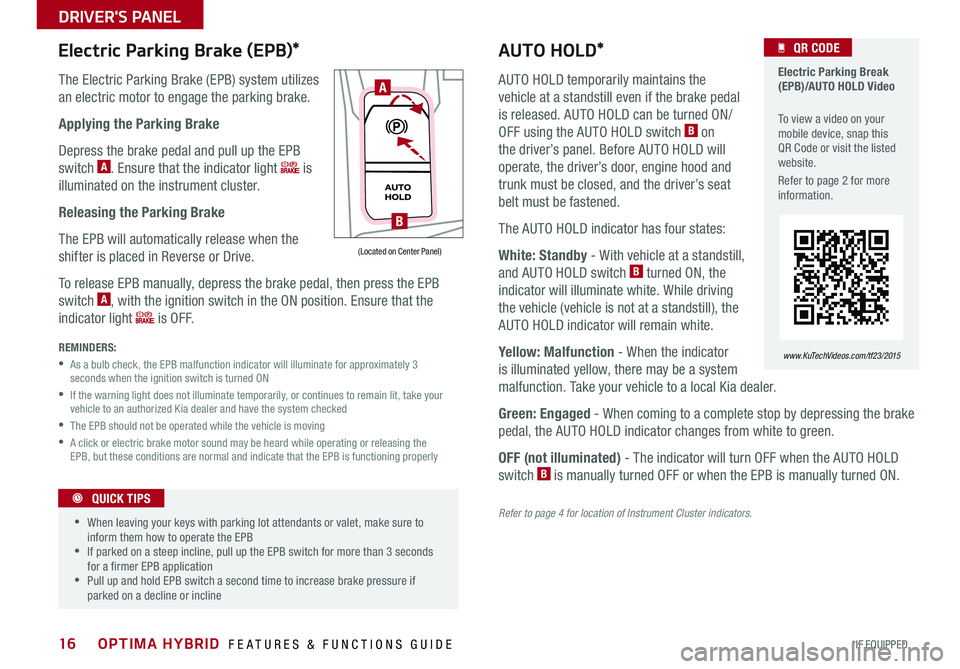
Depress the brake pedal and pull up the EPB
switch A . Ensure that the indicator light is
illuminated on the instrument cluster .
Releasing the Parking Brake
The EPB will automatically release when the
shifter is placed in Reverse or Drive .
To release EPB manually, depress the brake pedal, then press the EPB
switch A, with the ignition switch in the ON position . Ensure that the
indicator light i s O F F .
Electric Parking Break (EPB)/AUTO HOLD Video
To view a video on your mobile device, snap this QR Code or visit the listed website .
Refer to page 2 for more information .
QR CODE
www.KuTechVideos.com/tf23/2015
AUTO HOLD*
Refer to page 4 for location of Instrument Cluster indicators.
•
•When leaving your keys with parking lot attendants or valet, make sure to inform them how to operate the EPB •If parked on a steep incline, pull up the EPB switch for more than 3 seconds for a firmer EPB application •Pull up and hold EPB switch a second time to increase brake pressure if parked on a decline or incline
QUICK TIPS
A
B
(Located on Center Panel)
OPTIMA HYBRID FEATURES & FUNCTIONS GUIDE
*IF EQUIPPED
DRIVER'S PANEL
Page 19 of 50
17
For more information on Electronic Stability Control (ESC) and its specific features and operations, please refer to your Owner’s Manual.
Electronic Stability Control (ESC)
The ESC system is designed to help stabilize the vehicle during cornering
maneuvers . It is a good idea to keep the ESC turned ON for daily driving
whenever possible .
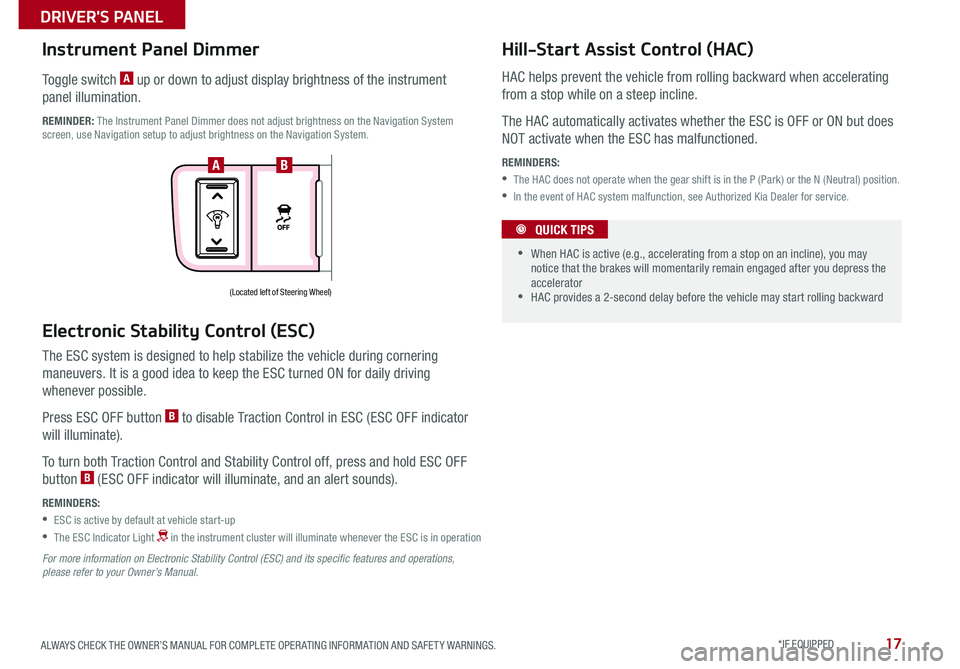
Press ESC OFF button B to disable Traction Control in ESC (ESC OFF indicator
will illuminate) .
To turn both Traction Control and Stability Control off, press and hold ESC OFF
button B (ESC OFF indicator will illuminate, and an alert sounds) .
REMINDERS:
•ESC is active by default at vehicle start-up
• The ESC Indicator Light in the instrument cluster will illuminate whenever the ESC is in operation
Instrument Panel Dimmer
Toggle switch A up or down to adjust display brightness of the instrument
panel illumination .
REMINDER: The Instrument Panel Dimmer does not adjust brightness on the Navigation System screen, use Navigation setup to adjust brightness on the Navigation System .
HAC helps prevent the vehicle from rolling backward when accelerating
from a stop while on a steep incline .
The HAC automatically activates whether the ESC is OFF or ON but does
NOT activate when the ESC has malfunctioned .
REMINDERS:
•The HAC does not operate when the gear shift is in the P (Park) or the N (Neutral) position .
•In the event of HAC system malfunction, see Authorized Kia Dealer for service .
(Located left of Steering Wheel)
Hill-Start Assist Control (HAC)
•
•When HAC is active (e .g ., accelerating from a stop on an incline), you may notice that the brakes will momentarily remain engaged after you depress the accelerator •HAC provides a 2-second delay before the vehicle may start rolling backward
QUICK TIPS
AB
ALWAYS CHECK THE OWNER’S MANUAL FOR COMPLETE OPER ATING INFORMATION AND SAFET Y WARNINGS. *IF EQUIPPED
DRIVER'S PANEL
Page 21 of 50
19
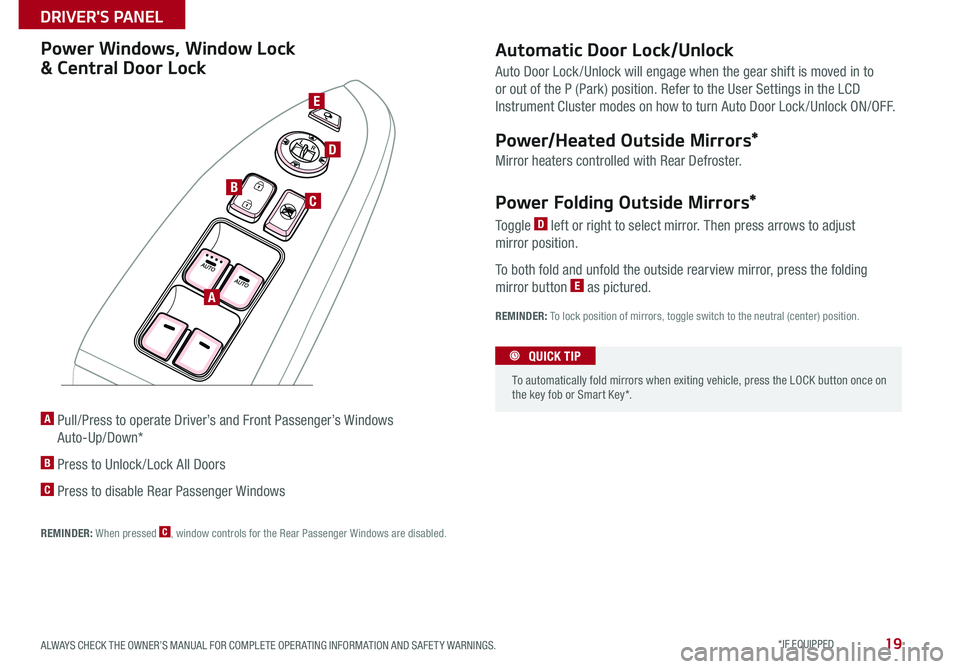
A Pull/Press to operate Driver’s and Front Passenger’s Windows
Auto-Up/Down*
B Press to Unlock /Lock All Doors
C Press to disable Rear Passenger Windows
Power Windows, Window Lock
& Central Door Lock
REMINDER: When pressed C, window controls for the Rear Passenger Windows are disabled .
REMINDER: To lock position of mirrors, toggle switch to the neutral (center) position .
Power Folding Outside Mirrors*
Toggle D left or right to select mirror . Then press arrows to adjust
mirror position .
To both fold and unfold the outside rearview mirror, press the folding
mirror button E as pictured .
Power/Heated Outside Mirrors*
Mirror heaters controlled with Rear Defroster .
Automatic Door Lock/Unlock
Auto Door Lock /Unlock will engage when the gear shift is moved in to
or out of the P (Park) position . Refer to the User Settings in the LCD
Instrument Cluster modes on how to turn Auto Door Lock /Unlock ON/OFF .
To automatically fold mirrors when exiting vehicle, press the LOCK button once on the key fob or Smart Key* .
QUICK TIP
A
BC
D
E
ALWAYS CHECK THE OWNER’S MANUAL FOR COMPLETE OPER ATING INFORMATION AND SAFET Y WARNINGS. *IF EQUIPPED
DRIVER'S PANEL
Page 23 of 50

21
To o p e r a t e :
•Move lever Up/Down to change Wiper modes
•Rotate lever to adjust Intermittent Wipe Speed
•Pull lever to spray and wipe
M I S T: Single wipeOFF: Wiper offI N T: Intermittent wipeLO: Slow wipeHI: Fast wipe
Windshield Wipers & Washers
MISTOFFINTLOHI
FRONT
Faster
Slower
Heated Steering Wheel Button*
Press button A to turn ON/OFF steering wheel heater, while the
ignition or ENGINE START/STOP button is in the ON position .
Steering wheel heater will turn off automatically in 30 minutes, or
when button is pressed again to deactivate .
If the wiper switch is in AUTO mode when the ignition is ON, the wiper will operate once to perform a self-check of the system . Set the wiper to OFF position when the wiper is not in use .
QUICK TIP
If ignition is turned OFF, then ON again, within 30 minutes of steering wheel heater being turned on, system will automatically be set ON again .
QUICK TIP
A
ALWAYS CHECK THE OWNER’S MANUAL FOR COMPLETE OPER ATING INFORMATION AND SAFET Y WARNINGS. *IF EQUIPPED
STEERING WHEEL CONTROLS
Page 25 of 50
23
Voice Recognition and Phone
Contact Tips
The Kia Voice Recognition System may
have difficulty understanding some accents
or uncommon names . When using Voice
Recognition to place a call, speak in a
moderate tone, with clear pronunciation .
Help your Bluetooth® Wireless Technology
Voice Recognition performance by making a
few simple changes to your phone contacts:
•Use full names vs . short or single-syllable
names (“John Smith” vs . “Dad”; “Smith
Residence” vs . “Home”)
•Avoid using special characters or hyphens
(@, &, #, /, -, *, +, etc . )
•Avoid using acronyms (“In Case
Emergency” vs . “ICE”)
•Spell words completely, no abbreviations
(“Doctor Goodman” vs . “Dr . Goodman”)
Bluetooth® Wireless Technology
Pairing a Phone
For instructions on how to pair a phone, refer to the audio system’s user’s
guide or your vehicle’s Quick Start Guide .
How to Place a Call
When using the voice command feature, wait for the system BEEP before
speaking the command .
There are two options for placing a call:
Standard Audio System
•Option 1: Press the Receive/Place Call button D (system will prompt you
through call process)
•Option 2: Press the Talk button C (system will BEEP to indicate it is ready
for call placement) . Then say the command “Call {name}” or “Dial {number}”
UVO eServices System
•Option 1: Press the Receive/Place Call button D (displays the phone
screen with number keypad)
•Option 2: Press the Talk button C . Then say the command “Call {name}”
or “Dial {number}”
Navigation System
•Option 1: Press the Receive/Place Call button D (displays the phone
screen with number keypad)
•Option 2: Press the Talk button C . Then say the command “Call Name”
or “Dial Number,” followed by phone book name or number
During the pairing process, be sure to accept the connection requests on the phone for phonebook download and to allow acceptance of all future Bluetooth® connection requests .
QUICK TIP
Contacts Sync Tips •If Contact Sync is set to ON, contacts stored in your phone will download each time your phone is connected . There may be a delay before the system is available to place a call •If Contact Sync is set to OFF, your phone contacts will download only at the initial pairing . This allows you to make calls without waiting for your phone contact list to download
QUICK TIPS
Voice Recognition Tips Video To view a video on your mobile device, snap this QR Code or visit the listed website .
Refer to page 2 for more information .
www.KuTechVideos.com/tf23/2015
QR CODE
ALWAYS CHECK THE OWNER’S MANUAL FOR COMPLETE OPER ATING INFORMATION AND SAFET Y WARNINGS. *IF EQUIPPED
STEERING WHEEL CONTROLS
Page 27 of 50

25
To adjust the Steering Wheel, push the lock-release lever A down and adjust to
desired angle B and distance C .
When finished, pull the lock-release lever A up to lock Steering Wheel in place .
Tilt/Telescoping Steering Wheel
B
C
A
ALWAYS CHECK THE OWNER’S MANUAL FOR COMPLETE OPER ATING INFORMATION AND SAFET Y WARNINGS. *IF EQUIPPED
STEERING WHEEL CONTROLS
Page 29 of 50
27
Sound Settings – To adjust the sound settings, press the SOUND button on the main screen of any audio mode . Then press the selection (Fader, Balance, Tone, Touch-screen Beep), and use the on-screen arrows to adjust setting . When done, press return symbol to save and go back to previous screen .
UVO eServices System Videos To view a video on your mobile device, snap this QR Code or visit the listed website .
Refer to page 2 for more information .
QR CODE
http://kutechvideos.com/audio/UVO_eServices
DISP
FM/AM
S AT
MEDIA eServices
PHONE
SETUP
ENTER TUNE
FILE
POWER
PUSH
VOL
B luetooth®
SEEK
TRACK CATEGORY
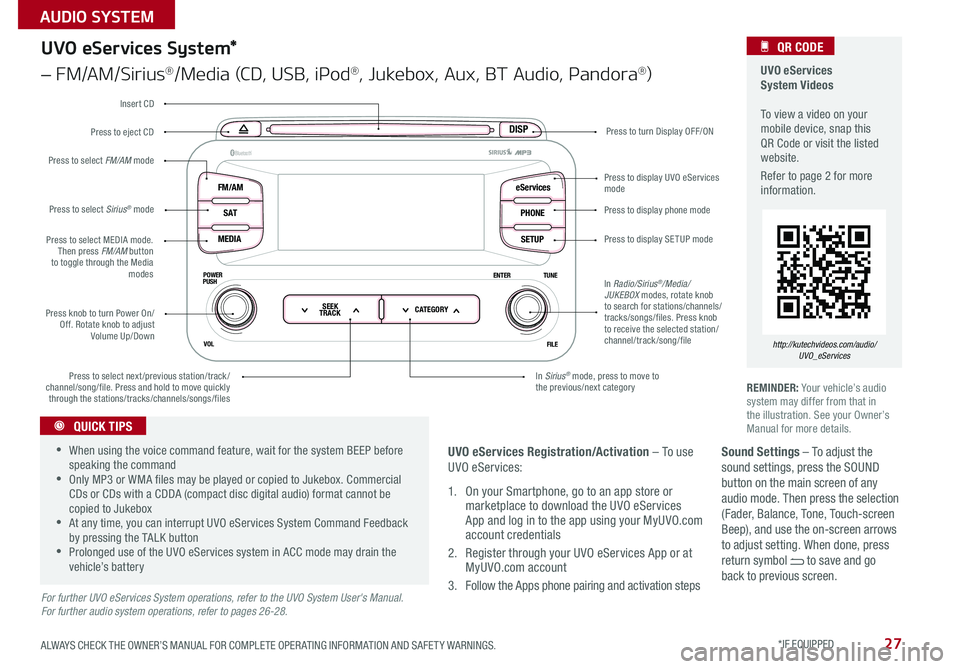
UVO eServices System*
– FM/AM/Sirius®/Media (CD, USB, iPod®, Jukebox, Aux, BT Audio, Pandora®)
Press to eject CDPress to turn Display OFF/ON
Press to display phone mode
Press to display SE TUP mode
Press to display UVO eServices mode
In Sirius® mode, press to move to the previous/next categoryPress to select next/previous station/track/channel/song/file
. Press and hold to move quickly through the stations/tracks/channels/songs/files
Press knob to turn Power On/Off . Rotate knob to adjust Volume Up/Down
Press to select MEDIA mode . Then press FM/AM button to toggle through the Media modes
Press to select Sirius® mode
Press to select FM/AM mode
In Radio/Sirius®/Media/JUKEBOX modes, rotate knob to search for stations/channels/tracks/songs/files . Press knob to receive the selected station/channel/track /song/file
Insert CD
REMINDER: Your vehicle’s audio system may differ from that in the illustration . See your Owner’s Manual for more details .
For further UVO eServices System operations, refer to the UVO System User's Manual. For further audio system operations, refer to pages 26-28.
•When using the voice command feature, wait for the system BEEP before speaking the command •Only MP3 or WMA files may be played or copied to Jukebox . Commercial CDs or CDs with a CDDA (compact disc digital audio) format cannot be copied to Jukebox •At any time, you can interrupt UVO eServices System Command Feedback by pressing the TALK button •Prolonged use of the UVO eServices system in ACC mode may drain the vehicle’s battery
QUICK TIPS
UVO eServices Registration/Activation – To use UVO eServices:
1 . On your Smartphone, go to an app store or marketplace to download the UVO eServices App and log in to the app using your MyUVO .com account credentials
2 . Register through your UVO eServices App or at MyUVO .com account
3 . Follow the Apps phone pairing and activation steps
ALWAYS CHECK THE OWNER’S MANUAL FOR COMPLETE OPER ATING INFORMATION AND SAFET Y WARNINGS. *IF EQUIPPED
AUDIO SYSTEM
Page 30 of 50
28
For further UVO eServices with Premium Navigation* operations, refer to the Car Multimedia System User's Manual. For further audio system operations, refer to pages 2 6 - 27.
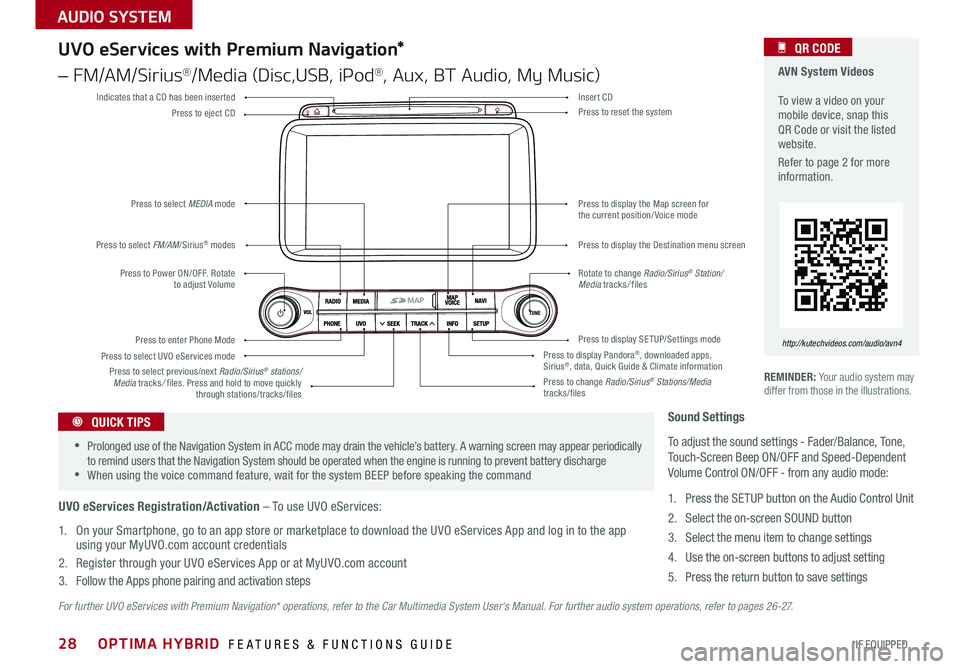
REMINDER: Your audio system may differ from those in the illustrations .
UVO eServices with Premium Navigation*
– FM/AM/Sirius®/Media (Disc,USB, iPod®, Aux, BT Audio, My Music)
Press to Power ON/OFF . Rotate to adjust Volume
Press to enter Phone Mode
Press to select FM/AM/Sirius® modes
Press to select MEDIA mode
Press to display SE TUP/Settings mode
Press to select UVO eServices mode
Indicates that a CD has been inserted
Press to change Radio/Sirius® Stations/Media tracks/files
Press to display the Map screen for the current position/ Voice mode
Press to display the Destination menu screen
Press to display Pandora®, downloaded apps, Sirius®, data, Quick Guide & Climate information
Press to eject CDPress to reset the system
Press to select previous/next Radio/Sirius® stations/Media tracks/ files . Press and hold to move quickly through stations/tracks/files
Insert CD
Rotate to change Radio/Sirius® Station/Media tracks/ files
AVN System Videos To view a video on your mobile device, snap this QR Code or visit the listed website .
Refer to page 2 for more information .
QR CODE
http://kutechvideos.com/audio/avn4
Sound Settings
To adjust the sound settings - Fader/Balance, Tone, Touch-Screen Beep ON/OFF and Speed-Dependent Volume Control ON/OFF - from any audio mode:
1 . Press the SETUP button on the Audio Control Unit
2 . Select the on-screen SOUND button
3 . Select the menu item to change settings
4 . Use the on-screen buttons to adjust setting
5 . Press the return button to save settings
•Prolonged use of the Navigation System in ACC mode may drain the vehicle’s battery . A warning screen may appear periodically to remind users that the Navigation System should be operated when the engine is running to prevent battery discharge •When using the voice command feature, wait for the system BEEP before speaking the command
QUICK TIPS
UVO eServices Registration/Activation – To use UVO eServices:
1 . On your Smartphone, go to an app store or marketplace to download the UVO eServices App and log in to the app using your MyUVO .com account credentials
2 . Register through your UVO eServices App or at MyUVO .com account
3 . Follow the Apps phone pairing and activation steps
OPTIMA HYBRID FEATURES & FUNCTIONS GUIDE
*IF EQUIPPED
AUDIO SYSTEM
Page 31 of 50
29
REMINDER: Using the power outlet (accessory plug) for prolonged periods of time with the engine off could cause the battery to discharge .
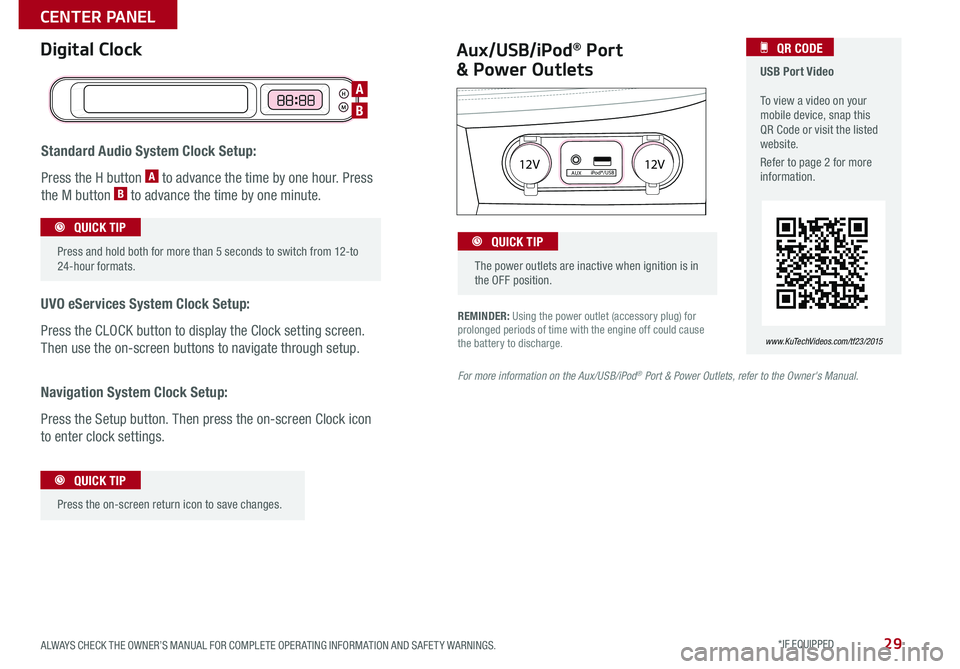
Aux/USB/iPod® Port
& Power Outlets
Digital Clock USB Port Video To view a video on your mobile device, snap this QR Code or visit the listed website .
Refer to page 2 for more information .
QR CODE
www.KuTechVideos.com/tf23/2015
For more information on the Aux/USB/iPod® Port & Power Outlets, refer to the Owner's Manual.
H
M
H
MH
M
Standard Audio System Clock Setup:
Press the H button A to advance the time by one hour . Press
the M button B to advance the time by one minute .
UVO eServices System Clock Setup:
Press the CLOCK button to display the Clock setting screen .
Then use the on-screen buttons to navigate through setup .
Navigation System Clock Setup:
Press the Setup button . Then press the on-screen Clock icon
to enter clock settings .
12V 12VAUXiPod®/USB
Press and hold both for more than 5 seconds to switch from 12-to 24-hour formats .
QUICK TIP
Press the on-screen return icon to save changes
.
QUICK TIP
The power outlets are inactive when ignition is in the OFF position .
QUICK TIP
A
B
ALWAYS CHECK THE OWNER’S MANUAL FOR COMPLETE OPER ATING INFORMATION AND SAFET Y WARNINGS. *IF EQUIPPED
CENTER PANEL
Page 33 of 50
31
Defrost Outside Windshield:
1 . Set Fan Speed to the highest position
2 . Set desired Temperature
3 . Press the Defrost button
Defog Inside Windshield:
1 . Set Fan Speed to desired position
2 . Set desired Temperature
3 . Press the Defrost button
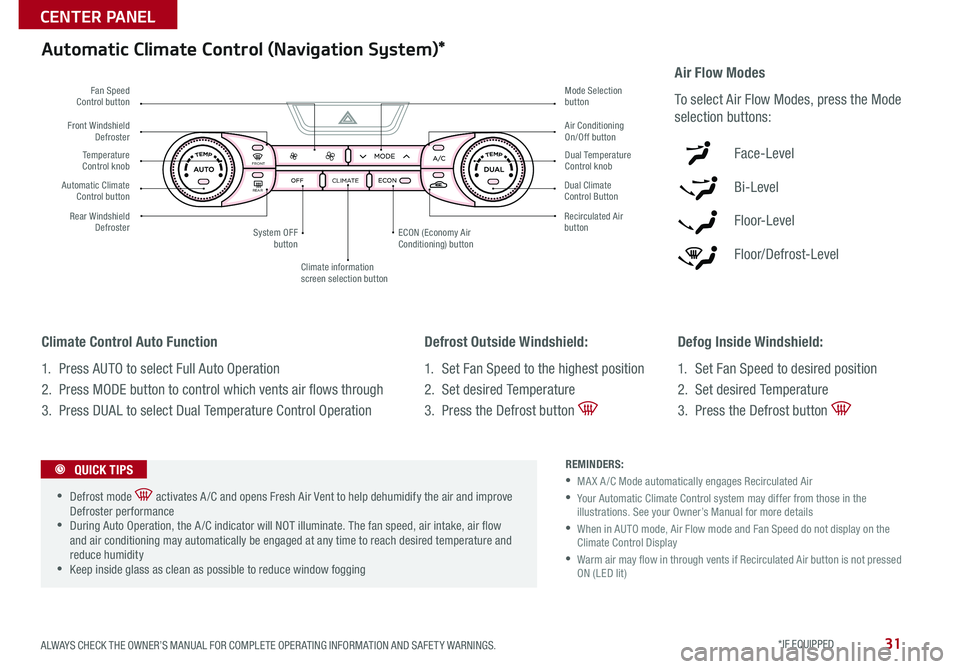
Climate Control Auto Function
1 . Press AUTO to select Full Auto Operation
2 . Press MODE button to control which vents air flows through
3 . Press DUAL to select Dual Temperature Control Operation
REMINDERS:
•MA X A /C Mode automatically engages Recirculated Air
• Your Automatic Climate Control system may differ from those in the illustrations . See your Owner’s Manual for more details
• When in AUTO mode, Air Flow mode and Fan Speed do not display on the Climate Control Display
• Warm air may flow in through vents if Recirculated Air button is not pressed ON (LED lit)
Automatic Climate Control (Navigation System)*
Air Flow Modes
To select Air Flow Modes, press the Mode
selection buttons:
Face-Level
Bi-Level
F lo o r- L evel
Floor/Defrost-Level
•Defrost mode activates A /C and opens Fresh Air Vent to help dehumidify the air and improve Defroster performance •During Auto Operation, the A /C indicator will NOT illuminate . The fan speed, air intake, air flow and air conditioning may automatically be engaged at any time to reach desired temperature and reduce humidity •Keep inside glass as clean as possible to reduce window fogging
QUICK TIPS
REAR
FRONTREAR
FRONTCLIMATE
Fan Speed Control button
Temperature Control knob
Rear Windshield Defroster
Front Windshield Defroster
System OFF button
Mode Selection button
Air Conditioning On/Off button
Dual Temperature Control knob
Recirculated Air buttonECON (Economy Air Conditioning) button
Automatic Climate Control button Dual Climate Control Button
Climate information screen selection button
ALWAYS CHECK THE OWNER’S MANUAL FOR COMPLETE OPER ATING INFORMATION AND SAFET Y WARNINGS. *IF EQUIPPED
CENTER PANEL