change time KIA OPTIMA HYBRID 2015 Features and Functions Guide
[x] Cancel search | Manufacturer: KIA, Model Year: 2015, Model line: OPTIMA HYBRID, Model: KIA OPTIMA HYBRID 2015Pages: 50, PDF Size: 8.34 MB
Page 2 of 50
GETTING TO KNOW YOUR OPTIMA HYBRID
Congratulations on Your New Kia Purchase!
Your new Kia vehicle has been designed, engineered and manufactured to provide you with years of comfortable and dependable driving. Kia is committed to quality, innovation, safety and — above all — your satisfaction.
Using This Guide
The information contained in this guide is a brief overview that will help you become familiar with the operation and features of your new Kia vehicle. The flipbook format facilitates information access, while the detailed illustrations ensure the instructions are easy to follow.
This Features & Functions Guide and the specific operational and safety information it provides is not a substitute for your Owner’s Manual. In the interest of your safety and that of your family, and to help you avoid risks that may result in death or serious injury, Kia reminds you to carefully read your Owner’s Manual in order to fully familiarize yourself with the important information it contains.
While the information contained in this guide is accurate at the time of printing, Kia may change vehicle specifications without notice in advance or after the fact, and assumes no liability in connection with such changes.
Page 9 of 50
7
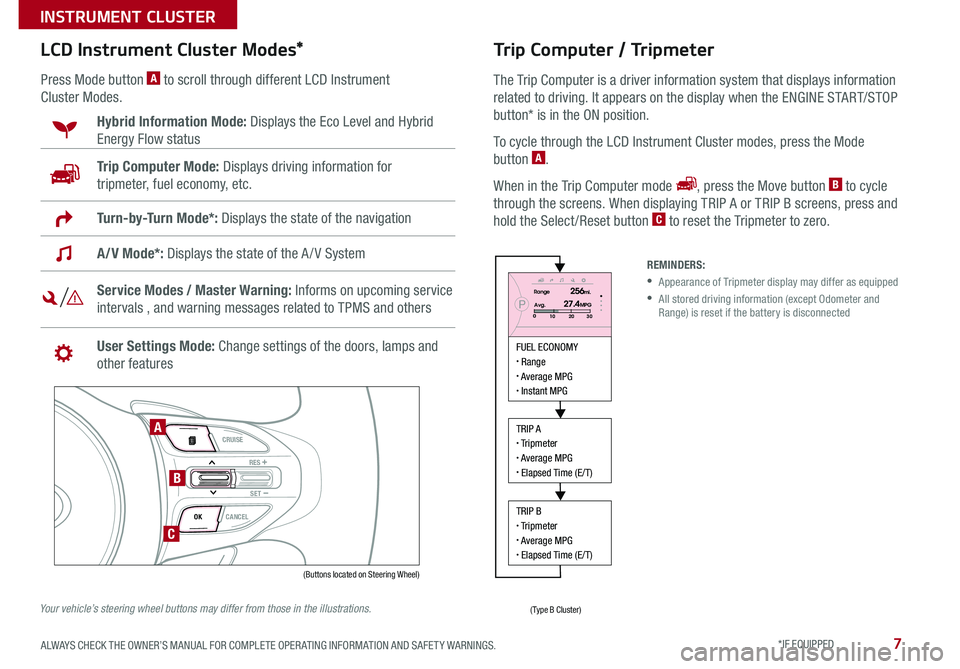
LCD Instrument Cluster Modes*
Press Mode button A to scroll through different LCD Instrument
Cluster Modes .
Trip Computer Mode: Displays driving information for
tripmeter, fuel economy, etc .
Hybrid Information Mode: Displays the Eco Level and Hybrid
Energy Flow status
A/V Mode*: Displays the state of the A / V System
Turn-by-Turn Mode*: Displays the state of the navigation
Service Modes / Master Warning: Informs on upcoming service
intervals , and warning messages related to TPMS and others
User Settings Mode: Change settings of the doors, lamps and
other features
VOL
VOL
MUTE
MODE CRUISE
RES
SET
CANCEL
OK
DRIVE
MODE
VOL
VOL
MUTE
MODE
REMINDERS:
• Appearance of Tripmeter display may differ as equipped
• All stored driving information (except Odometer and Range) is reset if the battery is disconnected
Trip Computer / Tripmeter
The Trip Computer is a driver information system that displays information
related to driving
. It appears on the display when the ENGINE START/STOP
button* is in the ON position .
To cycle through the LCD Instrument Cluster modes, press the Mode
button A .
When in the Trip Computer mode , press the Move button B to cycle
through the screens . When displaying TRIP A or TRIP B screens, press and
hold the Select /Reset button C to reset the Tripmeter to zero .
FUEL ECONOMY Range Average MPG Instant MPG
TRIP A Tripmeter Average MPG Elapsed Time (E/T)
TRIP B Tripmeter Average MPG Elapsed Time (E/T)
PRange256mi.
30
20
10Avg.027.4MPG
(Buttons located on Steering Wheel)
(Type B Cluster)
A
B
C
Your vehicle’s steering wheel buttons may differ from those in the illustrations.
ALWAYS CHECK THE OWNER’S MANUAL FOR COMPLETE OPER ATING INFORMATION AND SAFET Y WARNINGS. *IF EQUIPPED
INSTRUMENT CLUSTER
Page 18 of 50
16
AUTO HOLD temporarily maintains the
vehicle at a standstill even if the brake pedal
is released . AUTO HOLD can be turned ON/
OFF using the AUTO HOLD switch B on
the driver’s panel . Before AUTO HOLD will
operate, the driver’s door, engine hood and
trunk must be closed, and the driver’s seat
belt must be fastened .
The AUTO HOLD indicator has four states:
White: Standby - With vehicle at a standstill,
and AUTO HOLD switch B turned ON, the
indicator will illuminate white . While driving
the vehicle (vehicle is not at a standstill), the
AUTO HOLD indicator will remain white .
Yellow: Malfunction - When the indicator
is illuminated yellow, there may be a system
malfunction . Take your vehicle to a local Kia dealer .
Green: Engaged - When coming to a complete stop by depressing the brake
pedal, the AUTO HOLD indicator changes from white to green .
OFF (not illuminated) - The indicator will turn OFF when the AUTO HOLD
switch B is manually turned OFF or when the EPB is manually turned ON .
REMINDERS:
• As a bulb check, the EPB malfunction indicator will illuminate for approximately 3 seconds when the ignition switch is turned ON
• If the warning light does not illuminate temporarily, or continues to remain lit, take your vehicle to an authorized Kia dealer and have the system checked
•The EPB should not be operated while the vehicle is moving
• A click or electric brake motor sound may be heard while operating or releasing the EPB, but these conditions are normal and indicate that the EPB is functioning properly
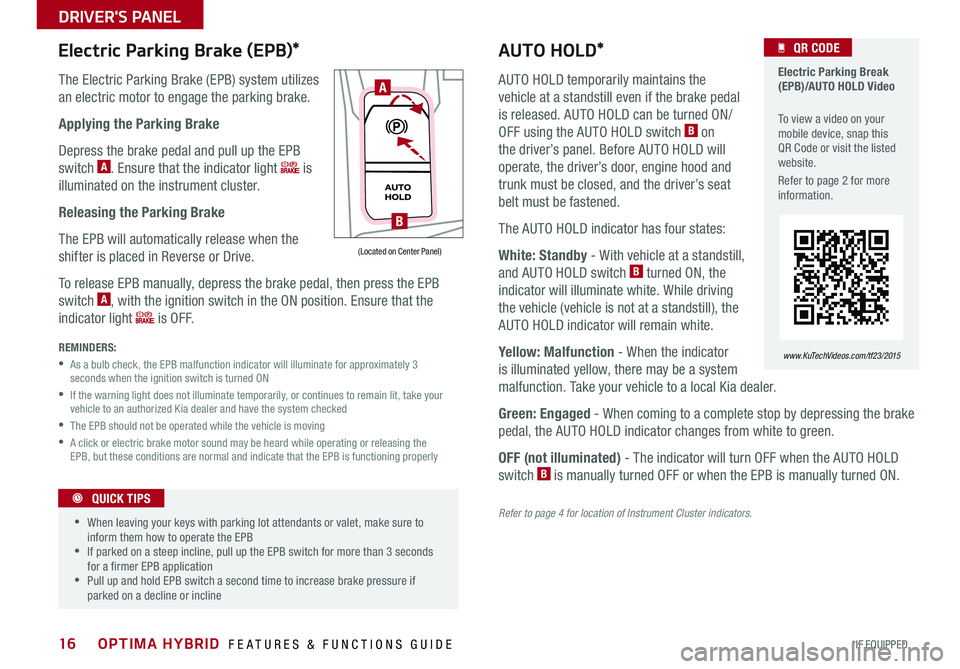
Electric Parking Brake (EPB)*
The Electric Parking Brake (EPB) system utilizes
an electric motor to engage the parking brake .
Applying the Parking Brake
Depress the brake pedal and pull up the EPB
switch A . Ensure that the indicator light is
illuminated on the instrument cluster .
Releasing the Parking Brake
The EPB will automatically release when the
shifter is placed in Reverse or Drive .
To release EPB manually, depress the brake pedal, then press the EPB
switch A, with the ignition switch in the ON position . Ensure that the
indicator light i s O F F .
Electric Parking Break (EPB)/AUTO HOLD Video
To view a video on your mobile device, snap this QR Code or visit the listed website .
Refer to page 2 for more information .
QR CODE
www.KuTechVideos.com/tf23/2015
AUTO HOLD*
Refer to page 4 for location of Instrument Cluster indicators.
•
•When leaving your keys with parking lot attendants or valet, make sure to inform them how to operate the EPB •If parked on a steep incline, pull up the EPB switch for more than 3 seconds for a firmer EPB application •Pull up and hold EPB switch a second time to increase brake pressure if parked on a decline or incline
QUICK TIPS
A
B
(Located on Center Panel)
OPTIMA HYBRID FEATURES & FUNCTIONS GUIDE
*IF EQUIPPED
DRIVER'S PANEL
Page 22 of 50
20
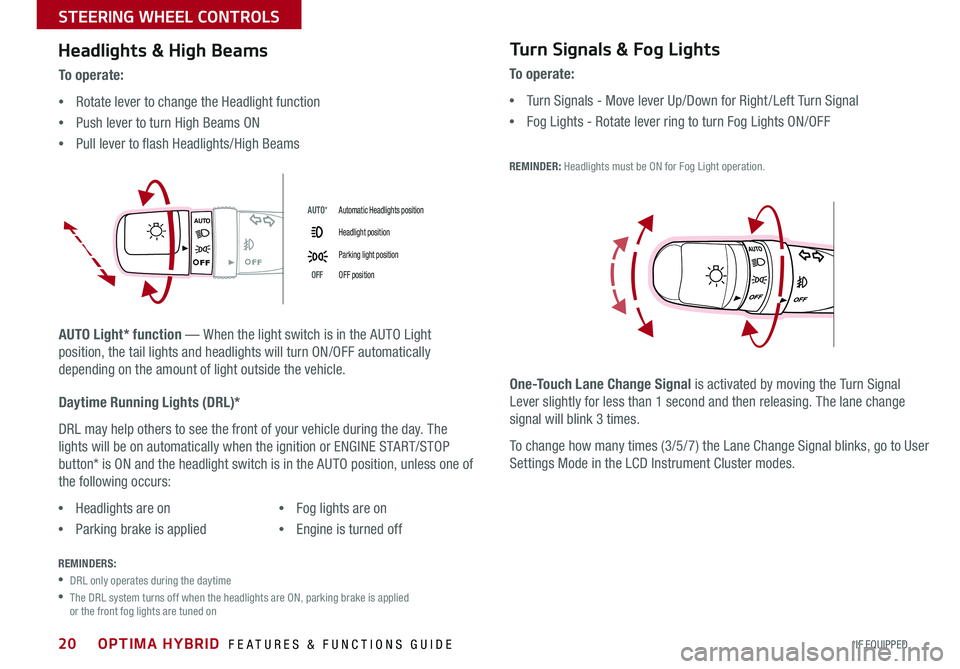
Headlights & High Beams
AUTO Light* function — When the light switch is in the AUTO Light
position, the tail lights and headlights will turn ON/OFF automatically
depending on the amount of light outside the vehicle .
To o p e r a t e :
•Rotate lever to change the Headlight function
•Push lever to turn High Beams ON
•Pull lever to flash Headlights/High Beams
Daytime Running Lights (DRL)*
DRL may help others to see the front of your vehicle during the day . The
lights will be on automatically when the ignition or ENGINE START/STOP
button* is ON and the headlight switch is in the AUTO position, unless one of
the following occurs:
Turn Signals & Fog Lights
To o p e r a t e :
•Turn Signals - Move lever Up/Down for Right /Left Turn Signal
•Fog Lights - Rotate lever ring to turn Fog Lights ON/OFF
REMINDER: Headlights must be ON for Fog Light operation .
AUTO
AUTO
•Headlights are on
•Parking brake is applied
•Fog lights are on
•Engine is turned off
REMINDERS:
•DRL only operates during the daytime
• The DRL system turns off when the headlights are ON, parking brake is applied or the front fog lights are tuned on
One-Touch Lane Change Signal is activated by moving the Turn Signal
Lever slightly for less than 1 second and then releasing . The lane change
signal will blink 3 times .
To change how many times (3/5/7) the Lane Change Signal blinks, go to User
Settings Mode in the LCD Instrument Cluster modes .
AUTO*Automatic Headlights position
Headlight position
Parking light position
OFFOFF position
OPTIMA HYBRID FEATURES & FUNCTIONS GUIDE
*IF EQUIPPED
STEERING WHEEL CONTROLS
Page 25 of 50
23
Voice Recognition and Phone
Contact Tips
The Kia Voice Recognition System may
have difficulty understanding some accents
or uncommon names . When using Voice
Recognition to place a call, speak in a
moderate tone, with clear pronunciation .
Help your Bluetooth® Wireless Technology
Voice Recognition performance by making a
few simple changes to your phone contacts:
•Use full names vs . short or single-syllable
names (“John Smith” vs . “Dad”; “Smith
Residence” vs . “Home”)
•Avoid using special characters or hyphens
(@, &, #, /, -, *, +, etc . )
•Avoid using acronyms (“In Case
Emergency” vs . “ICE”)
•Spell words completely, no abbreviations
(“Doctor Goodman” vs . “Dr . Goodman”)
Bluetooth® Wireless Technology
Pairing a Phone
For instructions on how to pair a phone, refer to the audio system’s user’s
guide or your vehicle’s Quick Start Guide .
How to Place a Call
When using the voice command feature, wait for the system BEEP before
speaking the command .
There are two options for placing a call:
Standard Audio System
•Option 1: Press the Receive/Place Call button D (system will prompt you
through call process)
•Option 2: Press the Talk button C (system will BEEP to indicate it is ready
for call placement) . Then say the command “Call {name}” or “Dial {number}”
UVO eServices System
•Option 1: Press the Receive/Place Call button D (displays the phone
screen with number keypad)
•Option 2: Press the Talk button C . Then say the command “Call {name}”
or “Dial {number}”
Navigation System
•Option 1: Press the Receive/Place Call button D (displays the phone
screen with number keypad)
•Option 2: Press the Talk button C . Then say the command “Call Name”
or “Dial Number,” followed by phone book name or number
During the pairing process, be sure to accept the connection requests on the phone for phonebook download and to allow acceptance of all future Bluetooth® connection requests .
QUICK TIP
Contacts Sync Tips •If Contact Sync is set to ON, contacts stored in your phone will download each time your phone is connected . There may be a delay before the system is available to place a call •If Contact Sync is set to OFF, your phone contacts will download only at the initial pairing . This allows you to make calls without waiting for your phone contact list to download
QUICK TIPS
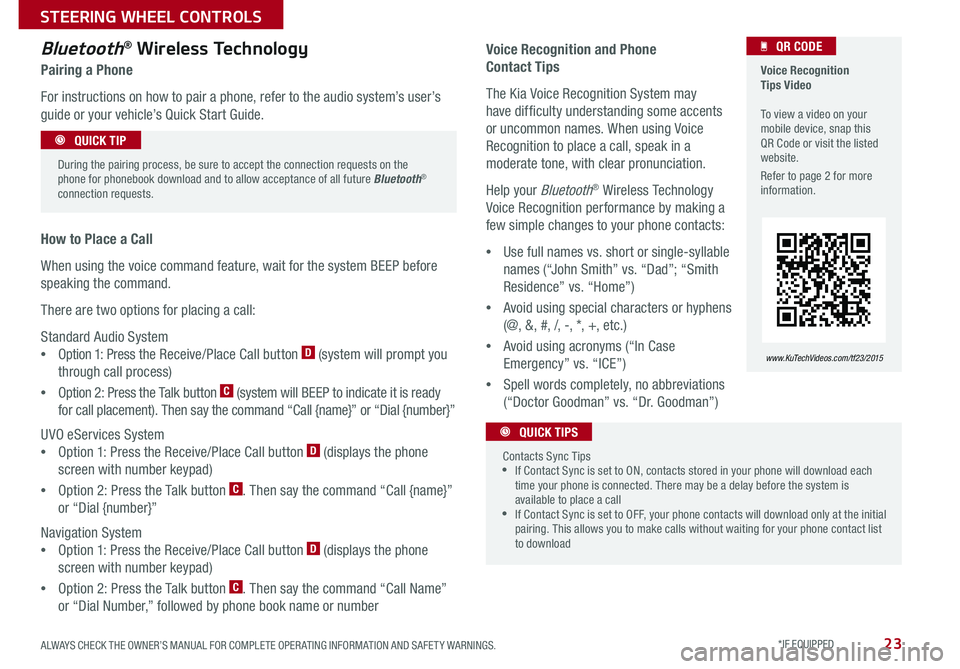
Voice Recognition Tips Video To view a video on your mobile device, snap this QR Code or visit the listed website .
Refer to page 2 for more information .
www.KuTechVideos.com/tf23/2015
QR CODE
ALWAYS CHECK THE OWNER’S MANUAL FOR COMPLETE OPER ATING INFORMATION AND SAFET Y WARNINGS. *IF EQUIPPED
STEERING WHEEL CONTROLS
Page 30 of 50
28
For further UVO eServices with Premium Navigation* operations, refer to the Car Multimedia System User's Manual. For further audio system operations, refer to pages 2 6 - 27.
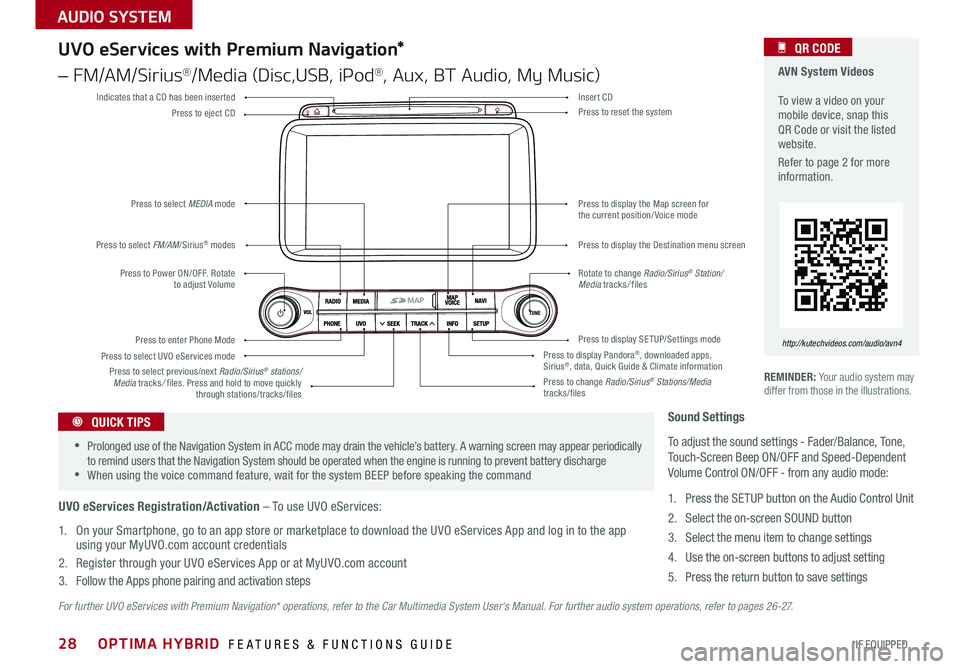
REMINDER: Your audio system may differ from those in the illustrations .
UVO eServices with Premium Navigation*
– FM/AM/Sirius®/Media (Disc,USB, iPod®, Aux, BT Audio, My Music)
Press to Power ON/OFF . Rotate to adjust Volume
Press to enter Phone Mode
Press to select FM/AM/Sirius® modes
Press to select MEDIA mode
Press to display SE TUP/Settings mode
Press to select UVO eServices mode
Indicates that a CD has been inserted
Press to change Radio/Sirius® Stations/Media tracks/files
Press to display the Map screen for the current position/ Voice mode
Press to display the Destination menu screen
Press to display Pandora®, downloaded apps, Sirius®, data, Quick Guide & Climate information
Press to eject CDPress to reset the system
Press to select previous/next Radio/Sirius® stations/Media tracks/ files . Press and hold to move quickly through stations/tracks/files
Insert CD
Rotate to change Radio/Sirius® Station/Media tracks/ files
AVN System Videos To view a video on your mobile device, snap this QR Code or visit the listed website .
Refer to page 2 for more information .
QR CODE
http://kutechvideos.com/audio/avn4
Sound Settings
To adjust the sound settings - Fader/Balance, Tone, Touch-Screen Beep ON/OFF and Speed-Dependent Volume Control ON/OFF - from any audio mode:
1 . Press the SETUP button on the Audio Control Unit
2 . Select the on-screen SOUND button
3 . Select the menu item to change settings
4 . Use the on-screen buttons to adjust setting
5 . Press the return button to save settings
•Prolonged use of the Navigation System in ACC mode may drain the vehicle’s battery . A warning screen may appear periodically to remind users that the Navigation System should be operated when the engine is running to prevent battery discharge •When using the voice command feature, wait for the system BEEP before speaking the command
QUICK TIPS
UVO eServices Registration/Activation – To use UVO eServices:
1 . On your Smartphone, go to an app store or marketplace to download the UVO eServices App and log in to the app using your MyUVO .com account credentials
2 . Register through your UVO eServices App or at MyUVO .com account
3 . Follow the Apps phone pairing and activation steps
OPTIMA HYBRID FEATURES & FUNCTIONS GUIDE
*IF EQUIPPED
AUDIO SYSTEM
Page 31 of 50
29
REMINDER: Using the power outlet (accessory plug) for prolonged periods of time with the engine off could cause the battery to discharge .
Aux/USB/iPod® Port
& Power Outlets
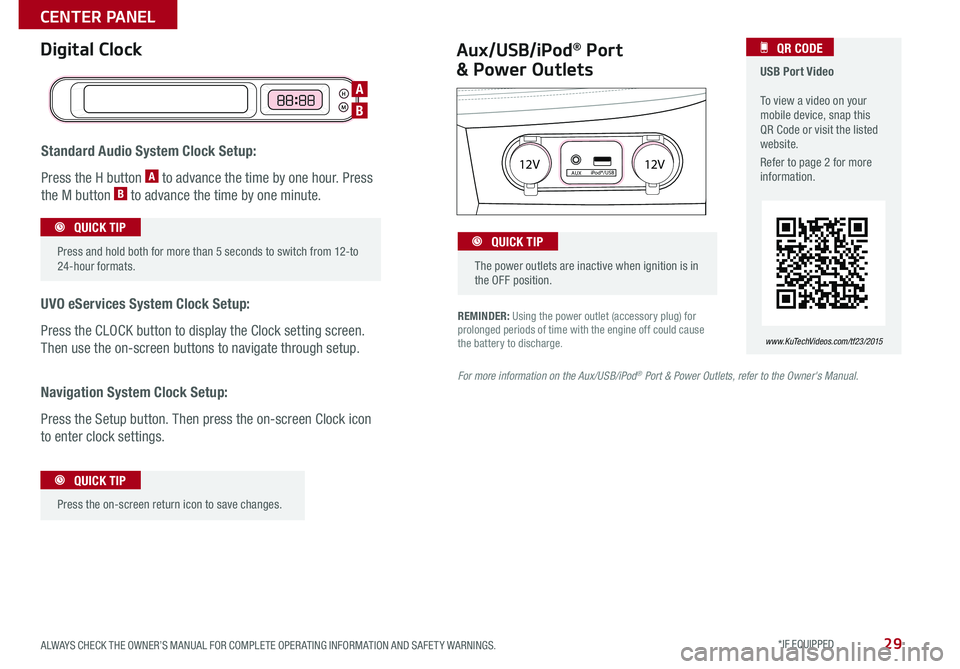
Digital Clock USB Port Video To view a video on your mobile device, snap this QR Code or visit the listed website .
Refer to page 2 for more information .
QR CODE
www.KuTechVideos.com/tf23/2015
For more information on the Aux/USB/iPod® Port & Power Outlets, refer to the Owner's Manual.
H
M
H
MH
M
Standard Audio System Clock Setup:
Press the H button A to advance the time by one hour . Press
the M button B to advance the time by one minute .
UVO eServices System Clock Setup:
Press the CLOCK button to display the Clock setting screen .
Then use the on-screen buttons to navigate through setup .
Navigation System Clock Setup:
Press the Setup button . Then press the on-screen Clock icon
to enter clock settings .
12V 12VAUXiPod®/USB
Press and hold both for more than 5 seconds to switch from 12-to 24-hour formats .
QUICK TIP
Press the on-screen return icon to save changes
.
QUICK TIP
The power outlets are inactive when ignition is in the OFF position .
QUICK TIP
A
B
ALWAYS CHECK THE OWNER’S MANUAL FOR COMPLETE OPER ATING INFORMATION AND SAFET Y WARNINGS. *IF EQUIPPED
CENTER PANEL
Page 48 of 50
*IF EQUIPPEDNORMAL MAINTENANCE SCHEDULE
When your vehicle requires service, remember that your dealer knows your vehicle best. Your dealer has factory-trained technicians, recommended special tools, genuine Kia
replacement parts, and is dedicated to your complete satisfaction. For expert advice and quality service, see your authorized Kia dealer.
Optima Hybrid Features & Functions Guide
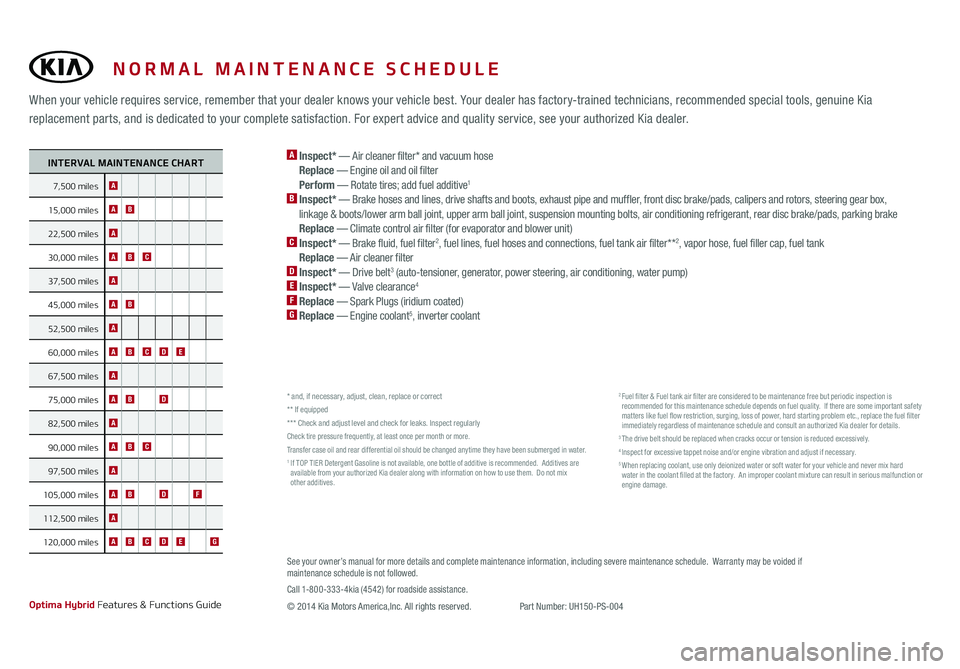
A Inspect* — Air cleaner filter* and vacuum hose Replace — Engine oil and oil filter Perform — Rotate tires; add fuel additive1
B Inspect* — Brake hoses and lines, drive shafts and boots, exhaust pipe and muffler, front disc brake/pads, calipers and rotors, steering gear box, linkage & boots/lower arm ball joint, upper arm ball joint, suspension mounting bolts, air conditioning refrigerant, rear disc brake/pads, parking brake Replace — Climate control air filter (for evaporator and blower unit)C Inspect* — Brake fluid, fuel filter2, fuel lines, fuel hoses and connections, fuel tank air filter* *2, vapor hose, fuel filler cap, fuel tank Replace — Air cleaner filterD Inspect* — Drive belt3 (auto-tensioner, generator, power steering, air conditioning, water pump)E Inspect* — Valve clearance4
F Replace — Spark Plugs (iridium coated)G Replace — Engine coolant5, inverter coolant
* and, if necessary, adjust, clean, replace or correct** If equipped* * * Check and adjust level and check for leaks. Inspect regularlyCheck tire pressure frequently, at least once per month or more.Transfer case oil and rear differential oil should be changed anytime they have been submerged in water.1 If TOP TIER Detergent Gasoline is not available, one bottle of additive is recommended. Additives are available from your authorized Kia dealer along with information on how to use them. Do not mix other additives.
2 Fuel filter & Fuel tank air filter are considered to be maintenance free but periodic inspection is recommended for this maintenance schedule depends on fuel quality. If there are some important safety matters like fuel flow restriction, surging, loss of power, hard starting problem etc., replace the fuel filter immediately regardless of maintenance schedule and consult an authorized Kia dealer for details.3 The drive belt should be replaced when cracks occur or tension is reduced excessively.4 Inspect for excessive tappet noise and/or engine vibration and adjust if necessary.5 When replacing coolant, use only deionized water or soft water for your vehicle and never mix hard water in the coolant filled at the factory. An improper coolant mixture can result in serious malfunction or engine damage.
See your owner’s manual for more details and complete maintenance information, including severe maintenance schedule. Warranty may be voided if maintenance schedule is not followed. Call 1-800-333-4kia (4542) for roadside assistance.
© 2014 Kia Motors America, Inc. All rights reserved. Part Number: UH150-PS-004
INTERVAL MAINTENANCE CHART
7,500 miles A
15,000 milesAB
22,500 milesA
30,000 milesABC
37,500 milesA
45,000 milesAB
52,500 milesA
60,000 milesABCDE
67,500 milesA
75,000 milesABD
82,500 milesA
90,000 milesABC
97,500 milesA
105,000 miles ABDF
112,500 milesA
120,000 milesABCDEG