KIA OPTIMA HYBRID 2015 Owners Manual
Manufacturer: KIA, Model Year: 2015, Model line: OPTIMA HYBRID, Model: KIA OPTIMA HYBRID 2015Pages: 495, PDF Size: 13.38 MB
Page 191 of 495
Features of your vehicle
100
4
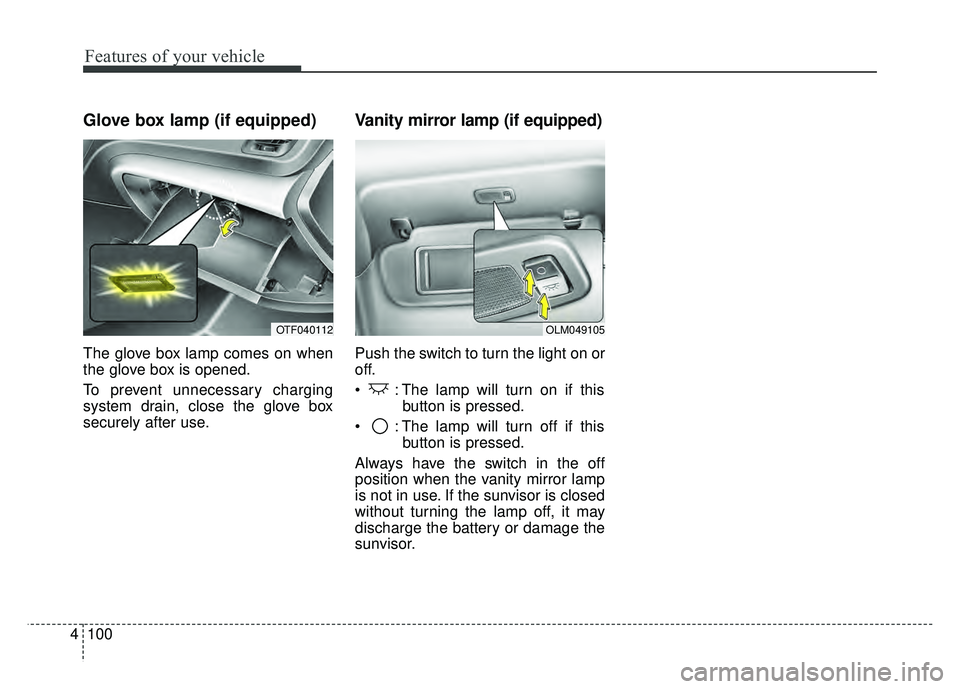
Glove box lamp (if equipped)
The glove box lamp comes on when
the glove box is opened.
To prevent unnecessary charging
system drain, close the glove box
securely after use.
Vanity mirror lamp (if equipped)
Push the switch to turn the light on or
off.
: The lamp will turn on if this
button is pressed.
: The lamp will turn off if this button is pressed.
Always have the switch in the off
position when the vanity mirror lamp
is not in use. If the sunvisor is closed
without turning the lamp off, it may
discharge the battery or damage the
sunvisor.
OLM049105OTF040112
Page 192 of 495
4101
Features of your vehicle
DEFROSTER
If you want to defrost and defog the
front windshield, refer to “Windshield
Defrosting and Defogging” in this
chapter.
Rear window defroster
The defroster heats the window to
remove frost, fog and thin ice from
the interior and exterior of the rear
window, while the engine is running.
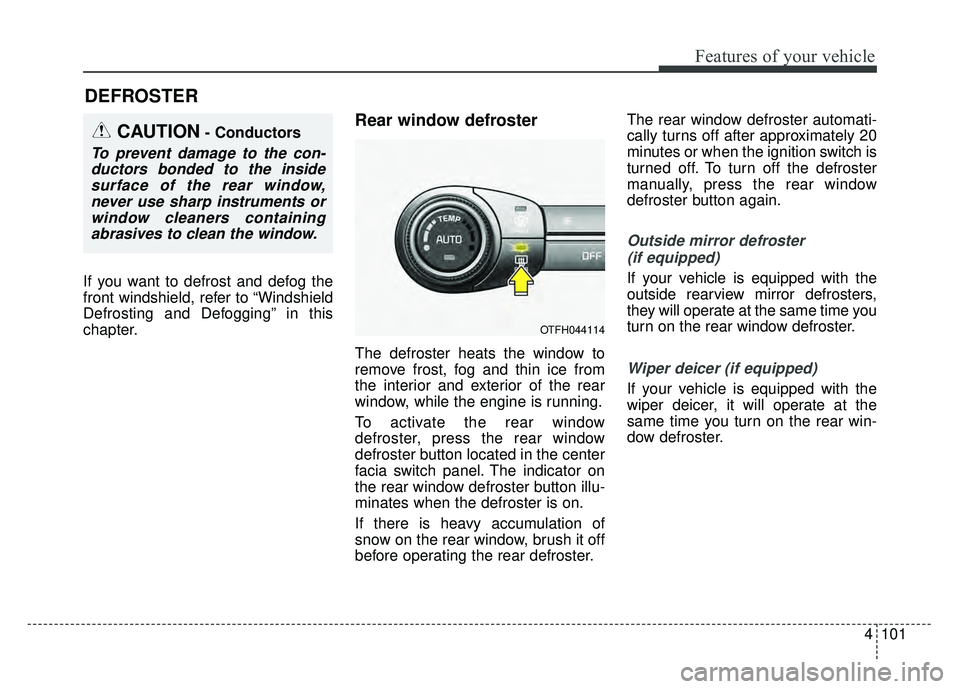
To activate the rear window
defroster, press the rear window
defroster button located in the center
facia switch panel. The indicator on
the rear window defroster button illu-
minates when the defroster is on.
If there is heavy accumulation of
snow on the rear window, brush it off
before operating the rear defroster.The rear window defroster automati-
cally turns off after approximately 20
minutes or when the ignition switch is
turned off. To turn off the defroster
manually, press the rear window
defroster button again.
Outside mirror defroster
(if equipped)
If your vehicle is equipped with the
outside rearview mirror defrosters,
they will operate at the same time you
turn on the rear window defroster.
Wiper deicer (if equipped)
If your vehicle is equipped with the
wiper deicer, it will operate at the
same time you turn on the rear win-
dow defroster.
CAUTION- Conductors
To prevent damage to the con-ductors bonded to the insidesurface of the rear window,never use sharp instruments orwindow cleaners containingabrasives to clean the window.
OTFH044114
Page 193 of 495
Features of your vehicle
102
4
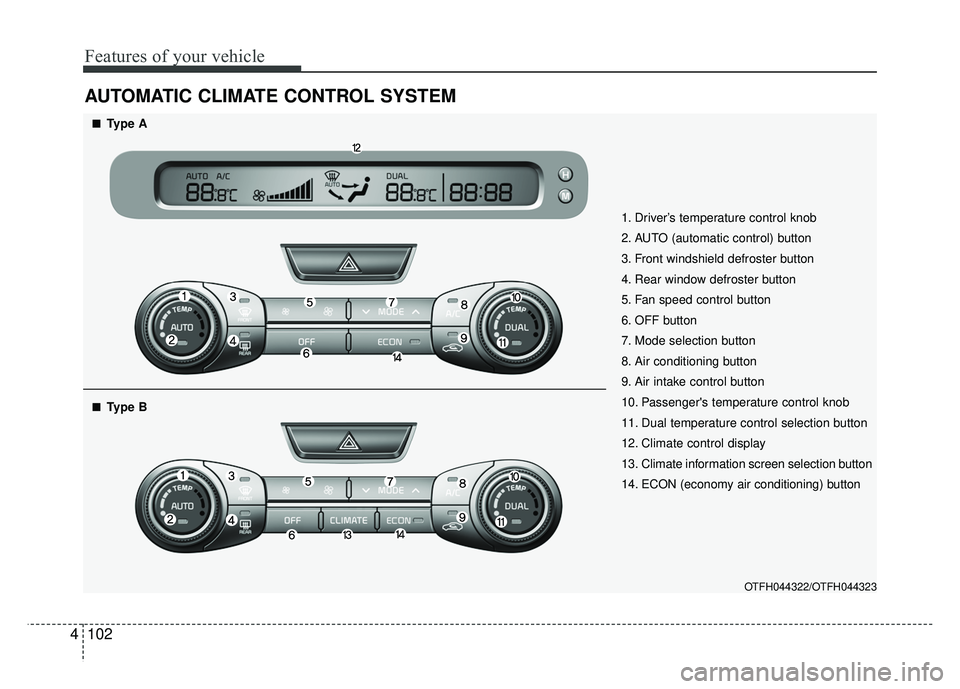
AUTOMATIC CLIMATE CONTROL SYSTEM
OTFH044322/OTFH044323
1. Driver’s temperature control knob
2. AUTO (automatic control) button
3. Front windshield defroster button
4. Rear window defroster button
5. Fan speed control button
6. OFF button
7. Mode selection button
8. Air conditioning button
9. Air intake control button
10. Passenger's temperature control knob
11. Dual temperature control selection button
12. Climate control display
13. Climate information screen selection button
14. ECON (economy air conditioning) button
■
■Type A
■
■Type B
Page 194 of 495
4103
Features of your vehicle
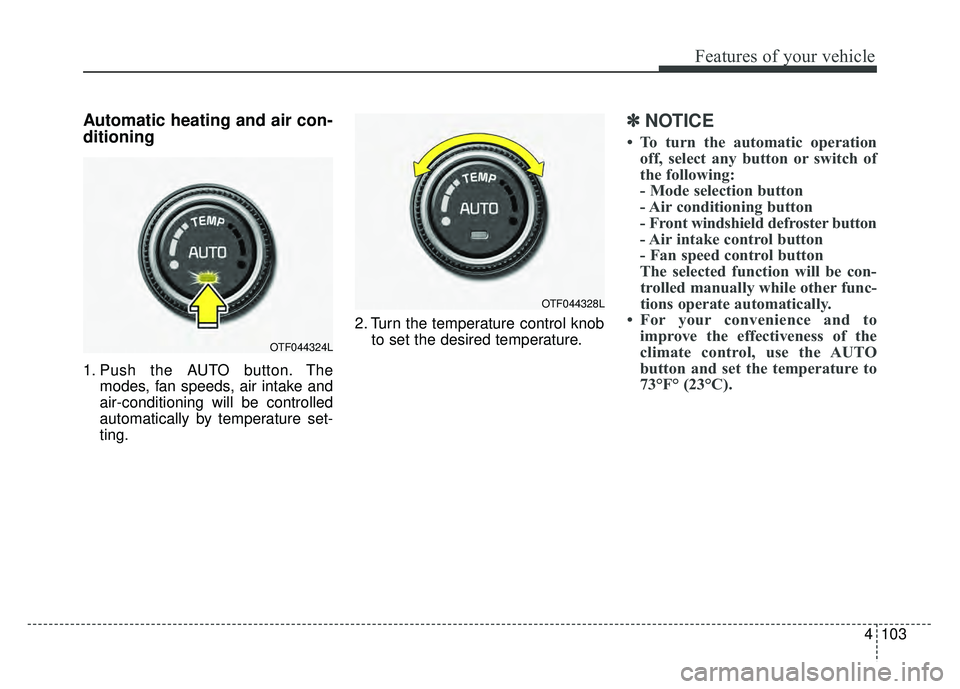
Automatic heating and air con-
ditioning
1. Push the AUTO button. Themodes, fan speeds, air intake and
air-conditioning will be controlled
automatically by temperature set-
ting. 2. Turn the temperature control knob
to set the desired temperature.
✽ ✽NOTICE
• To turn the automatic operation
off, select any button or switch of
the following:
- Mode selection button
- Air conditioning button
- Front windshield defroster button
- Air intake control button
- Fan speed control button
The selected function will be con- trolled manually while other func-
tions operate automatically.
• For your convenience and to improve the effectiveness of the
climate control, use the AUTO
button and set the temperature to
73°F° (23°C).
OTF044324L
OTF044328L
Page 195 of 495
Features of your vehicle
104
4
✽
✽
NOTICE
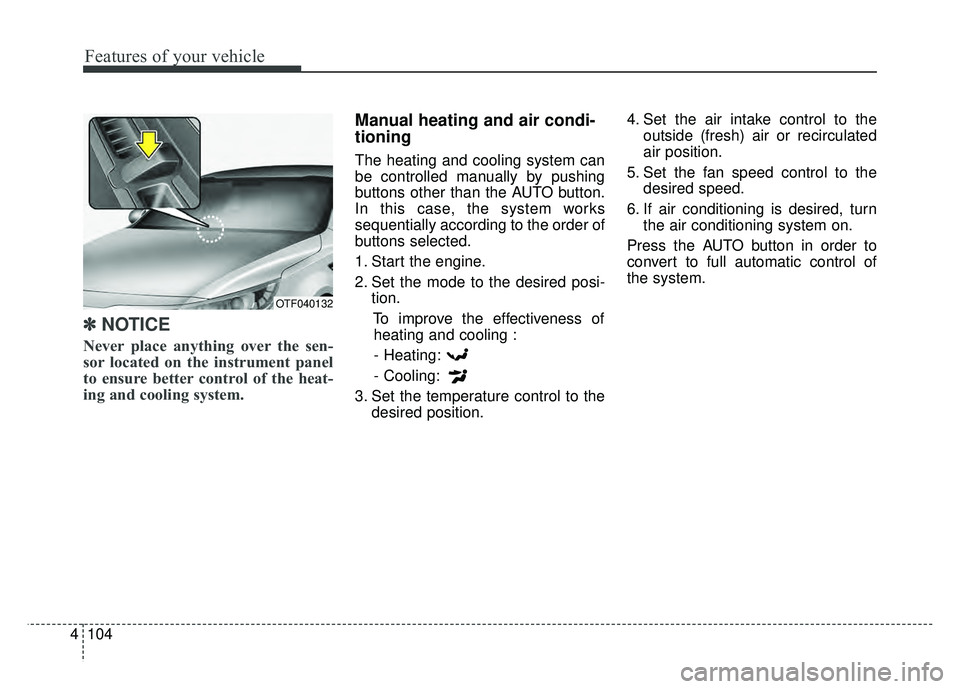
Never place anything over the sen-
sor located on the instrument panel
to ensure better control of the heat-
ing and cooling system.
Manual heating and air condi-
tioning
The heating and cooling system can
be controlled manually by pushing
buttons other than the AUTO button.
In this case, the system works
sequentially according to the order of
buttons selected.
1. Start the engine.
2. Set the mode to the desired posi-
tion.
To improve the effectiveness ofheating and cooling :
- Heating:
- Cooling:
3. Set the temperature control to the desired position. 4. Set the air intake control to the
outside (fresh) air or recirculated
air position.
5. Set the fan speed control to the desired speed.
6. If air conditioning is desired, turn the air conditioning system on.
Press the AUTO button in order to
convert to full automatic control of
the system.
OTF040132
Page 196 of 495
4105
Features of your vehicle
Mode selection
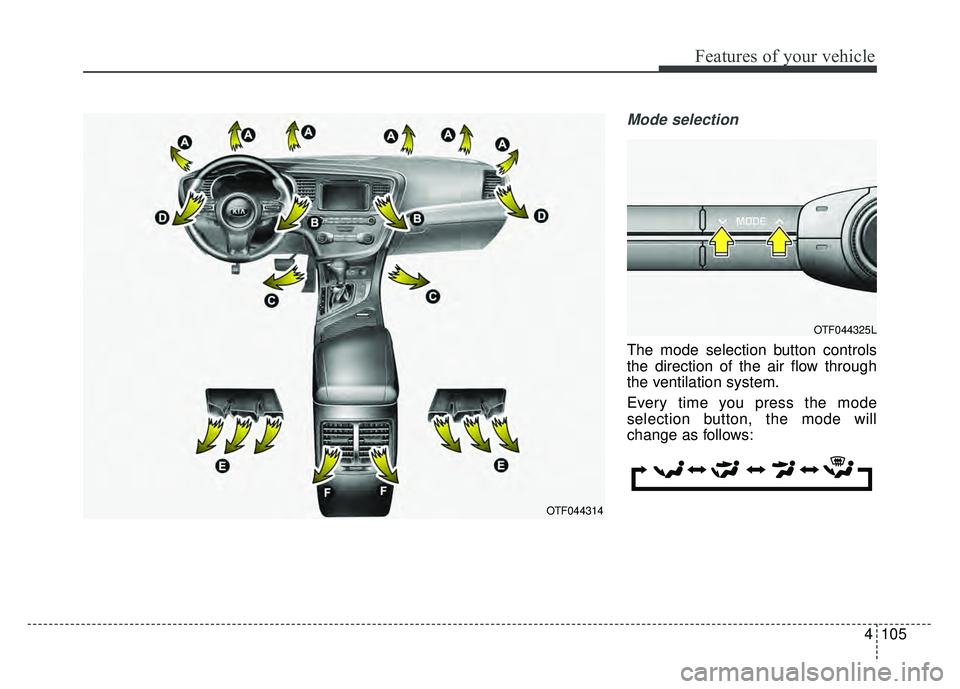
The mode selection button controls
the direction of the air flow through
the ventilation system.
Every time you press the mode
selection button, the mode will
change as follows:
OTF044314
OTF044325L
Page 197 of 495

Features of your vehicle
106
4
Face-Level (B, C, D, E, F)
Air flow is directed toward the upper
body and face. Additionally, each
outlet can be controlled to direct the
air discharged from the outlet.
Bi-Level (B, C, D, E, F)
Air flow is discharged towards the
face and floor. Floor-Level (C, A, D, E)
Most of the air flow is directed to the
floor, with a small amount of the air
being directed to the windshield and
side window defroster.
Floor/Defrost-Level (A, C, D, E)
Most of the air flow is directed to the
floor and the windshield with a small
amount directed to the side window
defrosters. Defrost-level
Most of the air flow is directed to the
windshield with a small amount of air
directed to the side window
defrosters.
OTF044326L
Page 198 of 495
4107
Features of your vehicle
Instrument panel vents
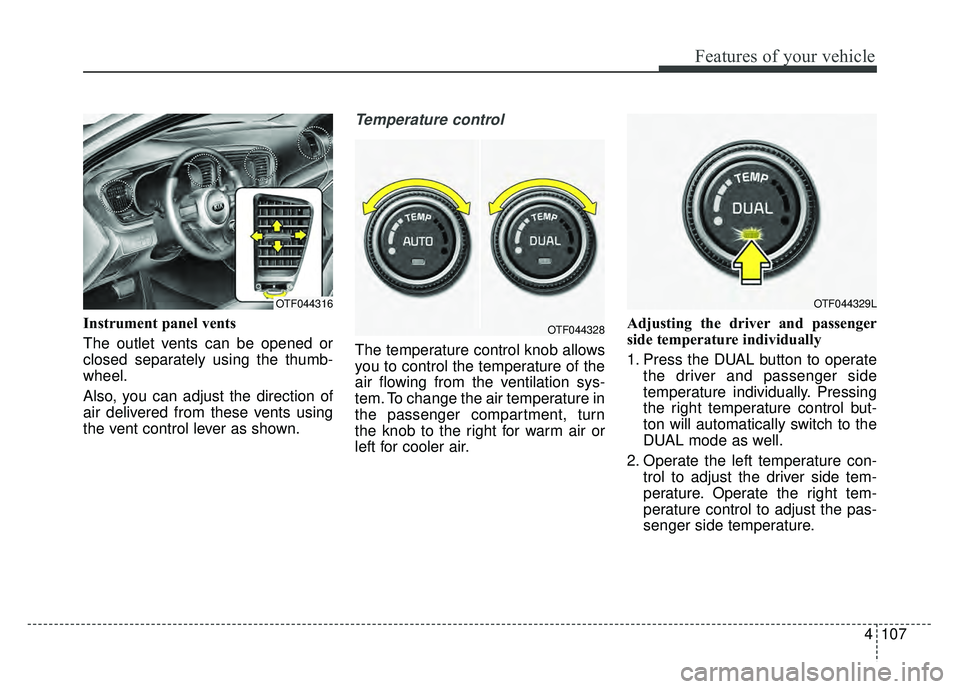
The outlet vents can be opened or
closed separately using the thumb-
wheel.
Also, you can adjust the direction of
air delivered from these vents using
the vent control lever as shown.
Temperature control
The temperature control knob allows
you to control the temperature of the
air flowing from the ventilation sys-
tem. To change the air temperature in
the passenger compartment, turn
the knob to the right for warm air or
left for cooler air.Adjusting the driver and passenger
side temperature individually
1. Press the DUAL button to operate
the driver and passenger side
temperature individually. Pressing
the right temperature control but-
ton will automatically switch to the
DUAL mode as well.
2. Operate the left temperature con- trol to adjust the driver side tem-
perature. Operate the right tem-
perature control to adjust the pas-
senger side temperature.
OTF044329LOTF044316
OTF044328
Page 199 of 495
Features of your vehicle
108
4
Adjusting the driver and passenger
side temperature equally
1. Press the DUAL button again to
deactivate DUAL mode. The pas-
senger side temperature will be
set to the same temperature as
the driver side temperature.
2. Operate the driver side tempera- ture control switch. The driver and
passenger side temperature will
be adjusted equally. Temperature conversion
You can switch the temperature
mode between Fahrenheit to
Centigrade as follows:
While pressing the OFF, press the
AUTO button for 3 seconds or more.
The display will change from
Fahrenheit to Centigrade, or from
Centigrade to Fahrenheit.
The temperature unit (from °C to °F
or from °F to °C) can be changed by
using the “User Settings” mode of the
LCD display.
If the battery has been discharged or
disconnected, the temperature mode
display will reset to Fahrenheit.
WARNING- Reduced
Visibility
Continued use of the climate
control system in the recirculat-
ed air position may allow
humidity to increase inside the
vehicle which may fog the glass
and obscure visibility.
WARNING- Recirculated Air
Continued use of the climate
control system in the recirculat-
ed air position can cause
drowsiness or sleepiness, and
loss of vehicle control. Set the
air intake control to the outside
(fresh) air position as much as
possible while driving.
Page 200 of 495
4109
Features of your vehicle
Outside thermometer
The current outside temperature is
displayed in 1°F (1°C) increments.
The temperature range is between -
40°F~140°F (-40°C ~ 60°C).
The outside temperature on thedisplay may not change immedi-
ately like a general thermometer to
prevent the driver from being inat-
tentive.
The outside temperature on the display will update as the vehicle is
driven.
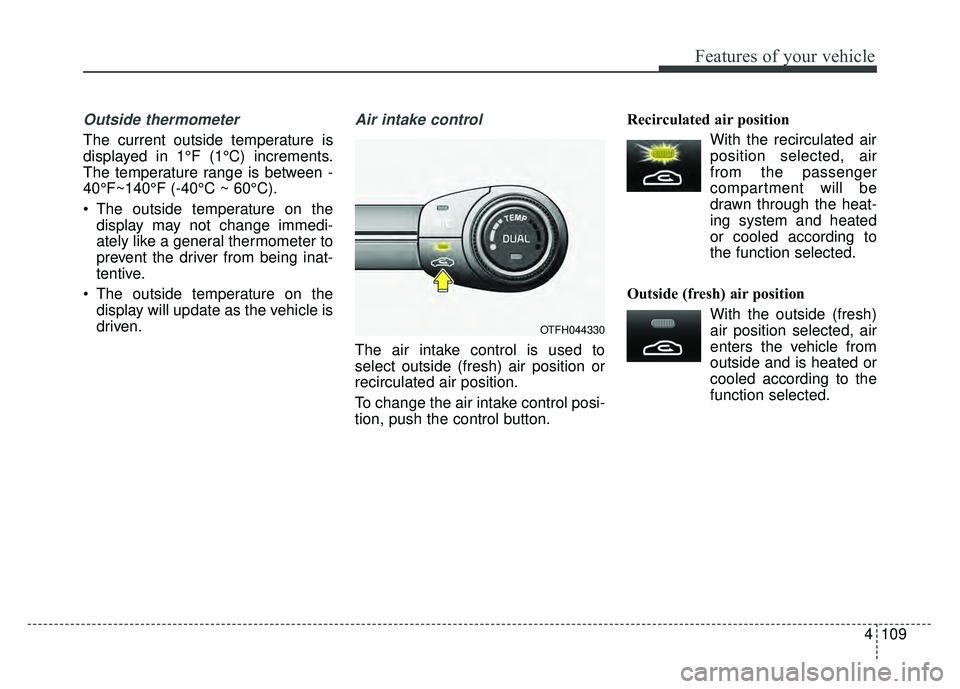
Air intake control
The air intake control is used to
select outside (fresh) air position or
recirculated air position.
To change the air intake control posi-
tion, push the control button. Recirculated air position
With the recirculated airposition selected, air
from the passenger
compartment will be
drawn through the heat-
ing system and heated
or cooled according to
the function selected.
Outside (fresh) air position With the outside (fresh)air position selected, air
enters the vehicle from
outside and is heated or
cooled according to the
function selected.
OTFH044330