steering KIA OPTIMA HYBRID 2018 Features and Functions Guide
[x] Cancel search | Manufacturer: KIA, Model Year: 2018, Model line: OPTIMA HYBRID, Model: KIA OPTIMA HYBRID 2018Pages: 56, PDF Size: 5.74 MB
Page 26 of 56
24*IF EQUIPPED OPTIMA HYBRID / PLUG-IN HYBRID FEATURES & FUNCTIONS GUIDE
Voice Recognition and Phone
Contact Tips
The Kia Voice Recognition System may
have difficulty understanding some accents
or uncommon names . When using Voice
Recognition to place a call, speak in a
moderate tone, with clear pronunciation .
Help your Bluetooth® Wireless Technology
Voice Recognition performance by making
a few simple changes to your phone
contacts:
•Use full names vs . short or single-syllable
names (“John Smith” vs . “Dad”; “Smith
Residence” vs . “Home”)
•Avoid using special characters, emoji’s or
hyphens (@, &, #, /, -, *, +, etc . )
•Avoid using acronyms (“In Case
Emergency” vs . “ICE”)
•Spell words completely, no abbreviations
(“Doctor Goodman” vs . “Dr . Goodman”)
Bluetooth® Wireless Technology
Pairing a Phone
For instructions on how to pair a phone, refer to the Car Multimedia
System User's Manual or your vehicle’s Quick Start Guide .
How to Place a Call
For the UVO eServices System and the UVO eServices System with
Premium Navigation, there are two options for placing a call:
•Option 1: Press the Receive/Place Call button D (displays the phone screen
with number keypad)
•Option 2: Press the Talk button C . Then say the command “Call {name}”
or “Dial {number}”
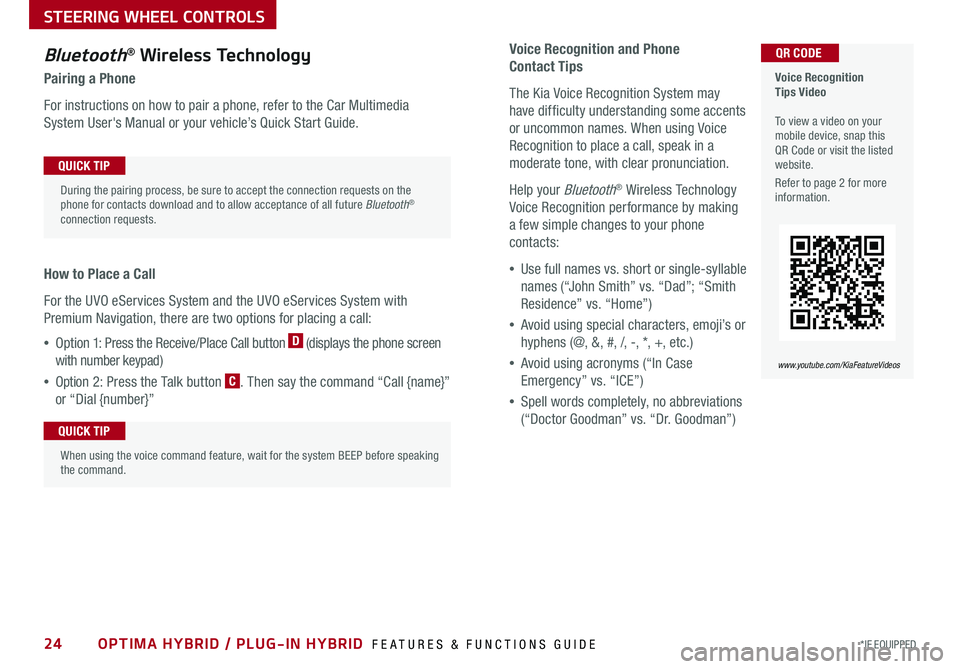
Voice Recognition Tips Video To view a video on your mobile device, snap this QR Code or visit the listed website .
Refer to page 2 for more information .
www.youtube.com/KiaFeatureVideos
QR CODE
During the pairing process, be sure to accept the connection requests on the phone for contacts download and to allow acceptance of all future Bluetooth® connection requests .
QUICK TIP
When using the voice command feature, wait for the system BEEP before speaking the command .
QUICK TIP
STEERING WHEEL CONTROLS
Page 27 of 56
25*IF EQUIPPED ALWAYS CHECK THE OWNER’S MANUAL FOR COMPLETE OPER ATING INFORMATION AND SAFET Y WARNINGS .
Audio Controls
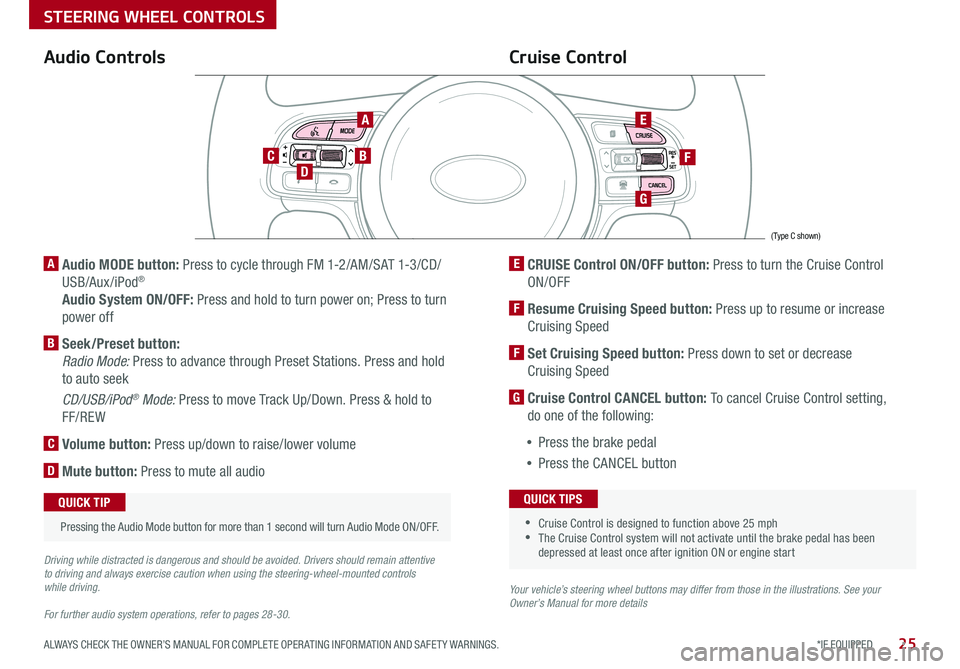
AE
F
G
DCB
Cruise Control
A Audio MODE button: Press to cycle through FM 1-2/AM/SAT 1-3/CD/
USB/Aux /iPod®
Audio System ON/OFF: Press and hold to turn power on; Press to turn
power off
B Seek/Preset button:
Radio Mode: Press to advance through Preset Stations . Press and hold
to auto seek
CD/USB/iPod® Mode: Press to move Track Up/Down . Press & hold to
FF/REW
C Volume button: Press up/down to raise/lower volume
D Mute button: Press to mute all audio
E CRUISE Control ON/OFF button: Press to turn the Cruise Control
ON/OFF
F Resume Cruising Speed button: Press up to resume or increase
Cruising Speed
F Set Cruising Speed button: Press down to set or decrease
Cruising Speed
G Cruise Control CANCEL button: To cancel Cruise Control setting,
do one of the following:
•Press the brake pedal
•Press the CANCEL button
•Cruise Control is designed to function above 25 mph •The Cruise Control system will not activate until the brake pedal has been depressed at least once after ignition ON or engine start
QUICK TIPS
Your vehicle’s steering wheel buttons may differ from those in the illustrations. See your Owner’s Manual for more details
Driving while distracted is dangerous and should be avoided. Drivers should remain attentive to driving and always exercise caution when using the steering-wheel-mounted controls while driving.
For further audio system operations, refer to pages 28-30.
Pressing the Audio Mode button for more than 1 second will turn Audio Mode ON/OFF .
QUICK TIP
(Type C shown)
STEERING WHEEL CONTROLS
Page 28 of 56
26*IF EQUIPPED OPTIMA HYBRID / PLUG-IN HYBRID FEATURES & FUNCTIONS GUIDE
(Distances are approximate and vary depending on vehicle speed)
STEERING WHEEL CONTROLS
Advanced Smart Cruise Control Video To view a video on your mobile device, snap this QR Code or visit the listed website .
Refer to page 2 for more information .
www.youtube.com/KiaFeatureVideos
QR CODE
To change the Cruise Control mode from ASCC to standard Cruise Control, press and hold button A . Repeat to switch modes again ( The ASCC system must not be activated to change modes) .
For the ASCC System to operate: •When no vehicle is in front, you must be travelling at a minimum speed of 20 mph •When following a vehicle, there is no minimum speed requirement
When following a vehicle, the system will automatically adjust your cruise speed based on the vehicle in front . It will even bring the vehicle to a complete stop if necessary .
Advanced Smart Cruise Control (ASCC)*
The Advanced Smart Cruise Control (ASCC)* system allows you to set the vehicle to
maintain a speed so long as it is not limited by traffic . When traffic is encountered, the
vehicle will be slowed to maintain a set distance behind traffic without depressing the
accelerator or brake pedal .
To set/adjust the ASCC speed:
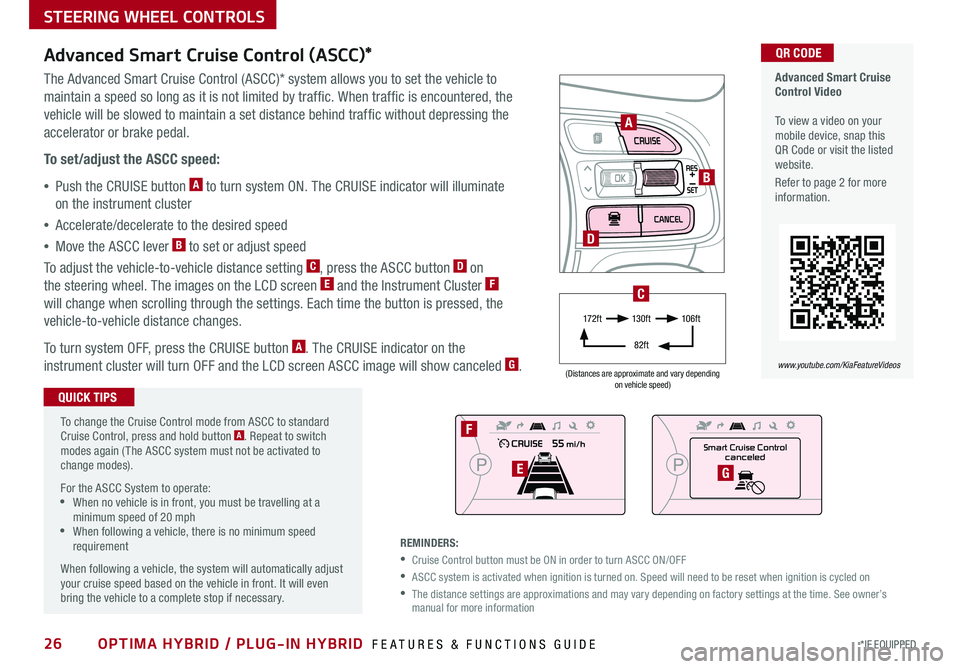
•Push the CRUISE button A to turn system ON . The CRUISE indicator will illuminate
on the instrument cluster
•Accelerate/decelerate to the desired speed
•Move the ASCC lever B to set or adjust speed
To adjust the vehicle-to-vehicle distance setting C, press the ASCC button D on
the steering wheel . The images on the LCD screen E and the Instrument Cluster F
will change when scrolling through the settings . Each time the button is pressed, the
vehicle-to-vehicle distance changes .
To turn system OFF, press the CRUISE button A . The CRUISE indicator on the
instrument cluster will turn OFF and the LCD screen ASCC image will show canceled G .
QUICK TIPS
REMINDERS:
•Cruise Control button must be ON in order to turn ASCC ON/OFF
•ASCC system is activated when ignition is turned on . Speed will need to be reset when ignition is cycled on
•
The distance settings are approximations and may vary depending on factory settings at the time . See owner’s manual for more information
A
B
D
Smart Cruise Control
canceled
F
EG
17 2 f t13 0 f t
82ft
10 6 f t
C
Page 29 of 56

B
C
A
Tilt/Telescoping Steering Wheel
To adjust the Steering Wheel, push the lock-release lever A down and
adjust the desired angle B and distance C .
When finished, pull the lock-release lever A up to lock Steering Wheel
in place .
27*IF EQUIPPED ALWAYS CHECK THE OWNER’S MANUAL FOR COMPLETE OPER ATING INFORMATION AND SAFET Y WARNINGS .
STEERING WHEEL CONTROLS
Page 42 of 56

40*IF EQUIPPED OPTIMA HYBRID / PLUG-IN HYBRID FEATURES & FUNCTIONS GUIDE
Power Trunk / Smart Trunk*
Smart Key:
To open the Power Trunk, press and hold the Trunk
button A until the Trunk begins opening . Press
again to cancel .
REMINDER: Pulling the Trunk upward by the handle or pressing the button a second time will interrupt the automatic opening of the Power Trunk .
HOLDA
Outside the Vehicle:
To open Power Trunk
automatically, press the Trunk
Release button B located
underneath the Trunk lid .
Mechanical Key can also be
used to open trunk C .
Inside the Vehicle:
Press and hold the Power
Trunk Open button D to
open the Trunk .
Smart Trunk*
When the Smart Key fob is on your person and you are near the back of
the vehicle, within close proximity, the hazard lights will blink and a chime
will sound for about 3 seconds as an alert that the Power Trunk is about
to open . Then the alert system will blink and chime two additional times
before opening the Power Trunk .
The Smart Trunk feature is off by default . To enable the Smart Trunk, go to
User Settings in the LCD Instrument Cluster modes .
REMINDERS:
•All doors are closed and locked after about 15 seconds
•The Smart Trunk feature will not operate when:
- The doors are recently closed and locked, and the Smart Key is still detected after 15 seconds near the vehicle or within 60 inches of the door handles
- A door is not locked or closed
- The Smart Key is in the vehicle
For more information on the Smart Trunk operation, please refer to the Owner's Manual.
During the Smart Trunk alert, the Smart Trunk can be deactivated with the Smart Key by pressing any button on the key fob .
QUICK TIP
BC
(Button located on Driver's Panel left of Steering Wheel)
D
OTHER KEY FEATURES
Page 45 of 56

43*IF EQUIPPED ALWAYS CHECK THE OWNER’S MANUAL FOR COMPLETE OPER ATING INFORMATION AND SAFET Y WARNINGS .
Rear Parking Assist System*
The Rear Parking Assist System* is not a safety device . The Rear Parking
Assist System* is a supplemental system that assists the driver by chiming
if any object is detected within the sensing area to the rear and side of the
vehicle when backing up . When the ignition is ON, the system is activated .
REMINDERS:
•If the vehicle is moving at speeds over 3 mph, the system may not activate correctly
•
When more than two objects are sensed at the same time, the closest one will be recognized first
REMINDER: The above images are for illustration purposes only and may not reflect actual operation
The Rear Parking Assist System* is not a substitute for proper and safe backing-up procedures. Always drive safely and use caution when backing up. The Back-Up Warning System may not detect every object behind the vehicle
Rear-Camera Display*
The Rear-Camera Display system is not a safety device . It is a
supplemental system that displays the view behind the vehicle through the
rearview display mirror or the UVO eServices System/UVO eServices with
Premium Navigation System* screens while the vehicle is in Reverse .
The Rear-Camera Display activates when the:
•ENGINE START/STOP button is in the ON position (green light)
•Gear Shift Lever is in the R (Reverse) position
REMINDERS:
•The above images are for illustration purposes only and may not reflect actual operation
•
UVO eServices System* — While camera is active, only the volume controls on the Audio System can be operated .
•
UVO eServices with Premium Navigation System* — While camera is active, only the Audio System can be operated on the Steering Wheel and Audio Control Unit . Navigation features are disabled .
The Rear-Camera Display is not a substitute for proper and safe backing-up procedures. The Rear-Camera Display may not display every object behind the vehicle. Always drive safely and use caution when backing up
Warning ! Che ck sur roundings for safety
OTHER KEY FEATURES
Page 49 of 56
Normal Maintenance Schedule
When your vehicle requires service, remember that your dealer knows your vehicle best . Your dealer has factory-trained technicians, recommended special tools,
genuine Kia replacement parts and is dedicated to your complete satisfaction . For expert advice and quality service, see your authorized Kia dealer .
* And, if necessary, adjust, correct, clean, or replace .1 If TOP TIER detergent gasoline is not available, one bottle of additive is recommended . Additives are available from your authorized Kia dealer along with information on how to use them . Do not mix other additives .2 Inspect HSG belt for evidence of cuts, cracks, excessive wear or oil saturation and replace if necessary . If HSG belt noise occurred, readjust HSG belt tension before replacing .
* And, if necessary, adjust, correct, clean, or replace .1 If TOP TIER detergent gasoline is not available, one bottle of additive is recommended . Additives are available from your authorized Kia dealer along with information on how to use them . Do not mix other additives .2 Inspect HSG belt for evidence of cuts, cracks, excessive wear or oil saturation and replace if necessary . If HSG belt noise occurred, readjust HSG belt tension before replacing .
MAINTENANCE
47ALWAYS CHECK THE OWNER’S MANUAL FOR COMPLETE OPER ATING INFORMATION AND SAFET Y WARNINGS .
Check your Maintenance Schedule or schedule an appointment with a dealer using your UVO eServices account by logging into your UVO App or your account on MyUVO . com ( Vehicles equipped with UVO eServices only; see page 28 for setup information)
QUICK TIP
7,500 miles
PERFORM:
•Add fuel additive1
•Rotate tire position
REPLACE:
•Engine oil and filter
INSPECT*:
•Air cleaner filter
•HSG belt2
•Vacuum hose
15,000 miles
PERFORM:
•Add fuel additive1
•Rotate tire position
REPLACE:
•Climate control air filter (for evaporator and blower unit)
•Engine oil and filter
INSPECT*:
•Air cleaner filter
•HSG belt2
•Vacuum hose
•Air conditioning refrigerant
•Brake hoses and lines
•Drive shafts and boots
•Exhaust pipe and muffler
•Front brake disc/pads, calipers and rotors
•Rear brake disc/pads
•Steering gear box, linkage & boots/lower
arm ball joint, upper arm ball joint
•Suspension mounting bolts
Page 50 of 56
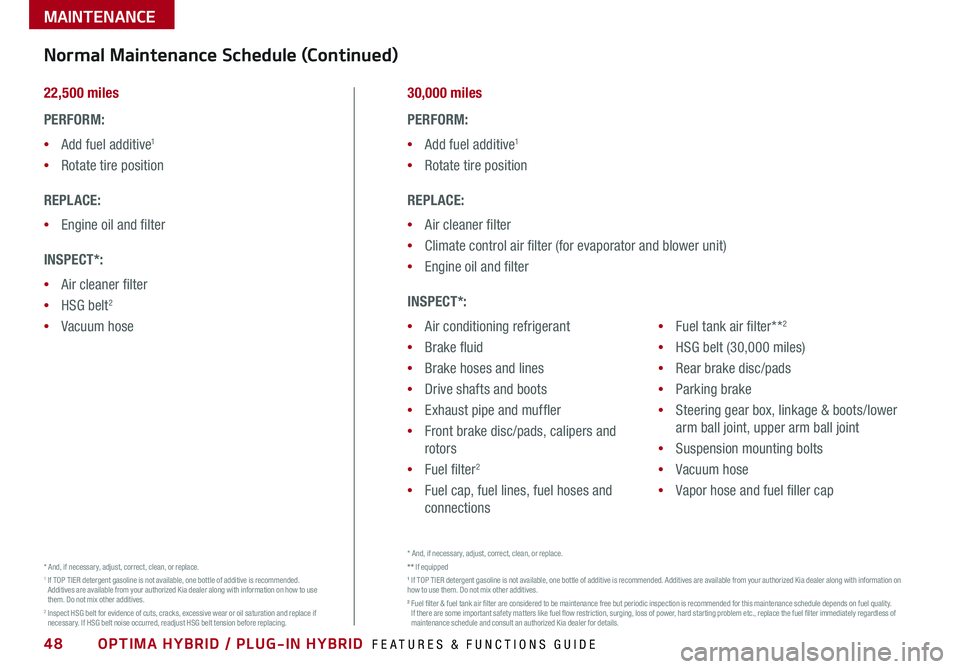
* And, if necessary, adjust, correct, clean, or replace .1 If TOP TIER detergent gasoline is not available, one bottle of additive is recommended . Additives are available from your authorized Kia dealer along with information on how to use them . Do not mix other additives .2 Inspect HSG belt for evidence of cuts, cracks, excessive wear or oil saturation and replace if necessary . If HSG belt noise occurred, readjust HSG belt tension before replacing .
* And, if necessary, adjust, correct, clean, or replace .** If equipped 1 If TOP TIER detergent gasoline is not available, one bottle of additive is recommended . Additives are available from your authorized Kia dealer along with information on how to use them . Do not mix other additives . 2 Fuel filter & fuel tank air filter are considered to be maintenance free but periodic inspection is recommended for this maintenance schedule depends on fuel quality . If there are some important safety matters like fuel flow restriction, surging, loss of power, hard starting problem etc ., replace the fuel filter immediately regardless of maintenance schedule and consult an authorized Kia dealer for details .
MAINTENANCE
48OPTIMA HYBRID / PLUG-IN HYBRID FEATURES & FUNCTIONS GUIDE
22,500 miles
PERFORM:
•Add fuel additive1
•Rotate tire position
REPLACE:
•Engine oil and filter
INSPECT*:
•Air cleaner filter
•HSG belt2
•Vacuum hose
30,000 miles
PERFORM:
•Add fuel additive1
•Rotate tire position
REPLACE:
•Air cleaner filter
•Climate control air filter (for evaporator and blower unit)
•Engine oil and filter
INSPECT*:
•Air conditioning refrigerant
•Brake fluid
•Brake hoses and lines
•Drive shafts and boots
•Exhaust pipe and muffler
•Front brake disc/pads, calipers and
rotors
•Fuel filter2
•Fuel cap, fuel lines, fuel hoses and
connections
•Fuel tank air filter**2
•HSG belt (30,000 miles)
•Rear brake disc/pads
•Parking brake
•Steering gear box, linkage & boots/lower
arm ball joint, upper arm ball joint
•Suspension mounting bolts
•Vacuum hose
•Vapor hose and fuel filler cap
Normal Maintenance Schedule (Continued)
Page 51 of 56
MAINTENANCE
49ALWAYS CHECK THE OWNER’S MANUAL FOR COMPLETE OPER ATING INFORMATION AND SAFET Y WARNINGS .
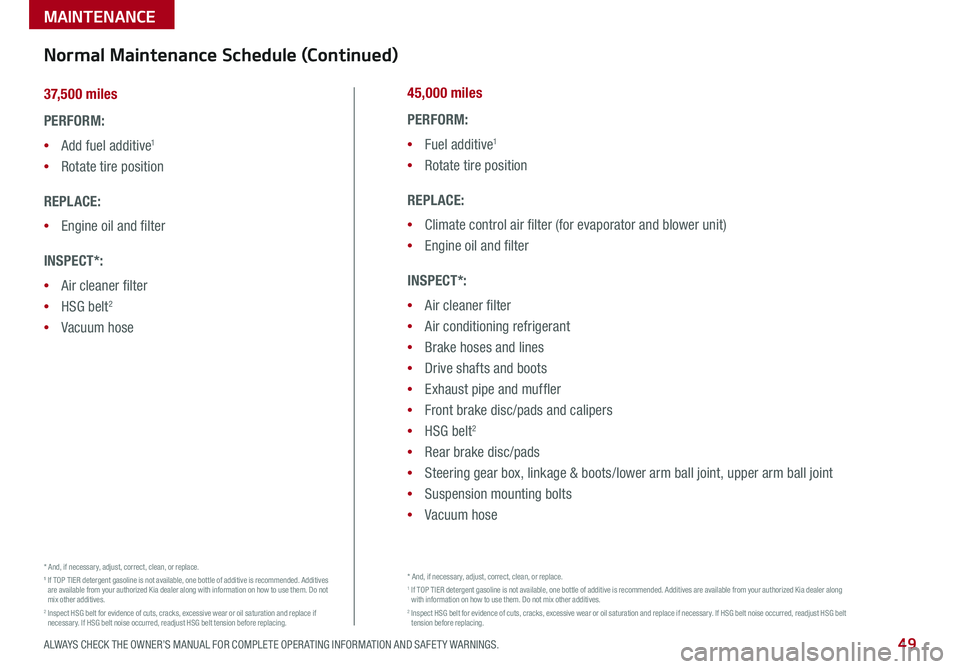
* And, if necessary, adjust, correct, clean, or replace .1 If TOP TIER detergent gasoline is not available, one bottle of additive is recommended . Additives are available from your authorized Kia dealer along with information on how to use them . Do not mix other additives .2 Inspect HSG belt for evidence of cuts, cracks, excessive wear or oil saturation and replace if necessary . If HSG belt noise occurred, readjust HSG belt tension before replacing .
* And, if necessary, adjust, correct, clean, or replace .1 If TOP TIER detergent gasoline is not available, one bottle of additive is recommended . Additives are available from your authorized Kia dealer along with information on how to use them . Do not mix other additives .2 Inspect HSG belt for evidence of cuts, cracks, excessive wear or oil saturation and replace if necessary . If HSG belt noise occurred, readjust HSG belt tension before replacing .
37,500 miles
PERFORM:
•Add fuel additive1
•Rotate tire position
REPLACE:
•Engine oil and filter
INSPECT*:
•Air cleaner filter
•HSG belt2
•Vacuum hose
45,000 miles
PERFORM:
•Fuel additive1
•Rotate tire position
REPLACE:
•Climate control air filter (for evaporator and blower unit)
•Engine oil and filter
INSPECT*:
•Air cleaner filter
•Air conditioning refrigerant
•Brake hoses and lines
•Drive shafts and boots
•Exhaust pipe and muffler
•Front brake disc/pads and calipers
•HSG belt2
•Rear brake disc/pads
•Steering gear box, linkage & boots/lower arm ball joint, upper arm ball joint
•Suspension mounting bolts
•Vacuum hose
Normal Maintenance Schedule (Continued)
Page 52 of 56
MAINTENANCE
50
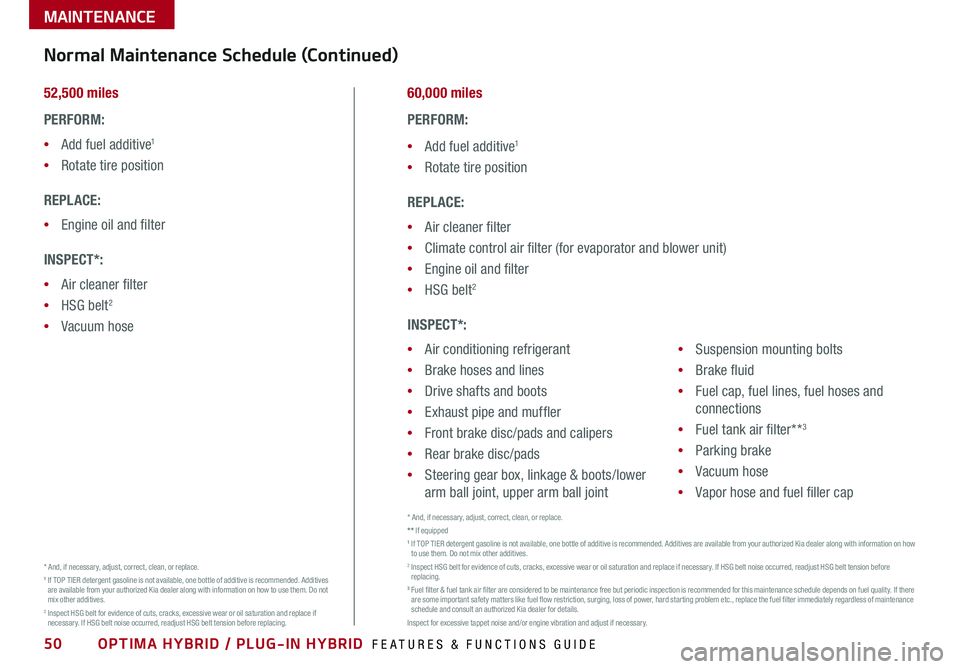
* And, if necessary, adjust, correct, clean, or replace .** If equipped 1 If TOP TIER detergent gasoline is not available, one bottle of additive is recommended . Additives are available from your authorized Kia dealer along with information on how to use them . Do not mix other additives .2 Inspect HSG belt for evidence of cuts, cracks, excessive wear or oil saturation and replace if necessary . If HSG belt noise occurred, readjust HSG belt tension before replacing . 3 Fuel filter & fuel tank air filter are considered to be maintenance free but periodic inspection is recommended for this maintenance schedule depends on fuel quality . If there are some important safety matters like fuel flow restriction, surging, loss of power, hard starting problem etc ., replace the fuel filter immediately regardless of maintenance schedule and consult an authorized Kia dealer for details . Inspect for excessive tappet noise and/or engine vibration and adjust if necessary .
* And, if necessary, adjust, correct, clean, or replace .1 If TOP TIER detergent gasoline is not available, one bottle of additive is recommended . Additives are available from your authorized Kia dealer along with information on how to use them . Do not mix other additives .2 Inspect HSG belt for evidence of cuts, cracks, excessive wear or oil saturation and replace if necessary . If HSG belt noise occurred, readjust HSG belt tension before replacing .
OPTIMA HYBRID / PLUG-IN HYBRID FEATURES & FUNCTIONS GUIDE
52,500 miles
PERFORM:
•Add fuel additive1
•Rotate tire position
REPLACE:
•Engine oil and filter
INSPECT*:
•Air cleaner filter
•HSG belt2
•Vacuum hose
60,000 miles
PERFORM:
•Add fuel additive1
•Rotate tire position
REPLACE:
•Air cleaner filter
•Climate control air filter (for evaporator and blower unit)
•Engine oil and filter
•HSG belt2
INSPECT*:
•Air conditioning refrigerant
•Brake hoses and lines
•Drive shafts and boots
•Exhaust pipe and muffler
•Front brake disc/pads and calipers
•Rear brake disc/pads
•Steering gear box, linkage & boots/lower
arm ball joint, upper arm ball joint
•Suspension mounting bolts
•Brake fluid
•Fuel cap, fuel lines, fuel hoses and
connections
•Fuel tank air filter**3
•Parking brake
•Vacuum hose
•Vapor hose and fuel filler cap
Normal Maintenance Schedule (Continued)