KIA OPTIMA HYBRID 2020 Features and Functions Guide
Manufacturer: KIA, Model Year: 2020, Model line: OPTIMA HYBRID, Model: KIA OPTIMA HYBRID 2020Pages: 54, PDF Size: 4.85 MB
Page 21 of 54
19ALWAYS CHECK THE OWNER’S MANUAL FOR COMPLETE OPER ATING INFORMATION AND SAFET Y WARNINGS . *IF EQUIPPED †LEGAL DISCL AIMERS ON BACK INSIDE COVER
To use electrical accessories:
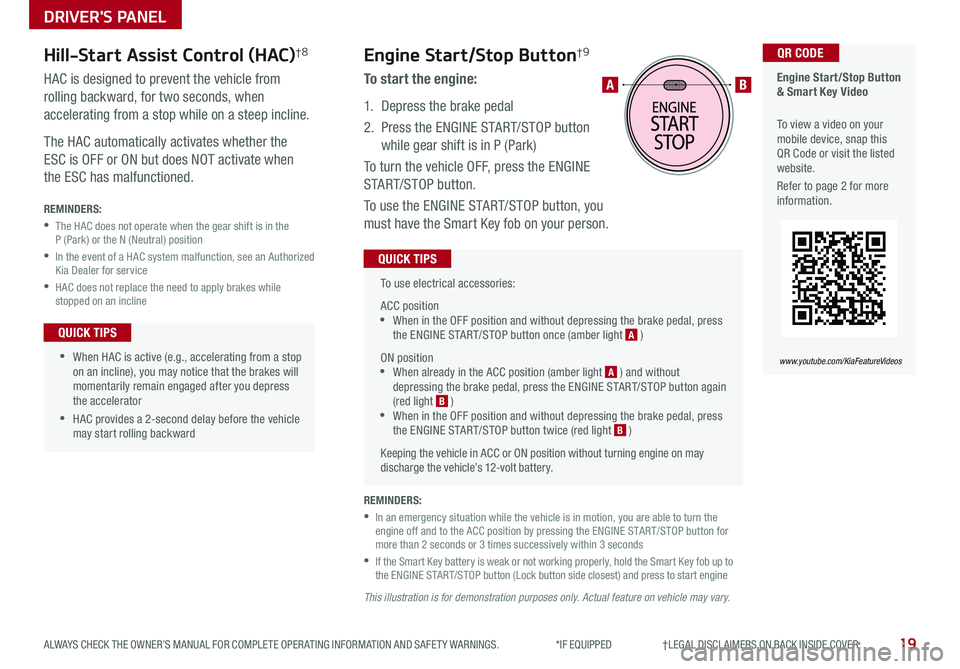
ACC position •When in the OFF position and without depressing the brake pedal, press the ENGINE START/STOP button once (amber light A )
ON position •When already in the ACC position (amber light A ) and without depressing the brake pedal, press the ENGINE START/STOP button again (red light B ) •
When in the OFF position and without depressing the brake pedal, press the ENGINE START/STOP button twice (red light B )
Keeping the vehicle in ACC or ON position without turning engine on may discharge the vehicle’s 12-volt battery .
QUICK TIPS
Engine Start/Stop Button & Smart Key Video
To view a video on your mobile device, snap this QR Code or visit the listed website .
Refer to page 2 for more information .
QR CODE
www.youtube.com/KiaFeatureVideos
AB
REMINDERS:
•
In an emergency situation while the vehicle is in motion, you are able to turn the engine off and to the ACC position by pressing the ENGINE START/STOP button for more than 2 seconds or 3 times successively within 3 seconds
•
If the Smart Key battery is weak or not working properly, hold the Smart Key fob up to the ENGINE START/STOP button (Lock button side closest) and press to start engine
Engine Start/Stop Button†9
To start the engine:
1 . Depress the brake pedal
2 .
Press the ENGINE START/STOP button
while gear shift is in P (Park)
To turn the vehicle OFF, press the ENGINE
START/STOP button .
To use the ENGINE START/STOP button, you
must have the Smart Key fob on your person .
Hill-Start Assist Control (HAC)†8
HAC is designed to prevent the vehicle from
rolling backward, for two seconds, when
accelerating from a stop while on a steep incline .
The HAC automatically activates whether the
ESC is OFF or ON but does NOT activate when
the ESC has malfunctioned .
REMINDERS:
•
The HAC does not operate when the gear shift is in the P (Park) or the N (Neutral) position
•
In the event of a HAC system malfunction, see an Authorized Kia Dealer for service
•
HAC does not replace the need to apply brakes while stopped on an incline
•
•When HAC is active (e .g ., accelerating from a stop on an incline), you may notice that the brakes will momentarily remain engaged after you depress the accelerator
•HAC provides a 2-second delay before the vehicle may start rolling backward
QUICK TIPS
This illustration is for demonstration purposes only. Actual feature on vehicle may vary.
DRIVER'S PANEL
Page 22 of 54
20*IF EQUIPPED OPTIMA HYBRID / PLUG-IN HYBRID FEATURES & FUNCTIONS GUIDE
Automatic Door Lock/Unlock
Auto Door Lock /Unlock will engage when the gear shift is moved into or
out of the P (Park) position . Refer to the User Settings in the LCD
Instrument Cluster modes on how to turn Auto Door Lock /Unlock ON/OFF .
Power/Heated Outside Mirrors*
Mirror heaters are activated when Rear Defroster is turned on .
Power Folding Outside Mirrors*
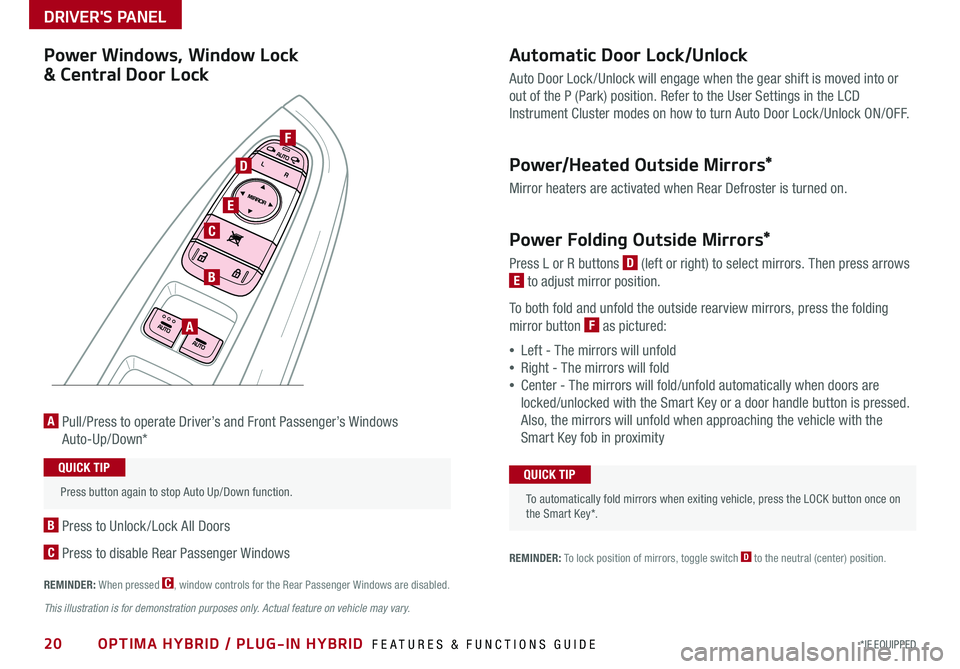
Press L or R buttons D (left or right) to select mirrors . Then press arrows
E to adjust mirror position .
To both fold and unfold the outside rearview mirrors, press the folding
mirror button F as pictured:
•Left - The mirrors will unfold
•Right - The mirrors will fold
•Center - The mirrors will fold/unfold automatically when doors are
locked/unlocked with the Smart Key or a door handle button is pressed .
Also, the mirrors will unfold when approaching the vehicle with the
Smart Key fob in proximity
A Pull/Press to operate Driver’s and Front Passenger’s Windows
Auto-Up/Down*
B Press to Unlock /Lock All Doors
C Press to disable Rear Passenger Windows
REMINDER: When pressed C, window controls for the Rear Passenger Windows are disabled .
A
B
C
E
D
F
REMINDER: To lock position of mirrors, toggle switch D to the neutral (center) position .
Power Windows, Window Lock
& Central Door Lock
To automatically fold mirrors when exiting vehicle, press the LOCK button once on the Smart Key* .
QUICK TIP Press button again to stop Auto Up/Down function .
QUICK TIP
This illustration is for demonstration purposes only. Actual feature on vehicle may vary.
DRIVER'S PANEL
Page 23 of 54

21*IF EQUIPPED ALWAYS CHECK THE OWNER’S MANUAL FOR COMPLETE OPER ATING INFORMATION AND SAFET Y WARNINGS .
Headlight position
Parking light position
AUTO*Adaptive Front-Lighting System-Height (AFS-H)*/ High Beam Assist position/Daytime Running Lights (DRL)
OFFOFF position
Headlights & High Beams
To o p e rate:
•Rotate lever to change the Headlight function
•Push lever to turn High Beams ON
•Pull lever briefly to flash Headlights/High Beams
Adaptive Front-Lighting System-Height (AFS-H)* - When switch is in the
AUTO position and the vehicle’s ignition or the Engine Start /Stop button* is on, the
AFS-H system will operate . To turn the system off, change the switch setting . After
turning the system off, headlamp swiveling no longer occurs, but leveling operates
continuously .
High Beam Assist (HBA)* - The High Beam Assist is designed to automatically adjust
the headlight range by switching between high and low beams based on light detected
from oncoming vehicles and road conditions .
When switch is in the AUTO position and the vehicle’s ignition or the Engine Start /
Stop button* is on, the High Beam Assist will operate . To turn HBA off, change the
switch setting .
Daytime Running Lights (DRL)* - DRL may help others to see the front of your
vehicle during the day . The lights will be on automatically when the ignition or ENGINE
START/STOP button* is ON and the headlight switch is in the AUTO position, unless
one of the following occurs:
•Headlights are on
•Parking brake is applied
•Fog lights are on
•Engine is turned off
Turn Signals & Fog Lights
To o p e r a t e :
•Tu r n Signals - Move lever Up/Down for Right /Left Turn Signal
•Fog Lights - Rotate lever ring to turn Fog Lights ON/OFF
REMINDER: Headlights must be ON for Fog Light operation .
One-Touch Lane Change Signal is activated by moving the
Turn Signal Lever slightly for less than 1 second and then
releasing . The lane change signal will blink 3 times .
To change how many times (3/5/7) the Lane Change Signal
blinks, go to User Settings Mode in the LCD Instrument Cluster
modes .
REMINDERS:
•DRL only operates during the daytime
•
The DRL system turns off when the headlights are ON, parking brake is applied or the front fog lights are turned on
OFF
OFF
OFF
OFF
This illustration is for demonstration purposes only. Actual feature on vehicle may vary.
STEERING WHEEL CONTROLS
Page 24 of 54
22*IF EQUIPPED OPTIMA HYBRID / PLUG-IN HYBRID FEATURES & FUNCTIONS GUIDE
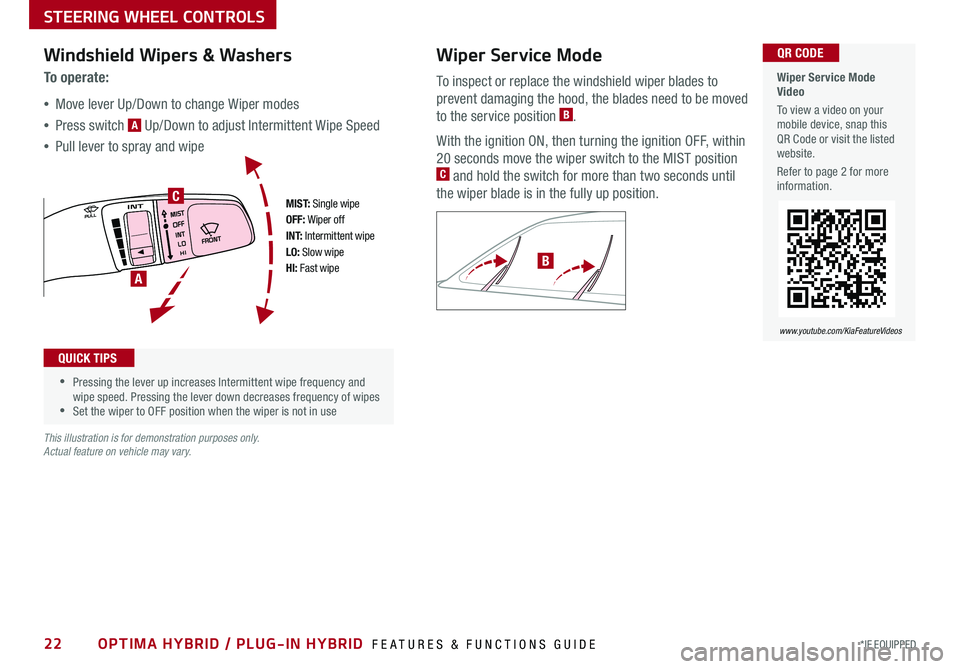
M I S T: Single wipeOFF: Wiper offI N T: Intermittent wipeLO: Slow wipeHI: Fast wipeA
C
Windshield Wipers & Washers
To o p e r a t e :
•Move lever Up/Down to change Wiper modes
•Press switch A Up/Down to adjust Intermittent Wipe Speed
•Pull lever to spray and wipe
Wiper Service Mode
To inspect or replace the windshield wiper blades to
prevent damaging the hood, the blades need to be moved
to the service position B .
With the ignition ON, then turning the ignition OFF, within
20 seconds move the wiper switch to the MIST position C and hold the switch for more than two seconds until
the wiper blade is in the fully up position .
•
•Pressing the lever up increases Intermittent wipe frequency and wipe speed . Pressing the lever down decreases frequency of wipes •Set the wiper to OFF position when the wiper is not in use
QUICK TIPS
This illustration is for demonstration purposes only. Actual feature on vehicle may vary.
B
Wiper Service Mode Video
To view a video on your mobile device, snap this QR Code or visit the listed website .
Refer to page 2 for more information .
QR CODE
www.youtube.com/KiaFeatureVideos
STEERING WHEEL CONTROLS
Page 25 of 54
23ALWAYS CHECK THE OWNER’S MANUAL FOR COMPLETE OPER ATING INFORMATION AND SAFET Y WARNINGS . *IF EQUIPPED †LEGAL DISCL AIMERS ON BACK INSIDE COVER
If ignition is turned OFF, then ON again, within 30 minutes of steering wheel heater being turned on, the system will automatically be set ON again .
QUICK TIP
D
(Located below gear shift . Button location may vary)
Heated Steering Wheel Button*
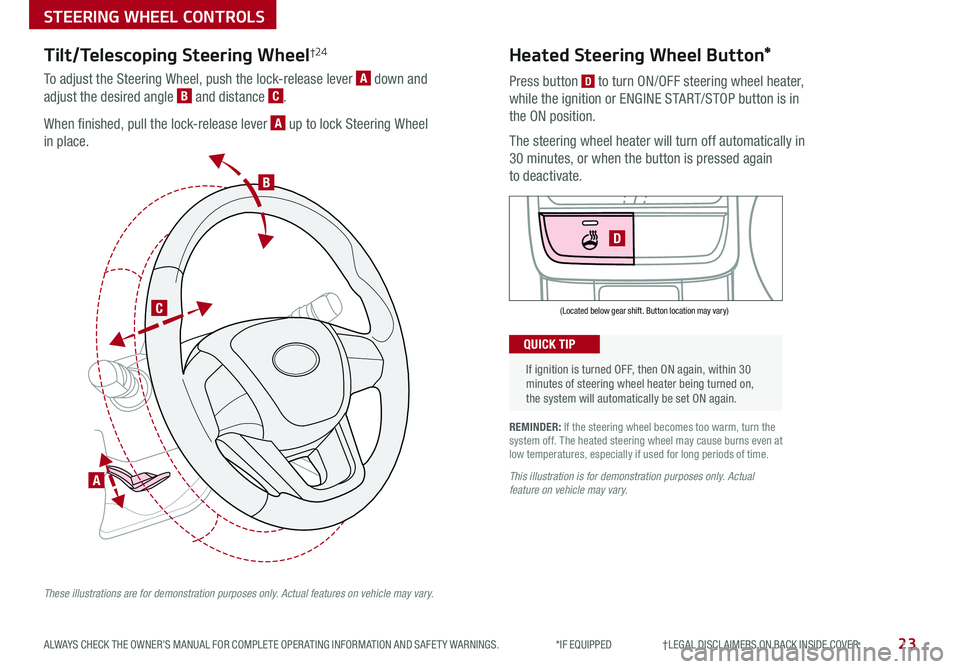
Press button D to turn ON/OFF steering wheel heater,
while the ignition or ENGINE START/STOP button is in
the ON position .
The steering wheel heater will turn off automatically in
30 minutes, or when the button is pressed again
to deactivate .
REMINDER: If the steering wheel becomes too warm, turn the system off . The heated steering wheel may cause burns even at low temperatures, especially if used for long periods of time .
This illustration is for demonstration purposes only. Actual feature on vehicle may vary.
STEERING WHEEL CONTROLS
B
C
A
Tilt/Telescoping Steering Wheel†24
To adjust the Steering Wheel, push the lock-release lever A down and
adjust the desired angle B and distance C .
When finished, pull the lock-release lever A up to lock Steering Wheel
in place .
These illustrations are for demonstration purposes only. Actual features on vehicle may vary.
Page 26 of 54
24OPTIMA HYBRID / PLUG-IN HYBRID FEATURES & FUNCTIONS GUIDE*IF EQUIPPED †LEGAL DISCL AIMERS ON BACK INSIDE COVER
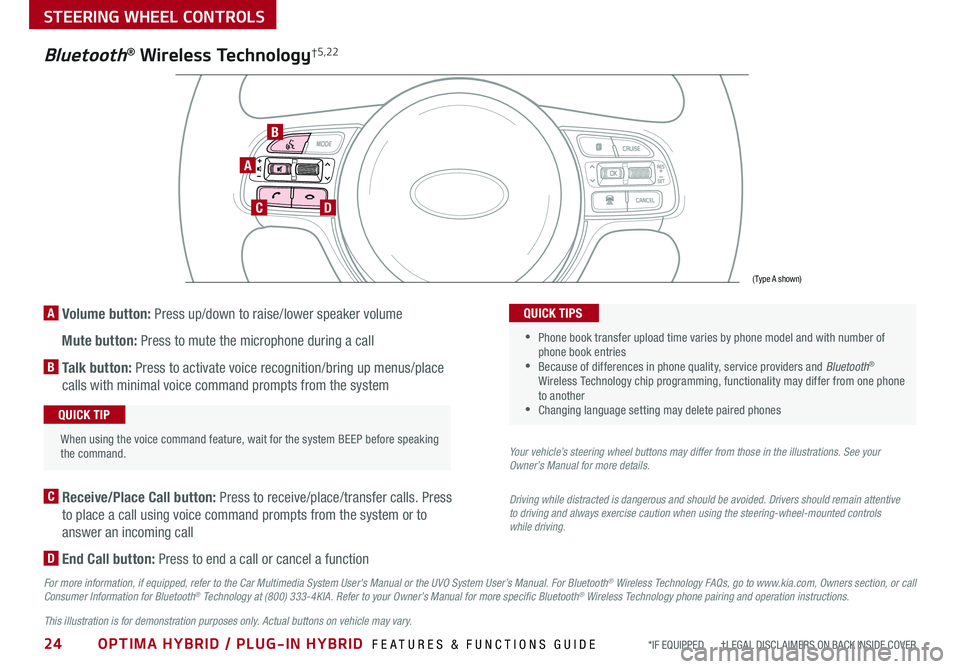
A Volume button: Press up/down to raise/lower speaker volume
Mute button: Press to mute the microphone during a call
B Talk button: Press to activate voice recognition/bring up menus/place
calls with minimal voice command prompts from the system
A
CD
B
Bluetooth® Wireless Technology†5,22
When using the voice command feature, wait for the system BEEP before speaking the command .
QUICK TIP
C Receive/Place Call button: Press to receive/place/transfer calls . Press
to place a call using voice command prompts from the system or to
answer an incoming call
D End Call button: Press to end a call or cancel a function
For more information, if equipped, refer to the Car Multimedia System User's Manual or the UVO System User’s Manual. For Bluetooth® Wireless Technology FAQs, go to www.kia.com, Owners section, or call Consumer Information for Bluetooth® Technology at (800) 333-4KIA. Refer to your Owner’s Manual for more specific Bluetooth® Wireless Technology phone pairing and operation instructions.
•
Phone book transfer upload time varies by phone model and with number of phone book entries •Because of differences in phone quality, service providers and Bluetooth® Wireless Technology chip programming, functionality may differ from one phone to another •Changing language setting may delete paired phones
QUICK TIPS
Your vehicle’s steering wheel buttons may differ from those in the illustrations. See your Owner’s Manual for more details.
Driving while distracted is dangerous and should be avoided. Drivers should remain attentive to driving and always exercise caution when using the steering-wheel-mounted controls while driving.
(Type A shown)
This illustration is for demonstration purposes only. Actual buttons on vehicle may vary.
STEERING WHEEL CONTROLS
Page 27 of 54
25ALWAYS CHECK THE OWNER’S MANUAL FOR COMPLETE OPER ATING INFORMATION AND SAFET Y WARNINGS . *IF EQUIPPED
Voice Recognition and Phone
Contact Tips
To help optimize the Bluetooth® Wireless
Technology Voice Recognition system, below
are some tips and reminders . Improve the
performance by making a few simple changes
to your phone contacts:
•Use full names vs . short or single-syllable
names (“John Smith” vs . “Dad”; “Smith
Residence” vs . “Home”)
•Avoid using special characters, emojis or
hyphens (@, &, #, /, -, *, +, etc . )
•Avoid using acronyms (“In Case Emergency”
vs . “ICE”)
•Spell words completely, no abbreviations
(“Doctor Goodman” vs . “Dr . Goodman”)
The system may have difficulty understanding
some accents or uncommon names . To help optimize
when using the voice recognition, below are tips:
Bluetooth® Wireless Technology
Pairing a Phone
For instructions on how to pair a phone, refer to the Car Multimedia
System User's Manual or your vehicle’s Quick Start Guide .
How to Place a Call
There are two options for placing a call:
•Option 1: Press the Receive/Place Call button D (displays the phone screen
with number keypad)
•Option 2: Press the Talk button C . Then say the command “Call {name}”
or “Dial {number}”
Voice Recognition Tips Video To view a video on your mobile device, snap this QR Code or visit the listed website .
Refer to page 2 for more information .
www.youtube.com/KiaFeatureVideos
QR CODE
During the pairing process, be sure to accept the connection requests on the phone for contacts download and to allow acceptance of all future Bluetooth® connection requests .
QUICK TIP
When using the voice command feature, wait for the system BEEP before speaking the command .
QUICK TIP
•Bluetooth® Music Streaming: If the Bluetooth® music is inaudible or too low, turn up the volume on the connected phone
•When placing a call, speak in a natural, moderate tone, with clear pronunciation . The system may have trouble recognizing commands if you speak too softly or too loudly
•Always wait for the beep before speaking any commands
•Close windows and sunroof and turn off A /C; open windows, sunroof, weather (wind/rain), or an A /C fan operating at higher speeds can interfere with Voice Recognition
•Press the talk button and say “Help” to get a list of available commands
QUICK TIPS
STEERING WHEEL CONTROLS
Page 28 of 54
26OPTIMA HYBRID / PLUG-IN HYBRID FEATURES & FUNCTIONS GUIDE*IF EQUIPPED †LEGAL DISCL AIMERS ON BACK INSIDE COVER
STEERING WHEEL CONTROLS
Audio Controls†2 2
AD
E
F
CB
Cruise Control†2 2
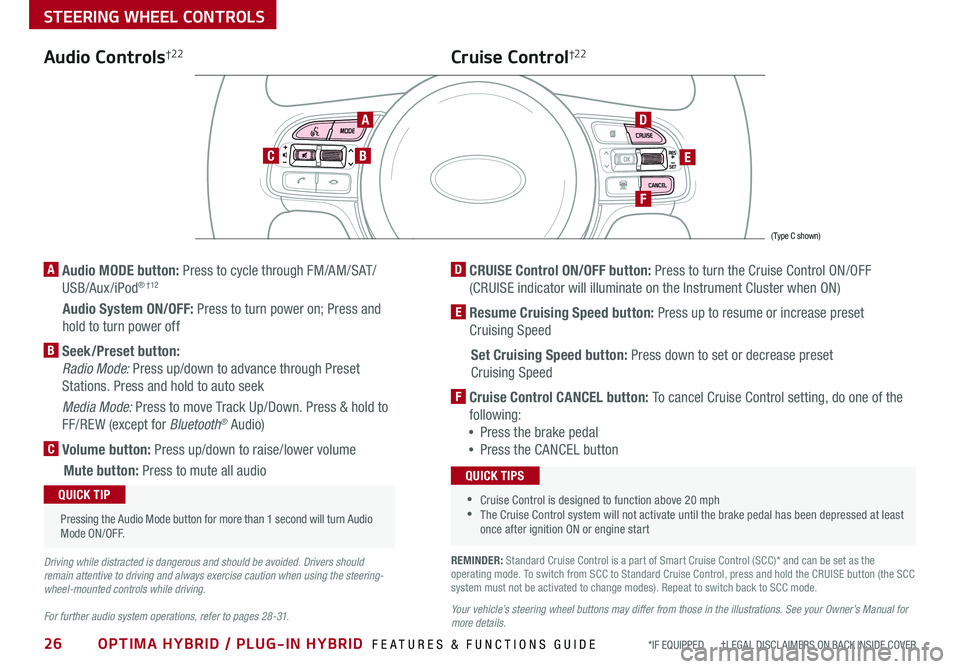
A Audio MODE button: Press to cycle through FM/AM/SAT/
USB/Aux /iPod® † 12
Audio System ON/OFF: Press to turn power on; Press and
hold to turn power off
B Seek/Preset button:
Radio Mode: Press up/down to advance through Preset
Stations . Press and hold to auto seek
Media Mode: Press to move Track Up/Down . Press & hold to
FF/REW (except for Bluetooth® Audio)
C Volume button: Press up/down to raise/lower volume
Mute button: Press to mute all audio
D CRUISE Control ON/OFF button: Press to turn the Cruise Control ON/OFF
(CRUISE indicator will illuminate on the Instrument Cluster when ON)
E Resume Cruising Speed button: Press up to resume or increase preset
Cruising Speed
Set Cruising Speed button: Press down to set or decrease preset
Cruising Speed
F Cruise Control CANCEL button: To cancel Cruise Control setting, do one of the
following:
•Press the brake pedal
•Press the CANCEL button
•Cruise Control is designed to function above 20 mph •The Cruise Control system will not activate until the brake pedal has been depressed at least once after ignition ON or engine start
QUICK TIPS
Your vehicle’s steering wheel buttons may differ from those in the illustrations. See your Owner’s Manual for more details.
Driving while distracted is dangerous and should be avoided. Drivers should remain attentive to driving and always exercise caution when using the steering-wheel-mounted controls while driving.
For further audio system operations, refer to pages 28 -31.
Pressing the Audio Mode button for more than 1 second will turn Audio Mode ON/OFF .
QUICK TIP
(Type C shown)
REMINDER: Standard Cruise Control is a part of Smart Cruise Control (SCC)* and can be set as the operating mode . To switch from SCC to Standard Cruise Control, press and hold the CRUISE button (the SCC system must not be activated to change modes) . Repeat to switch back to SCC mode .
Page 29 of 54

27
STEERING WHEEL CONTROLS
ALWAYS CHECK THE OWNER’S MANUAL FOR COMPLETE OPER ATING INFORMATION AND SAFET Y WARNINGS . *IF EQUIPPED †LEGAL DISCL AIMERS ON BACK INSIDE COVER
The SCC system is a supplemental system and is not a substitute for safe driving. It is the responsibility of the driver to always check the speed and distance to the vehicle ahead.These illustrations are for demonstration purposes only. Actual images or buttons on vehicle may vary.
Smart Cruise Control with Stop & Go Video
To view a video on your mobile device, snap this QR Code or visit the listed website . Refer to page 2 for more information .
www.youtube.com/KiaFeatureVideos
QR CODESmart Cruise Control (SCC) with Stop & Go System*†6
The Smart Cruise Control (SCC) with Stop & Go System is designed to maintain a predetermined distance from vehicles detected
ahead by automatically adjusting the driving speed as needed . When traffic is detected, the vehicle will
slow down to maintain a set distance behind traffic without depressing the accelerator or brake pedal .
With the SCC on and activated, the vehicle-to-vehicle distance set, and the system detects a vehicle
slowing or stopping, the system can bring the vehicle to a complete stop . The system will hold the
vehicle until the accelerator pedal is pressed – when pressed and when the vehicle ahead starts to
move forward, the SCC re-engages .
To set/adjust the SCC speed:
•Press the CRUISE button A to turn system ON . The CRUISE indicator will illuminate on the
instrument cluster
•Accelerate/decelerate to the desired speed
•Press button B down to set the speed . The SET indicator light will illuminate . The set speed and
vehicle-to-vehicle distance will illuminate on the LCD screen . Press the RES+/SET- button B up/
down to increase/decrease the set speed
To adjust the vehicle-to-vehicle distance setting C, press the SCC button D on the steering wheel .
Images on the LCD screen E and Instrument Cluster F will change when scrolling through the settings .
To cancel SCC operation: Press the CANCEL button G or press the brake pedal . The LCD screen will display a message that the SCC operation is canceled .
To turn system OFF, press the CRUISE button A . The CRUISE indicator on the instrument cluster will turn OFF and the LCD screen SCC image will show canceled H
.
Smart Cruise Control
canceled
A
B
D
F
E
H
(Distances are approximate and vary depending on vehicle speed)
17 2 f t13 0 f t
82ft
10 6 f t
C
G
To change the Cruise Control mode from SCC to standard Cruise Control, press and hold button A . Repeat to switch modes again ( The SCC system must not be activated to change modes) .
For the SCC System to operate: •When no vehicle is in front, you must be traveling at a minimum speed of 20 mph •When following a vehicle, there is no minimum speed requirement
When following a vehicle, the system will automatically adjust your cruise speed based on the vehicle detected in front . It may even bring the vehicle to a complete stop if necessary .
QUICK TIPSREMINDERS: •Cruise Control button must be ON in order to turn SCC ON/OFF •
The SCC system is turned ON again when the ignition is cycled off, then on again . The speed setting will need to be reset when ignition is cycled •
When following a vehicle, the system will automatically adjust your cruise speed based on the vehicle detected in front •
If the SCC system is left on, it can be activated inadvertently . Keep the system off when not in use to avoid setting a speed that the driver is not aware of •
In standard Cruise Control, the driver needs to manually assess the distance from other vehicles as the system will not apply brakes to slow down automatically in order to turn SCC ON/OFF •
The SCC is also canceled when the driver’s door is opened, gear shift is changed out of D (Drive) and various other conditions . See Owner’s Manual for other conditions
Page 30 of 54
28OPTIMA HYBRID / PLUG-IN HYBRID FEATURES & FUNCTIONS GUIDE*IF EQUIPPED †LEGAL DISCL AIMERS ON BACK INSIDE COVER
AUDIO SYSTEMS
Android AutoTM†3 / Apple CarPlay®†4 S e tup*
For further UVO link operations, refer to the Car Infortainment System User's Manual. For other audio system information, refer to pages 29 -31.
Driving while distracted can result in a loss of vehicle control that may lead to an accident, severe bodily injury, and death. The driver’s primary responsibility is in the safe and legal operation of a vehicle, and any handheld devices, other equipment, or vehicle systems which take the driver’s eyes, attention and focus away from the safe operation of a vehicle or which are not permissible by law should never be used during operation of the vehicle.
Android Auto™*
Setting up Android Auto™:
1 . From an Android Auto™ compatible device, download the Android Auto™ app from the Google Play™ † 11 Store
2 . Open the Android Auto™ app and proceed with the onscreen instructions to complete setup on the mobile device
How to start Android Auto™:
1 . Press the SETUP key on your audio control unit’s control panel
2 . Press the PHONE PROJECTION button or DEVICE CONNECTION button, select Android Auto™ and then select
ENABLE ANDROID AUTO . Accept all terms, conditions and requests on the head unit and phone in order to use
Android Auto™
3 . Connect the Android™ device with the vehicle’s USB port using the manufacturer’s cable provided with your phone
4 . From the vehicle’s home screen, select the Android Auto™ button, where you’ll see all the Android Auto™ supported apps
Apple CarPlay®*
Setting up and starting Apple CarPlay®:
1 . Connect the Apple CarPlay® compatible iPhone® † 12 with the vehicle’s USB port using the manufacturer’s cable provided
with your iPhone®
2 . On the audio control unit's control panel, press the SETUP key
3 . Press the PHONE PROJECTION button or DEVICE CONNECTION button on the screen and select Apple CarPlay®
4 . Select ENABLE APPLE CARPL AY . Accept all terms, conditions and requests on the head unit and phone in order to use
Apple CarPlay®
5 . From the vehicle’s home screen, select the Apple CarPlay® button, where you’ll see all the Apple CarPlay® supported apps
REMINDERS:
• Android Auto™ compatibility requirements: Micro-USB cable that came with your phone, OS Android™ 5 .0 or higher, compatible Android™ smartphone and data and wireless plan for applicable feature(s)
• Apple CarPlay® compatibility requirements: Apple Lightning® cable, latest iOS software, iPhone® 5 or later and data and wireless plan for applicable feature(s)
• It is recommended to always update your phone to the latest operating system release