lights KIA OPTIMA PHEV 2019 Features and Functions Guide
[x] Cancel search | Manufacturer: KIA, Model Year: 2019, Model line: OPTIMA PHEV, Model: KIA OPTIMA PHEV 2019Pages: 54, PDF Size: 5.73 MB
Page 17 of 54
15*IF EQUIPPED ALWAYS CHECK THE OWNER’S MANUAL FOR COMPLETE OPER ATING INFORMATION AND SAFET Y WARNINGS .
F
G
POWER
CHARGE
FAULT
E
REMINDERS:
•
For more detail and/or subsequent steps in charging your vehicle please see the Owner’s Manual .
•
The charge door lock will unlock /open only when driver’s side door is unlocked
Charging the Plug-In Hybrid Vehicle* (Continued)
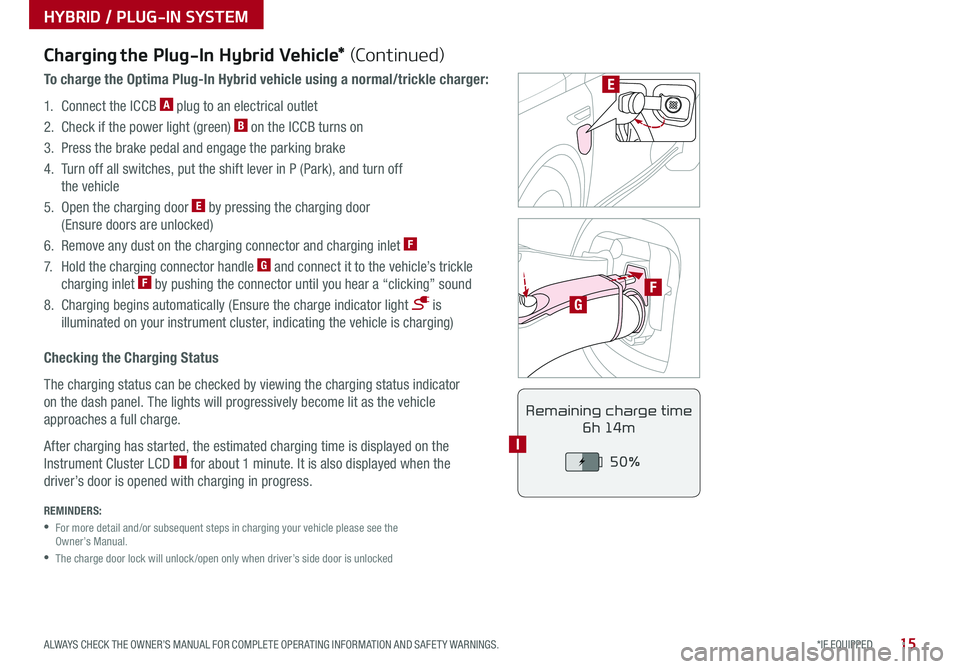
To charge the Optima Plug-In Hybrid vehicle using a normal/trickle charger:
1 . Connect the ICCB A plug to an electrical outlet
2 . Check if the power light (green) B on the ICCB turns on
3 . Press the brake pedal and engage the parking brake
4 . Turn off all switches, put the shift lever in P (Park), and turn off
the vehicle
5 . Open the charging door E by pressing the charging door
(Ensure doors are unlocked)
6 . Remove any dust on the charging connector and charging inlet F
7 . Hold the charging connector handle G and connect it to the vehicle’s trickle
charging inlet F by pushing the connector until you hear a “clicking” sound
8 . Charging begins automatically (Ensure the charge indicator light is
illuminated on your instrument cluster, indicating the vehicle is charging)
Checking the Charging Status
The charging status can be checked by viewing the charging status indicator
on the dash panel . The lights will progressively become lit as the vehicle
approaches a full charge .
After charging has started, the estimated charging time is displayed on the
Instrument Cluster LCD I for about 1 minute . It is also displayed when the
driver’s door is opened with charging in progress .
Remaining charge time
6h 14m
50%
I
HYBRID / PLUG-IN SYSTEM
Page 18 of 54
16OPTIMA HYBRID / PLUG-IN HYBRID FEATURES & FUNCTIONS GUIDE*IF EQUIPPED †LEGAL DISCL AIMERS ON BACK INSIDE COVER
Blind-Spot Collision Warning (BCW) w/ RCCW*†6
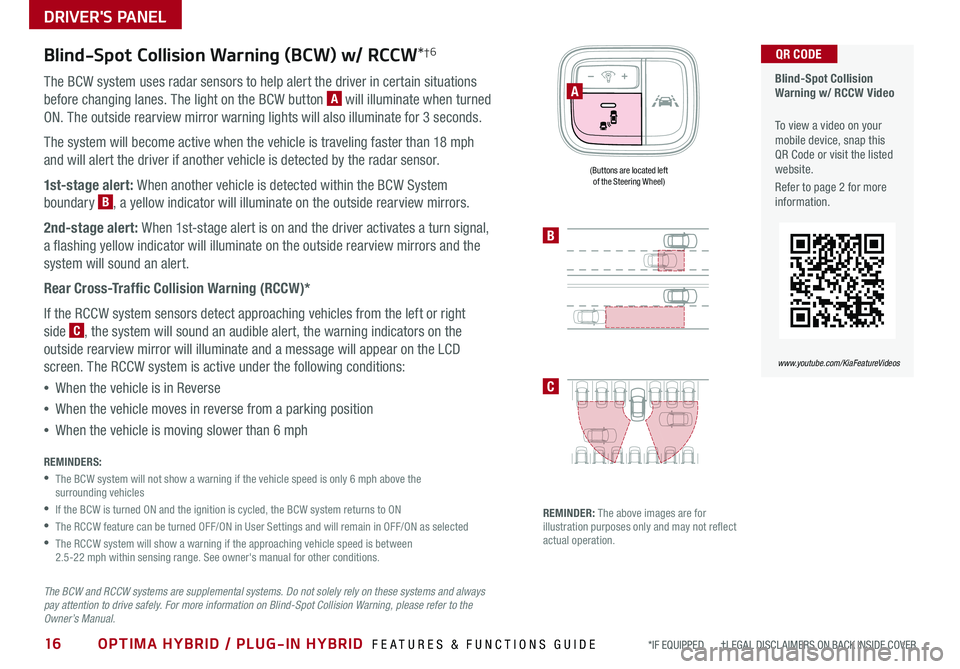
The BCW system uses radar sensors to help alert the driver in certain situations
before changing lanes . The light on the BCW button A will illuminate when turned
ON . The outside rearview mirror warning lights will also illuminate for 3 seconds .
The system will become active when the vehicle is traveling faster than 18 mph
and will alert the driver if another vehicle is detected by the radar sensor .
1st-stage alert: When another vehicle is detected within the BCW System
boundary B, a yellow indicator will illuminate on the outside rearview mirrors .
2nd-stage alert: When 1st-stage alert is on and the driver activates a turn signal,
a flashing yellow indicator will illuminate on the outside rearview mirrors and the
system will sound an alert .
Rear Cross-Traffic Collision Warning (RCCW)*
If the RCCW system sensors detect approaching vehicles from the left or right
side C, the system will sound an audible alert, the warning indicators on the
outside rearview mirror will illuminate and a message will appear on the LCD
screen . The RCCW system is active under the following conditions:
•When the vehicle is in Reverse
•When the vehicle moves in reverse from a parking position
•When the vehicle is moving slower than 6 mph
REMINDERS:
•
The BCW system will not show a warning if the vehicle speed is only 6 mph above the surrounding vehicles
•If the BCW is turned ON and the ignition is cycled, the BCW system returns to ON
•The RCCW feature can be turned OFF/ON in User Settings and will remain in OFF/ON as selected
•
The RCCW system will show a warning if the approaching vehicle speed is between 2 .5-22 mph within sensing range . See owner's manual for other conditions .
The BCW and RCCW systems are supplemental systems. Do not solely rely on these systems and always pay attention to drive safely. For more information on Blind-Spot Collision Warning, please refer to the Owner’s Manual.
Blind-Spot Collision Warning w/ RCCW Video
To view a video on your mobile device, snap this QR Code or visit the listed website .
Refer to page 2 for more information .
QR CODE
www.youtube.com/KiaFeatureVideos
B
C
(Buttons are located left of the Steering Wheel)
REMINDER: The above images are for illustration purposes only and may not reflect actual operation .
A
DRIVER'S PANEL
Page 19 of 54
17ALWAYS CHECK THE OWNER’S MANUAL FOR COMPLETE OPER ATING INFORMATION AND SAFET Y WARNINGS *IF EQUIPPED †LEGAL DISCL AIMERS ON BACK INSIDE COVER
Your vehicle’s instrument cluster & indicator light locations may differ from those in the illustrations. For more information on the instrument cluster, please refer to the Owner’s Manual.
These illustrations are for demonstration purposes only. Some indicators and warning lights may not appear in illustration. On the vehicle, they may appear in the LCD.
Lane Departure Warning (LDW)*†6
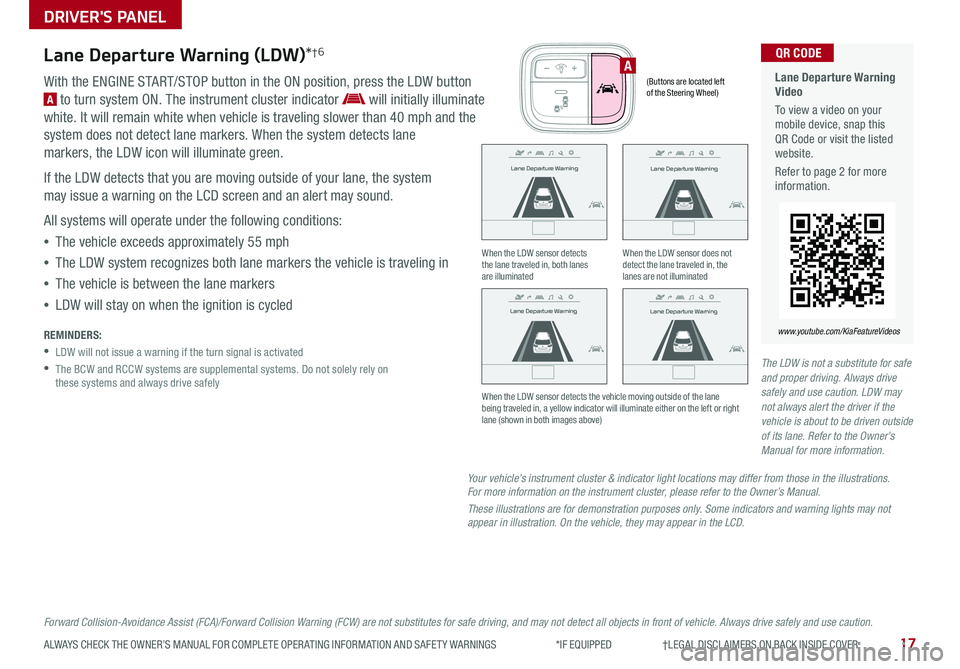
With the ENGINE START/STOP button in the ON position, press the LDW button
A to turn system ON . The instrument cluster indicator will initially illuminate
white . It will remain white when vehicle is traveling slower than 40 mph and the
system does not detect lane markers . When the system detects lane
markers, the LDW icon will illuminate green .
If the LDW detects that you are moving outside of your lane, the system
may issue a warning on the LCD screen and an alert may sound .
All systems will operate under the following conditions:
•The vehicle exceeds approximately 55 mph
•The LDW system recognizes both lane markers the vehicle is traveling in
•The vehicle is between the lane markers
•LDW will stay on when the ignition is cycled
REMINDERS:
•LDW will not issue a warning if the turn signal is activated
•
The BCW and RCCW systems are supplemental systems . Do not solely rely on these systems and always drive safely
DRIVER'S PANEL
When the LDW sensor detects the lane traveled in, both lanes are illuminated
When the LDW sensor does not detect the lane traveled in, the lanes are not illuminated
When the LDW sensor detects the vehicle moving outside of the lane being traveled in, a yellow indicator will illuminate either on the left or right lane (shown in both images above)
Lane Departure Warning Video
To view a video on your mobile device, snap this QR Code or visit the listed website .
Refer to page 2 for more information .
www.youtube.com/KiaFeatureVideos
QR CODE
(Buttons are located left of the Steering Wheel)
A
Forward Collision-Avoidance Assist (FCA)/Forward Collision Warning (FCW) are not substitutes for safe driving, and may not detect all objects in front of vehicle. Always drive safely and use caution.
The LDW is not a substitute for safe and proper driving. Always drive safely and use caution. LDW may not always alert the driver if the vehicle is about to be driven outside of its lane. Refer to the Owner’s Manual for more information.
Lane Departure Warning
Lane Departure Warning
Lane Departure Warning
Lane Departure Warning
Lane Departure Warning
Lane Departure WarningLane Departure Warning
Lane Departure Warning
Lane Departure Warning
Lane Departure Warning Lane Departure Warning
Lane Departure Warning
Lane Departure Warning
Lane Departure Warning Lane Departure Warning
Lane Departure Warning
Page 23 of 54
21*IF EQUIPPED ALWAYS CHECK THE OWNER’S MANUAL FOR COMPLETE OPER ATING INFORMATION AND SAFET Y WARNINGS .
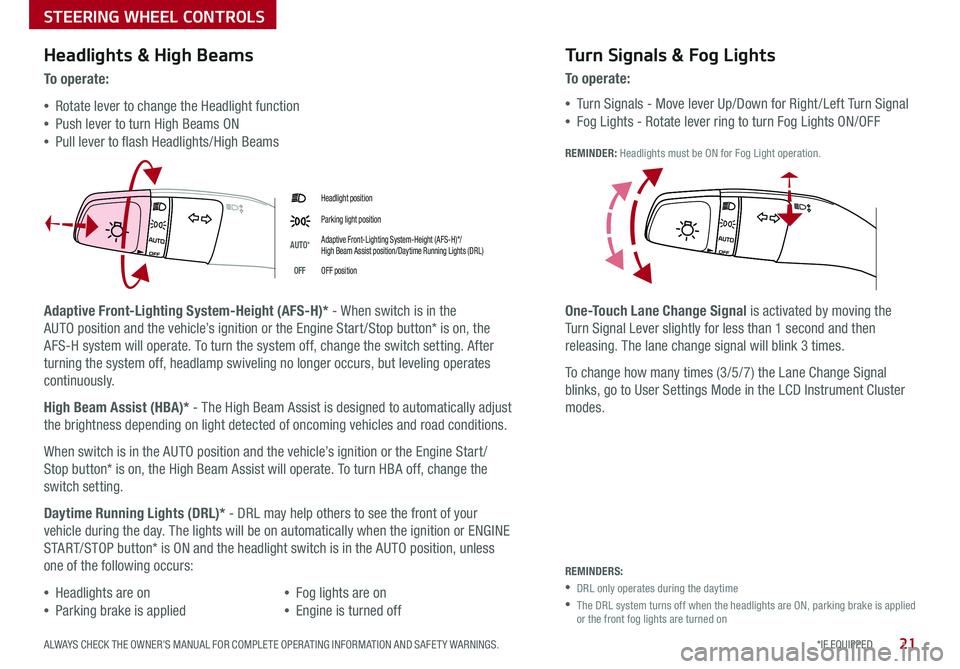
Headlight position
Parking light position
AUTO*Adaptive Front-Lighting System-Height (AFS-H)*/ High Beam Assist position/Daytime Running Lights (DRL)
OFFOFF position
Headlights & High Beams
To o p e rate:
•Rotate lever to change the Headlight function
•Push lever to turn High Beams ON
•Pull lever to flash Headlights/High Beams
Adaptive Front-Lighting System-Height (AFS-H)* - When switch is in the
AUTO position and the vehicle’s ignition or the Engine Start /Stop button* is on, the
AFS-H system will operate . To turn the system off, change the switch setting . After
turning the system off, headlamp swiveling no longer occurs, but leveling operates
continuously .
High Beam Assist (HBA)* - The High Beam Assist is designed to automatically adjust
the brightness depending on light detected of oncoming vehicles and road conditions .
When switch is in the AUTO position and the vehicle’s ignition or the Engine Start /
Stop button* is on, the High Beam Assist will operate . To turn HBA off, change the
switch setting .
Daytime Running Lights (DRL)* - DRL may help others to see the front of your
vehicle during the day . The lights will be on automatically when the ignition or ENGINE
START/STOP button* is ON and the headlight switch is in the AUTO position, unless
one of the following occurs:
•Headlights are on
•Parking brake is applied
•Fog lights are on
•Engine is turned off
Turn Signals & Fog Lights
To o p e r a t e :
•Tu r n Signals - Move lever Up/Down for Right /Left Turn Signal
•Fog Lights - Rotate lever ring to turn Fog Lights ON/OFF
REMINDER: Headlights must be ON for Fog Light operation .
One-Touch Lane Change Signal is activated by moving the
Turn Signal Lever slightly for less than 1 second and then
releasing . The lane change signal will blink 3 times .
To change how many times (3/5/7) the Lane Change Signal
blinks, go to User Settings Mode in the LCD Instrument Cluster
modes .
REMINDERS:
•DRL only operates during the daytime
•
The DRL system turns off when the headlights are ON, parking brake is applied or the front fog lights are turned on
STEERING WHEEL CONTROLS
Page 43 of 54

41ALWAYS CHECK THE OWNER’S MANUAL FOR COMPLETE OPER ATING INFORMATION AND SAFET Y WARNINGS *IF EQUIPPED †LEGAL DISCL AIMERS ON BACK INSIDE COVER
Power Trunk / Smart Power Trunk*†15
Smart Key:
To open the Power Trunk, press and hold the
Trunk button A until the Trunk begins opening .
Press again to cancel .
REMINDER: Pulling the Trunk upward by the handle or pressing the button a second time will interrupt the automatic opening of the Power Trunk .
HOLDA
Outside the Vehicle:
To open Power Trunk
automatically, press the Trunk
Release button B located
underneath the Trunk lid .
Mechanical Key can also be
used to open trunk C .
Inside the Vehicle:
Press and hold the Power
Trunk Open button D to
open the Trunk .
Smart Power Trunk*
When the Smart Key fob is on your person and you are near the back of
the vehicle, within close proximity, the hazard lights will blink and a chime
will sound for about 3 seconds as an alert that the Smart Power Trunk is
about to open . Then the alert system will blink and chime two additional
times before opening the Smart Power Trunk .
The Smart Power Trunk feature is off by default . To enable the Smart
Power Trunk, go to User Settings in the LCD Instrument Cluster modes .
REMINDERS:
•All doors are closed and locked after about 15 seconds
•The Smart Power Trunk feature will not operate when:
- The doors are recently closed and locked, and the Smart Key is still detected after 15 seconds near the vehicle or within 60 inches of the door handles
- A door is not locked or closed
- The Smart Key is in the vehicle
•Ensure obstacles and people are of the way of the Power Trunk
For more information on the Smart Power Trunk operation, please refer to the Owner's Manual.
During the Smart Power Trunk alert, the Smart Power Trunk can be deactivated with the Smart Key by pressing any button on the key fob .
QUICK TIP
(Button located on Driver's Panel left of Steering Wheel)
D
OTHER KEY FEATURES
C
B
Page 44 of 54
42OPTIMA HYBRID / PLUG-IN HYBRID FEATURES & FUNCTIONS GUIDE*IF EQUIPPED
Sunroof Operation Video
To view a video on your mobile device, snap this QR Code or visit the listed website .
Refer to page 2 for more information .
QR CODE
www.youtube.com/KiaFeatureVideos
The Sunroof and Sunshade operation is
controlled through a multi-directional switch/
lever, and the ignition needs to be in the ON
position to operate the Sunroof/Sunshade .
Slide the Sunshade and Sunroof:
•Auto Open: Slide lever backward to the
farthest position and release
•Auto Close (Sunroof only): Slide the lever D
forward to the farthest position and release
Slide the Sunshade:
•Open: Slide the lever D partially backward to the first detent position
•Auto Close: Slide the lever D forward to the
farthest position
Slide the Sunroof (with Sunshade open):
•Open: Slide the lever D backward to the first detent and release
•Close: Slide the lever D partially forward to the first detent position
Tilt the Sunroof:
•Raise: Push lever D upward
•Lower: Push lever D forward
•Auto Close: Slide the lever D forward to the farthest position
( Type A )
C
( Type B)
AA
B
D
C
OTHER KEY FEATURES
REMINDERS:
•Sunshade needs to remain OPEN while Sunroof is open and vehicle is moving
•
Do not adjust the sunroof or sunshade while driving . This could result in loss of control of the vehicle
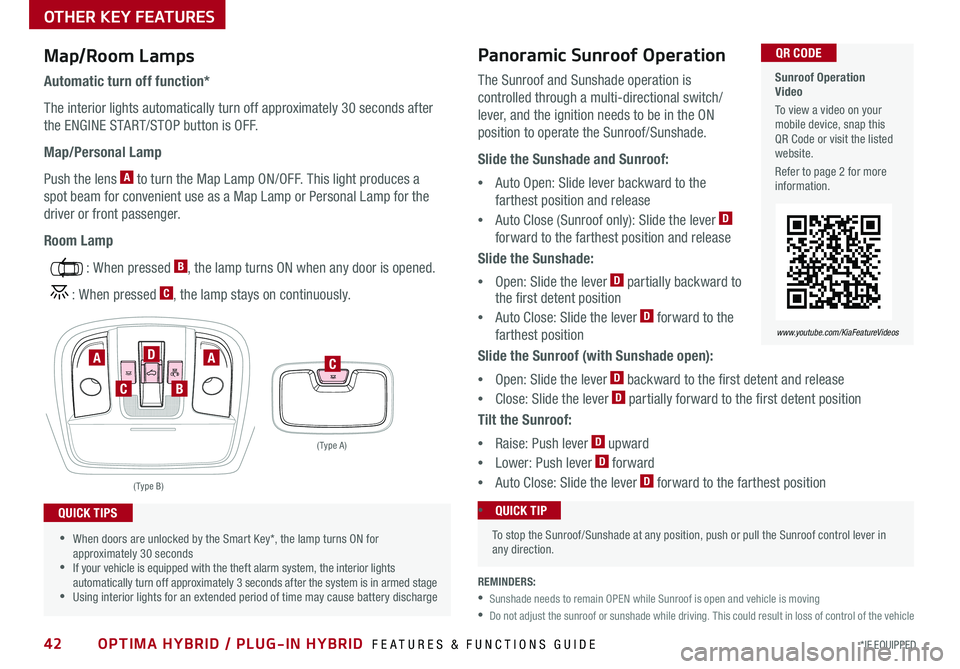
Map/Room Lamps
Automatic turn off function*
The interior lights automatically turn off approximately 30 seconds after
the ENGINE START/STOP button is OFF .
Map/Personal Lamp
Push the lens A to turn the Map Lamp ON/OFF . This light produces a
spot beam for convenient use as a Map Lamp or Personal Lamp for the
driver or front passenger .
Room Lamp
: When pressed B, the lamp turns ON when any door is opened .
: When pressed C, the lamp stays on continuously .
•When doors are unlocked by the Smart Key*, the lamp turns ON for approximately 30 seconds •If your vehicle is equipped with the theft alarm system, the interior lights automatically turn off approximately 3 seconds after the system is in armed stage •Using interior lights for an extended period of time may cause battery discharge
QUICK TIPS
Panoramic Sunroof Operation
To stop the Sunroof/Sunshade at any position, push or pull the Sunroof control lever in any direction .
•QUICK TIP