stop start KIA OPTIMA PHEV 2019 Owners Manual
[x] Cancel search | Manufacturer: KIA, Model Year: 2019, Model line: OPTIMA PHEV, Model: KIA OPTIMA PHEV 2019Pages: 553, PDF Size: 11.97 MB
Page 420 of 553
What to do in an emergency
22
7
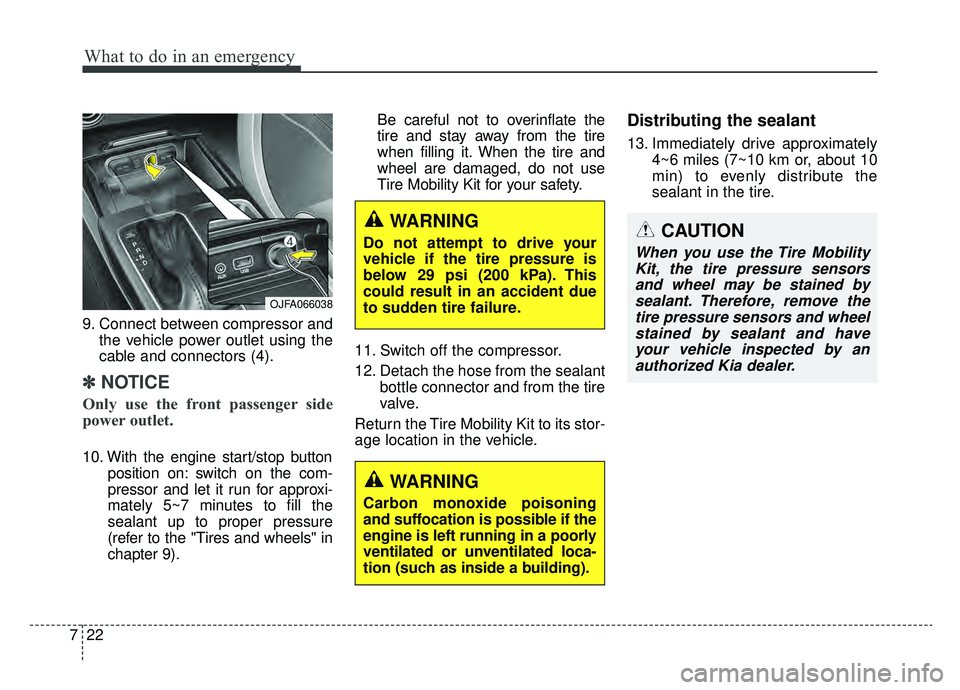
9. Connect between compressor and
the vehicle power outlet using the
cable and connectors (4).
✽ ✽NOTICE
Only use the front passenger side
power outlet.
10. With the engine start/stop button
position on: switch on the com-
pressor and let it run for approxi-
mately 5~7 minutes to fill the
sealant up to proper pressure
(refer to the "Tires and wheels" in
chapter 9). Be careful not to overinflate the
tire and stay away from the tire
when filling it. When the tire and
wheel are damaged, do not use
Tire Mobility Kit for your safety.
11. Switch off the compressor.
12. Detach the hose from the sealant bottle connector and from the tire
valve.
Return the Tire Mobility Kit to its stor-
age location in the vehicle.
Distributing the sealant
13. Immediately drive approximately 4~6 miles (7~10 km or, about 10
min) to evenly distribute the
sealant in the tire.
OJFA066038
WARNING
Do not attempt to drive your
vehicle if the tire pressure is
below 29 psi (200 kPa). This
could result in an accident due
to sudden tire failure.
WARNING
Carbon monoxide poisoning
and suffocation is possible if the
engine is left running in a poorly
ventilated or unventilated loca-
tion (such as inside a building).
CAUTION
When you use the Tire MobilityKit, the tire pressure sensorsand wheel may be stained bysealant. Therefore, remove thetire pressure sensors and wheelstained by sealant and haveyour vehicle inspected by anauthorized Kia dealer.
Page 428 of 553
Maintenance
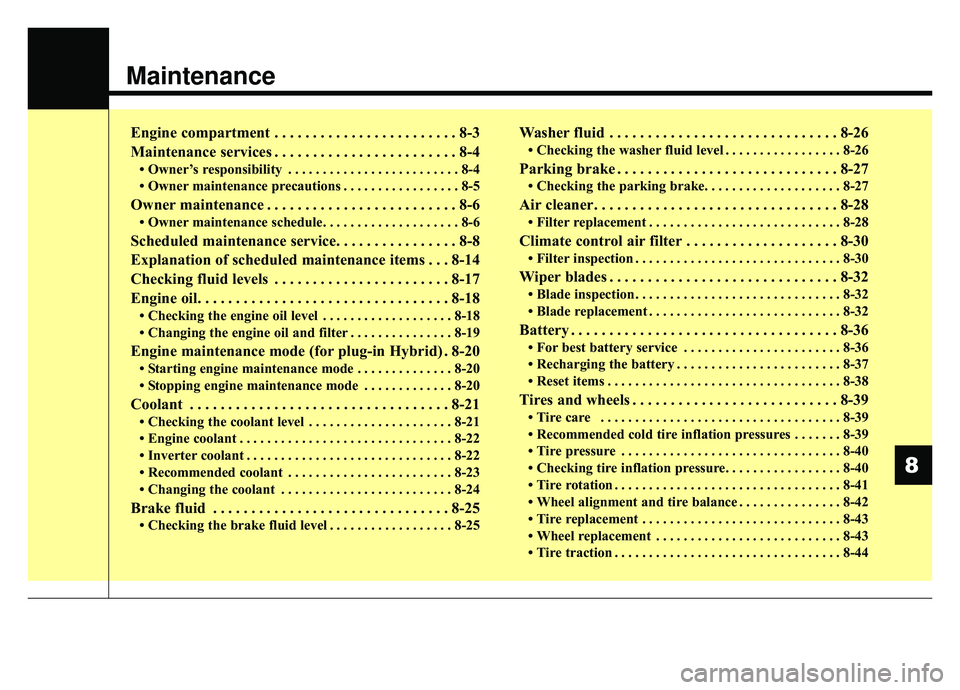
Engine compartment . . . . . . . . . . . . . . . . . . . . . . . . 8-3
Maintenance services . . . . . . . . . . . . . . . . . . . . . . . . 8-4
• Owner’s responsibility . . . . . . . . . . . . . . . . . . . . . . . . . 8-4
• Owner maintenance precautions . . . . . . . . . . . . . . . . . 8-5
Owner maintenance . . . . . . . . . . . . . . . . . . . . . . . . . 8-6
• Owner maintenance schedule. . . . . . . . . . . . . . . . . . . . 8-6
Scheduled maintenance service. . . . . . . . . . . . . . . . 8-8
Explanation of scheduled maintenance items . . . 8-14
Checking fluid levels . . . . . . . . . . . . . . . . . . . . . . . 8-17
Engine oil. . . . . . . . . . . . . . . . . . . . . . . . . . . . . . . . . 8-18
• Checking the engine oil level . . . . . . . . . . . . . . . . . . . 8-18
• Changing the engine oil and filter . . . . . . . . . . . . . . . 8-19
Engine maintenance mode (for plug-in Hybrid) . 8-20
• Starting engine maintenance mode . . . . . . . . . . . . . . 8-20
• Stopping engine maintenance mode . . . . . . . . . . . . . 8-20
Coolant . . . . . . . . . . . . . . . . . . . . . . . . . . . . . . . . . . 8-21\
• Checking the coolant level . . . . . . . . . . . . . . . . . . . . . 8-21
• Engine coolant . . . . . . . . . . . . . . . . . . . . . . . . . . . . . . . 8-22
• Inverter coolant . . . . . . . . . . . . . . . . . . . . . . . . . . . . . . 8-22
• Recommended coolant . . . . . . . . . . . . . . . . . . . . . . . . 8-23
• Changing the coolant . . . . . . . . . . . . . . . . . . . . . . . . . 8-24
Brake fluid . . . . . . . . . . . . . . . . . . . . . . . . . . . . . . . 8-25
• Checking the brake fluid level . . . . . . . . . . . . . . . . . . 8-25
Washer fluid . . . . . . . . . . . . . . . . . . . . . . . . . . . . . . 8-26
• Checking the washer fluid level . . . . . . . . . . . . . . . . . 8-26
Parking brake . . . . . . . . . . . . . . . . . . . . . . . . . . . . . 8-27
• Checking the parking brake. . . . . . . . . . . . . . . . . . . . 8-27
Air cleaner. . . . . . . . . . . . . . . . . . . . . . . . . . . . . . . . 8-28
• Filter replacement . . . . . . . . . . . . . . . . . . . . . . . . . . . . 8-28
Climate control air filter . . . . . . . . . . . . . . . . . . . . 8-30
• Filter inspection . . . . . . . . . . . . . . . . . . . . . . . . . . . . . . 8-30
Wiper blades . . . . . . . . . . . . . . . . . . . . . . . . . . . . . . 8-32
• Blade inspection . . . . . . . . . . . . . . . . . . . . . . . . . . . . . . 8-32
• Blade replacement . . . . . . . . . . . . . . . . . . . . . . . . . . . . 8-32
Battery . . . . . . . . . . . . . . . . . . . . . . . . . . . . . . . . . . . 8-\
36
• For best battery service . . . . . . . . . . . . . . . . . . . . . . . 8-36
• Recharging the battery . . . . . . . . . . . . . . . . . . . . . . . . 8-37
• Reset items . . . . . . . . . . . . . . . . . . . . . . . . . . . . . . . . . . 8-38\
Tires and wheels . . . . . . . . . . . . . . . . . . . . . . . . . . . 8-39
• Tire care . . . . . . . . . . . . . . . . . . . . . . . . . . . . . . . . . . . 8-\
39
• Recommended cold tire inflation pressures . . . . . . . 8-39
• Tire pressure . . . . . . . . . . . . . . . . . . . . . . . . . . . . . . . . 8-40
• Checking tire inflation pressure. . . . . . . . . . . . . . . . . 8-40
• Tire rotation . . . . . . . . . . . . . . . . . . . . . . . . . . . . . . . . . 8-41
• Wheel alignment and tire balance . . . . . . . . . . . . . . . 8-42
• Tire replacement . . . . . . . . . . . . . . . . . . . . . . . . . . . . . 8-43
• Wheel replacement . . . . . . . . . . . . . . . . . . . . . . . . . . . 8-43
• Tire traction . . . . . . . . . . . . . . . . . . . . . . . . . . . . . . . . . 8-44
8
Page 444 of 553
817
Maintenance
Exhaust pipe and muffler
Visually inspect the exhaust pipes,
muffler and hangers for cracks, dete-
rioration, or damage. Start the
engine and listen carefully for any
exhaust gas leakage. Tighten con-
nections or replace parts as neces-
sary.
Suspension mounting bolts
Check the suspension connections
for looseness or damage. Retighten
to the specified torque.
Steering gear box, linkage &
boots/lower arm ball joint
With the vehicle stopped and engine
off, check for excessive free-play in
the steering wheel.
Check the linkage for bends or dam-
age. Check the dust boots and ball
joints for deterioration, cracks, or
damage. Replace any damaged
parts.
Drive shafts and boots
Check the drive shafts, boots and
clamps for cracks, deterioration, or
damage. Replace any damaged
parts and, if necessary, repack the
grease.
Air conditioning refrigerant
Check the air conditioning lines and
connections for leakage and dam-
age.When checking engine oil, engine
coolant, brake fluid, and washer fluid,
always be sure to clean the area
around any filler plug, drain plug, or
dipstick before checking or draining
any lubricant or fluid. This is espe-
cially important in dusty or sandy
areas and when the vehicle is used
on unpaved roads. Cleaning the plug
and dipstick areas will prevent dirt
and grit from entering the engine and
other mechanisms that could be
damaged.
CHECKING FLUID LEVELS
Page 447 of 553
Maintenance
20
8
ENGINE MAINTENANCE MODE(FOR PLUG-IN HYBRID)
Starting Engine Maintenance
Mode
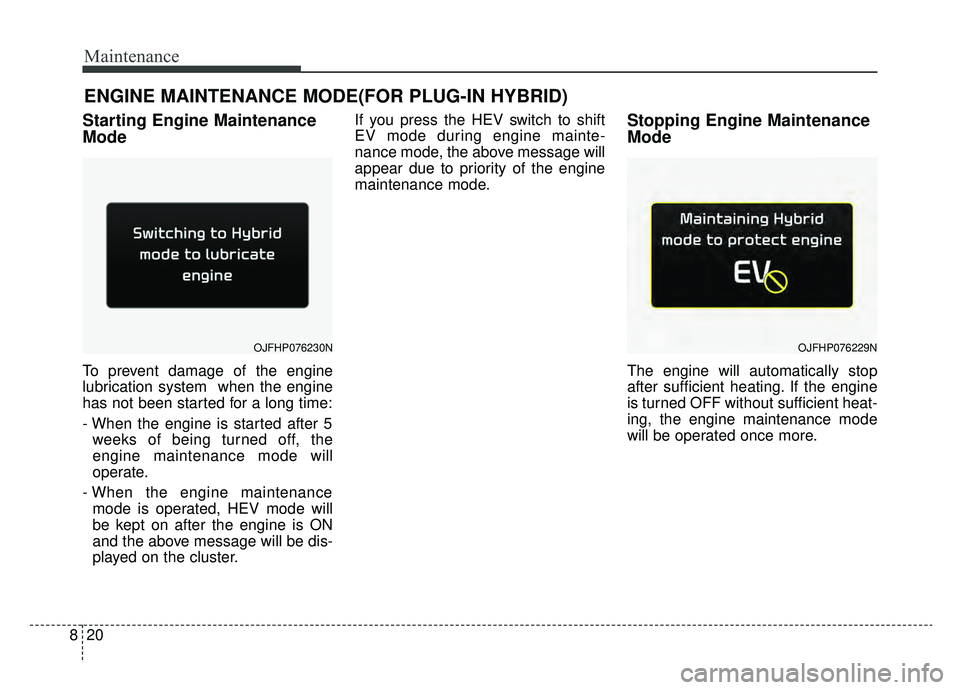
To prevent damage of the engine
lubrication system when the engine
has not been started for a long time:
- When the engine is started after 5
weeks of being turned off, the
engine maintenance mode will
operate.
- When the engine maintenance mode is operated, HEV mode will
be kept on after the engine is ON
and the above message will be dis-
played on the cluster. If you press the HEV switch to shift
EV mode during engine mainte-
nance mode, the above message will
appear due to priority of the engine
maintenance mode.
Stopping Engine Maintenance
Mode
The engine will automatically stop
after sufficient heating. If the engine
is turned OFF without sufficient heat-
ing, the engine maintenance mode
will be operated once more.
OJFHP076230NOJFHP076229N
Page 461 of 553
Maintenance
34
8
4. Return the wiper arm on the wind-
shield.
5. Turn the engine start/stop button to the ON position and wiper arms
will return to the normal operating
position.
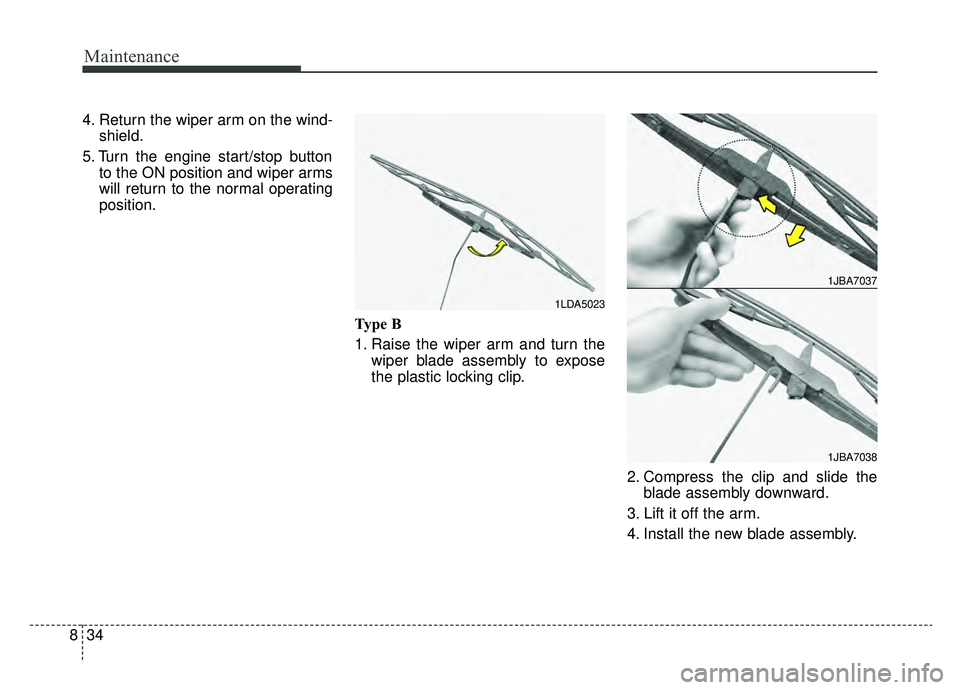
Type B
1. Raise the wiper arm and turn thewiper blade assembly to expose
the plastic locking clip.
2. Compress the clip and slide theblade assembly downward.
3. Lift it off the arm.
4. Install the new blade assembly.
1JBA7037
1JBA7038
1LDA5023
Page 462 of 553
835
Maintenance
5. Return the wiper arm on the wind-shield.
6. Turn the engine start/stop button to the ON position and wiper arms
will return to the normal operating
position.
Page 483 of 553
Maintenance
56
8
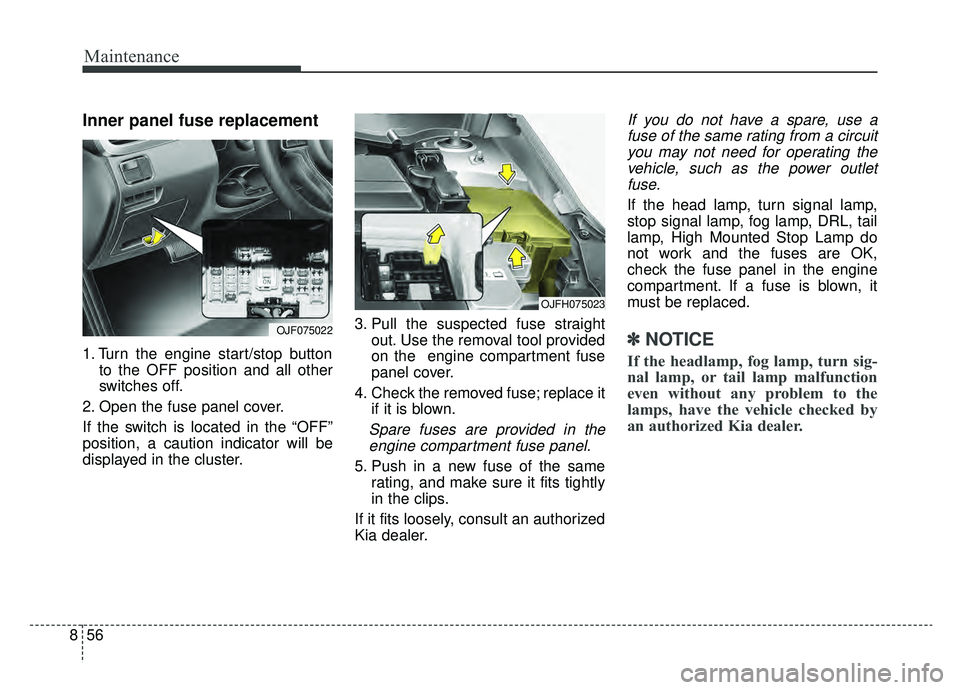
Inner panel fuse replacement
1. Turn the engine start/stop button
to the OFF position and all other
switches off.
2. Open the fuse panel cover.
If the switch is located in the “OFF”
position, a caution indicator will be
displayed in the cluster. 3. Pull the suspected fuse straight
out. Use the removal tool provided
on the engine compartment fuse
panel cover.
4. Check the removed fuse; replace it if it is blown.
Spare fuses are provided in theengine compartment fuse panel.
5. Push in a new fuse of the same rating, and make sure it fits tightly
in the clips.
If it fits loosely, consult an authorized
Kia dealer.
If you do not have a spare, use a fuse of the same rating from a circuityou may not need for operating thevehicle, such as the power outletfuse.
If the head lamp, turn signal lamp,
stop signal lamp, fog lamp, DRL, tail
lamp, High Mounted Stop Lamp do
not work and the fuses are OK,
check the fuse panel in the engine
compartment. If a fuse is blown, it
must be replaced.
✽ ✽ NOTICE
If the headlamp, fog lamp, turn sig-
nal lamp, or tail lamp malfunction
even without any problem to the
lamps, have the vehicle checked by
an authorized Kia dealer.
OJFH075023
OJF075022
Page 484 of 553
857
Maintenance
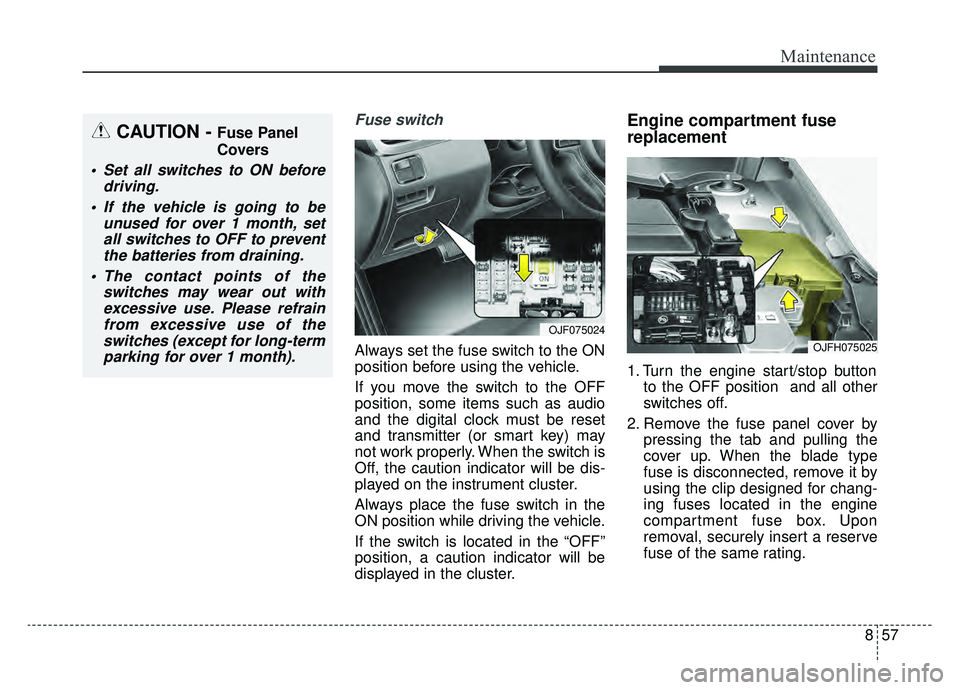
Fuse switch
Always set the fuse switch to the ON
position before using the vehicle.
If you move the switch to the OFF
position, some items such as audio
and the digital clock must be reset
and transmitter (or smart key) may
not work properly. When the switch is
Off, the caution indicator will be dis-
played on the instrument cluster.
Always place the fuse switch in the
ON position while driving the vehicle.
If the switch is located in the “OFF”
position, a caution indicator will be
displayed in the cluster.
Engine compartment fuse
replacement
1. Turn the engine start/stop buttonto the OFF position and all other
switches off.
2. Remove the fuse panel cover by pressing the tab and pulling the
cover up. When the blade type
fuse is disconnected, remove it by
using the clip designed for chang-
ing fuses located in the engine
compartment fuse box. Upon
removal, securely insert a reserve
fuse of the same rating.
OJF075024
OJFH075025
CAUTION - Fuse Panel
Covers
Set all switches to ON beforedriving.
If the vehicle is going to be unused for over 1 month, setall switches to OFF to preventthe batteries from draining.
The contact points of the switches may wear out withexcessive use. Please refrainfrom excessive use of theswitches (except for long-termparking for over 1 month).
Page 488 of 553
861
Maintenance
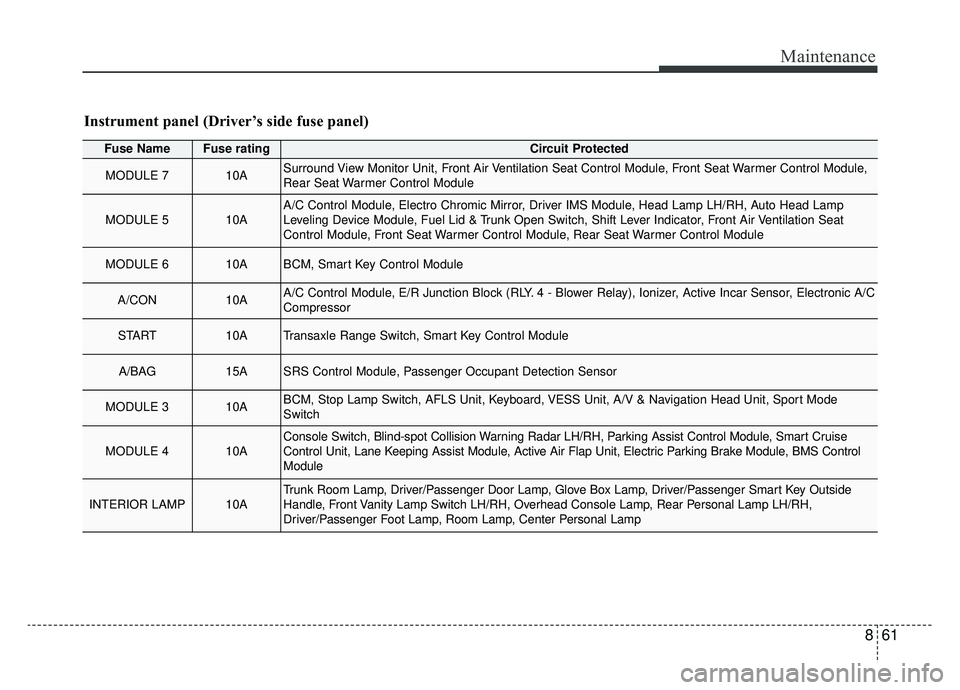
Instrument panel (Driver’s side fuse panel)
Fuse NameFuse ratingCircuit Protected
MODULE 710ASurround View Monitor Unit, Front Air Ventilation Seat Control Module, Front Seat Warmer Control Module,
Rear Seat Warmer Control Module
MODULE 510AA/C Control Module, Electro Chromic Mirror, Driver IMS Module, Head Lamp LH/RH, Auto Head Lamp
Leveling Device Module, Fuel Lid & Trunk Open Switch, Shift Lever Indicator, Front Air Ventilation Seat
Control Module, Front Seat Warmer Control Module, Rear Seat Warmer Control Module
MODULE 610ABCM, Smart Key Control Module
A/CON10AA/C Control Module, E/R Junction Block (RLY. 4 - Blower Relay), Ionizer, Active Incar Sensor, Electronic A/C
Compressor
START10ATransaxle Range Switch, Smart Key Control Module
A/BAG15ASRS Control Module, Passenger Occupant Detection Sensor
MODULE 310ABCM, Stop Lamp Switch, AFLS Unit, Keyboard, VESS Unit, A/V & Navigation Head Unit, Sport Mode
Switch
MODULE 410AConsole Switch, Blind-spot Collision Warning Radar LH/RH, Parking Assist Control Module, Smart Cruise
Control Unit, Lane Keeping Assist Module, Active Air Flap Unit, Electric Parking Brake Module, BMS Control
Module
INTERIOR LAMP10ATrunk Room Lamp, Driver/Passenger Door Lamp, Glove Box Lamp, Driver/Passenger Smart Key Outside
Handle, Front Vanity Lamp Switch LH/RH, Overhead Console Lamp, Rear Personal Lamp LH/RH,
Driver/Passenger Foot Lamp, Room Lamp, Center Personal Lamp
Page 491 of 553
![KIA OPTIMA PHEV 2019 Owners Manual Maintenance
64
8
Fuse NameFuse ratingCircuit Protected
P/WDW RH25A
Power Window RH Relay, Rear Safety Power Window Module LH, Rear Power Window Switch LH, Power
Window Main Switch,
[LHD] Passenger Saf KIA OPTIMA PHEV 2019 Owners Manual Maintenance
64
8
Fuse NameFuse ratingCircuit Protected
P/WDW RH25A
Power Window RH Relay, Rear Safety Power Window Module LH, Rear Power Window Switch LH, Power
Window Main Switch,
[LHD] Passenger Saf](/img/2/54962/w960_54962-490.png)
Maintenance
64
8
Fuse NameFuse ratingCircuit Protected
P/WDW RH25A
Power Window RH Relay, Rear Safety Power Window Module LH, Rear Power Window Switch LH, Power
Window Main Switch,
[LHD] Passenger Safety Power Window Module
[RHD] Driver Safety Power Window Module
P/SEAT PASS30APassenger Seat Manual Switch, Walk In Relay Module, Passenger Reclining Limit Switch
AMP25AAMP
BRAKE SWITCH10AStop Lamp Switch, Smart Key Control Module, Start/Stop Button Switch
P/WDW LH25A
Power Window LH Relay, Rear Safety Power Window Module RH, Rear Power Window Switch RH, Power
Window Main Switch,
[LHD] Driver Safety Power Window Module
[RHD] Passenger Safety Power Window Module
P/SEAT DRV30ADriver Seat Manual Switch, Driver IMS Module
POWER
OUTLET20AFront Power Outlet #1, Front Cigarette Lighter & Power Outlet #2
RR WIPER15A-
SPARE 110A-
SPARE 210A-