engine KIA PICANTO 2006 Repair Manual
[x] Cancel search | Manufacturer: KIA, Model Year: 2006, Model line: PICANTO, Model: KIA PICANTO 2006Pages: 281, PDF Size: 9.89 MB
Page 199 of 281
621
In case of an emergency
1 23456789
Changing tires
Jacking instructions
The jack is provided for emergency
tire changing only.
Follow jacking instructions to reduce
the possibility of personal injury.
WARNING- Changing
tires
Never attempt vehicle repairs in the traffic lanes of a public
road or highway.
Always move the vehicle com- pletely off the road and onto
the shoulder before trying to
change a tire. The jack should
be used on level firm ground
whenever possible. If you can-
not find a firm, level place off
the road, call a towing service
company for assistance.
Be sure to use the correct front and rear jacking posi-
tions on the vehicle; never use
the bumpers or any other part
of the vehicle for jack support.
(Continued)(Continued)
The vehicle can easily roll offthe jack causing serious
injury or death. No person
should place any portion of
their body under a vehicle that
is supported only by a jack ;
use vehicle support stands.
Do not start or run the engine while the vehicle is on the
jack.
Do not allow anyone to remain in the vehicle while it is on the
jack.
Make sure any children pres- ent are in a secure place away
from the road and from the
vehicle to be raised with the
jack.
Page 205 of 281
627
In case of an emergency
1 23456789
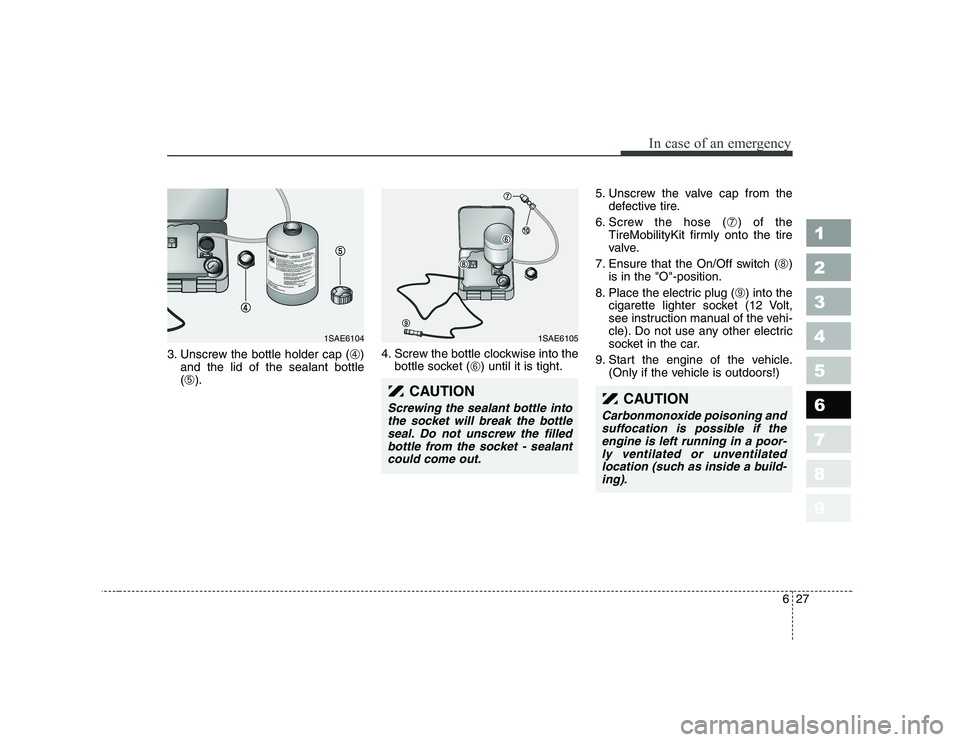
3. Unscrew the bottle holder cap (➃)
and the lid of the sealant bottle ( ➄ ). 4. Screw the bottle clockwise into the
bottle socket ( ➅) until it is tight. 5. Unscrew the valve cap from the
defective tire.
6. Screw the hose ( ➆) of the
TireMobilityKit firmly onto the tire
valve.
7. Ensure that the On/Off switch ( ➇)
is in the "O"-position.
8. Place the electric plug ( ➈) into the
cigarette lighter socket (12 Volt,
see instruction manual of the vehi-
cle). Do not use any other electric
socket in the car.
9. Start the engine of the vehicle. (Only if the vehicle is outdoors!)
1SAE61041SAE6105
CAUTION
Screwing the sealant bottle into
the socket will break the bottle seal. Do not unscrew the filledbottle from the socket - sealantcould come out.CAUTION
Carbonmonoxide poisoning andsuffocation is possible if theengine is left running in a poor- ly ventilated or unventilatedlocation (such as inside a build-ing).
Page 209 of 281
631
In case of an emergency
1 23456789
3rd stage: What to do when
checking the tire inflationpressure
1. Open the lid from theTireMobilityKit.
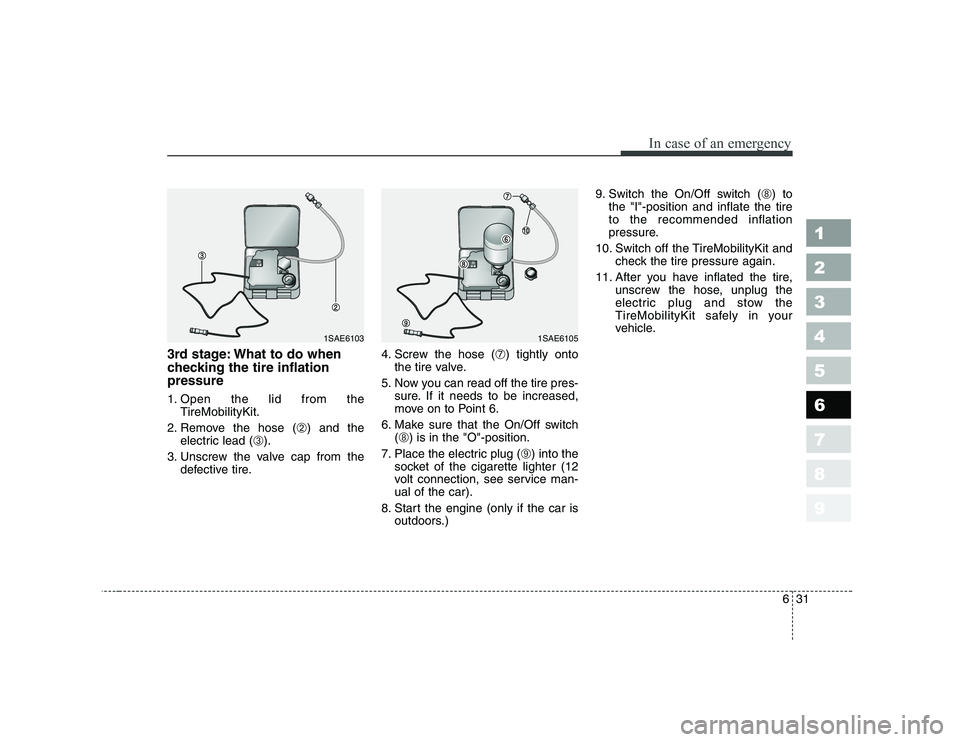
2. Remove the hose ( ➁) and the
electric lead ( ➂).
3. Unscrew the valve cap from the defective tire. 4. Screw the hose (
➆) tightly onto
the tire valve.
5. Now you can read off the tire pres- sure. If it needs to be increased,
move on to Point 6.
6. Make sure that the On/Off switch (➇ ) is in the "O"-position.
7. Place the electric plug ( ➈) into the
socket of the cigarette lighter (12
volt connection, see service man-ual of the car).
8. Start the engine (only if the car is outdoors.) 9. Switch the On/Off switch (
➇) to
the "I"-position and inflate the tireto the recommended inflation
pressure.
10. Switch off the TireMobilityKit and check the tire pressure again.
11. After you have inflated the tire, unscrew the hose, unplug the
electric plug and stow the
TireMobilityKit safely in your
vehicle.
1SAE61051SAE6103
Page 210 of 281
In case of an emergency
32
6
1 23456789
Notes on the safe use of the TireMobilityKit
Park your car at the side of the
road so that you can work with the
TireMobilityKit away from moving
traffic. Place your warning triangle
in a prominent place to make pass-
ing vehicles aware of your location.
To be sure your vehicle won't move, even when your're on fairly
level ground, always set your park-
ing brake.
Only use the TireMobilityKit for sealing/inflation passenger car
tires. Do not use on motorcycles,
bicycles or any other type of tires.
Do not remove any foreign objects - such as nails or screws - that
have penetrated the tire. Before using the TireMobilityKit
read the precautionary advice
printed on the sealant bottle!
Provided the car is outdoors, leave the engine running. Otherwise
operating the compressor may
eventually drain the car battery.
Never leave the TireMobilityKit unattended while it is being used.
Do not leave the compressor run- ning for more than 10 min. at a time
or it may overheat.
Do not use the TireMobilityKit if the ambient temperature is below -
30°C / -20°F.
Do not use the sealing compound after its expiration date which can
be found on the label of the bottle.
Keep away from children.CAUTION
Do not use the TireMobilityKit if the tire was severely damagedby driving with insufficient airpressure (e.g. if the tire has bulges, cuts, cracks or similardefects). Only seal puncturedareas located well within the tread region of the tire. Damageto the sidewall may not besealed for safety reasons.
Page 214 of 281
1 234567891 23456789
10
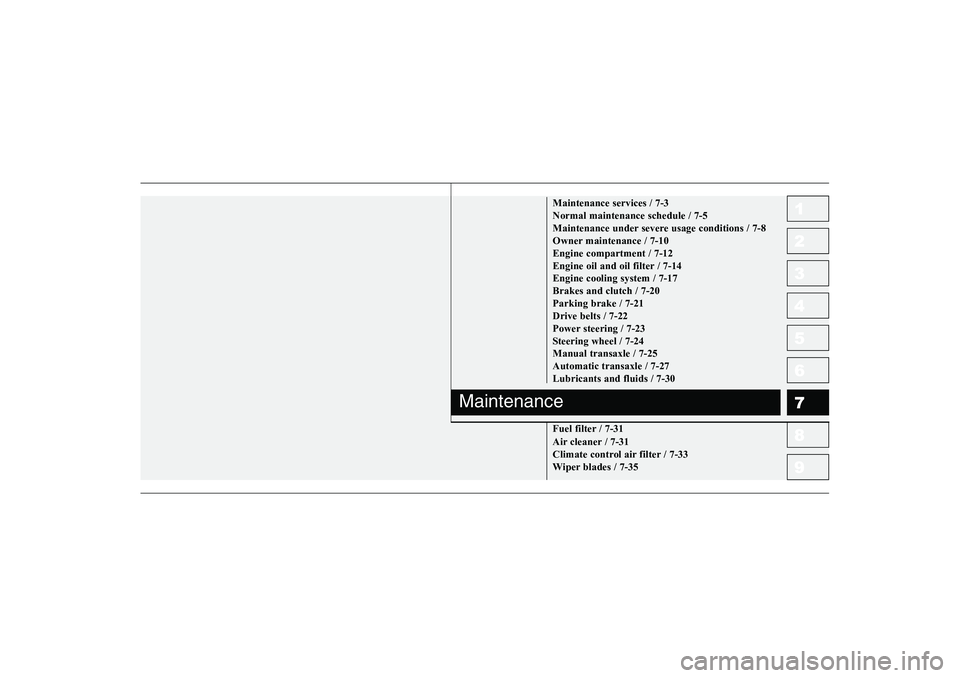
Maintenance services / 7-3 Normal maintenance schedule / 7-5
Maintenance under severe usage conditions / 7-8
Owner maintenance / 7-10Engine compartment / 7-12
Engine oil and oil filter / 7-14Engine cooling system / 7-17Brakes and clutch / 7-20Parking brake / 7-21Drive belts / 7-22
Power steering / 7-23
Steering wheel / 7-24Manual transaxle / 7-25Automatic transaxle / 7-27Lubricants and fluids / 7-30
Fuel filter / 7-31
Air cleaner / 7-31
Climate control air filter / 7-33
Wiper blades / 7-35
Maintenance
Page 218 of 281

1 23456789
75
Maintenance
NORMAL MAINTENANCE SCHEDULE
I : Inspect and if necessary, adjust, correct, clean or replace.
R : Replace or change. *1: Adjust alternator and power steering (and water pump drive belt) and airconditioner drive belt (if equipped).
Inspect and if necessary correct or replace.
*2 : Check the engine oil level and leak every 500 km (350 miles) or before starting a long trip.
MAINTENANCE
INTERVALS
MAINTENANCE ITEMNumber of months or driving distance, whichever comes first
Months 12 24 36 48 60 72 84 96
Miles×1,000 10 20 30 40 50 60 70 80
Km×1,000 15 30 45 60 75 90 105 120
Drive belts *1 Gasoline I I I I I I I I
Diesel I I I I
Engine oil and Gasoline R R R R R R R R
engine oil filter *2
DieselFor Europe R R R R R R R R
Except Europe
Engine timing belt
I R
Air cleaner element I R I R I R I R
Spark plugs (Gasoline) For Europe R R R R
Except Europe
Valve clearance
I I I I
Vapor hose and fuel filler cap I I I I
Vacuum and crankcase ventilation hoses I I I IFuel filter (
Gasoline) RR
Replace every 40,000 km (25,000 miles)
Replace every 10,000 km (6,000 miles) or 12 months
Page 219 of 281
1 23456789
Maintenance
6
7
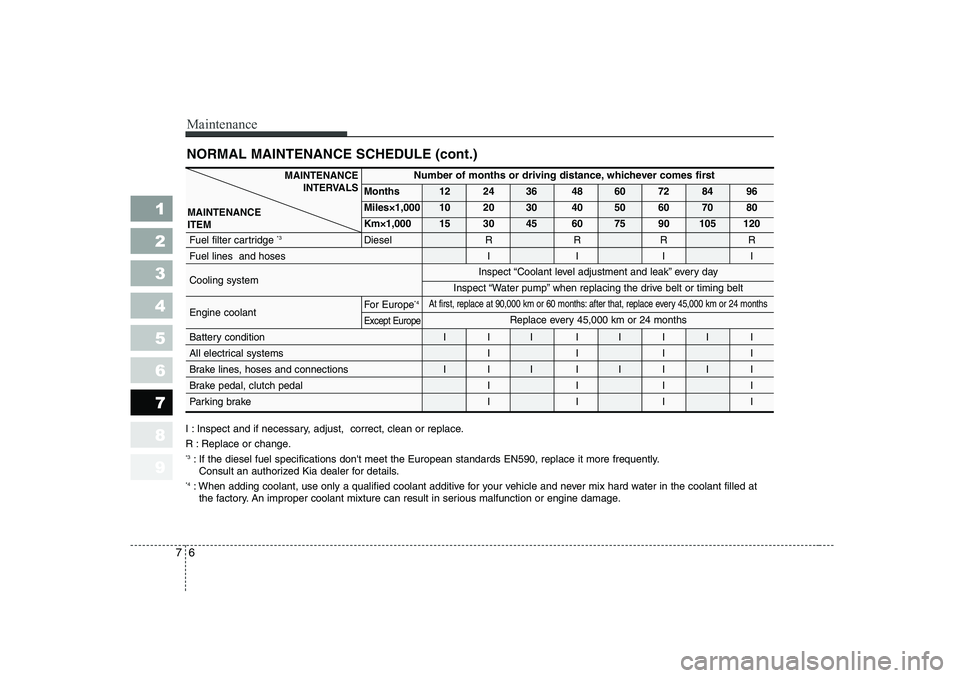
NORMAL MAINTENANCE SCHEDULE (cont.)
I : Inspect and if necessary, adjust, correct, clean or replace.
R : Replace or change. *3
: If the diesel fuel specifications don't meet the European standards EN590, replace it more frequently.
Consult an authorized Kia dealer for details.
*4 : When adding coolant, use only a qualified coolant additive for your vehicle and never mix hard water in the coolant filled at
the factory. An improper coolant mixture can result in serious malfunction or engine damage.
MAINTENANCE ITEM
Number of months or driving distance, whichever comes first
Months 12 24 36 48 60 72 84 96
Miles×1,000 10 20 30 40 50 60 70 80
Km×1,000 15 30 45 60 75 90 105 120
Fuel filter cartridge *3
Diesel R R R R
Fuel lines and hoses I I I I
Cooling system Engine coolant For Europe
*4
Except Europe
Battery condition
I I I I I I I I
All electrical systems I I I I
Brake lines, hoses and connections I I I I I I I I
Brake pedal, clutch pedal I I I I
Parking brake I I I I
Inspect “Coolant level adjustment and leak” every day
Inspect “Water pump” when replacing the drive belt or timing belt
At first, replace at 90,000 km or 60 months: after that, replace every 45,000 km or 24 months
Replace every 45,000 km or 24 months
MAINTENANCE INTERVALS
Page 221 of 281
Maintenance
8
7
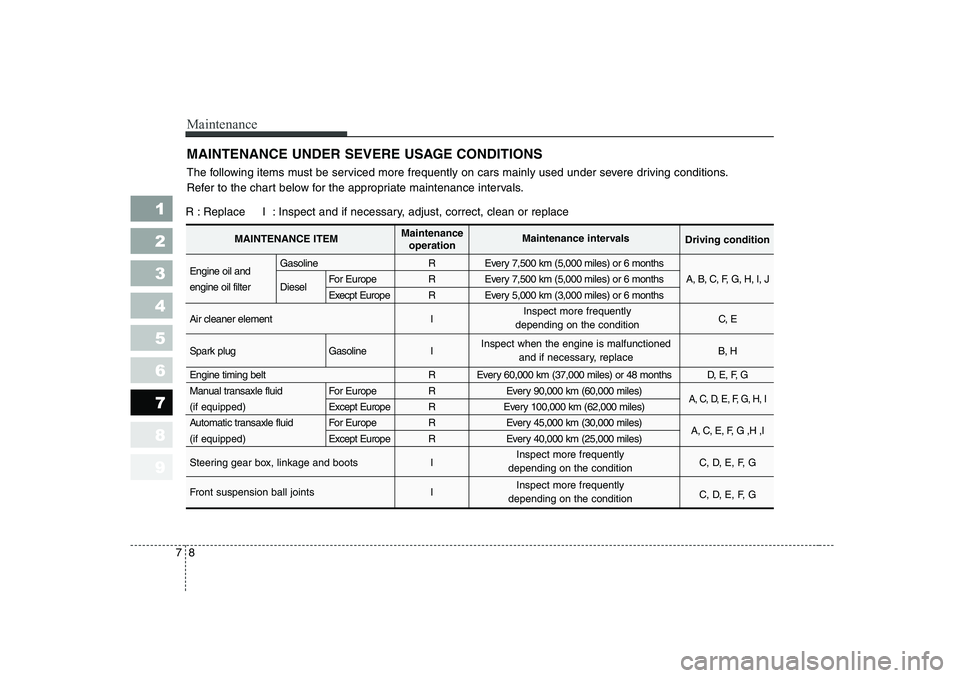
MAINTENANCE UNDER SEVERE USAGE CONDITIONS
1 23456789
The following items must be serviced more frequently on cars mainly used under severe driving conditions.
Refer to the chart below for the appropriate maintenance intervals.
R : Replace I : Inspect and if necessary, adjust, correct, clean or replace
Engine oil and Gasoline R Every 7,500 km (5,000 miles) or 6 months
engine oil filter Diesel For Europe R Every 7,500 km (5,000 miles) or 6 months A, B, C, F, G, H, I, J
Execpt Europe R Every
5,000 km (3,000 miles) or 6 months
Air cleaner element I C, E
Spark plug Gasoline I B, H
Engine timing belt R Every 60,000 km (37,000 miles) or 48 months D, E, F, G
Manual transaxle fluid For Europe R Every 90,000 km (60,000 miles)
A, C, D, E, F, G, H, I(if equipped)Except Europe R Every 100,000 km (62,000 miles)
Automatic transaxle fluid For Europe R Every 45,000 km (30,000 miles) A, C, E, F, G ,H ,I
(if equipped)Except Europe R Every 40,000 km (25,000 miles)
Steering gear box, linkage and boots I C, D, E, F, G
Front suspension ball joints I C, D, E, F, G
MAINTENANCE ITEMMaintenance
operation Maintenance intervals
Driving condition
Inspect more frequently
depending on the condition
Inspect more frequently
depending on the condition
Inspect more frequently
depending on the condition
Inspect when the engine is malfunctioned
and if necessary, replace
Page 223 of 281
Maintenance
10
7
1 23456789
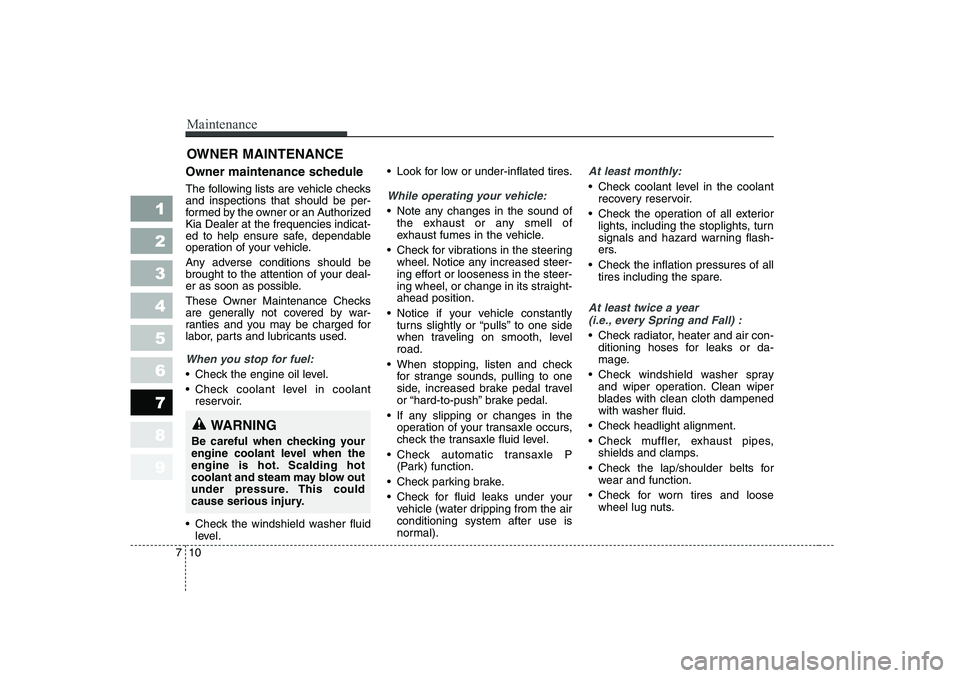
OWNER MAINTENANCE
Owner maintenance schedule
The following lists are vehicle checks and inspections that should be per-
formed by the owner or an AuthorizedKia Dealer at the frequencies indicat-
ed to help ensure safe, dependable
operation of your vehicle.
Any adverse conditions should be
brought to the attention of your deal-
er as soon as possible.
These Owner Maintenance Checks
are generally not covered by war-
ranties and you may be charged for
labor, parts and lubricants used.
When you stop for fuel:
Check the engine oil level.
Check coolant level in coolant reservoir.
Check the windshield washer fluid level. Look for low or under-inflated tires.
While operating your vehicle:
Note any changes in the sound of
the exhaust or any smell of
exhaust fumes in the vehicle.
Check for vibrations in the steering wheel. Notice any increased steer-
ing effort or looseness in the steer-
ing wheel, or change in its straight-ahead position.
Notice if your vehicle constantly turns slightly or “pulls” to one side
when traveling on smooth, levelroad.
When stopping, listen and check for strange sounds, pulling to one
side, increased brake pedal travel
or “hard-to-push” brake pedal.
If any slipping or changes in the operation of your transaxle occurs,
check the transaxle fluid level.
Check automatic transaxle P (Park) function.
Check parking brake.
Check for fluid leaks under your vehicle (water dripping from the air conditioning system after use is
normal).
At least monthly:
Check coolant level in the coolantrecovery reservoir.
Check the operation of all exterior lights, including the stoplights, turn
signals and hazard warning flash-
ers.
Check the inflation pressures of all tires including the spare.
At least twice a year
(i.e., every Spring and Fall) :
Check radiator, heater and air con- ditioning hoses for leaks or da-
mage.
Check windshield washer spray and wiper operation. Clean wiper
blades with clean cloth dampened
with washer fluid.
Check headlight alignment.
Check muffler, exhaust pipes, shields and clamps.
Check the lap/shoulder belts for wear and function.
Check for worn tires and loose wheel lug nuts.
WARNING
Be careful when checking your
engine coolant level when the
engine is hot. Scalding hot
coolant and steam may blow out
under pressure. This could
cause serious injury.
Page 224 of 281
711
Maintenance
1 23456789
At least once a year :
Clean body and door drain holes.
Lubricate door hinges and checks,and hood hinges.
Lubricate door and hood locks and latches.
Lubricate door rubber weather- strips.
Check the air conditioning system before the warm weather season.
Check the power steering fluid level.
Inspect and lubricate automatic transaxle linkage and controls.
Clean battery and terminals.
Check the brake fluid level. Owner maintenance precau- tions
Improper or incomplete service may
result in problems. This section gives
instructions only for the maintenance
items that are easy to perform.
As explained earlier in this section,
several procedures can be done only
by an Authorized Kia Dealer with
special tools.
✽✽
NOTICE
Improper owner maintenance dur- ing the warranty period may affect
warranty coverage. For details, read
the separate Kia Warranty &
Maintenance book provided with
the vehicle. If you're unsure about
any servicing or maintenance proce-
dure, have it done by an Authorized
Kia Dealer.
WARNING - Maintenance
work
Performing maintenance work on a vehicle can be danger-
ous. You can be seriously
injured while performing some
maintenance procedures. If
you lack sufficient knowledge
and experience or the propertools and equipment to do the
work, have it done by an
Authorized Kia Dealer.
Working under the hood with the engine running is danger-
ous. It becomes even more
dangerous when you wear
jewelry or loose clothing.These can become entangled
in moving parts and result in
injury. Therefore, if you must
run the engine while working
under the hood, make certain
that you remove all jewelry
(especially rings, bracelets,
watches, and necklaces) and
all neckties, scarves, and sim-
ilar loose clothing before get-ting near the engine or cool-ing fans.