engine KIA PICANTO 2006 Owners Manual
[x] Cancel search | Manufacturer: KIA, Model Year: 2006, Model line: PICANTO, Model: KIA PICANTO 2006Pages: 281, PDF Size: 9.89 MB
Page 6 of 281
13
1 23456789
Introduction
VEHICLE BREAK-IN
PROCESS
No special break-in period is need-
ed. By following a few simple precau-
tions for the first 1,000 km (600
miles) you may add to the perform-
ance, economy and life of your vehi-
cle.
Do not race the engine.
Do not maintain a single speed forlong periods of time, either fast or
slow. Varying engine speed is
needed to properly break-in the
engine.
Avoid hard stops, except in emer- gencies, to allow the brakes to seat
properly.
Avoid full-throttle starts.
Page 7 of 281
1 23456789
Interior overview / 2-2 Instrument panel overview / 2-3Engine compartment / 2-4
Your vehicle at a glance
Page 10 of 281
Your vehicle at a glance
4
2
1 23456789
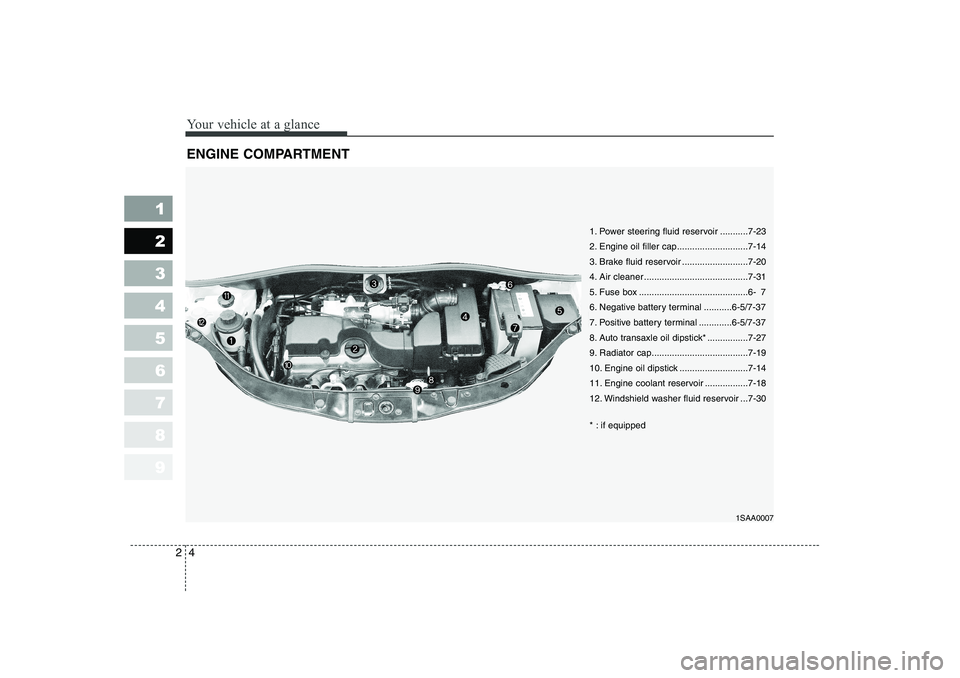
ENGINE COMPARTMENT
1SAA0007
1. Power steering fluid reservoir ...........7-23
2. Engine oil filler cap............................7-14
3. Brake fluid reservoir ..........................7-20
4. Air cleaner .........................................7-31
5. Fuse box ...........................................6- 7
6. Negative battery terminal ...........6-5/7-37
7. Positive battery terminal .............6-5/7-37
8. Auto transaxle oil dipstick* ................7-27
9. Radiator cap......................................7-19
10. Engine oil dipstick ...........................7-14
11. Engine coolant reservoir .................7-18
12. Windshield washer fluid reservoir ...7-30
* : if equipped
Page 12 of 281
Knowing your vehicle
2
3
1 23456789
The key code number is stamped on
the plate attached to the key set.
Should you lose your keys, this num-
ber will enable an authorized Kia
Dealer to duplicate the keys easily.
Remove the plate and store it in a
safe place. Also, record the code
number and keep it in a safe and
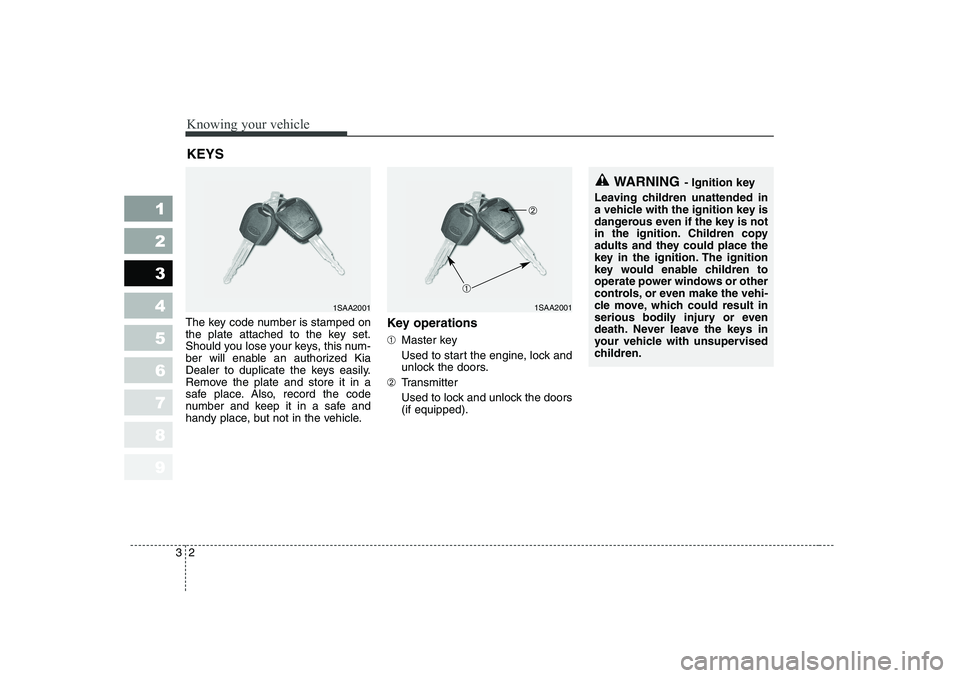
handy place, but not in the vehicle. Key operations ➀
Master key
Used to start the engine, lock and unlock the doors.
➁ Transmitter
Used to lock and unlock the doors (if equipped).
KEYS
1SAA20011SAA2001
WARNING
- Ignition key
Leaving children unattended in
a vehicle with the ignition key is
dangerous even if the key is not
in the ignition. Children copy
adults and they could place the
key in the ignition. The ignition
key would enable children to
operate power windows or other
controls, or even make the vehi-
cle move, which could result in
serious bodily injury or even
death. Never leave the keys in
your vehicle with unsupervised
children.
➀ ➁
Page 17 of 281
37
1 23456789
Knowing your vehicle
Your vehicle is equipped with an
electronic engine immobilizer system
to reduce the risk of unauthorized
vehicle use.
Your immobilizer system is com-
prised of a small transponder in the
ignition key, and antenna coil in the
key cylinder and ICU (Immobilizer
Control Unit) in the steering shaft.
With this system, whenever you
insert your ignition key into the igni-
tion switch and turn it to ON, the
antenna coil in the ignition switch
receives a signal from the transpon-
der in the ignition key and then sendsthe signal to the ECU (EngineControl Unit).
The ECU checks the signal whether
the ignition key is valid.
If the key is determined to be valid,
the engine will start.
If the key is determined to be invalid,
the engine will not start.To deactivate the immobilizer sys-tem:
Insert the ignition key into the key
cylinder and turn it to the ON posi-tion.
To activate the immobilizer sys- tem:
Turn the ignition key to the OFF posi-
tion. The immobilizer system acti-
vates automatically. Without a valid
ignition key for your vehicle, the
engine will not start.
✽✽
NOTICE
When starting the engine, do not use
the key with other immobilizer keys
around.Otherwise the engine may not start
or may stop soon after it starts. Keepeach key separately not to have any
malfunction after you receive yournew vehicle.
IMMOBILIZER SYSTEM (IF EQUIPPED)
CAUTION
The transponder in your ignition key is an important part of theimmobilizer system. It is designed to give years of trou-blefree service, however youshould avoid exposure to mois- ture, static electricity and roughhandling. Immobilizer systemmalfunction could occur.
CAUTION
Do not change, alter or adjustthe immobilizer system becauseit could cause the immobilizer system to malfunction andshould only be serviced by anauthorized Kia dealer. Malfunctions caused by improp-er alterations, adjustments ormodifications to the immobilizer system are not covered by yourvehicle manufacturer warranty.
Page 39 of 281
329
1 23456789
Knowing your vehicle
To unfold the rear seat:
1. Lift and push the seatback back-ward firmly until it clicks into place.
2. Move and push the seat cushion downward firmly to the proper position.
3. Replace the rear safty belt to the proper position.CAUTION
When returning the rear seat-
backs to the upright position,remember to return the rearshoulder belts to their properposition.
Do not remove the floor carpet in your vehicle. Emission con-trol system componentscause high exhaust tempera-tures under the floor.
WARNING - Cargo
Cargo should always be
secured to prevent it from being
thrown about the vehicle in a
collision and causing injury to
the vehicle occupants.
CAUTION
Make sure the engine is off, the transaxle is in P and theparking brake is applied whenever loading or unload-ing cargo. Vehicle may move ifshift lever is inadvertently moved to another position.
Be careful when loading cargo through the rear passengerseats to prevent damage tothe vehicle interior.
When cargo is loaded through the rear passenger seats,ensure the cargo is properlysecured to prevent it frommoving while driving. Unsecured cargo in the pas-senger compartment cancause damage to the vehicle or injury to it’s occupants.
Page 82 of 281
Knowing your vehicle
72
3
1 23456789
Airbag warning light
The purpose of airbag warning light
in your instrument panel is to alert
you of a potential problem with your
airbag - Supplemental RestraintSystem (SRS). When the ignition switch is turned
ON, the indicator light should blink or
illuminate for approximately 6 sec-
onds, then go off.
Have the system checked if:
The light does not turn on briefly
when you turn the ignition ON.
The light stays on after the engine starts.
The light comes on while the vehi- cle is in motion. Airbag (Supplemental
Restraint System) service
Your Supplemental Restraint System
is virtually maintenance-free. There
are no parts which you can service.
You must have the system serviced
under the following circumstances:
If an airbag ever inflates, the airbag
must be replaced. Do not try to
remove or discard the airbag by
yourself. This must be done by an
authorized Kia dealer.
If the airbag warning indicator light alerts you to a problem, have the
airbag system checked as soon as
possible. Otherwise, your airbag
system may be ineffective.
AIR
BAG
Page 85 of 281
375
1 23456789
Knowing your vehicle
Opening the hood:
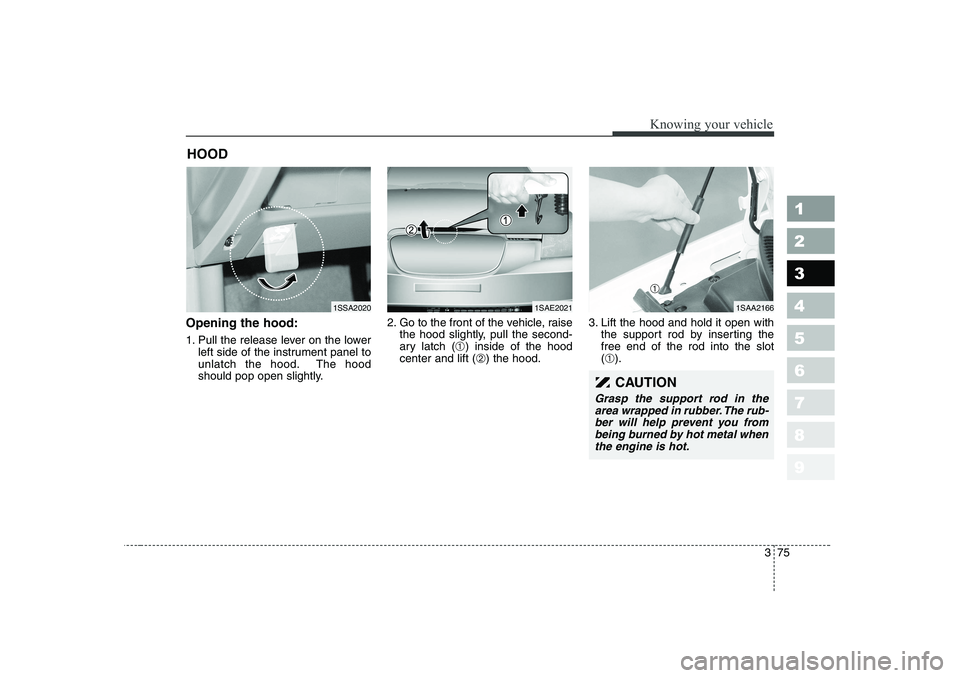
1. Pull the release lever on the lowerleft side of the instrument panel to
unlatch the hood. The hood
should pop open slightly. 2. Go to the front of the vehicle, raise
the hood slightly, pull the second-
ary latch ( ➀) inside of the hood
center and lift ( ➁) the hood. 3. Lift the hood and hold it open with
the support rod by inserting thefree end of the rod into the slot(➀ ).
HOOD
1SSA20201SAE20211SAA2166
CAUTION
Grasp the support rod in the
area wrapped in rubber. The rub-ber will help prevent you from being burned by hot metal whenthe engine is hot.
➀
Page 86 of 281

Knowing your vehicle
76
3
1 23456789
CAUTION
To avoid injury from sharp
objects, it is recommended thatprotective gloves be worn whenopening the fuel filler door man- ually.
Closing the hood
1. Before closing the hood, check the following:
All filler caps in engine compart- ment must be correctly installed.
Gloves, rags or any other com- bustible material must be
removed from the engine com-
partment.
2. Secure the support rod in its clip.
3. Lower the hood to about 30 cm (12 inches) height and then let it
drop to properly lock in place.
Make sure the hood is properly
locked before driving. 1. Stop the engine.
2. To open the fuel filler lid, pull the
release lever. 3. Pull the fuel filler lid out to open.
4. To remove the cap, turn the fuel
tank cap counter-clockwise.
5. Refuel as needed.
6. To install the cap, turn it clockwise until it “clicks”. This indicates that the cap is securely tightened.
7. Close the fuel filler lid and push it lightly and make sure that it issecurely closed.
CAUTION
Before closing the hood, make
sure that all engine parts andtools have been removed fromthe engine area and that noone’s hands are near the hoodopening.
Do not leave gloves, rags or any other combustible materi-al in the engine compartment.Doing so may cause a heat- induced fire.
FUEL FILLER LID
1SAA20181SAA2019
Page 92 of 281
Knowing your vehicle
82
3
1 23456789
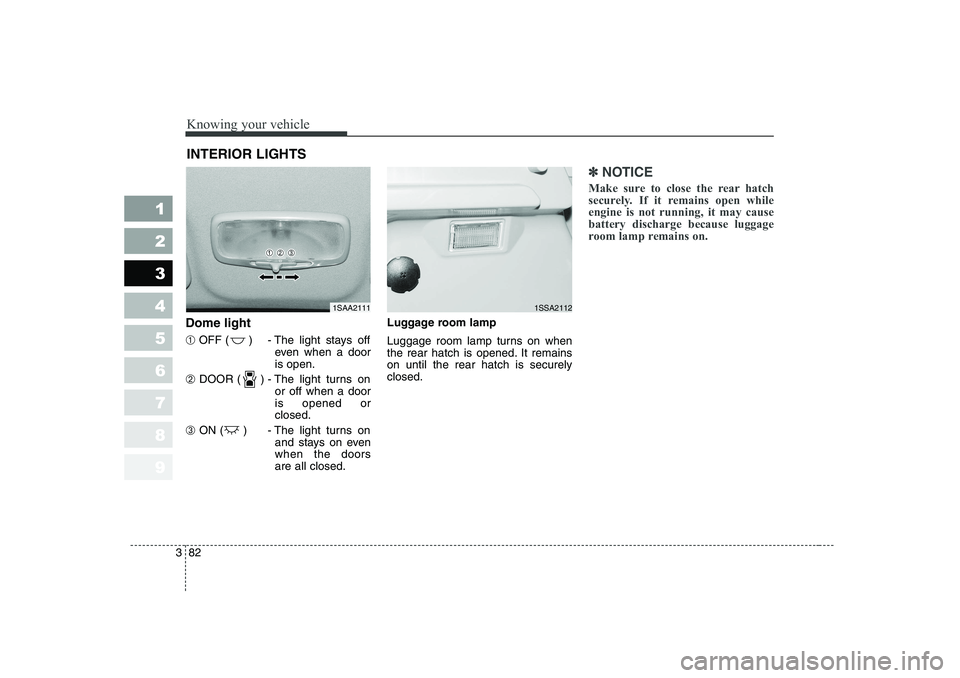
Dome light ➀ OFF ( ) - The light stays off
even when a door is open.
➁ DOOR ( ) - The light turns on
or off when a dooris opened orclosed.
➂ ON ( ) - The light turns on
and stays on evenwhen the doorsare all closed. Luggage room lamp
Luggage room lamp turns on when
the rear hatch is opened. It remainson until the rear hatch is securelyclosed.
✽✽
NOTICE
Make sure to close the rear hatch
securely. If it remains open whileengine is not running, it may causebattery discharge because luggage
room lamp remains on.
INTERIOR LIGHTS
1SAA21111SSA2112