turn signal KIA PICANTO 2008 User Guide
[x] Cancel search | Manufacturer: KIA, Model Year: 2008, Model line: PICANTO, Model: KIA PICANTO 2008Pages: 335, PDF Size: 12.98 MB
Page 225 of 335
What to do in an emergency
2
6
ROAD WARNING
F010100ASA
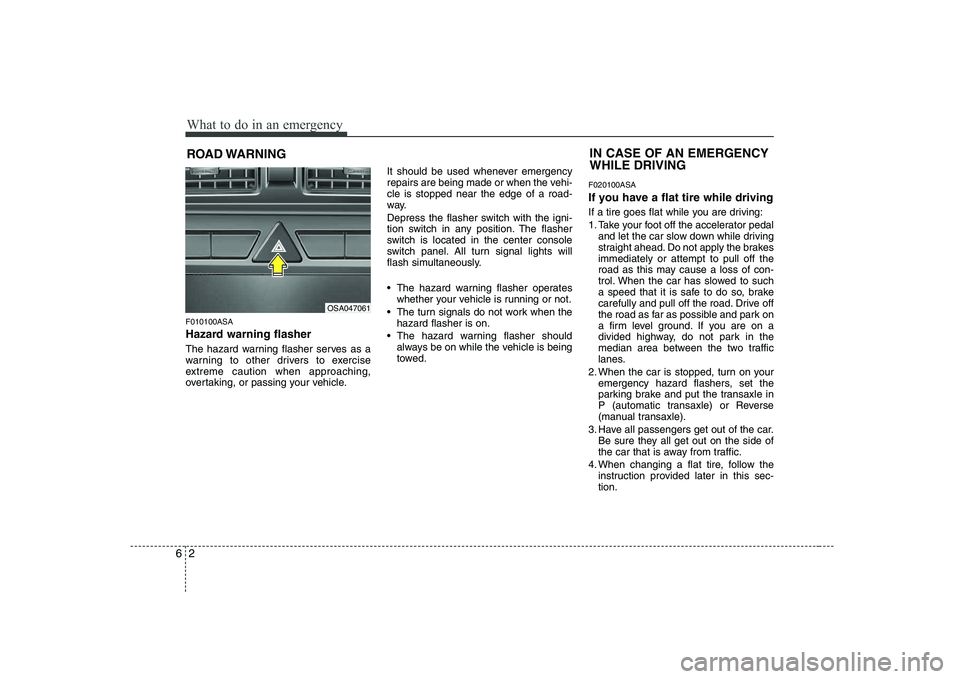
Hazard warning flasher
The hazard warning flasher serves as a
warning to other drivers to exercise
extreme caution when approaching,
overtaking, or passing your vehicle. It should be used whenever emergency
repairs are being made or when the vehi-cle is stopped near the edge of a road-
way.
Depress the flasher switch with the igni-
tion switch in any position. The flasher
switch is located in the center console
switch panel. All turn signal lights will
flash simultaneously.
• The hazard warning flasher operates
whether your vehicle is running or not.
The turn signals do not work when the hazard flasher is on.
The hazard warning flasher should always be on while the vehicle is being
towed. F020100ASA
If you have a flat tire while driving
If a tire goes flat while you are driving:
1. Take your foot off the accelerator pedal
and let the car slow down while driving
straight ahead. Do not apply the brakesimmediately or attempt to pull off the
road as this may cause a loss of con-
trol. When the car has slowed to such
a speed that it is safe to do so, brake
carefully and pull off the road. Drive off
the road as far as possible and park on
a firm level ground. If you are on a
divided highway, do not park in the
median area between the two traffic
lanes.
2. When the car is stopped, turn on your emergency hazard flashers, set the
parking brake and put the transaxle in
P (automatic transaxle) or Reverse
(manual transaxle).
3. Have all passengers get out of the car. Be sure they all get out on the side of
the car that is away from traffic.
4. When changing a flat tire, follow the instruction provided later in this sec-tion.
IN CASE OF AN EMERGENCY WHILE DRIVING
OSA047061
Page 307 of 335
Maintenance
56
7
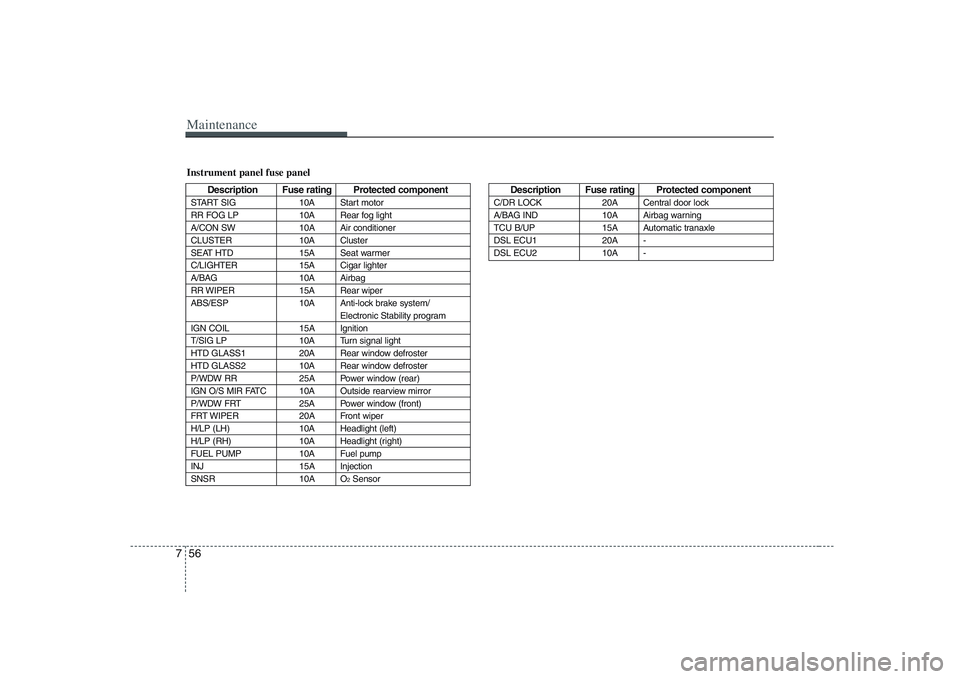
Instrument panel fuse panel
Description Fuse rating Protected component
START SIG 10A Start motor
RR FOG LP 10A Rear fog light
A/CON SW 10A Air conditioner
CLUSTER 10A Cluster
SEAT HTD 15A Seat warmer
C/LIGHTER 15A Cigar lighter
A/BAG 10A Airbag
RR WIPER 15A Rear wiper
ABS/ESP 10A Anti-lock brake system/ Electronic Stability program
IGN COIL 15A Ignition
T/SIG LP 10A Turn signal light
HTD GLASS1 20A Rear window defroster
HTD GLASS2 10A Rear window defroster
P/WDW RR 25A Power window (rear)
IGN O/S MIR FATC 10A Outside rearview mirror
P/WDW FRT 25A Power window (front)
FRT WIPER 20A Front wiper
H/LP (LH) 10A Headlight (left)
H/LP (RH) 10A Headlight (right)
FUEL PUMP 10A Fuel pump
INJ 15A Injection
SNSR 10A O 2SensorDescription Fuse rating Protected component
C/DR LOCK 20A Central door lock
A/BAG IND 10A Airbag warning
TCU B/UP 15A Automatic tranaxle
DSL ECU1 20A -
DSL ECU2 10A -
Page 309 of 335
Maintenance
58
7
LIGHT BULBS
G220000AUN
Use only the bulbs of the specified wattage.
✽✽ NOTICE
After heavy rain or washing, headlight
and taillight lenses could appear frosty.This condition is caused by the tempera-
ture difference between the lamp inside
and outside. This is similar to the con-
densation on your windows inside yourvehicle during rain and doesn’t indicate a
problem with your vehicle. If the water
leaks into the lamp bulb circuitry, havethe vehicle checked by an authorized
KIA dealer.
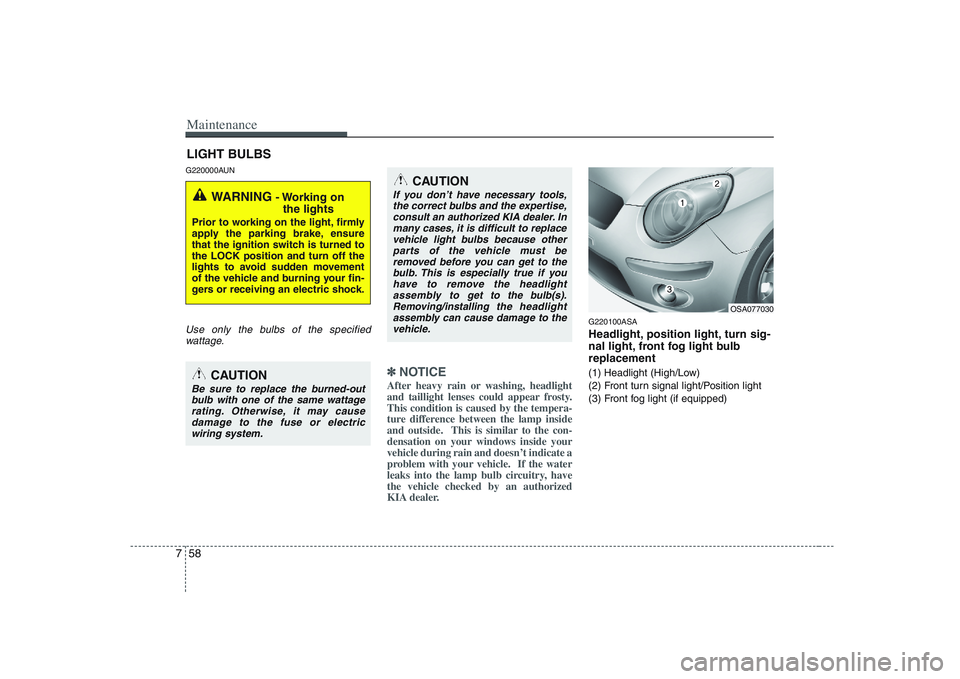
G220100ASA
Headlight, position light, turn sig-
nal light, front fog light bulbreplacement
(1) Headlight (High/Low)
(2) Front turn signal light/Position light
(3) Front fog light (if equipped)
WARNING - Working on
the lights
Prior to working on the light, firmly
apply the parking brake, ensure
that the ignition switch is turned tothe LOCK position and turn off the
lights to avoid sudden movement
of the vehicle and burning your fin-
gers or receiving an electric shock.
CAUTION
Be sure to replace the burned-out bulb with one of the same wattage rating. Otherwise, it may cause
damage to the fuse or electric wiring system.
CAUTION
If you don’t have necessary tools, the correct bulbs and the expertise,consult an authorized KIA dealer. In
many cases, it is difficult to replace vehicle light bulbs because otherparts of the vehicle must be
removed before you can get to the bulb. This is especially true if you
have to remove the headlight assembly to
get to the bulb(s).
Removing/installingthe headlight
assembly can cause damage to the
vehicle.OSA077030
Page 312 of 335

761
Maintenance
G220300ASA
Rear combination light bulb replacement (1) Stop and tail light
(2) Rear turn signal light
(3) Back-up light / Rear fog light (if equipped)
1. Open the tailgate.
2. Remove the rear combination lightassembly by turning the screw coun-
terclockwise and removing the assem-
bly.
3. Remove the socket from the assembly by turning the socket counterclockwise
until the tabs on the socket align with
the slots on the assembly. 4. Remove the bulb from the socket by
pressing it in and rotating it until the
tabs on the bulb align with the slots in
the socket. Pull the bulb out of the
socket.
5. Insert a new bulb by inserting it into the socket and rotating it until it locks
into place.
OSA077033
OSA077034
OSA077035
OSA077038
OSA077032
Page 328 of 335
Specifications
2
9
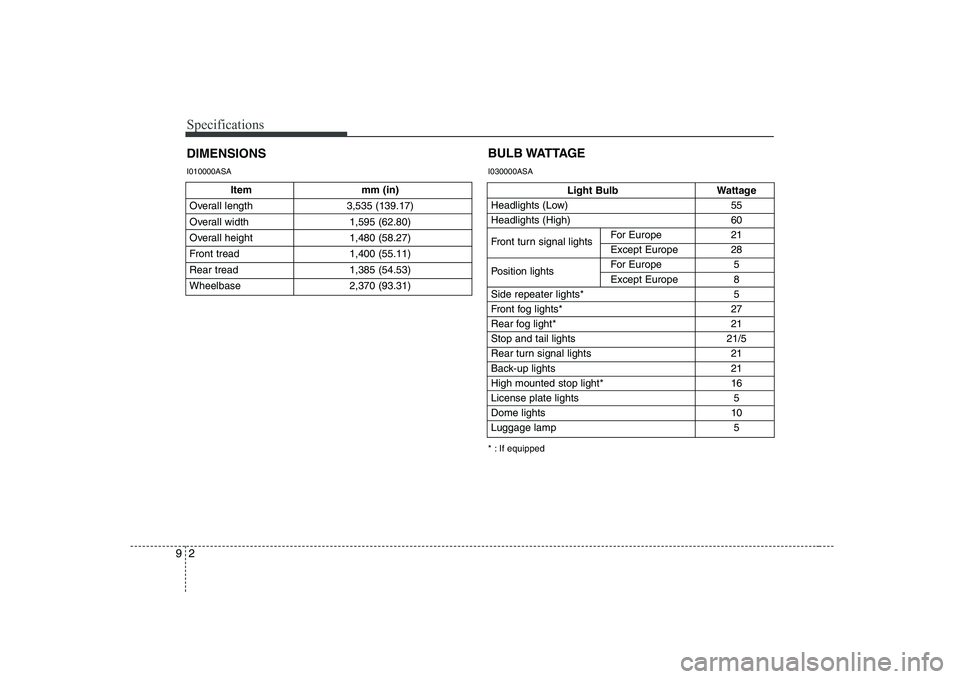
Item mm (in)
Overall length 3,535 (139.17)
Overall width 1,595 (62.80)
Overall height 1,480 (58.27)
Front tread 1,400 (55.11)
Rear tread 1,385 (54.53)
Wheelbase 2,370 (93.31)
DIMENSIONS
Light Bulb Wattage
Headlights (Low) 55
Headlights (High) 60
Front turn signal lights For Europe 21
Except Europe 28
Position lights For Europe 5
Except Europe 8
Side repeater lights* 5
Front fog lights* 27
Rear fog light* 21
Stop and tail lights 21/5
Rear turn signal lights 21
Back-up lights 21
High mounted stop light* 16
License plate lights 5Dome lights 10
Luggage lamp 5
BULB WATTAGE
* : If equipped
I010000ASA
I030000ASA