Driving KIA PICANTO 2010 Manual Online
[x] Cancel search | Manufacturer: KIA, Model Year: 2010, Model line: PICANTO, Model: KIA PICANTO 2010Pages: 336, PDF Size: 33.02 MB
Page 241 of 336
What to do in an emergency
16
6
F120200AUN What to do when a tire is punc- tured
A punctured tire is repaired in two
stages. In the 1st stage, sealing com-pound and air is inflated into the tire
and the vehicle driven a short dis-tance (3 km / 2 miles) to spread the
compound inside the tire. In the 2nd
stage, the inflation pressure is
checked and, if necessary, more air
is added into the tire. It is then possi-
ble to drive cautiously with the tire up
to 200 km (120 miles) at a maximumspeed of 80 km/h (50 mph) in order
to reach a vehicle or tire dealer to
have the tire replaced. If so inform
other drivers that the TireMobilityKit
has been used and provide advice
and warnings about changed driving
behaviour. F120201ASA
1st Stage: Pump sealing compound
and air into the tire
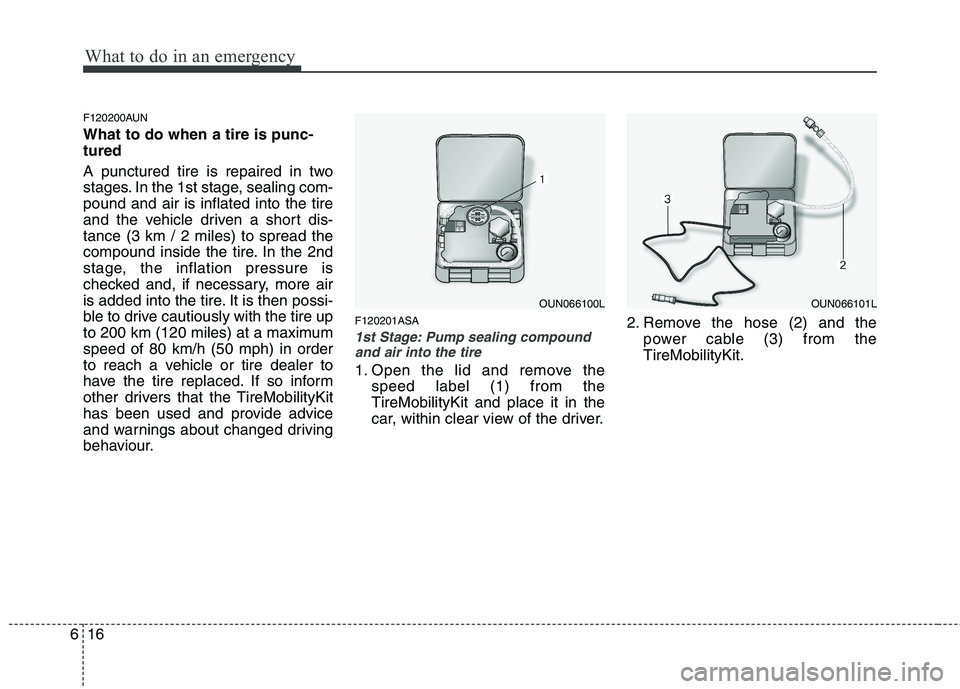
1. Open the lid and remove the
speed label (1) from the TireMobilityKit and place it in the
car, within clear view of the driver. 2. Remove the hose (2) and the
power cable (3) from theTireMobilityKit.
OUN066100LOUN066101L
Page 244 of 336
619
What to do in an emergency
12. If a tire inflation pressure of 1.8bar (26 psi) is reached, turn the
On/Off switch to the "O"-position,
quickly unscrew the hose from
the tire. Unplug the cable from
the cigarette lighter. Do not
unscrew the bottle. Stow theTireMobilityKit, the bottle cap and
the bottle holder cap safely in the
vehicle in an easily accessible
place, as it will be needed again
to check tire pressure.
13. Drive immediately and cautiously for about 3 km (2 miles) so thatthe sealing compound can seal
the puncture. Do not exceed 80
km/h (50 mph). While driving, if
you experience any unusual
vibration, ride disturbance or
noise, reduce your speed and
drive with caution until you can
safely pull off to the side of the
road. Call for road side service or
towing. F120202ASA
2nd Stage: Check tire pressure
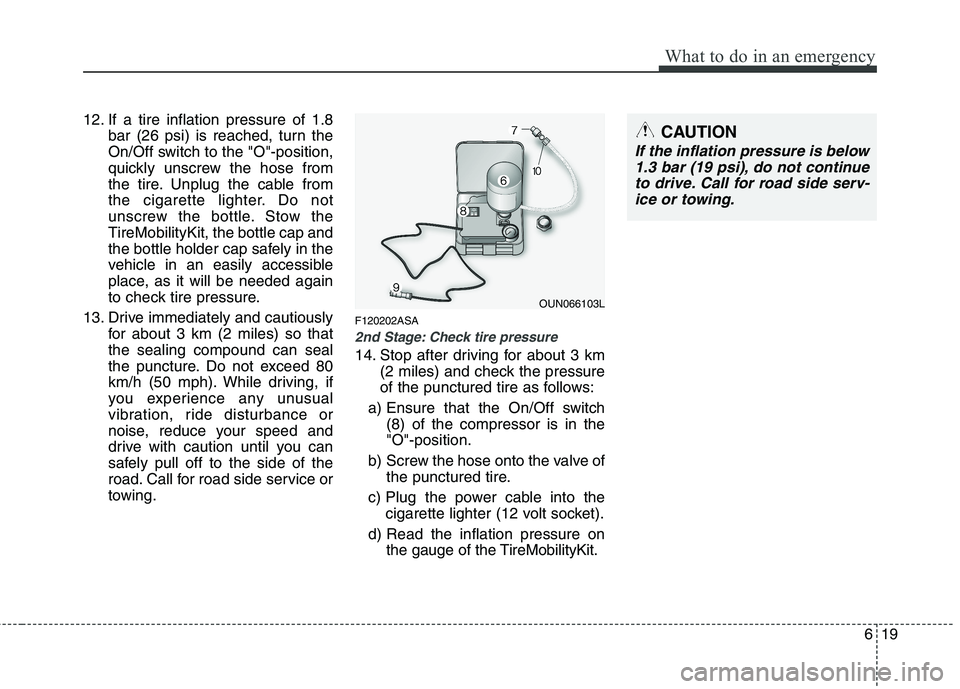
14. Stop after driving for about 3 km
(2 miles) and check the pressure
of the punctured tire as follows:
a) Ensure that the On/Off switch (8) of the compressor is in the"O"-position.
b) Screw the hose onto the valve of the punctured tire.
c) Plug the power cable into the cigarette lighter (12 volt socket).
d) Read the inflation pressure on the gauge of the TireMobilityKit.
CAUTION
If the inflation pressure is below
1.3 bar (19 psi), do not continueto drive. Call for road side serv-ice or towing.
OUN066103L
Page 245 of 336
What to do in an emergency
20
6
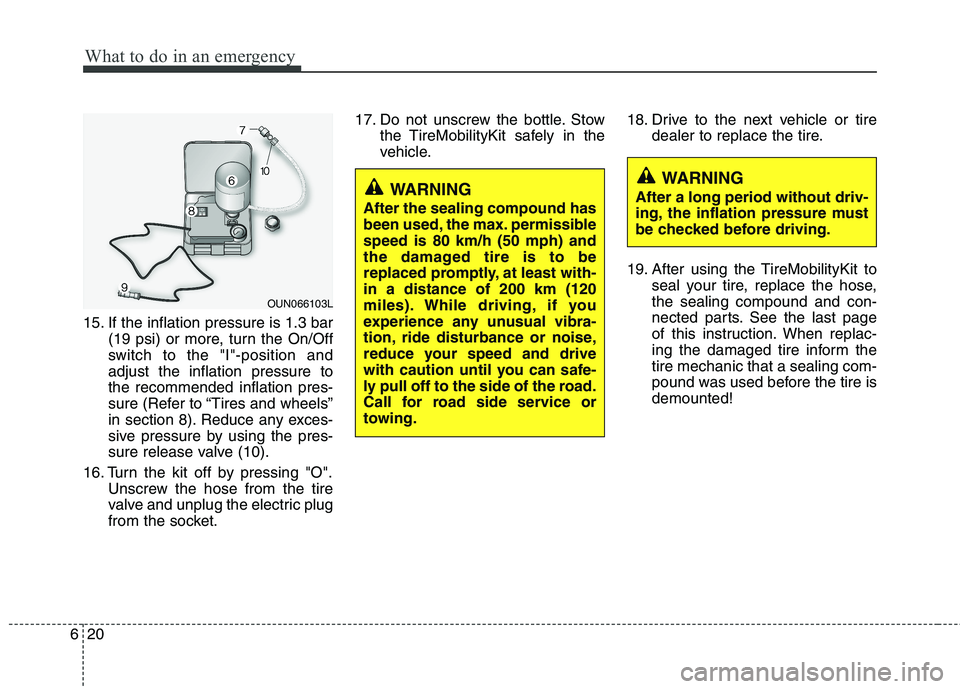
15. If the inflation pressure is 1.3 bar
(19 psi) or more, turn the On/Off
switch to the "I"-position andadjust the inflation pressure tothe recommended inflation pres-
sure (Refer to “Tires and wheels”
in section 8). Reduce any exces-
sive pressure by using the pres-
sure release valve (10).
16. Turn the kit off by pressing "O". Unscrew the hose from the tire
valve and unplug the electric plug
from the socket. 17. Do not unscrew the bottle. Stow
the TireMobilityKit safely in the
vehicle. 18. Drive to the next vehicle or tire
dealer to replace the tire.
19. After using the TireMobilityKit to seal your tire, replace the hose,the sealing compound and con-
nected parts. See the last page
of this instruction. When replac-
ing the damaged tire inform thetire mechanic that a sealing com-
pound was used before the tire isdemounted!
WARNING
After the sealing compound has
been used, the max. permissiblespeed is 80 km/h (50 mph) and
the damaged tire is to be
replaced promptly, at least with-in a distance of 200 km (120
miles). While driving, if you
experience any unusual vibra-
tion, ride disturbance or noise,
reduce your speed and drive
with caution until you can safe-
ly pull off to the side of the road.
Call for road side service or
towing.WARNING
After a long period without driv-
ing, the inflation pressure must
be checked before driving.
OUN066103L
Page 247 of 336
What to do in an emergency
22
6
F120300ASA
Notes on the safe use of the TireMobilityKit
Park your car at the side of the
road so that you can work with the
TireMobilityKit away from moving
traffic. Place your warning triangle
in a prominent place to make pass-
ing vehicles aware of your location.
To be sure your vehicle won't move, even when you're on a fairly
level ground, always set your park-
ing brake.
Only use the TireMobilityKit for sealing/inflation passenger car
tires. Do not use on motorcycles,
bicycles or any other type of tires.
Do not remove any foreign objects - such as nails or screws - that
have penetrated the tire. Before using the TireMobilityKit
read the precautionary advice
printed on the sealant bottle!
Provided the car is outdoors, leave the engine running. Otherwise
operating the compressor may
eventually drain the car battery.
Never leave the TireMobilityKit unattended while it is being used.
Do not leave the compressor run- ning for more than 10 min. at a time
or it may overheat.
Do not use the TireMobilityKit if the ambient temperature is below
- 30°C (-2 2°F).
Do not use the sealing compound after its expiration date which can
be found on the label of the bottle.
Keep away from children.
CAUTION
Do not use the TireMobilityKit if the tire is severely damaged bydriving with insufficient airpressure (e.g. if the tire has bulges, cuts, cracks or similardefects). Only seal puncturedareas located within the treadregion of the tire. Damage to thesidewall should not be sealed for safety reasons.
Page 252 of 336
627
What to do in an emergency
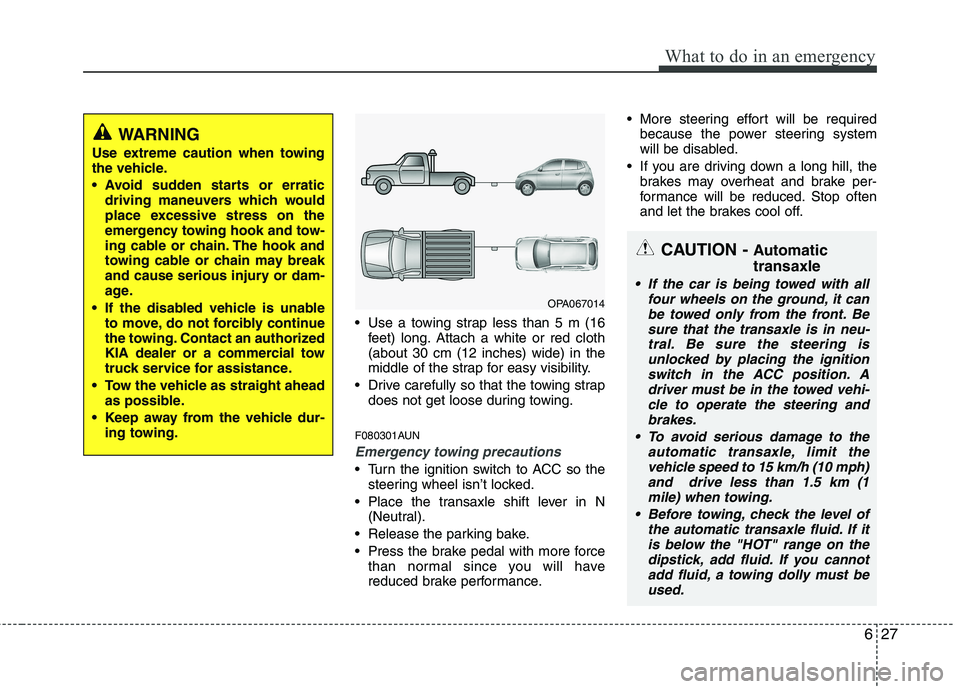
Use a towing strap less than 5 m (16feet) long. Attach a white or red cloth (about 30 cm (12 inches) wide) in the
middle of the strap for easy visibility.
Drive carefully so that the towing strap does not get loose during towing.
F080301AUN
Emergency towing precautions
Turn the ignition switch to ACC so the steering wheel isn’t locked.
Place the transaxle shift lever in N (Neutral).
Release the parking bake.
Press the brake pedal with more force than normal since you will have
reduced brake performance. More steering effort will be required
because the power steering system
will be disabled.
If you are driving down a long hill, the brakes may overheat and brake per-
formance will be reduced. Stop often
and let the brakes cool off.
WARNING
Use extreme caution when towing
the vehicle.
driving maneuvers which would
place excessive stress on the
emergency towing hook and tow-
ing cable or chain. The hook and
towing cable or chain may break
and cause serious injury or dam-
age.
If the disabled vehicle is unable to move, do not forcibly continue
the towing. Contact an authorized
KIA dealer or a commercial tow
truck service for assistance.
Tow the vehicle as straight ahead as possible.
Keep away from the vehicle dur- ing towing.
OPA067014
CAUTION - Automatic transaxle
If the car is being towed with all
four wheels on the ground, it canbe towed only from the front. Be
sure that the transaxle is in neu-tral. Be sure the steering isunlocked by placing the ignition
switch in the ACC position. Adriver must be in the towed vehi-
cle to operate the steering andbrakes.
To avoid serious damage to the automatic transaxle, limit thevehicle speed to 15 km/h (10 mph)
and drive less than 1.5 km (1mile) when towing.
Before towing, check the level of the automatic transaxle fluid. If itis below the "HOT" range on the
dipstick, add fluid. If you cannotadd fluid, a towing dolly must be
used.
Page 261 of 336
Maintenance
8
7
SCHEDULED MAINTENANCE SERVICE
G040000ASA
Follow Normal Maintenance Schedule if
the vehicle is usually operated where
none of the following conditions apply. If
any of the following conditions apply, fol-
low Maintenance Under Severe Usage
Conditions.
Repeated short distance driving.
Driving in dusty conditions or sandy areas.
Extensive use of brakes.
Driving in areas where salt or other corrosive materials are being used.
Driving on rough or muddy roads.
Driving in mountainous areas.
Extended periods of idling or low speed operation.
Driving for a prolonged period in cold temperatures and/or extremely humid
climates.
More than 50% driving in heavy city traffic during hot weather above 32°C(90°F).
If your vehicle is operated under the
above conditions, you should inspect,replace or refill more frequently than thefollowing Normal Maintenance Schedule.
After the periods or distance shown inthe chart, continue to follow the pre-scribed maintenance intervals.
Page 262 of 336

79
Maintenance
G040100ASA
I : Inspect and if necessary, adjust, correct, clean or replace. R : Replace or change. *1
: Adjust alternator and power steering (and water pump drive belt) and air conditioner drive belt (if equipped).
Inspect and if necessary correct or replace.
* 2
: Check the engine oil level and leak every 500 km (350 miles) or before starting a long trip.
* 3
: Driving in summer season temperature over 40 °C (104 °F - SAUDI, UAE, OMAN, KUWAIT, BAHRAIN, QATAR, IRAN,
YEMEN ETC) or driving over 170 km/h (106 mile/h) must conform the severe driving condition.
* 4
: For your convenience, it can be replaced prior to it's interval when you do maintenance of other items.
Number of months or driving distance, whichever comes first
Months 12 24 36 48 60 72 84 96
Miles×1,000 10 20 30 40 50 60 70 80
Km×1,000 15 30 45 60 75 90 105 120
For Europe II
Drive belts * 1
Except Europe I I I I
Engine oil and engine For Middle East
oil filter * 2
Except Middle East R R R R R R R R
Engine timing belt
Tensioner, idler and damper pulley Air cleaner filter For China, India, Middle East R R R R R R R R Except
China, India, Middle East I I R I I R I I
Spark plugs For Europe R R R RExcept Europe
Inspect when replacing the drive belt or timing belt
Replace every 10,000 km (6,250 miles) or 12 months *
3
Replace every 135,000 km (90,000 miles)
NORMAL MAINTENANCE SCHEDULE - GASOLINE ENGINE
MAINTENANCE INTERVALS
MAINTENANCE ITEM
Replace every 40,000 km (25,000 miles) * 4
At first, inspect 90,000 km (60,000 miles) or 72 months
after that, inspect every 30,000 km (20,000 miles) or 24 months
Page 263 of 336
Maintenance
10
7
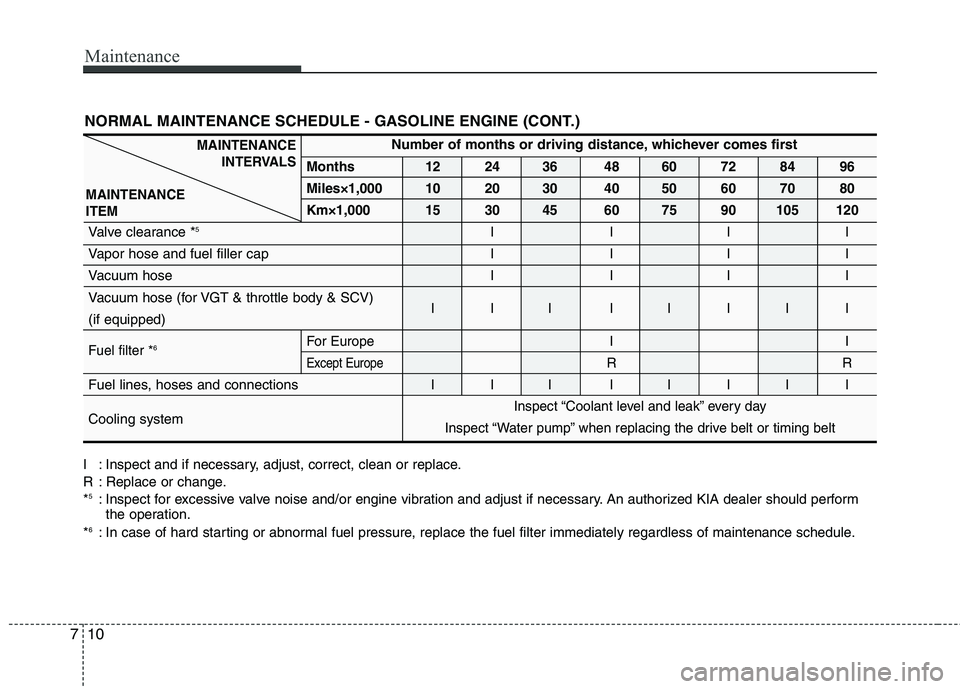
NORMAL MAINTENANCE SCHEDULE - GASOLINE ENGINE (CONT.)
Number of months or driving distance, whichever comes first
Months 12 24 36 48 60 72 84 96
Miles×1,000 10 20 30 40 50 60 70 80
Km×1,000 15 30 45 60 75 90 105 120
Valve clearance * 5
IIII
Vapor hose and fuel filler cap I I I I
Vacuum hose I I I I
Vacuum hose (for VGT & throttle body & SCV) III IIIII
(if equipped)
Fuel filter * 6For Europe
II
Except EuropeRR
Fuel lines, hoses and connections I I I I I I I I Cooling system
Inspect “Coolant level and leak” every day
Inspect “Water pump” when replacing the drive belt or timing belt
I : Inspect and if necessary, adjust, correct, clean or replace.
R : Replace or change.* 5
: Inspect for excessive valve noise and/or engine vibration and adjust if necessary. An authorized KIA dealer should perform
the operation.
* 6
: In case of hard starting or abnormal fuel pressure, replace the fuel filter immediately regardless of maintenance schedule.
MAINTENANCE
INTERVALS
MAINTENANCE ITEM
Page 264 of 336
711
Maintenance
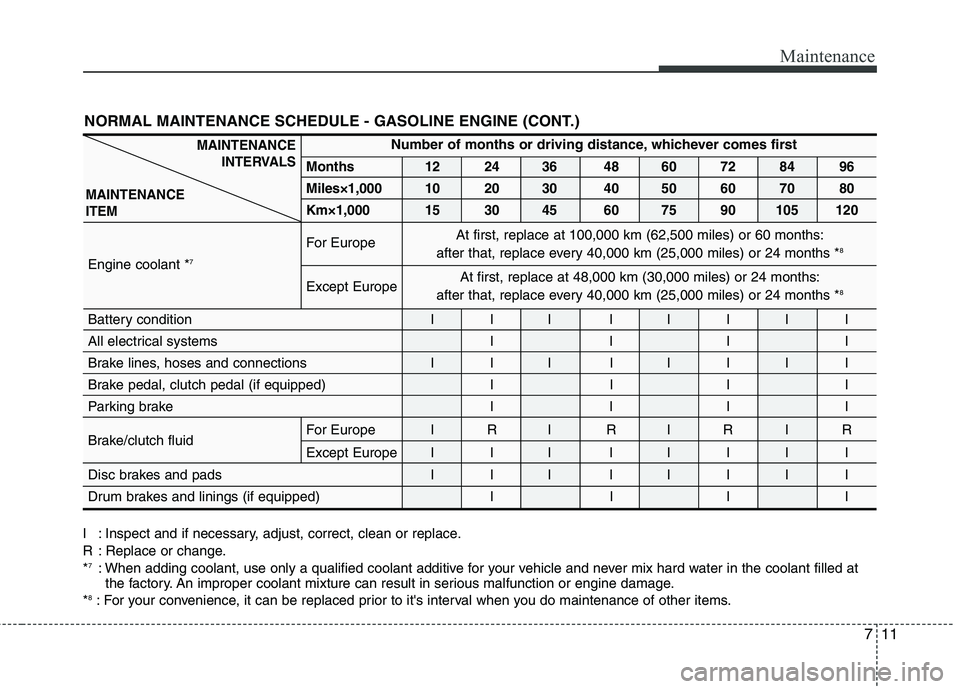
NORMAL MAINTENANCE SCHEDULE - GASOLINE ENGINE (CONT.)
I : Inspect and if necessary, adjust, correct, clean or replace.
R : Replace or change.*7
: When adding coolant, use only a qualified coolant additive for your vehicle and never mix hard water in the coolant filled at
the factory. An improper coolant mixture can result in serious malfunction or engine damage.
* 8
: For your convenience, it can be replaced prior to it's interval when you do maintenance of other items.
Number of months or driving distance, whichever comes first
Months 12 24 36 48 60 72 84 96
Miles×1,000 10 20 30 40 50 60 70 80
Km×1,000 15 30 45 60 75 90 105 120
For Europe
Engine coolant * 7
Except Europe
Battery condition I I I I I I I I
All electrical systems I I I I
Brake lines, hoses and connections I I I I I I I I
Brake pedal, clutch pedal (if equipped) I I I I
Parking brake I I I I
Brake/clutch fluid For Europe I R I R I R I R
Except Europe I I I I I I I I
Disc brakes and pads I I I I I I I I
Drum brakes and linings (if equipped) I I I I
At first, replace at 48,000 km (30,000 miles) or 24 months:
after that, replace every 40,000 km (25,000 miles) or 24 months * 8
At first, replace at 100,000 km (62,500 miles) or 60 months:
after that, replace every 40,000 km (25,000 miles) or 24 months * 8
MAINTENANCE
INTERVALS
MAINTENANCE ITEM
Page 265 of 336
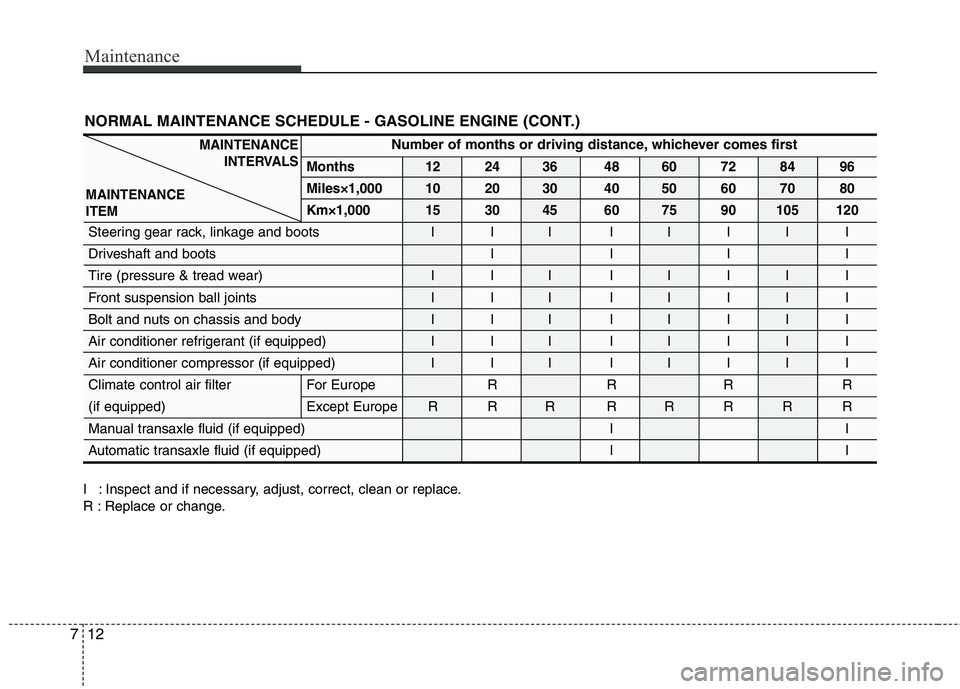
Maintenance
12
7
NORMAL MAINTENANCE SCHEDULE - GASOLINE ENGINE (CONT.)
I : Inspect and if necessary, adjust, correct, clean or replace.
R : Replace or change.
Number of months or driving distance, whichever comes first
Months 12 24 36 48 60 72 84 96
Miles×1,000 10 20 30 40 50 60 70 80
Km×1,000 15 30 45 60 75 90 105 120
Steering gear rack, linkage and boots I I I I I I I I
Driveshaft and boots I I I I
Tire (pressure & tread wear) I I I I I I I I
Front suspension ball joints I I I I I I I I
Bolt and nuts on chassis and body I I I I I I I I
Air conditioner refrigerant (if equipped) I I I I I I I I
Air conditioner compressor (if equipped) I I I I I I I I
Climate control air filter For Europe R R R R
(if equipped) Except Europe R R R R R R R R
Manual transaxle fluid (if equipped) II
Automatic transaxle fluid (if equipped) II
MAINTENANCE
INTERVALS
MAINTENANCE ITEM