fuse KIA PICANTO 2012 Owner's Guide
[x] Cancel search | Manufacturer: KIA, Model Year: 2012, Model line: PICANTO, Model: KIA PICANTO 2012Pages: 840, PDF Size: 41.16 MB
Page 603 of 840
Features of your vehicle
104
4
Digital clock
Whenever the battery terminals or relat-
ed fuses are disconnected, you must
reset the time.
When the ignition switch is in the ACC or
ON position, the clock buttons operate as
follows:
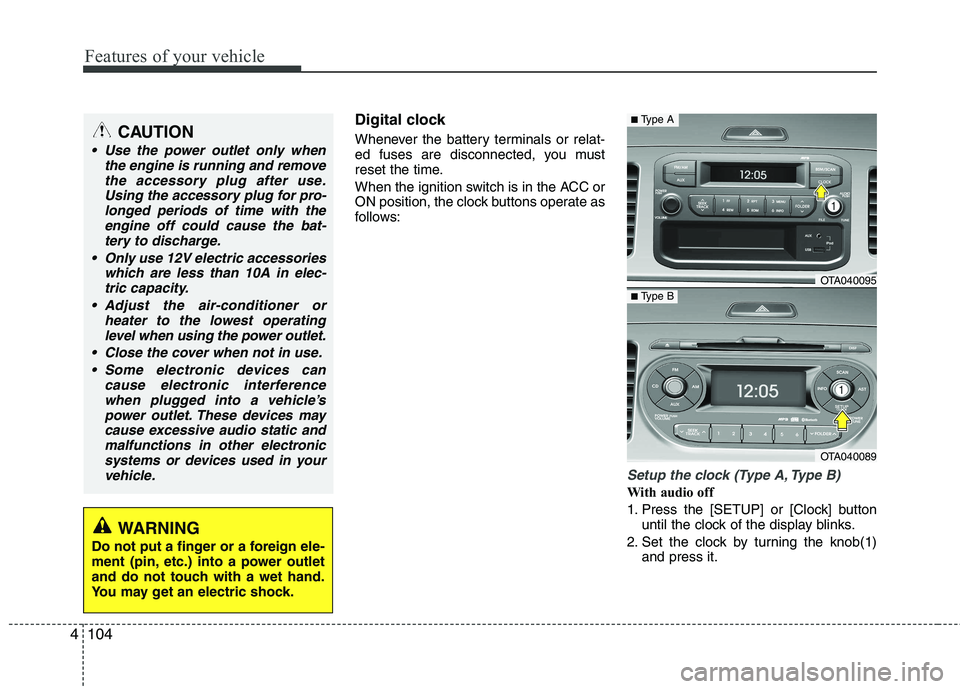
Setup the clock (Type A, Type B)
With audio off
1. Press the [SETUP] or [Clock] button
until the clock of the display blinks.
2. Set the clock by turning the knob(1) and press it.
CAUTION
Use the power outlet only when
the engine is running and remove
the accessory plug after use.Using the accessory plug for pro-longed periods of time with the engine off could cause the bat-
tery to discharge.
Only use 12V electric accessories which are less than 10A in elec-tric capacity.
Adjust the air-conditioner or heater to the lowest operatinglevel when using the power outlet.
Close the cover when not in use. Some electronic devices can cause electronic interference
when plugged into a vehicle’spower outlet. These devices maycause excessive audio static andmalfunctions in other electronic
systems or devices used in yourvehicle.
WARNING
Do not put a finger or a foreign ele-
ment (pin, etc.) into a power outlet
and do not touch with a wet hand.
You may get an electric shock.
OTA040095
OTA040089
■ Type A
■Type B
Page 678 of 840
511
Driving your vehicle
✽✽
NOTICE
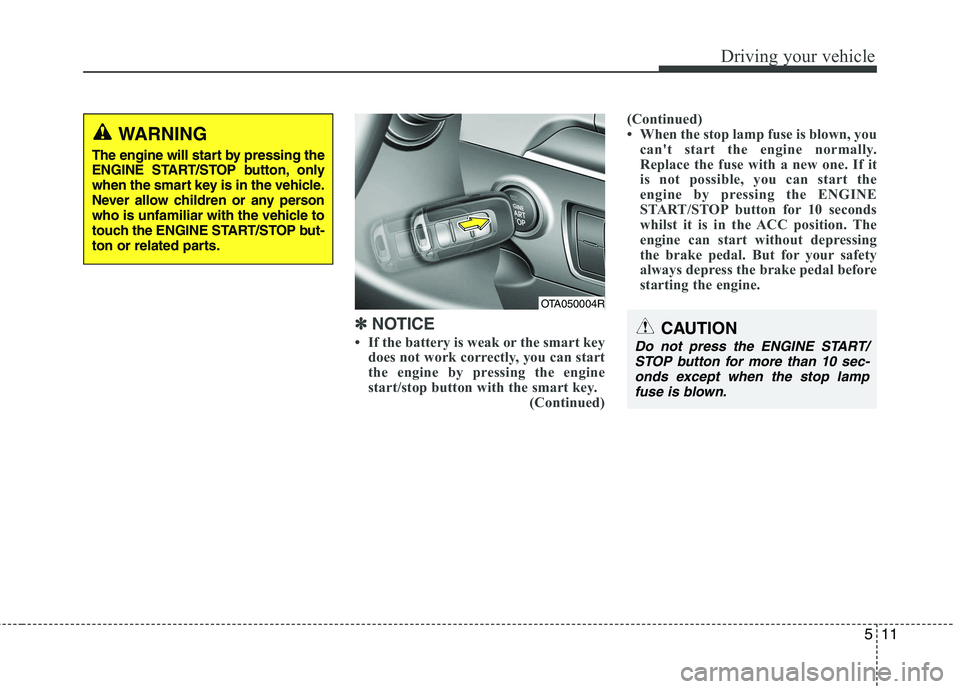
If the battery is weak or the smart key does not work correctly, you can start
the engine by pressing the engine
start/stop button with the smart key. (Continued)(Continued)
When the stop lamp fuse is blown, you
can't start the engine normally.
Replace the fuse with a new one. If it
is not possible, you can start the
engine by pressing the ENGINE
START/STOP button for 10 seconds
whilst it is in the ACC position. The
engine can start without depressing
the brake pedal. But for your safety
always depress the brake pedal before
starting the engine.CAUTION
Do not press the ENGINE START/
STOP button for more than 10 sec-
onds except when the stop lamp fuse is blown.
OTA050004R
WARNING
The engine will start by pressing the
ENGINE START/STOP button, only
when the smart key is in the vehicle.
Never allow children or any person
who is unfamiliar with the vehicle to
touch the ENGINE START/STOP but-
ton or related parts.
Page 748 of 840
7
Engine compartment / 7-2
Maintenance services / 7-3
Owner maintenance / 7-4
Scheduled maintenance service / 7-6
Explanation of scheduled maintenance items / 7-18
Engine oil / 7-21
Engine coolant / 7-23
Brake fluid / 7-26
Automatic transaxle fluid / 7-27
Washer fluid / 7-29
Parking brake / 7-29
Air cleaner / 7-30
Climate control air filter / 7-32
Wiper blades / 7-34
Battery / 7-37
Tyres and wheels / 7-40
Fuses / 7-50
Light bulbs / 7-61
Appearance care / 7-69
Emission control system / 7-75
Maintenance
Page 749 of 840
Maintenance
2
7
ENGINE COMPARTMENT
OTA010003R/OTA010004R
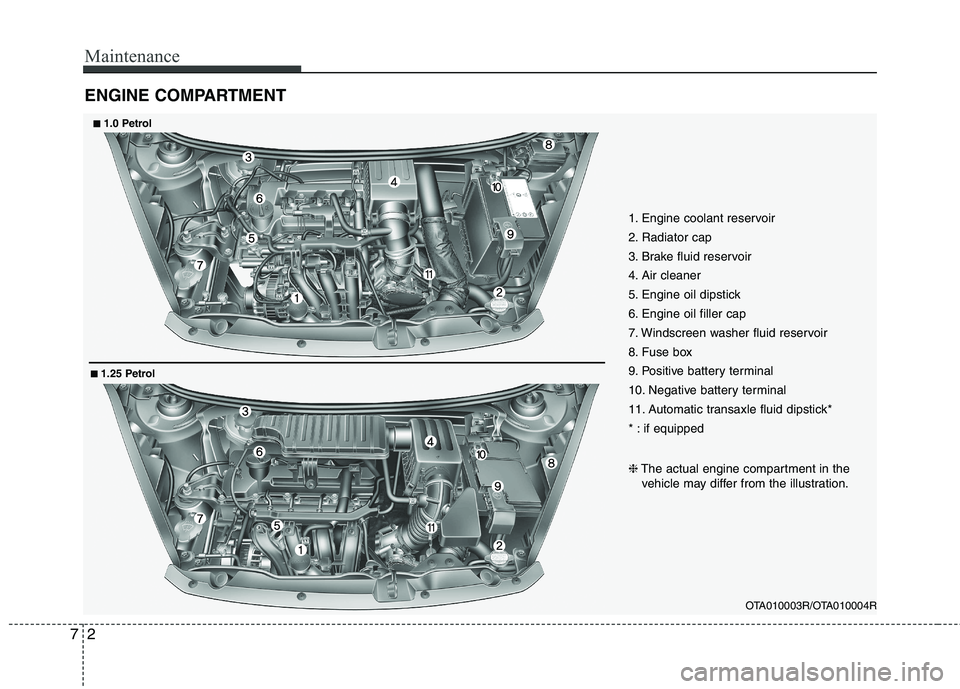
1. Engine coolant reservoir
2. Radiator cap
3. Brake fluid reservoir
4. Air cleaner
5. Engine oil dipstick
6. Engine oil filler cap
7. Windscreen washer fluid reservoir
8. Fuse box
9. Positive battery terminal
10. Negative battery terminal
11. Automatic transaxle fluid dipstick*
* : if equipped
■
■
1.0 Petrol
❈The actual engine compartment in the
vehicle may differ from the illustration.
■■ 1.25 Petrol
Page 797 of 840
Maintenance
50
7
FUSES
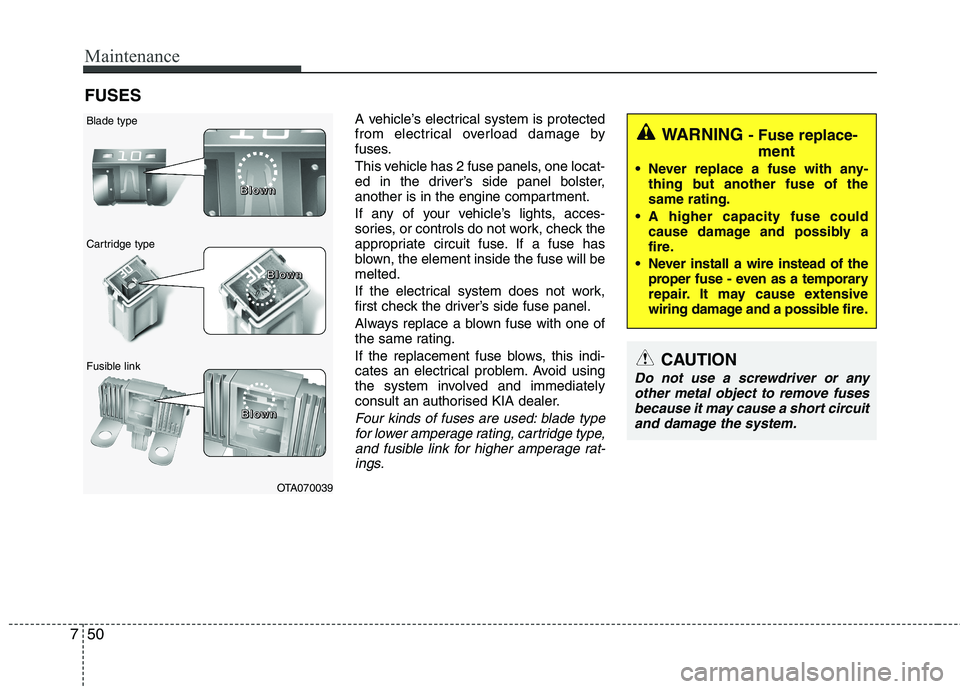
A vehicle’s electrical system is protected
from electrical overload damage by
fuses.
This vehicle has 2 fuse panels, one locat-
ed in the driver’s side panel bolster,
another is in the engine compartment.
If any of your vehicle’s lights, acces-
sories, or controls do not work, check the
appropriate circuit fuse. If a fuse has
blown, the element inside the fuse will bemelted.
If the electrical system does not work,
first check the driver’s side fuse panel.
Always replace a blown fuse with one of
the same rating.
If the replacement fuse blows, this indi-
cates an electrical problem. Avoid using
the system involved and immediately
consult an authorised KIA dealer.
Four kinds of fuses are used: blade typefor lower amperage rating, cartridge type, and fusible link for higher amperage rat-ings.
WARNING - Fuse replace-
ment
Never replace a fuse with any- thing but another fuse of the same rating.
A higher capacity fuse could cause damage and possibly a
fire.
Never install a wire instead of the proper fuse - even as a temporary
repair. It may cause extensive
wiring damage and a possible fire.
CAUTION
Do not use a screwdriver or any
other metal object to remove fuses because it may cause a short circuitand damage the system.
OTA070039
Blade type
Cartridge type
Fusible link B
BBBlllloooowwwwnnnn
BBBBlllloooowwwwnnnn
BBBBlllloooowwwwnnnn
Page 798 of 840
751
Maintenance
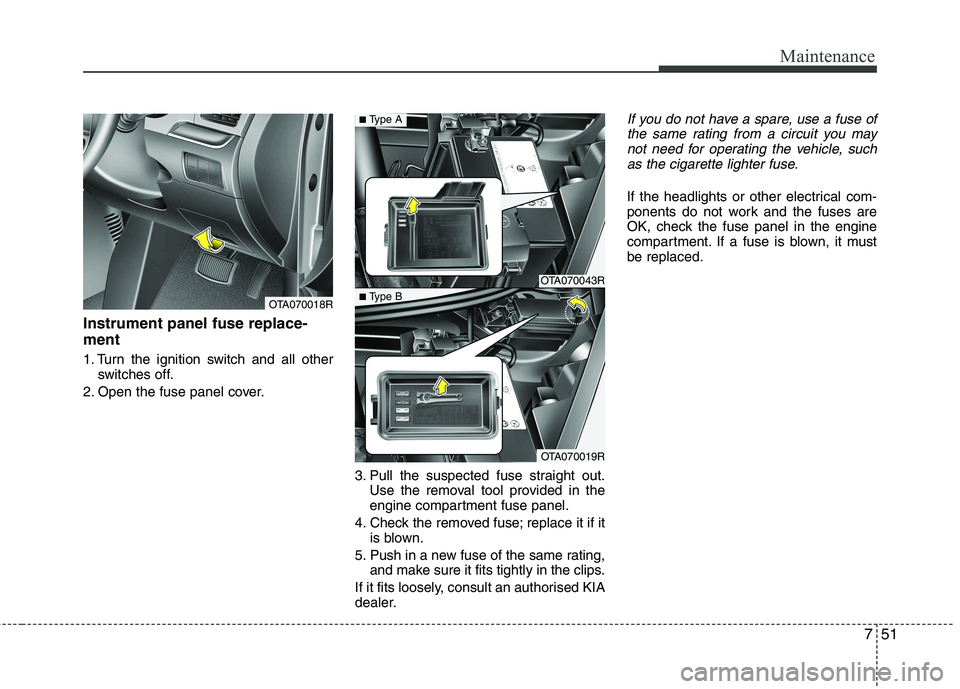
Instrument panel fuse replace- ment
1. Turn the ignition switch and all otherswitches off.
2. Open the fuse panel cover.
3. Pull the suspected fuse straight out.Use the removal tool provided in the
engine compartment fuse panel.
4. Check the removed fuse; replace it if it is blown.
5. Push in a new fuse of the same rating, and make sure it fits tightly in the clips.
If it fits loosely, consult an authorised KIA
dealer.
If you do not have a spare, use a fuse of the same rating from a circuit you may not need for operating the vehicle, suchas the cigarette lighter fuse.
If the headlights or other electrical com-
ponents do not work and the fuses are
OK, check the fuse panel in the engine
compartment. If a fuse is blown, it mustbe replaced.
OTA070018R
OTA070043R
OTA070019R
■ Type A
■ Type B
Page 799 of 840
Maintenance
52
7
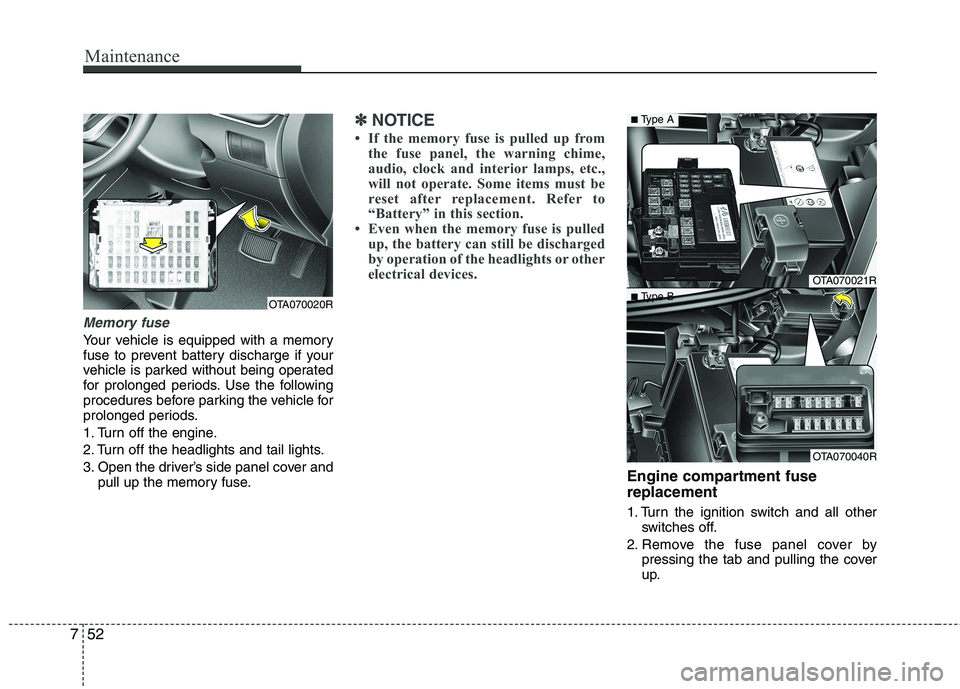
Memory fuse
Your vehicle is equipped with a memory
fuse to prevent battery discharge if your
vehicle is parked without being operated
for prolonged periods. Use the following
procedures before parking the vehicle for
prolonged periods.
1. Turn off the engine.
2. Turn off the headlights and tail lights.
3. Open the driver’s side panel cover and
pull up the memory fuse.
✽✽ NOTICE
If the memory fuse is pulled up from the fuse panel, the warning chime,
audio, clock and interior lamps, etc.,
will not operate. Some items must be
reset after replacement. Refer to
“Battery” in this section.
Even when the memory fuse is pulled
up, the battery can still be discharged
by operation of the headlights or other
electrical devices.
Engine compartment fuse replacement
1. Turn the ignition switch and all other switches off.
2. Remove the fuse panel cover by pressing the tab and pulling the cover
up.
OTA070020R
OTA070021R
OTA070040R
■Type A
■ Type B
Page 800 of 840
753
Maintenance
3. Check the removed fuse; replace it if itis blown. To remove or insert the fuse, use the fuse puller in the engine com-
partment fuse panel.
4. Push in a new fuse of the same rating, and make sure it fits tightly in the clips.
If it fits loosely, consult an authorised
KIA dealer.
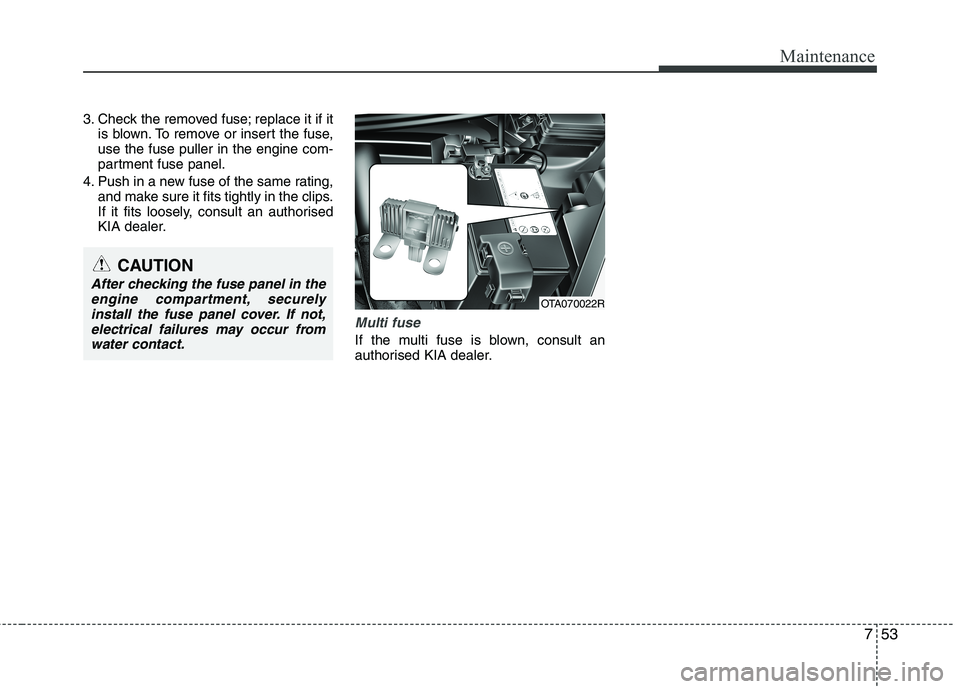
Multi fuse
If the multi fuse is blown, consult an
authorised KIA dealer.
OTA070022R
CAUTION
After checking the fuse panel in the
engine compartment, securelyinstall the fuse panel cover. If not,electrical failures may occur from
water contact.
Page 801 of 840
Maintenance
54
7
✽✽
NOTICE
Not all fuse panel descriptions in this
manual may be applicable to your vehi-
cle. It is accurate at the time of printing.
When you inspect the fuse panel in your
vehicle, refer to the fuse panel label.
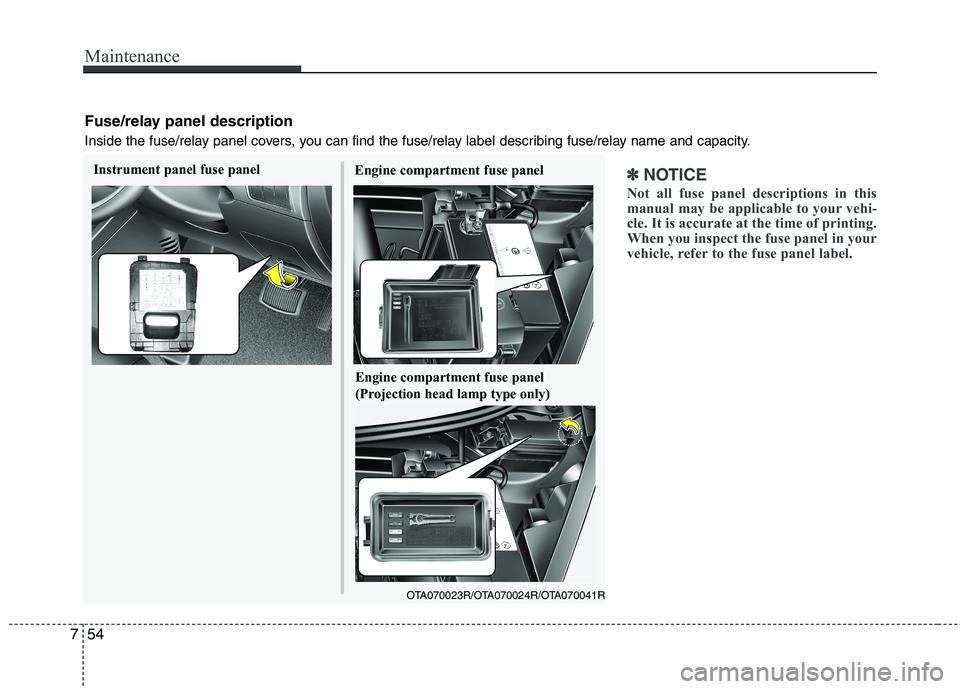
Fuse/relay panel description
Inside the fuse/relay panel covers, you can find the fuse/relay label describing fuse/relay name and capacity.
Engine compartment fuse panel
OTA070023R/OTA070024R/OTA070041R
Instrument panel fuse panel
Engine compartment fuse panel
(Projection head lamp type only)
Page 802 of 840
755
Maintenance
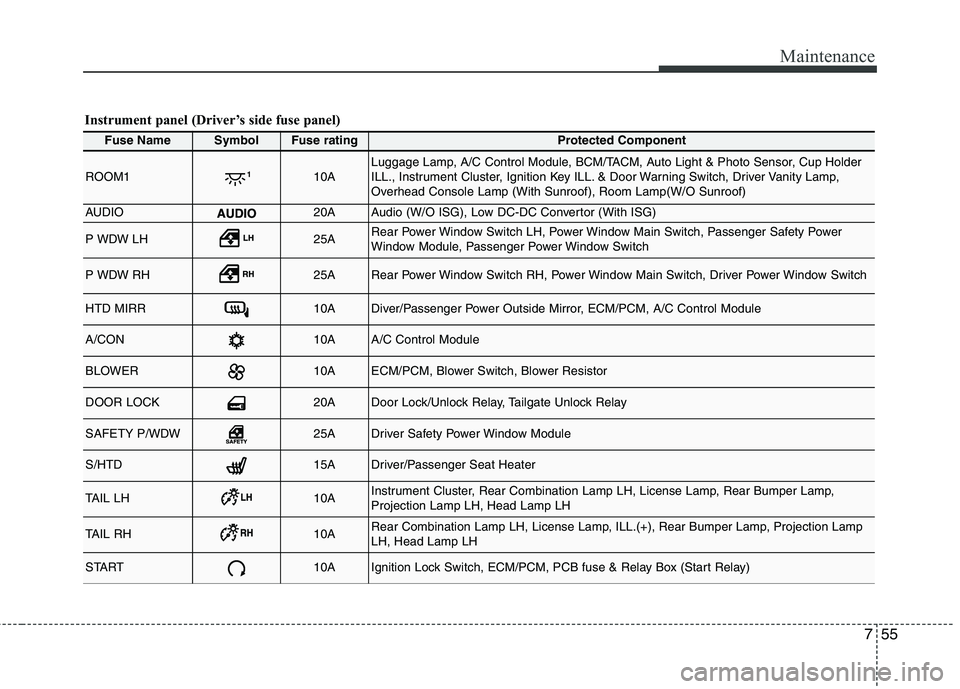
Fuse NameSymbolFuse ratingProtected Component
ROOM110ALuggage Lamp, A/C Control Module, BCM/TACM, Auto Light & Photo Sensor, Cup Holder
ILL., Instrument Cluster, Ignition Key ILL. & Door Warning Switch, Driver Vanity Lamp,
Overhead Console Lamp (With Sunroof), Room Lamp(W/O Sunroof)
AUDIO20AAudio (W/O ISG), Low DC-DC Convertor (With ISG)
P WDW LH25ARear Power Window Switch LH, Power Window Main Switch, Passenger Safety Power
Window Module, Passenger Power Window Switch
P WDW RH25ARear Power Window Switch RH, Power Window Main Switch, Driver Power Window Switch
HTD MIRR10ADiver/Passenger Power Outside Mirror, ECM/PCM, A/C Control Module
A/CON10AA/C Control Module
BLOWER10AECM/PCM, Blower Switch, Blower Resistor
DOOR LOCK20ADoor Lock/Unlock Relay, Tailgate Unlock Relay
SAFETY P/WDW25ADriver Safety Power Window Module
S/HTD15ADriver/Passenger Seat Heater
TAIL LH10AInstrument Cluster, Rear Combination Lamp LH, License Lamp, Rear Bumper Lamp, Projection Lamp LH, Head Lamp LH
TAIL RH10ARear Combination Lamp LH, License Lamp, ILL.(+), Rear Bumper Lamp, Projection Lamp LH, Head Lamp LH
START10AIgnition Lock Switch, ECM/PCM, PCB fuse & Relay Box (Start Relay)
Instrument panel (Driver’s side fuse panel)