clock KIA PICANTO 2012 Owners Manual
[x] Cancel search | Manufacturer: KIA, Model Year: 2012, Model line: PICANTO, Model: KIA PICANTO 2012Pages: 840, PDF Size: 41.16 MB
Page 98 of 840
425
Features of your vehicle
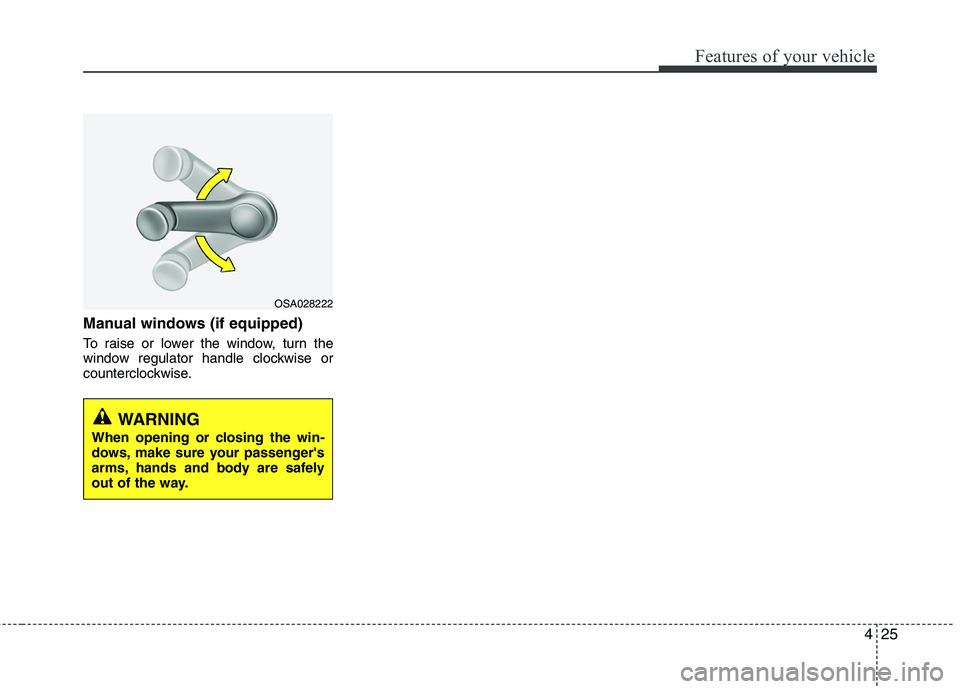
Manual windows (if equipped)
To raise or lower the window, turn the
window regulator handle clockwise or
counterclockwise.
WARNING
When opening or closing the win-
dows, make sure your passenger's
arms, hands and body are safely
out of the way.
OSA028222
Page 101 of 840
Features of your vehicle
28
4
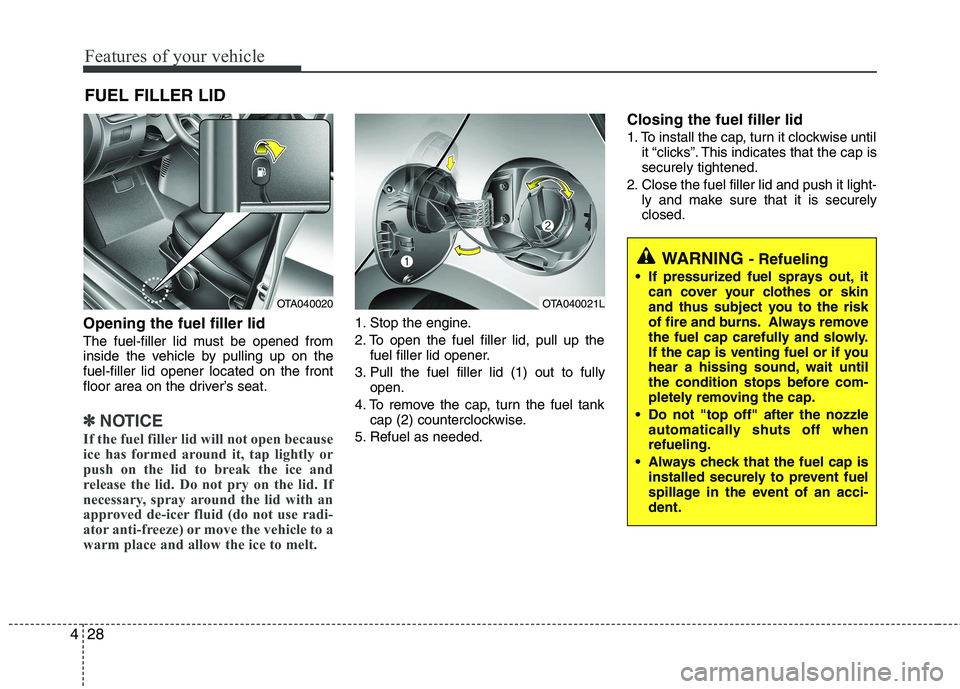
Opening the fuel filler lid
The fuel-filler lid must be opened from
inside the vehicle by pulling up on thefuel-filler lid opener located on the front
floor area on the driver’s seat.
✽✽
NOTICE
If the fuel filler lid will not open because
ice has formed around it, tap lightly or
push on the lid to break the ice and
release the lid. Do not pry on the lid. If
necessary, spray around the lid with an
approved de-icer fluid (do not use radi-
ator anti-freeze) or move the vehicle to a
warm place and allow the ice to melt.
1. Stop the engine.
2. To open the fuel filler lid, pull up the fuel filler lid opener.
3. Pull the fuel filler lid (1) out to fully open.
4. To remove the cap, turn the fuel tank cap (2) counterclockwise.
5. Refuel as needed. Closing the fuel filler lid
1. To install the cap, turn it clockwise until
it “clicks”. This indicates that the cap is securely tightened.
2. Close the fuel filler lid and push it light- ly and make sure that it is securelyclosed.
FUEL FILLER LID
OTA040020OTA040021L
WARNING
- Refueling
If pressurized fuel sprays out, it can cover your clothes or skin
and thus subject you to the risk
of fire and burns. Always remove
the fuel cap carefully and slowly.
If the cap is venting fuel or if you
hear a hissing sound, wait until
the condition stops before com-
pletely removing the cap.
Do not "top off" after the nozzle automatically shuts off whenrefueling.
Always check that the fuel cap is installed securely to prevent fuel
spillage in the event of an acci-dent.
Page 180 of 840
4107
Features of your vehicle
Digital clock
Whenever the battery terminals or relat-
ed fuses are disconnected, you must
reset the time.
When the ignition switch is in the ACC or
ON position, the clock buttons operate as
follows:
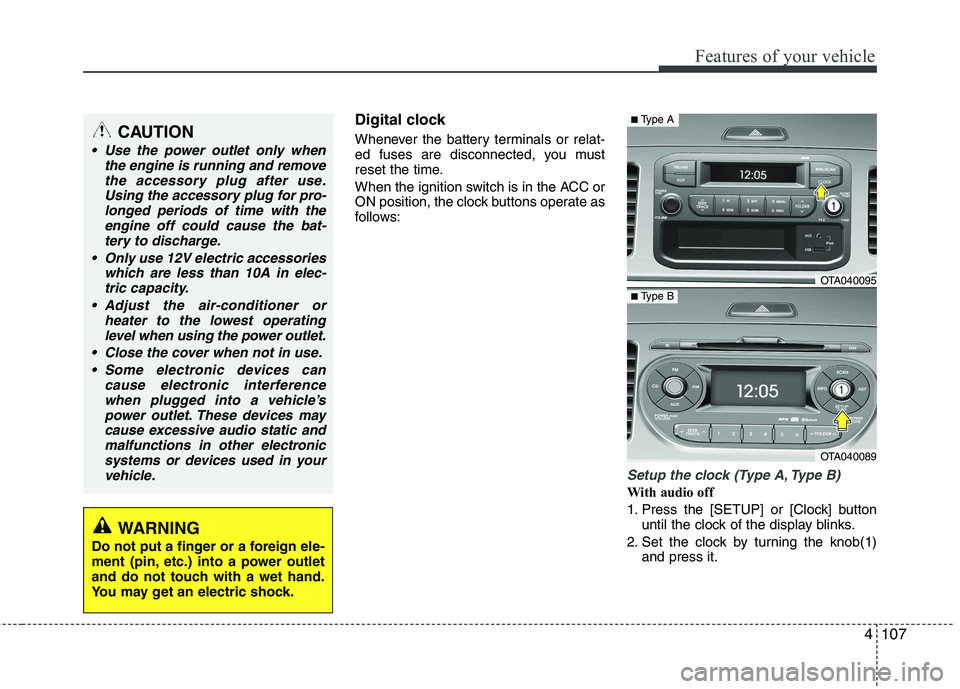
Setup the clock (Type A, Type B)
With audio off
1. Press the [SETUP] or [Clock] buttonuntil the clock of the display blinks.
2. Set the clock by turning the knob(1) and press it.
CAUTION
Use the power outlet only when
the engine is running and remove
the accessory plug after use.Using the accessory plug for pro-longed periods of time with the engine off could cause the bat-
tery to discharge.
Only use 12V electric accessories which are less than 10A in elec-tric capacity.
Adjust the air-conditioner or heater to the lowest operatinglevel when using the power outlet.
Close the cover when not in use. Some electronic devices can cause electronic interference
when plugged into a vehicle’spower outlet. These devices maycause excessive audio static andmalfunctions in other electronic
systems or devices used in yourvehicle.
WARNING
Do not put a finger or a foreign ele-
ment (pin, etc.) into a power outlet
and do not touch with a wet hand.
You may get an electric shock.
OTA040095
OTA040089
■ Type A
■Type B
Page 181 of 840
![KIA PICANTO 2012 Owners Manual Features of your vehicle
108
4
With audio on
1. Press the [SETUP] or [Clock] button
until the clock adjust mode displayed.
2. Set the clock by turning the knob(1) and press it.
Setup the clock (Type KIA PICANTO 2012 Owners Manual Features of your vehicle
108
4
With audio on
1. Press the [SETUP] or [Clock] button
until the clock adjust mode displayed.
2. Set the clock by turning the knob(1) and press it.
Setup the clock (Type](/img/2/57971/w960_57971-180.png)
Features of your vehicle
108
4
With audio on
1. Press the [SETUP] or [Clock] button
until the clock adjust mode displayed.
2. Set the clock by turning the knob(1) and press it.
Setup the clock (Type C)
Hour:
Turn the knob to the left (H), will advance
the time displayed by one hour.
Minute:
Turn the knob to the right (M), will
advance the time displayed by one
minute. Clothes hanger (if equipped)
To use the hanger, pull down the upper
portion of hanger.
WARNING
Do not adjust the clock while driv-
ing. You may lose your steering
control and cause an accident that
results in severe personal injury ordeath.
OTA040203L
■ Type C
CAUTION
Do not hang heavy clothes, since
those may damage the hook.
OUN026348
Page 183 of 840
Features of your vehicle
110
4
✽✽
NOTICE
If you install an aftermarket HID head
lamp, your vehicle’s audio and electron-
ic device may malfunction.
Antenna
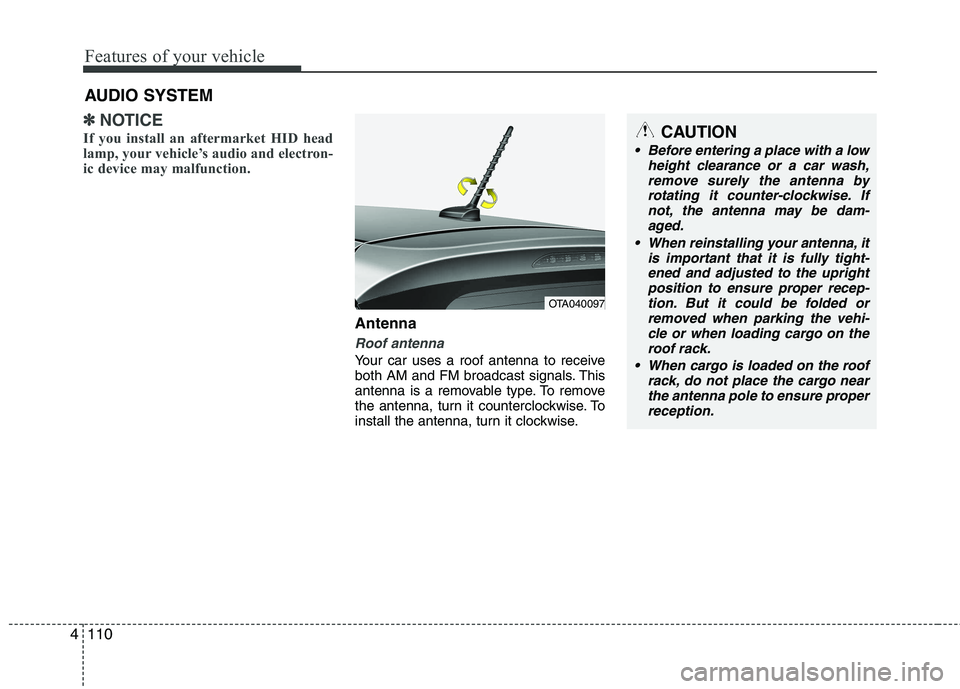
Roof antenna
Your car uses a roof antenna to receive
both AM and FM broadcast signals. This
antenna is a removable type. To remove
the antenna, turn it counterclockwise. To
install the antenna, turn it clockwise.
AUDIO SYSTEM
OTA040097
CAUTION
• Before entering a place with a low
height clearance or a car wash,
remove surely the antenna by rotating it counter-clockwise. Ifnot, the antenna may be dam-aged.
When reinstalling your antenna, it is important that it is fully tight-ened and adjusted to the upright position to ensure proper recep-
tion. But it could be folded or removed when parking the vehi-cle or when loading cargo on the roof rack.
When cargo is loaded on the roof rack, do not place the cargo nearthe antenna pole to ensure properreception.
Page 190 of 840
4117
Features of your vehicle
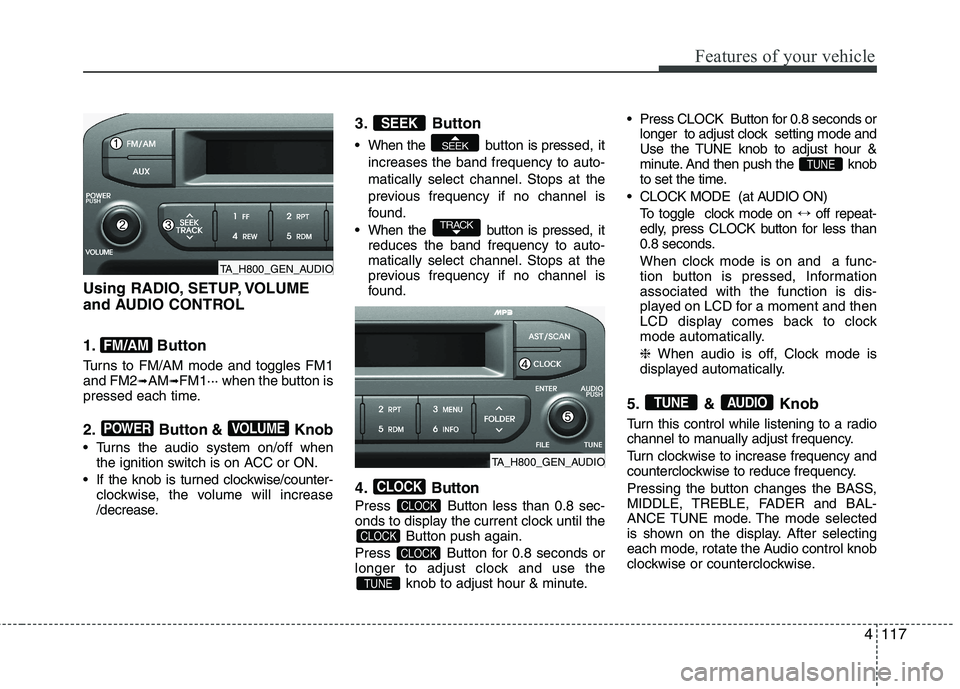
Using RADIO, SETUP, VOLUME
and AUDIO CONTROL
1. Button
Turns to FM/AM mode and toggles FM1 and FM2➟AM ➟FM1··· when the button is
pressed each time.
2. Button & Knob
Turns the audio system on/off when the ignition switch is on ACC or ON.
If the knob is turned clockwise/counter- clockwise, the volume will increase
/decrease. 3. Button
When the button is pre
ssed, it
increases the band frequency to auto-
matically select channel. Stops at the
previous frequency if no channel is
found.
When the button is pressed, it reduces the band frequency to auto-
matically select channel. Stops at the
previous frequency if no channel is
found.
4. Button
Press Button less than 0.8 sec-
onds to display the current clock until the Button push again.
Press Button for 0.8 seconds or
longer to adjust clock and use the knob to adjust hour & minute. Press CLOCK Button for 0.8 seconds or
longer to adjust clock setting mode and
Use the TUNE knob to adjust hour &
minute. And then push the knob
to set the time.
CLOCK MODE (at AUDIO ON) To toggle clock mode on ↔off repeat-
edly, press CLOCK button for less than
0.8 seconds.
When clock mode is on and a func-
tion button is pressed, Informationassociated with the function is dis-
played on LCD for a moment and then
LCD display comes back to clock
mode automatically. ❈ When audio is off, Clock mode is
displayed automatically.
5. & Knob
Turn this control while listening to a radio
channel to manually adjust frequency.
Turn clockwise to increase frequency and
counterclockwise to reduce frequency.
Pressing the button changes the BASS,
MIDDLE, TREBLE, FADER and BAL-
ANCE TUNE mode. The mode selected
is shown on the display. After selecting
each mode, rotate the Audio control knob
clockwise or counterclockwise.
AUDIOTUNE
TUNE
TUNE
CLOCK
CLOCK
CLOCK
CLOCK
TRACK
SEEK
SEEK
VOLUMEPOWER
FM/AM
TA_H800_GEN_AUDIO
TA_H800_GEN_AUDIO
Page 191 of 840
Features of your vehicle
118
4
To increase the BASS, rotate the knob
clockwise, while to decrease the BASS,
rotate the knob counterclockwise.
To increase the MIDDLE, rotate the knob
clockwise, while to decrease the MID-
DLE, rotate the knob counterclockwise.
To increase the TREBLE, rotate the knob
clockwise, while to decrease the TRE-
BLE, rotate the knob counterclockwise.
Turn the control knob clockwise to
emphasize rear speaker sound(front
speaker sound will be attenuated).
When the control knob is turned counter-
clockwise, front speaker sound will be
emphasized(rear speaker sound will be
attenuated).
Rotate the knob clockwise to emphasize
right speaker sound(left speaker sound
will be attenuated).
When the control knob is turned counter
clockwise, left speaker sound will be
emphasized(right speaker sound will be
attenuated).
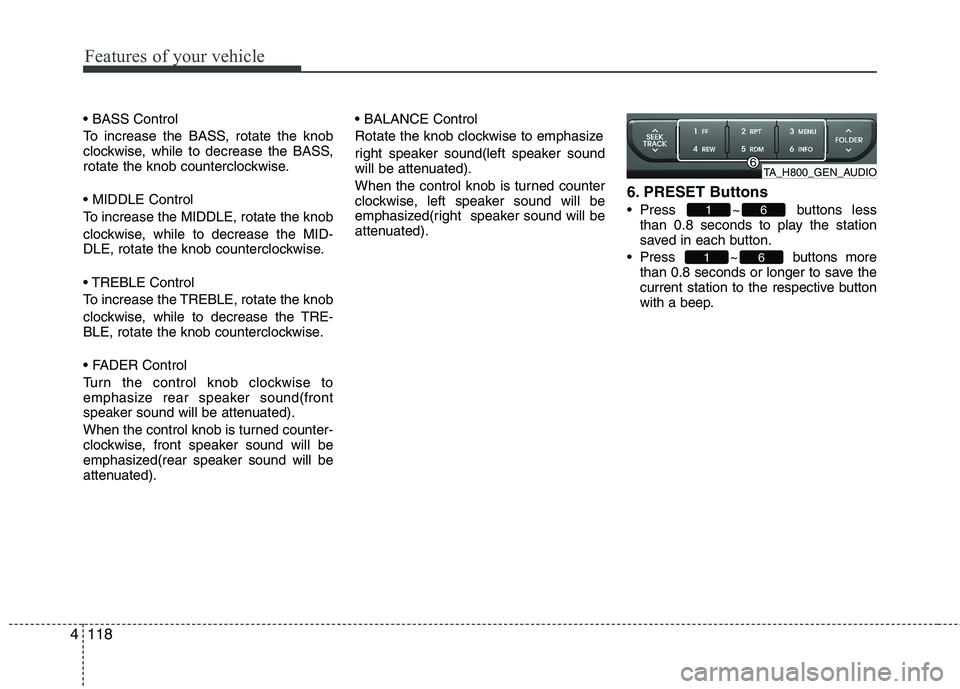
6. PRESET Buttons
Press ~ buttons
less
than 0.8 seconds to play the station
saved in each button.
Press ~ buttons more than 0.8 seconds or longer to save the
current station to the respective button
with a beep.
61
61
TA_H800_GEN_AUDIO
Page 195 of 840
Features of your vehicle
122
4
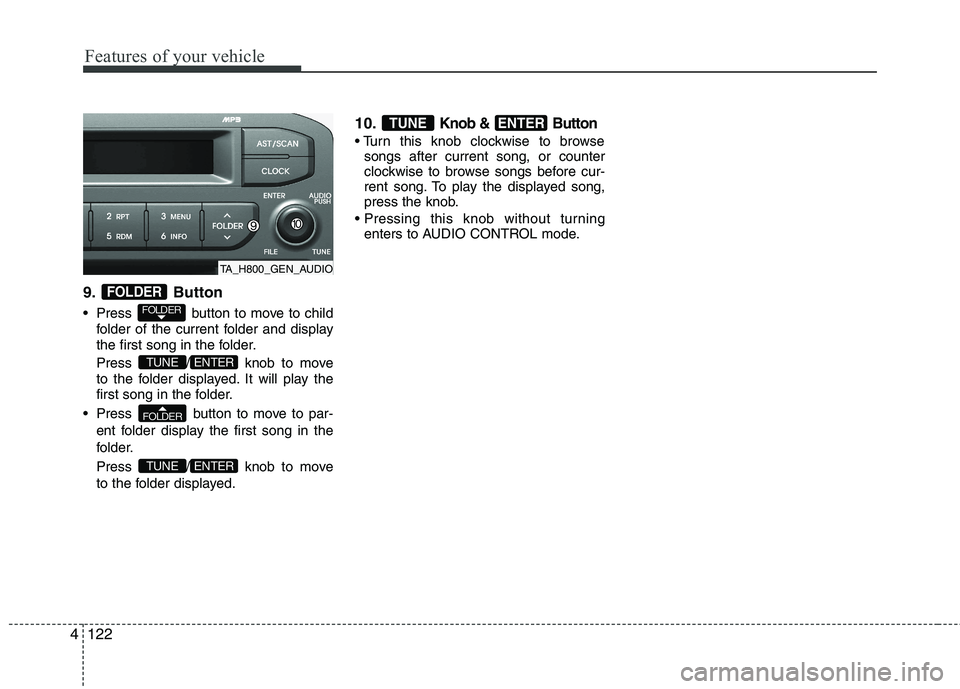
9. Button
Press button to move to child
folder of the current folder and display
the first song in the folder.
Press / knob to move
to the folder displayed. It will play the
first song in the folder.
Press button to move to par- ent folder display the first song in the
folder.
Press / knob to move
to the folder displayed. 10.
Knob & Button
songs after current song, or counter
clockwise to browse songs before cur-
rent song. To play the displayed song,
press the knob.
enters to AUDIO CONTROL mode.
ENTERTUNE
ENTERTUNE
FOLDER
ENTERTUNE
FOLDER
FOLDER
TA_H800_GEN_AUDIO
Page 198 of 840
4125
Features of your vehicle
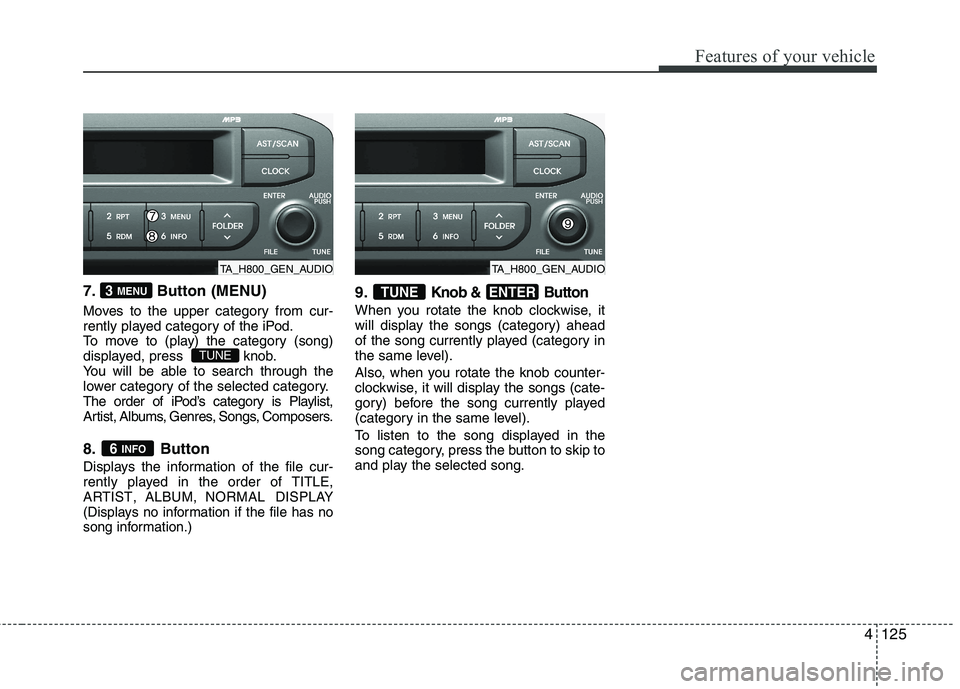
7. Button (MENU)
Moves to the upper category from cur-
rently played category of the iPod.
To move to (play) the category (song)
displayed, press knob.
You will be able to search through the
lower category of the selected category.
The order of iPod’s category is Playlist,
Artist, Albums, Genres, Songs, Composers.
8. Button
Displays the information of the file cur-
rently played in the order of
TITLE,ARTIST,ALBUM,NORMAL DISPLAY
(Displays no information if the file has no
song information.)
9.Knob & Button
When you rotate the knob clockwise, it
will display the songs (category) ahead
of the song currently played (category in
the same level).
Also, when you rotate the knob counter-
clockwise, it will display the songs (cate-
gory) before the song currently played
(category in the same level).
To listen to the song displayed in the
song category, press the button to skip to
and play the selected song.
ENTERTUNE
6 INFO
TUNE
3 MENU
TA_H800_GEN_AUDIOTA_H800_GEN_AUDIO
Page 200 of 840
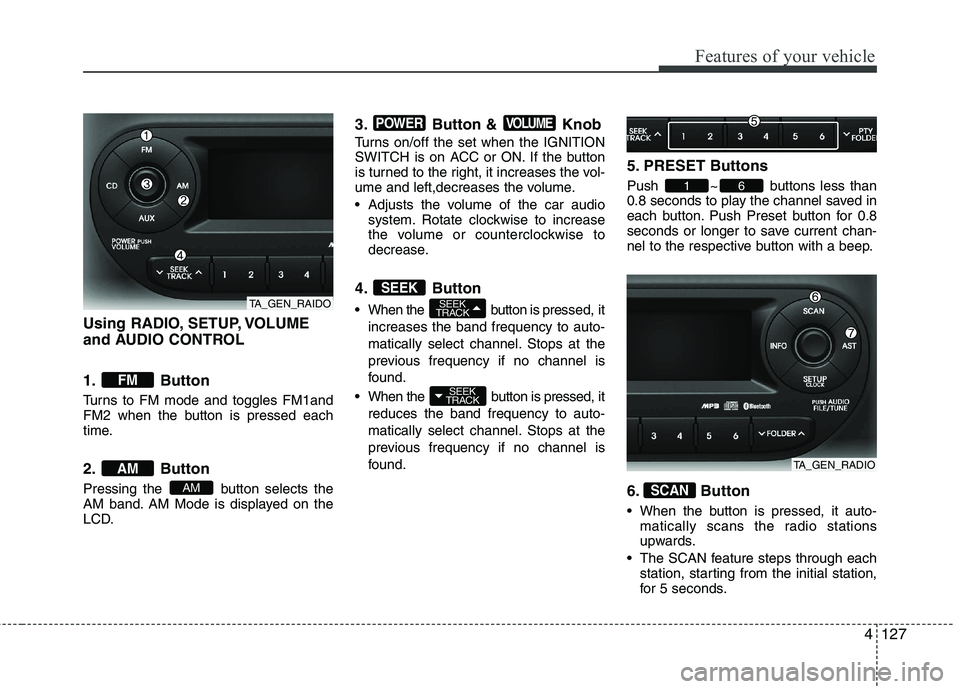
4127
Features of your vehicle
Using RADIO, SETUP, VOLUME
and AUDIO CONTROL
1. Button
Turns to FM mode and toggles FM1and
FM2 when the button is pressed each
time.
2. Button
Pressing the button selects the
AM band. AM Mode is displayed on the
LCD.3. Button & Knob
Turns on/off the set when the IGNITION
SWITCH is on ACC or ON. If the button
is turned to the right, it increases the vol-
ume and left,decreases the volume.
Adjusts the volume of the car audio
system. Rotate clockwise to increase
the volume or counterclockwise to
decrease.
4. Button
When the button is pre ssed, it
increases the band frequency to auto-
matically select channel. Stops at the
previous frequency if no channel is
found.
When the button is pressed, it reduces the band frequency to auto-
matically select channel. Stops at the
previous frequency if no channel is
found. 5. PRESET Buttons
Push ~ buttons less than
0.8 seconds to play the channel saved in
each button. Push Preset button for 0.8
seconds or longer to save current chan-
nel to the respective button with a beep.
6. Button
When the button is pressed, it auto-
matically scans the radio stations
upwards.
The SCAN feature steps through each station, starting from the initial station,
for 5 seconds.
SCAN
61
SEEK
TRACK
SEEK
TRACKSEEK
VOLUMEPOWER
AM
AM
FM
TA_GEN_RAIDO
TA_GEN_RADIO