light KIA PICANTO 2012 Owners Manual
[x] Cancel search | Manufacturer: KIA, Model Year: 2012, Model line: PICANTO, Model: KIA PICANTO 2012Pages: 840, PDF Size: 41.16 MB
Page 5 of 840
Introduction
2
1
We want to help you get the greatest
possible driving pleasure from your vehi-
cle. Your Owner’s Manual can assist you
in many ways. We strongly recommend
that you read the entire manual. In order
to minimize the chance of death or injury,
you must read the WARNING and CAU-
TION sections in the manual.
Illustrations complement the words in this
manual to best explain how to enjoy your
vehicle. By reading your manual, you
learn about features, important safety
information, and driving tips under vari-
ous road conditions.
The general layout of the manual is pro-
vided in the Table of Contents. Use the
index when looking for a specific area or
subject; it has an alphabetical listing of all
information in your manual.
Sections: This manual has eight sections
plus an index. Each section begins with a
brief list of contents so you can tell at a
glance if that section has the information
you want. You will find various WARNINGs,
CAUTIONs, and NOTICEs in this manu-
al. These WARNINGs were prepared to
enhance your personal safety. You should
carefully read and follow ALL procedures
and recommendations provided in these
WARNINGs, CAUTIONs and NOTICEs.
✽✽
NOTICE
A NOTICE indicates interesting or help-
ful information is being provided.
Gasoline engine
Unleaded
For Europe
For the optimal vehicle performance, we
recommend you to use unleaded gaso-line which complies with EN 228 and has
an octane rating of RON (Research
Octane Number) 95 / AKI (Anti Knock
Index) 91 or higher.
You may use unleaded gasoline with an
octane rating of RON 91~94 / AKI 87~90
but it may result in slight performance
reduction of the vehicle.
Except Europe
Your new KIA vehicle is designed to use
only unleaded fuel having an Octane
Rating of RON (Research Octane
Number) 91 / AKI (Anti-Knock Index) 87
or higher.
Your new vehicle is designed to obtain
maximum performance with UNLEADED
FUEL, as well as minimize exhaust emis-
sions and spark plug fouling.
HOW TO USE THIS MANUAL
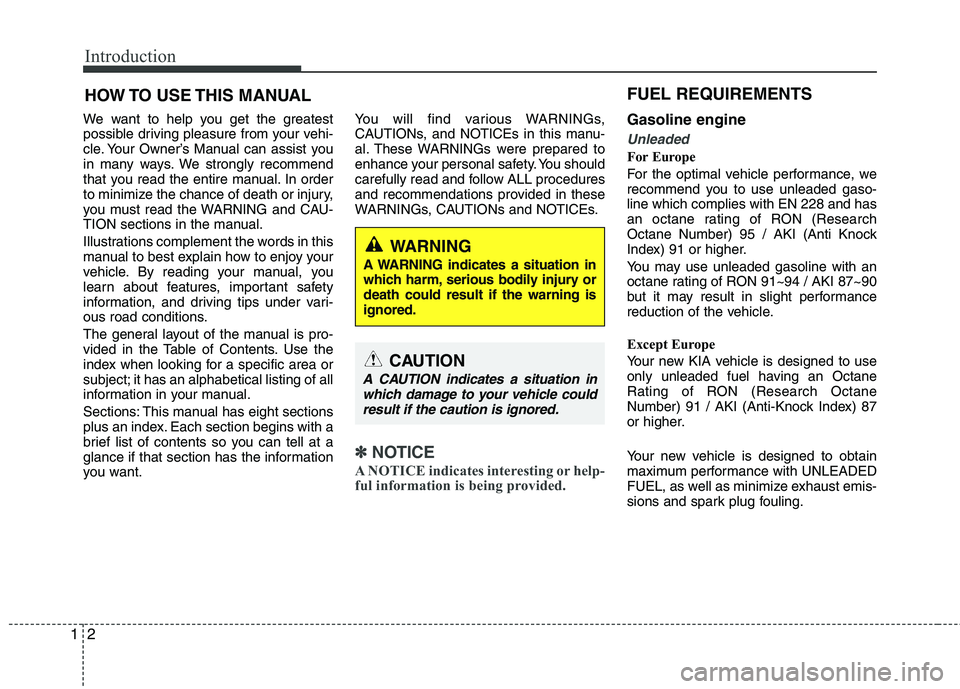
WARNING
A WARNING indicates a situation in
which harm, serious bodily injury ordeath could result if the warning isignored.
CAUTION
A CAUTION indicates a situation in which damage to your vehicle couldresult if the caution is ignored.
FUEL REQUIREMENTS
Page 8 of 840
15
Introduction
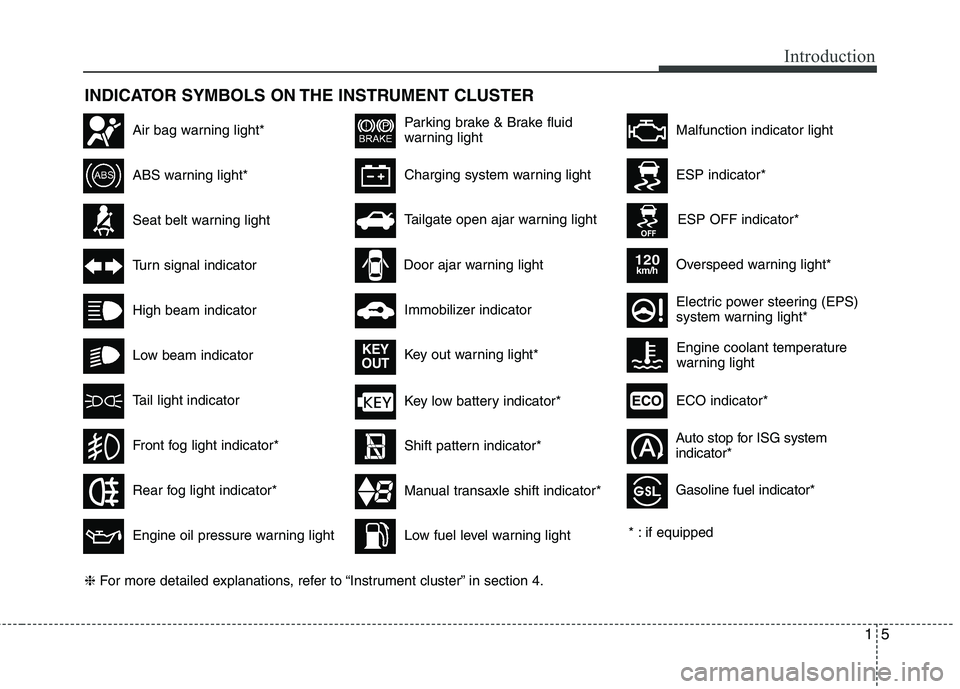
INDICATOR SYMBOLS ON THE INSTRUMENT CLUSTER
Seat belt warning light
High beam indicator
Turn signal indicator
ABS warning light*
Parking brake & Brake fluid
warning light
Engine oil pressure warning light
ESP indicator*
ESP OFF indicator*
Malfunction indicator lightAir bag warning light*
Immobilizer indicator
Low fuel level warning light* : if equipped
Charging system warning light
Overspeed warning light*
120km/h
Tail light indicator
Tailgate open ajar warning light
Front fog light indicator*
Electric power steering (EPS)
system warning light*
Key low battery indicator*
Rear fog light indicator*
Door ajar warning light
Shift pattern indicator*
Manual transaxle shift indicator*
Key out warning light*
KEY
OUT
ECO indicator*ECO
Auto stop for ISG system indicator*
Low beam indicator Engine coolant temperature
warning light
Gasoline fuel indicator*
❈ For more detailed explanations, refer to “Instrument cluster” in section 4.
Page 10 of 840
Your vehicle at a glance
2
2
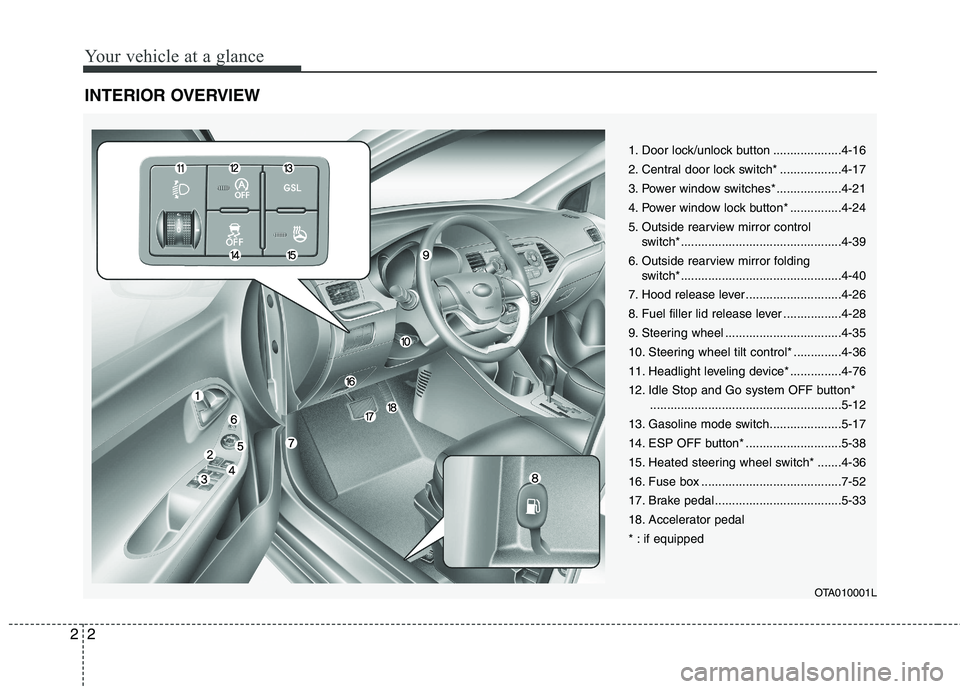
INTERIOR OVERVIEW
1. Door lock/unlock button ....................4-16
2. Central door lock switch* ..................4-17
3. Power window switches* ...................4-21
4. Power window lock button* ...............4-24
5. Outside rearview mirror control
switch*...............................................4-39
6. Outside rearview mirror folding switch*...............................................4-40
7. Hood release lever ............................4-26
8. Fuel filler lid release lever .................4-28
9. Steering wheel ..................................4-35
10. Steering wheel tilt control* ..............4-36
11. Headlight leveling device* ...............4-76
12. Idle Stop and Go system OFF button* ........................................................5-12
13. Gasoline mode switch.....................5-17
14. ESP OFF button* ............................5-38
15. Heated steering wheel switch* .......4-36
16. Fuse box .........................................7-52
17. Brake pedal .....................................5-33
18. Accelerator pedal
* : if equipped
OTA010001L
Page 11 of 840
23
Your vehicle at a glance
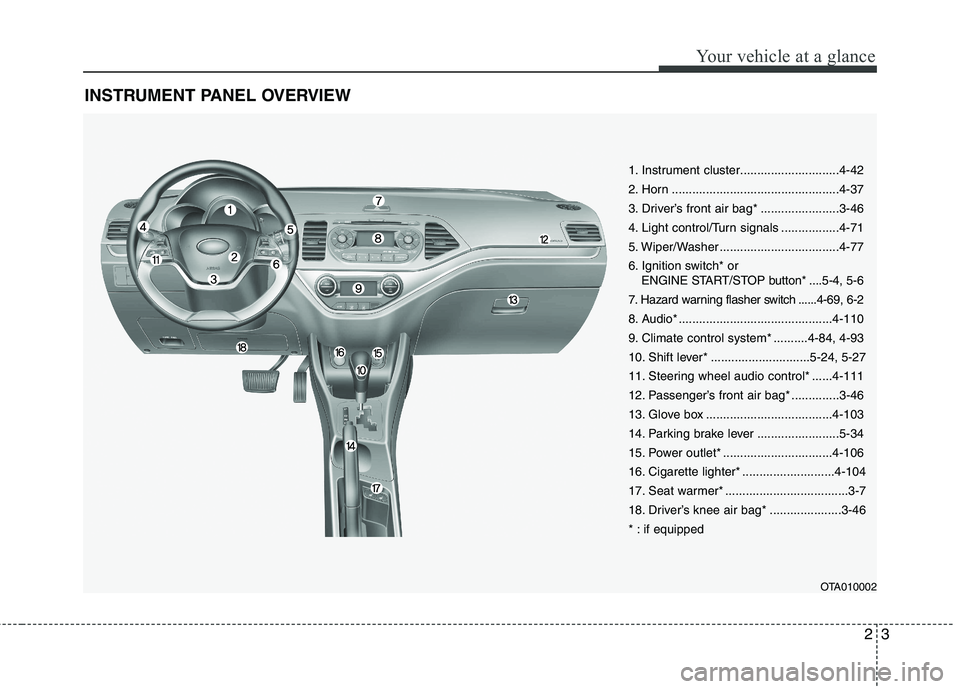
INSTRUMENT PANEL OVERVIEW
OTA010002
1. Instrument cluster.............................4-42
2. Horn .................................................4-37
3. Driver’s front air bag* .......................3-46
4. Light control/Turn signals .................4-71
5. Wiper/Washer ...................................4-77
6. Ignition switch* or ENGINE START/STOP button* ....5-4, 5-6
7. Hazard warning flasher switch ......4-69, 6-2
8. Audio* .............................................4-110
9. Climate control system* ..........4-84, 4-93
10. Shift lever* .............................5-24, 5-27
11. Steering wheel audio control* ......4-111
12. Passenger’s front air bag* ..............3-46
13. Glove box .....................................4-103
14. Parking brake lever ........................5-34
15. Power outlet* ................................4-106
16. Cigarette lighter* ...........................4-104
17. Seat warmer* ....................................3-7
18. Driver’s knee air bag* .....................3-46
* : if equipped
Page 16 of 840

Safety features of your vehicle
4
3
Front seat adjustment - manual
Forward and rearward
To move the seat forward or rearward:
1. Pull the seat slide adjustment lever up
and hold it.
2. Slide the seat to the position you desire.
3. Release the lever and make sure the seat is locked in place.
Adjust the seat before driving, and make
sure the seat is locked securely by trying
to move forward and rearward without
using the lever. If the seat moves, it is not
locked properly.
OTA030002L
(Continued)
To avoid the possibility of burns, do not remove the carpet in the
cargo area. Emission control
devices beneath this floor gener-ate high temperatures.WARNING - Rear seatbacks
The rear seatback must be securely latched. If not, passen-
gers and objects could be thrown
forward resulting in serious
injury or death in the event of a
sudden stop or collision.
Luggage and other cargo should be laid flat in the cargo area. If
objects are large, heavy, or must
be piled, they must be secured.
Under no circumstances should
cargo be piled higher than the
seatbacks. Failure to follow thesewarnings could result in serious
injury or death in the event of a
sudden stop, collision or rollover.
No passenger should ride in the cargo area or sit or lie on folded
seatbacks while the vehicle is
moving. All passengers must be
properly seated in seats and
restrained properly while riding.
When resetting the seatback to the upright position, make sure it
is securely latched by pushing it
forward and backwards.
(Continued)
WARNING
After adjusting the seat, always
check that it is securely locked into
place by attempting to move the
seat forward or backward without
using the lock release lever.
Sudden or unexpected movement
of the driver's seat could cause you
to lose control of the vehicle result-ing in an accident.
WARNING
Use extreme caution so that hands or other objects are not
caught in the seat mechanisms
while the seat is moving.
Do not put a cigarette lighter on the floor or seat. When you oper-
ate the seat, gas may gush out of
the lighter and cause fire.
Page 17 of 840
35
Safety features of your vehicle
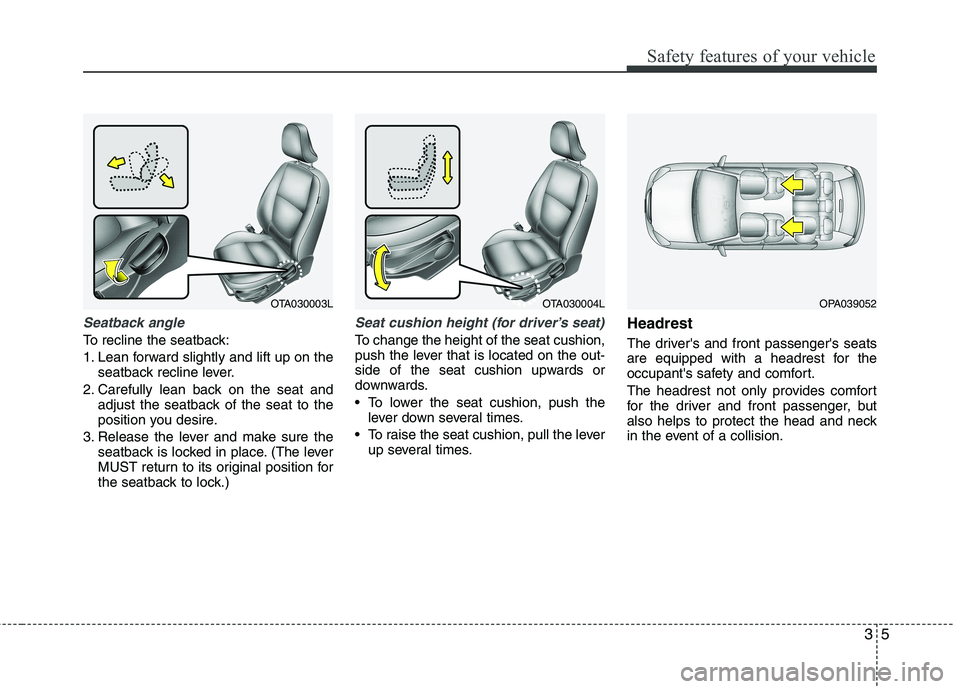
Seatback angle
To recline the seatback:
1. Lean forward slightly and lift up on theseatback recline lever.
2. Carefully lean back on the seat and adjust the seatback of the seat to the
position you desire.
3. Release the lever and make sure the seatback is locked in place. (The lever
MUST return to its original position for
the seatback to lock.)
Seat cushion height (for driver’s seat)
To change the height of the seat cushion,
push the lever that is located on the out-
side of the seat cushion upwards or
downwards.
• To lower the seat cushion, push thelever down several times.
To raise the seat cushion, pull the lever up several times. Headrest
The driver's and front passenger's seats
are equipped with a headrest for the
occupant's safety and comfort.
The headrest not only provides comfort
for the driver and front passenger, but
also helps to protect the head and neck
in the event of a collision.
OPA039052OTA030003LOTA030004L
Page 21 of 840

39
Safety features of your vehicle
Passenger seat under tray (if equipped)
To open the tray, pull up the lever and pull
out the tray forward. Rear seat adjustment Headrest (if equipped)
The rear seat is equipped with headrests
for the occupant's safety and comfort.
The headrest not only provides comfort
for passengers, but also helps to protect
the head and neck in the event of a colli-sion.
WARNING
- Flammable materials
Do not store cigarette lighters,
propane cylinders, or other flamma-
ble/explosive materials in the tray.
These items may catch fire and/or
explode if the vehicle is exposed to
hot temperatures for extended peri-ods.
OTA030010
WARNING
while driving, be sure to position
them in the tray so that they donot make noise or cause a poten-
tial safety hazard when the vehi-
cle is moving.
Always keep the tray closed while driving. Do not place many items
in the tray that the tray can not
close securely.
CAUTION
To avoid possible theft, do not leave
valuables in the tray.
The tray can be used to store smallitems required by the driver or pas-
sengers.
OPA039053
Page 28 of 840

Safety features of your vehicle
16
3
Seat belt warning
Type A
As a reminder to the driver, the seat belt
warning light will blink for approximately
6 seconds each time you turn the ignition
switch ON regardless of belt fastening.
If the driver’s seat belt is unfastened after
the ignition switch is ON, the seat belt
warning light blinks again for approxi-
mately 6 seconds.
If the driver's seat belt is not fastened
when the ignition switch is turned ON or
if it is unfastened after the ignition switch
is ON, the seat belt warning chime will
sound for approximately 6 seconds. At
this time, if the seat belt is fastened, the
chime will stop at once. (if equipped) Type B
Front
As a reminder to the driver and front pas-
senger, the driver’s and front passenger’s
seat belt warning lights will illuminate for
approximately 6 seconds each time you
turn the ignition switch ON regardless of
belt fastening.
If the driver’s or front passenger’s seat
belt is not fastened when the ignition
switch is turned ON or if it is disconnect-
ed after the ignition switch is turned ON,
the corresponding seat belt warning light
will illuminate until the belt is fastened.
If you continue not to fasten the seat belt
and you drive over 9km/h, the illuminated
warning light will start to blink or illumi-
nate until you drive under 6km/h.
1GQA2083
WARNING
No modifications or additions should be made by the user
which will either prevent the seat
belt adjusting devices from oper-
ating to remove slack, or prevent
the seat belt assembly from being
adjusted to remove slack.
When you fasten the seat belt, be careful not to latch the seat belt in
buckles of other seat. It's very dan-
gerous and you may not be pro-
tected by the seat belt properly.
Do not unfasten the seat belt and do not fasten and unfasten the
seat belt repeatedly while driving.This could result in loss of con-
trol, and an accident causing
death, serious injury, or property
damage.
When fastening the seat belt, make sure that the seat belt does
not pass over objects that are
hard or can break easily.
Make sure there is nothing in the buckle. The seat belt may not be
fastened securely.
OTA030050L
Page 29 of 840
317
Safety features of your vehicle
If you continue not to fasten the seat belt
and you drive over 20km/h the seat belt
warning chime will sound for approxi-mately 100 seconds and the correspon-
ding warning light will blink.
✽✽NOTICE
You can find the front passenger’s seat belt warning light on the center
fascia panel.
Although the front passenger seat is
not occupied, the seat belt warning
light will illuminate for 6 seconds.
The front passenger's seat belt warn- ing may operate when luggage is
placed on the front passenger seat.
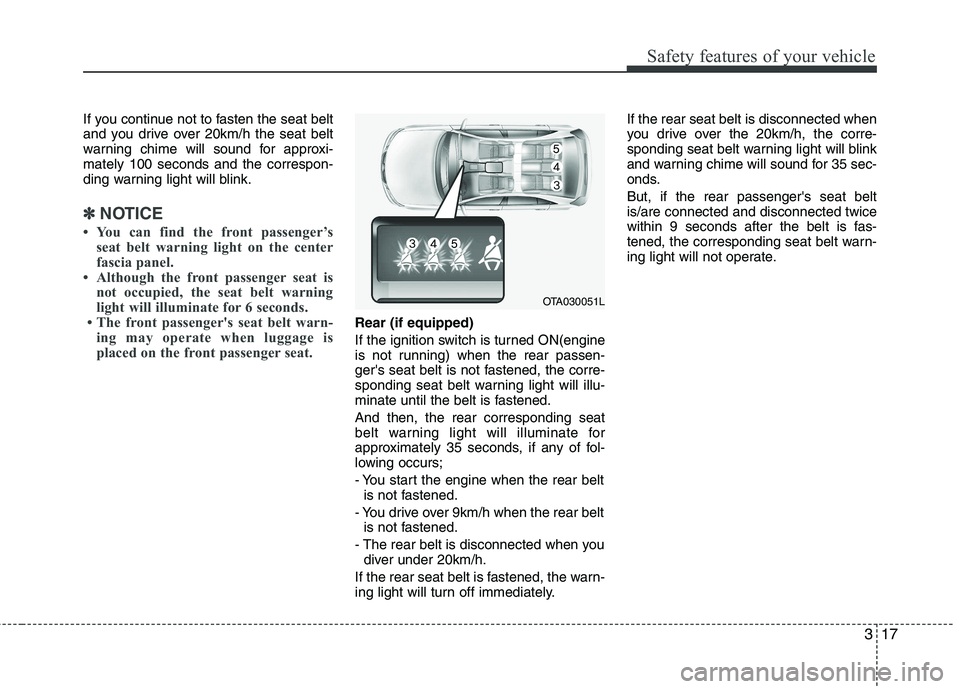
Rear (if equipped)
If the ignition switch is turned ON(engine
is not running) when the rear passen-
ger's seat belt is not fastened, the corre-
sponding seat belt warning light will illu-
minate until the belt is fastened. And then, the rear corresponding seat
belt warning light will illuminate for
approximately 35 seconds, if any of fol-
lowing occurs;
- You start the engine when the rear beltis not fastened.
- You drive over 9km/h when the rear belt is not fastened.
- The rear belt is disconnected when you diver under 20km/h.
If the rear seat belt is fastened, the warn-
ing light will turn off immediately. If the rear seat belt is disconnected when
you drive over the 20km/h, the corre-
sponding seat belt warning light will blink
and warning chime will sound for 35 sec-
onds. But, if the rear passenger's seat belt is/are connected and disconnected twice
within 9 seconds after the belt is fas-
tened, the corresponding seat belt warn-
ing light will not operate.
OTA030051L
Page 34 of 840
Safety features of your vehicle
22
3
Pre-tensioner seat belt (if equipped)
Your vehicle is equipped with driver's and front passenger's pre-tensioner seat
belts. The purpose of the pre-tensioner is
to make sure that the seat belts fit tightly
against the occupant's body in certain
frontal collisions. The pre-tensioner seat
belts may be activated in crashes where
the frontal collision is severe enough. When the vehicle stops suddenly, or if
the occupant tries to lean forward too
quickly, the seat belt retractor will lock
into position. In certain frontal collisions,
the pre-tensioner will activate and pullthe seat belt into tighter contact against
the occupant's body.
If the system senses excessive tension
on the driver or passenger's seat belt
when the pre-tensioner activates, theload limiter inside the pre-tensioner willrelease some of the pressure on the
affected seat belt. (if equipped)
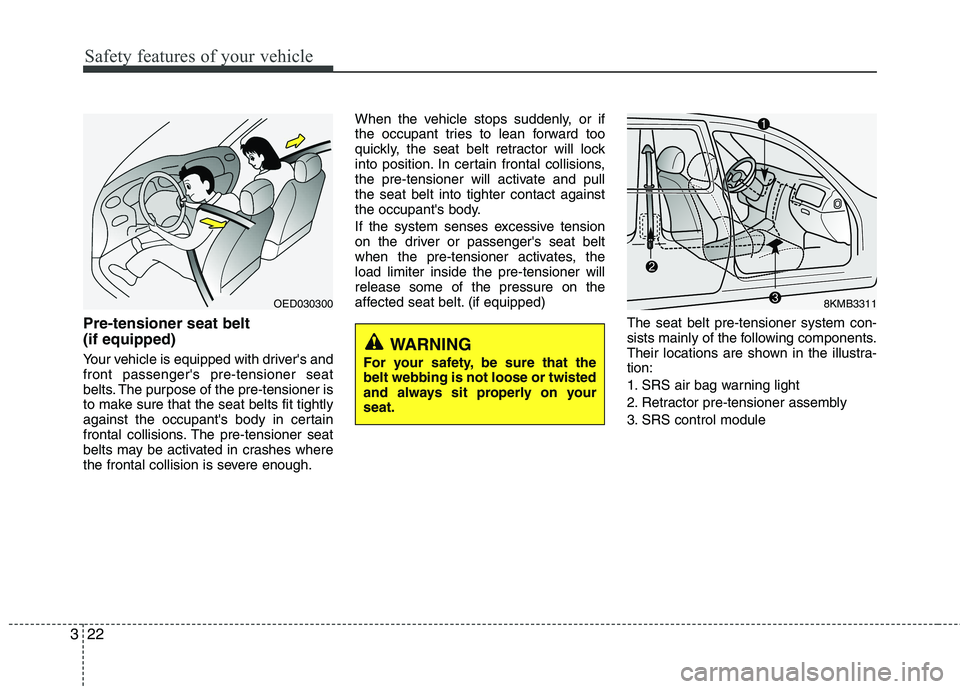
The seat belt pre-tensioner system con-
sists mainly of the following components.
Their locations are shown in the illustra-tion:
1. SRS air bag warning light
2. Retractor pre-tensioner assembly
3. SRS control module
OED0303008KMB3311
WARNING
For your safety, be sure that the belt webbing is not loose or twisted
and always sit properly on yourseat.