KIA PICANTO 2014 Owners Manual
Manufacturer: KIA, Model Year: 2014, Model line: PICANTO, Model: KIA PICANTO 2014Pages: 1003, PDF Size: 44.67 MB
Page 151 of 1003
Features of your vehicle
78
4
ORB040056E
■
Type B
ORBC040056E
■
Type A
ORB041408
■
Type D
OTA040056
■
Type C
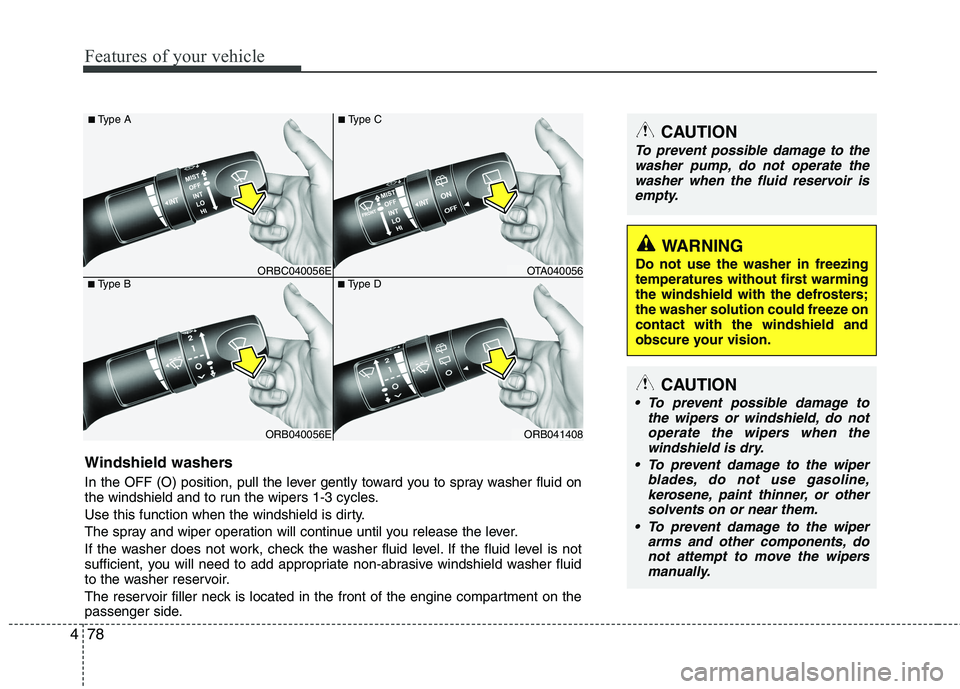
Windshield washers
In the OFF (O) position, pull the lever gently toward you to spray washer fluid on
the windshield and to run the wipers 1-3 cycles.
Use this function when the windshield is dirty.
The spray and wiper operation will continue until you release the lever.
If the washer does not work, check the washer fluid level. If the fluid level is not
sufficient, you will need to add appropriate non-abrasive windshield washer fluid
to the washer reservoir.
The reservoir filler neck is located in the front of the engine compartment on the
passenger side.
CAUTION
To prevent possible damage to the
washer pump, do not operate the
washer when the fluid reservoir is empty.
WARNING
Do not use the washer in freezing
temperatures without first warming
the windshield with the defrosters;
the washer solution could freeze oncontact with the windshield and
obscure your vision.
CAUTION
To prevent possible damage to the wipers or windshield, do not
operate the wipers when the windshield is dry.
To prevent damage to the wiper blades, do not use gasoline,
kerosene, paint thinner, or othersolvents on or near them.
To prevent damage to the wiper arms and other components, do
not attempt to move the wipersmanually.
Page 152 of 1003
479
Features of your vehicle
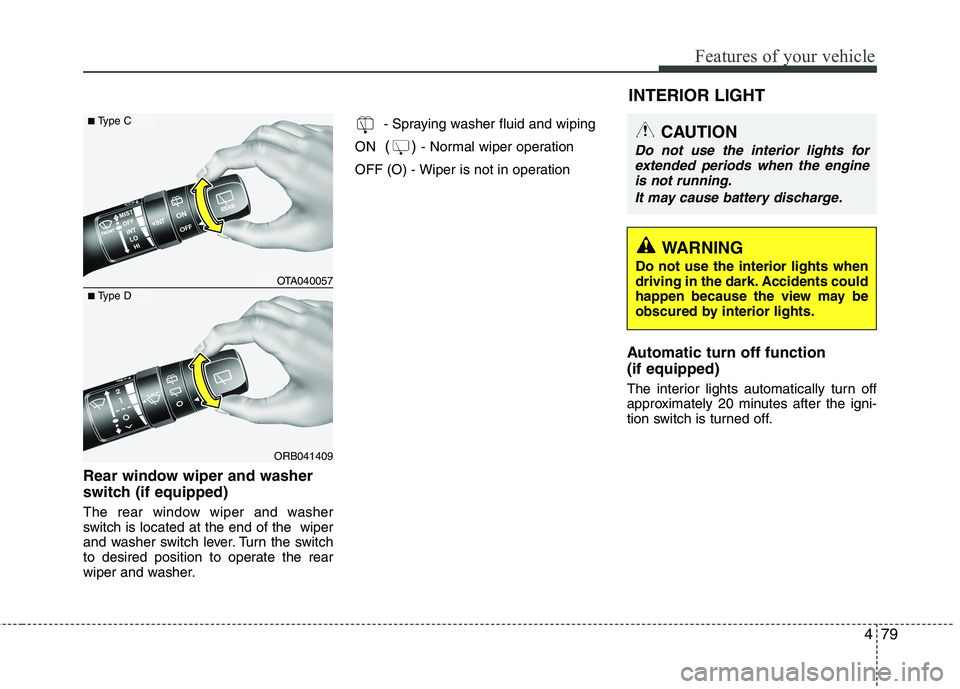
Rear window wiper and washer
switch (if equipped)
The rear window wiper and washer
switch is located at the end of the wiper
and washer switch lever. Turn the switch
to desired position to operate the rear
wiper and washer.- Spraying washer fluid and wiping
ON ()
- Normal wiper operation
OFF (O) - Wiper is not in operation
Automatic turn off function (if equipped)
The interior lights automatically turn off
approximately 20 minutes after the igni-
tion switch is turned off.
ORB041409
■Type C
■Type DOTA040057 INTERIOR LIGHT
CAUTION
Do not use the interior lights for
extended periods when the engine
is not running.
It may cause battery discharge.
WARNING
Do not use the interior lights when
driving in the dark. Accidents could
happen because the view may be
obscured by interior lights.
Page 153 of 1003

Features of your vehicle
80
4
Map lamp (if equipped)
Push the lens to turn the map lamp on or
off. This light produces a spot beam for
convenient use as a map lamp at night or
as a personal lamp for the driver and the
front passenger.
: In the DOOR position, the
map lamp come on when
any door is opened regard-
less of the ignition switch
position. When doors are
unlocked by the transmitter
(or smart key), the map lamp
and come on for approxi-mately 30 seconds as long
as any door is not open. The map lamp goes out gradu-
ally after approximately 30 sec-onds if the door is closed.
However, if the ignition switch is
ON or all doors are locked, the
map lamp will turn off immedi-
ately. If a door is opened with
the ignition switch in the ACC orLOCK position, the map lamp
stays on for about 20 minutes.
However, if a door is opened
with the ignition switch in the
ON position, the map lamp
stays on continuously.
: The lights turn off even if a door is opened.
When the lamp is turned ON
by pressing the lens (1), the
lamp does not turn off even
if the switch (2) is in the OFFposition.
: The map lamp and the room lamp stay on at all times. Room lamp (if equipped)
In the DOOR position, the room
lamp come on when any door is opened regardless of the ignition
switch position. When doors are
unlocked by the transmitter (or
smart key), the room lamp come
on for approximately 30 seconds
as long as any door is not open.
The room lamp goes out gradu-
ally after approximately 30 sec-onds if the door is closed.
However, if the ignition switch is
ON or all doors are locked, the
room lamp will turn off immedi-
ately. If a door is opened with the
ignition switch in the ACC orLOCK position, the room lamp
stays on for about 20 minutes.
(ON) O
(OFF)
(DOOR)
OTA040058OTA040181
Page 154 of 1003
481
Features of your vehicle
However, if a door is opened with
the ignition switch in the ON posi-
tion, the room lamp stays on con-
tinuously.
: The lights turn off even if a door is opened.
: The room lamp stay on at all times.
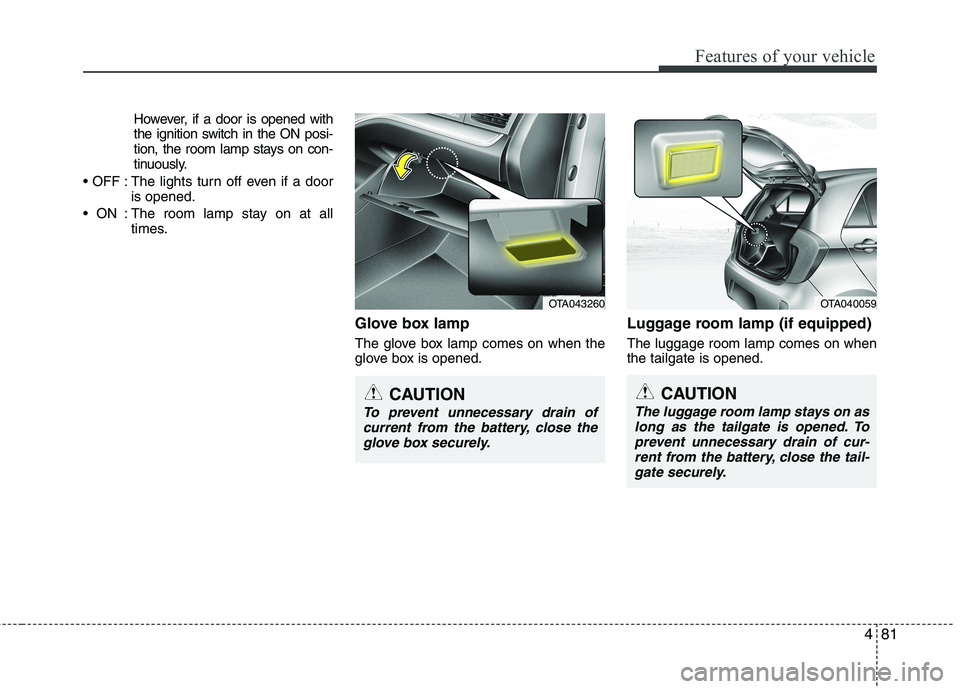
Glove box lamp
The glove box lamp comes on when the
glove box is opened. Luggage room lamp (if equipped) The luggage room lamp comes on when the tailgate is opened.
OTA040059
CAUTION
The luggage room lamp stays on as
long as the tailgate is opened. To prevent unnecessary drain of cur-rent from the battery, close the tail-
gate securely.
OTA043260
CAUTION
To prevent unnecessary drain ofcurrent from the battery, close the glove box securely.
Page 155 of 1003
Features of your vehicle
82
4
DEFROSTER
✽✽
NOTICE
If you want to defrost and defog the
front windshield, refer to “Windshield
defrosting and defogging” in this sec-
tion.
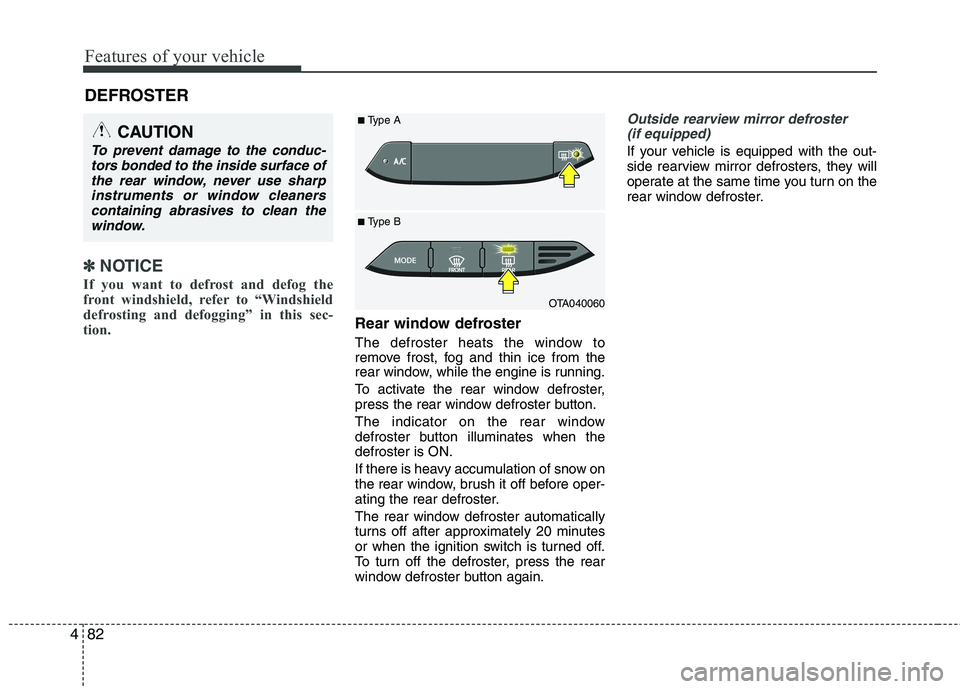
Rear window defroster
The defroster heats the window to
remove frost, fog and thin ice from the
rear window, while the engine is running.
To activate the rear window defroster,
press the rear window defroster button.
The indicator on the rear window
defroster button illuminates when thedefroster is ON.
If there is heavy accumulation of snow on
the rear window, brush it off before oper-
ating the rear defroster.
The rear window defroster automatically
turns off after approximately 20 minutes
or when the ignition switch is turned off.
To turn off the defroster, press the rear
window defroster button again.
Outside rearview mirror defroster (if equipped)
If your vehicle is equipped with the out-
side rearview mirror defrosters, they will
operate at the same time you turn on the
rear window defroster.
CAUTION
To prevent damage to the conduc- tors bonded to the inside surface of
the rear window, never use sharpinstruments or window cleanerscontaining abrasives to clean the window.
OTA040060
■
Type B
■
Type A
Page 156 of 1003

483
Features of your vehicle
MANUAL CLIMATE CONTROL SYSTEM (IF EQUIPPED)
1. Mode selection knob
2. Air intake control knob
3. Fan speed control knob
4. Temperature control knob
5. Air conditioning button (if equipped)
6. Rear window defroster buttonOTA040061/OTA040061L
■■Type A
■
■ Type B
Page 157 of 1003
Features of your vehicle
84
4
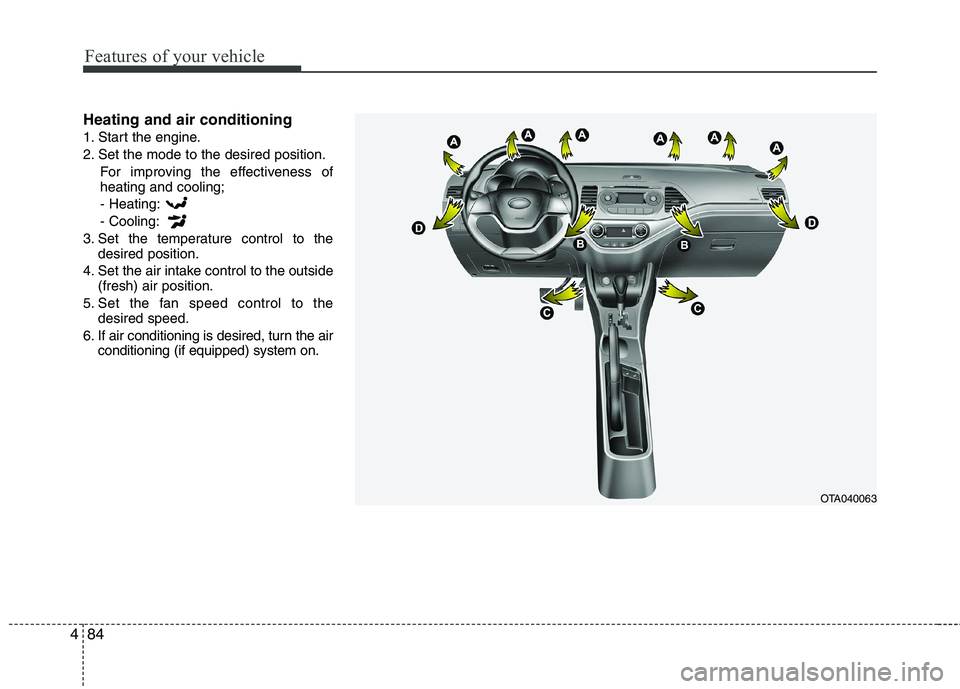
Heating and air conditioning
1. Start the engine.
2. Set the mode to the desired position.
For improving the effectiveness of heating and cooling;- Heating: - Cooling:
3. Set the temperature control to the desired position.
4. Set the air intake control to the outside (fresh) air position.
5. Set the fan speed control to the desired speed.
6. If air conditioning is desired, turn the air conditioning (if equipped) system on.
OTA040063
Page 158 of 1003
485
Features of your vehicle
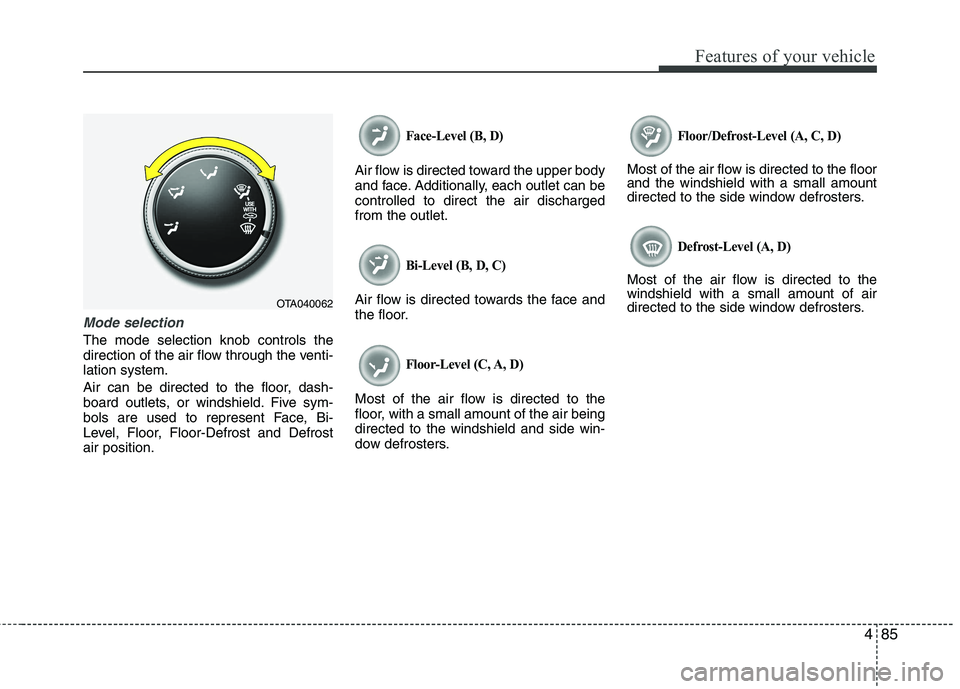
Mode selection
The mode selection knob controls the
direction of the air flow through the venti-lation system.
Air can be directed to the floor, dash-
board outlets, or windshield. Five sym-
bols are used to represent Face, Bi-
Level, Floor, Floor-Defrost and Defrostair position.
Face-Level (B, D)
Air flow is directed toward the upper body
and face. Additionally, each outlet can becontrolled to direct the air dischargedfrom the outlet.
Bi-Level (B, D, C)
Air flow is directed towards the face and
the floor.
Floor-Level (C, A, D)
Most of the air flow is directed to the
floor, with a small amount of the air beingdirected to the windshield and side win-
dow defrosters.
Floor/Defrost-Level (A, C, D)
Most of the air flow is directed to the floor and the windshield with a small amount
directed to the side window defrosters.
Defrost-Level (A, D)
Most of the air flow is directed to thewindshield with a small amount of air
directed to the side window defrosters.
OTA040062
Page 159 of 1003

Features of your vehicle
86
4
Instrument panel vents
You can adjust the direction of air deliv-
ery from these vents using the vent con-
trol lever as shown.
The outlet vents can be closed by mov-
ing the vent control lever to the direc-
tion of the arrow( ) shown on the
lever.
The direction of air delivery can be adjusted by moving vent control lever
to the direction preferred.Temperature control
The temperature control knob allows you
to control the temperature of the air flow-
ing from the ventilation system. To
change the air temperature in the pas-
senger compartment, turn the knob to
the right position for warm and hot air or
left position for cooler air.
Air intake control
The air intake control is used to select the outside (fresh) air position or recircu-lated air position.
To change the air intake control position,
turn the control knob.
OTA040065OTA040066OTA040064
Page 160 of 1003
487
Features of your vehicle
Recirculated air position With the recirculated airposition selected, air from
the passenger compart-
ment will be drawn throughthe heating system andheated or cooled according
to the function selected.
Outside (fresh) air position With the outside (fresh) airposition selected, air
enters the vehicle from out-side and is heated orcooled according to thefunction selected.✽✽NOTICE
Prolonged operation of the heater in the
recirculated air position (without air
conditioning selected) may cause fogging
of the windshield and side windows and
the air within the passenger compart-
ment may become stale.
In addition, prolonged use of the air con-
ditioning with the recirculated air posi-
tion selected will result in excessively dry
air in the passenger compartment. WARNING
Continue using the climate con- trol system in the recirculated air
position may allow humidity to
increase inside the vehicle which
may fog the glass and obscure
visibility.
Do not sleep in a vehicle with the air conditioning or heating sys-
tem on. It may cause serious
harm or death due to a drop in the
oxygen level and/or body temper-
ature.
Continue using the climate con- trol system in the recirculated air
position can cause drowsiness or
sleepiness, and loss of vehicle
control. Set the air intake controlto the outside (fresh) air position
as much as possible while driv-ing.