KIA PICANTO 2014 Owners Manual
Manufacturer: KIA, Model Year: 2014, Model line: PICANTO, Model: KIA PICANTO 2014Pages: 1003, PDF Size: 44.67 MB
Page 611 of 1003
4119
Features of your vehicle
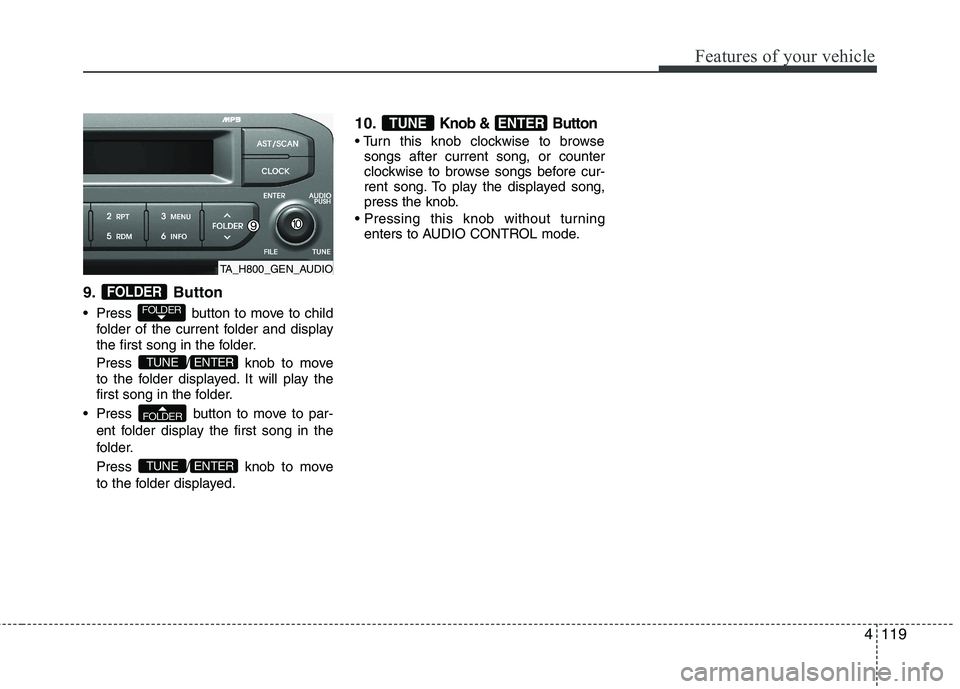
9. Button
Press button to move to childfolder of the current folder and display
the first song in the folder.
Press / knob to move
to the folder displayed. It will play the
first song in the folder.
Press button to move to par- ent folder display the first song in the
folder.
Press / knob to move
to the folder displayed. 10.
Knob & Button
songs after current song, or counter
clockwise to browse songs before cur-
rent song. To play the displayed song,
press the knob.
enters to AUDIO CONTROL mode.
ENTERTUNE
ENTERTUNE
FOLDER
ENTERTUNE
FOLDER
FOLDER
TA_H800_GEN_AUDIO
Page 612 of 1003
Features of your vehicle
120
4
CAUTION IN USING THE
iPod DEVICE
The Kia iPod Power Cable is needed in order to operate iPodwith the audio buttons on the audio system. The USB cable pro-
vided by Apple may cause mal-function and should not be usedfor Kia vehicles.
❋ The Kia iPod Power Cable maybe purchased through your KiaDealership.
When connecting iPod with the iPod Power Cable, insert the con-
nector to the multimedia socket completely. If not inserted com-pletely, communications betweeniPod and audio may be interrupted.
When adjusting the sound effects of the iPod and the audio system, thesound effects of both devices willoverlap and might reduce or distort the quality of the sound.
Deactivate (turn off) the equalizer function of an iPod when adjust-ing the audio system’s volume,and turn off the equalizer of the
audio system when using theequalizer of an iPod.
(Continued)
(Continued) When the iPod cable is connected, the system can be switched to AUXmode even without iPod deviceand may cause noise. Disconnect
the iPod cable when you are not using the iPod device.
When not using iPod with car audio, detach the iPod cable from
iPod. Otherwise, iPod may remainin accessory mode, and may not work properly.
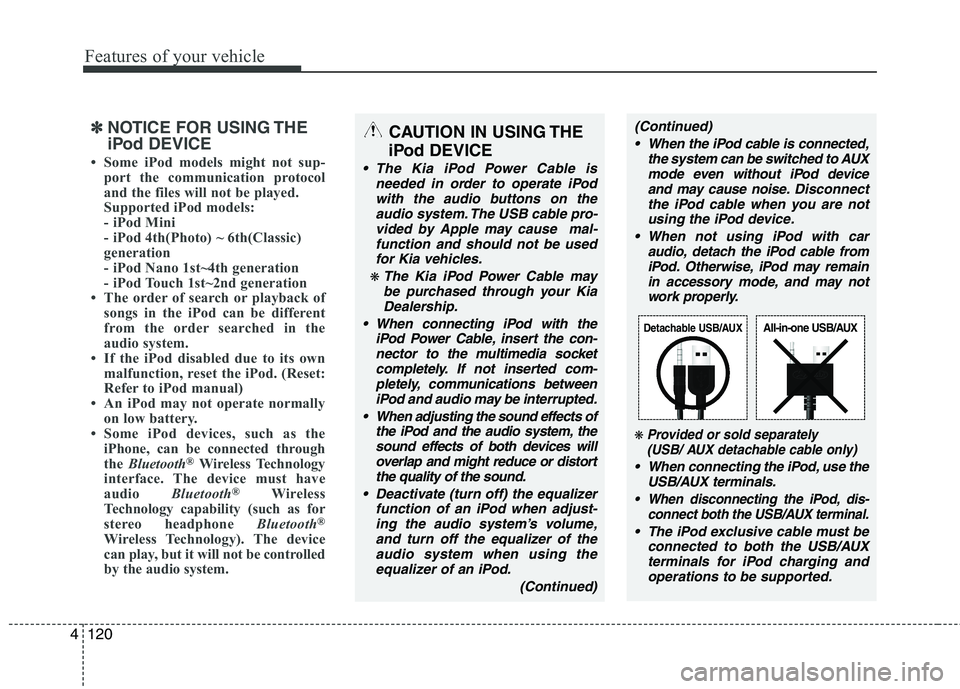
❋ Provided or sold separately(USB/ AUX detachable cable only)
When connecting the iPod, use the
USB/AUX terminals.
When disconnecting the iPod, dis- connect both the USB/AUX terminal.
The iPod exclusive cable must be
connected to both the USB/AUXterminals for iPod charging andoperations to be supported.
Detachable USB/AUXAll-in-one USB/AUX
✽✽ NOTICE FOR USING THE
iPod DEVICE
Some iPod models might not sup- port the communication protocol
and the files will not be played.
Supported iPod models:
- iPod Mini
- iPod 4th(Photo) ~ 6th(Classic)
generation
- iPod Nano 1st~4th generation
- iPod Touch 1st~2nd generation
The order of search or playback of songs in the iPod can be different
from the order searched in the
audio system.
If the iPod disabled due to its own malfunction, reset the iPod. (Reset:
Refer to iPod manual)
An iPod may not operate normally
on low battery.
Some iPod devices, such as the
iPhone, can be connected through
the Bluetooth ®
Wireless Technology
interface. The device must have
audio Bluetooth®
Wireless
Technology capability (such as for
stereo headphone Bluetooth®
Wireless Technology). The device
can play, but it will not be controlled
by the audio system.
Page 613 of 1003
4121
Features of your vehicle
Using iPod ❋iPod is a trademark of Apple Inc.
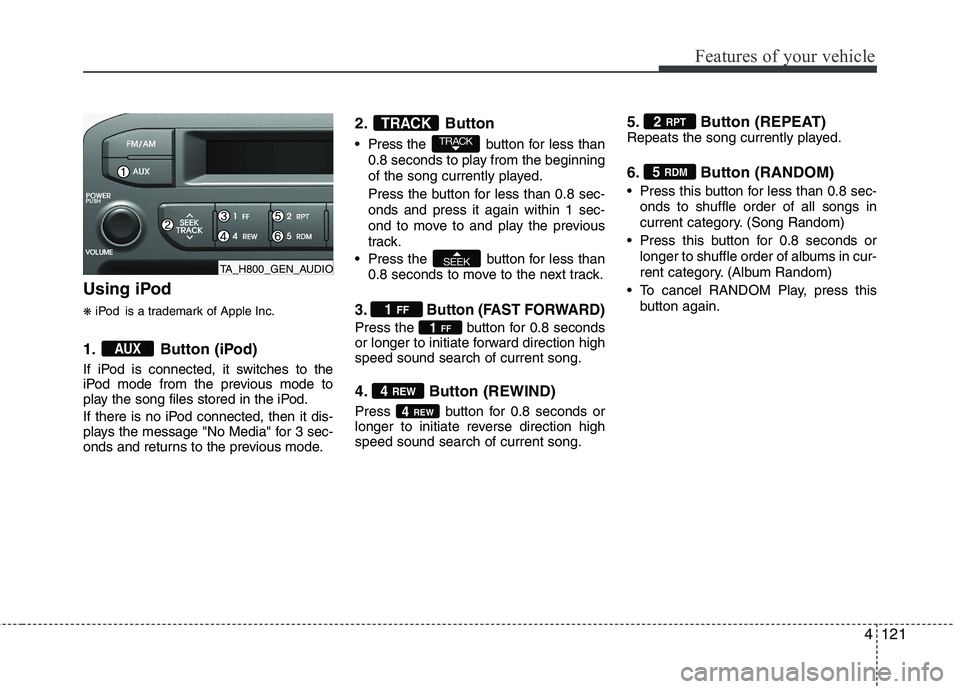
1. Button (iPod)
If iPod is connected, it switches to the
iPod mode from the previous mode to
play the song files stored in the iPod.
If there is no iPod connected, then it dis-
plays the message "No Media" for 3 sec-
onds and returns to the previous mode. 2. Button
Press the button for
less than
0.8 seconds to play from the beginning
of the song currently played.
Press the button for less than 0.8 sec- onds and press it again within 1 sec-
ond to move to and play the previous
track.
Press the button for less than 0.8 seconds to move to the next track.
3. Button (FAST FORWARD)
Press the button for 0.8 seconds
or longer to initiate forward direction highspeed sound search of current song.
4. Button (REWIND)
Press button for 0.8 seconds or
longer to initiate reverse direction highspeed sound search of current song. 5. Button (REPEAT)
Repeats the song currently played.
6. Button (RANDOM)
Press this button for less than 0.8 sec-
onds to shuffle order of all songs in
current category. (Song Random)
Press this button for 0.8 seconds or longer to shuffle order of albums in cur-
rent category. (Album Random)
To cancel RANDOM Play, press this button again.
5 RDM
2 RPT
4REW
4
REW
1FF
1
FF
SEEK
TRACK
TRACK
AUX
TA_H800_GEN_AUDIO
Page 614 of 1003
Features of your vehicle
122
4
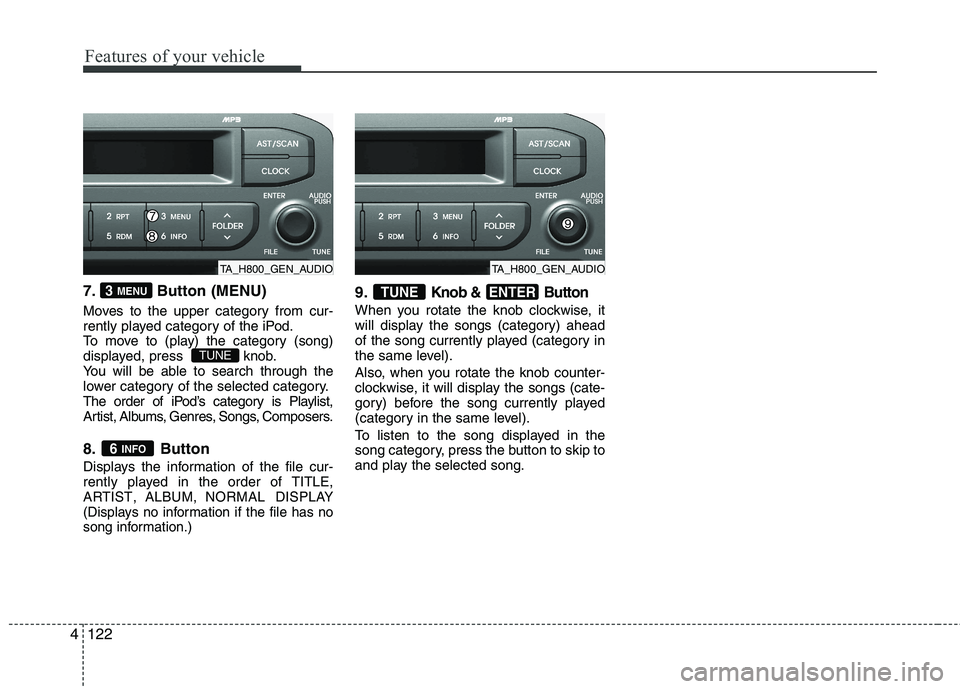
7. Button (MENU)
Moves to the upper category from cur-
rently played category of the iPod.
To move to (play) the category (song)
displayed, press knob.
You will be able to search through the
lower category of the selected category.
The order of iPod’s category is Playlist,
Artist, Albums, Genres, Songs, Composers.
8. Button
Displays the information of the file cur-
rently played in the order of
TITLE,ARTIST,ALBUM,NORMAL DISPLAY
(Displays no information if the file has no
song information.)
9.Knob & Button
When you rotate the knob clockwise, it
will display the songs (category) ahead
of the song currently played (category in
the same level).
Also, when you rotate the knob counter-
clockwise, it will display the songs (cate-
gory) before the song currently played
(category in the same level).
To listen to the song displayed in the
song category, press the button to skip to
and play the selected song.
ENTERTUNE
6 INFO
TUNE
3 MENU
TA_H800_GEN_AUDIOTA_H800_GEN_AUDIO
Page 615 of 1003
4123
Features of your vehicle
TA_GEN_RADIO
■
■
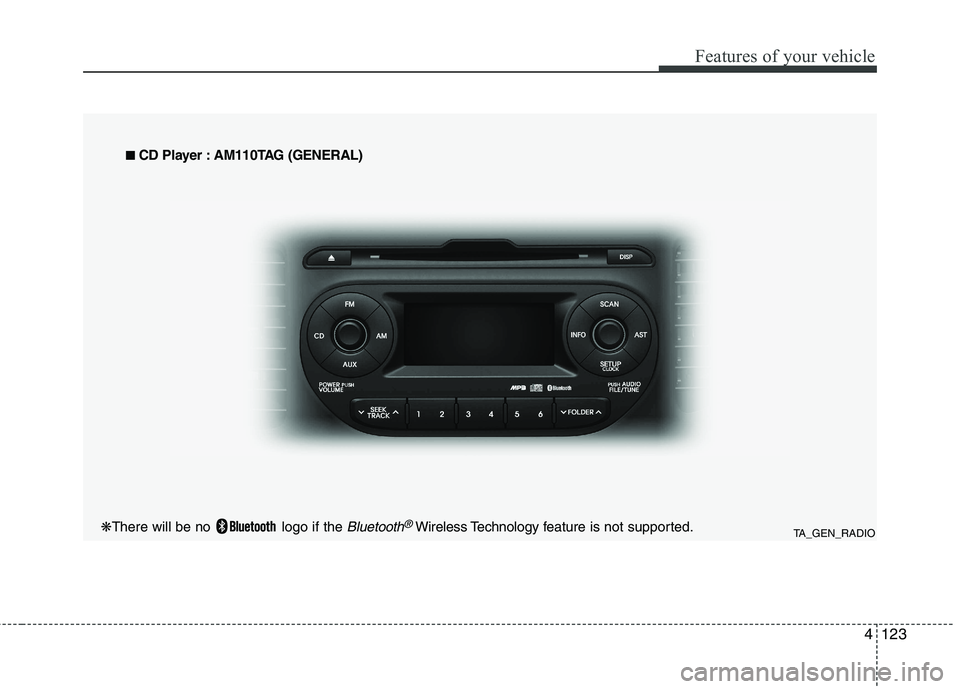
CD Player : AM110TAG (GENERAL)
❋ There will be no logo if the Bluetooth®Wireless Technology f eature is not supported.
Page 616 of 1003
Features of your vehicle
124
4
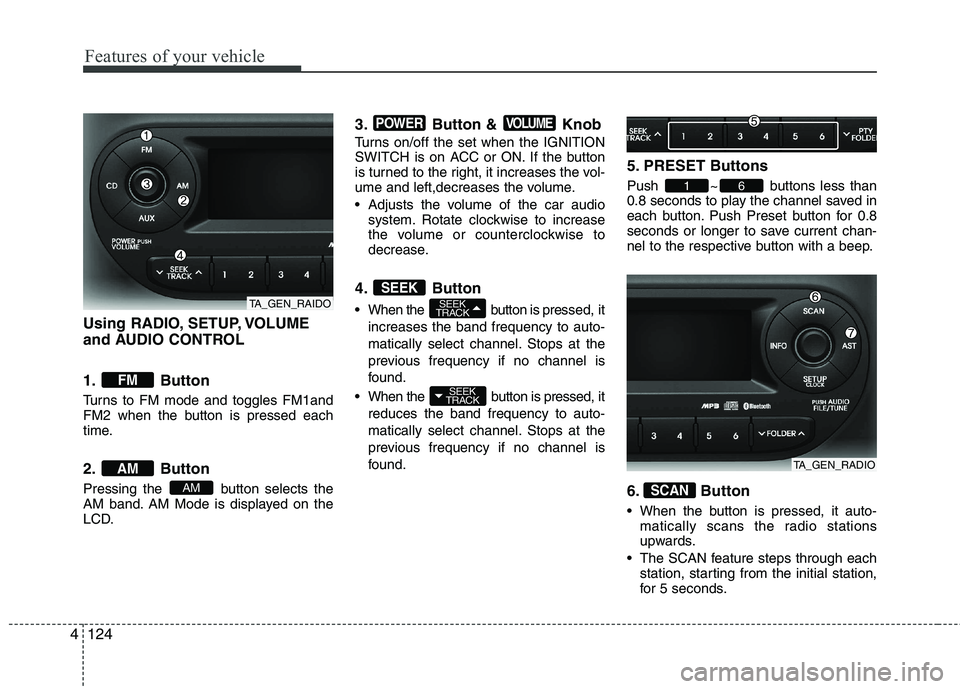
Using RADIO, SETUP, VOLUME
and AUDIO CONTROL
1. Button
Turns to FM mode and toggles FM1and
FM2 when the button is pressed each
time.
2. Button
Pressing the button selects the
AM band. AM Mode is displayed on the
LCD. 3. Button & Knob
Turns on/off the set when the IGNITION
SWITCH is on ACC or ON. If the button
is turned to the right, it increases the vol-
ume and left,decreases the volume.
Adjusts the volume of the car audio
system. Rotate clockwise to increase
the volume or counterclockwise to
decrease.
4. Button
When the button is pre ssed, it
increases the band frequency to auto-
matically select channel. Stops at the
previous frequency if no channel is
found.
When the button is pressed, it reduces the band frequency to auto-
matically select channel. Stops at the
previous frequency if no channel is
found. 5. PRESET Buttons
Push ~ buttons less than
0.8 seconds to play the channel saved in
each button. Push Preset button for 0.8
seconds or longer to save current chan-
nel to the respective button with a beep.
6. Button
When the button is pressed, it auto-
matically scans the radio stations
upwards.
The SCAN feature steps through each station, starting from the initial station,
for 5 seconds.
SCAN
61
SEEK
TRACK
SEEK
TRACKSEEK
VOLUMEPOWER
AM
AM
FM
TA_GEN_RAIDO
TA_GEN_RADIO
Page 617 of 1003
4125
Features of your vehicle
Press the button again to stopthe scan feature and to listen to the currently selected channel.
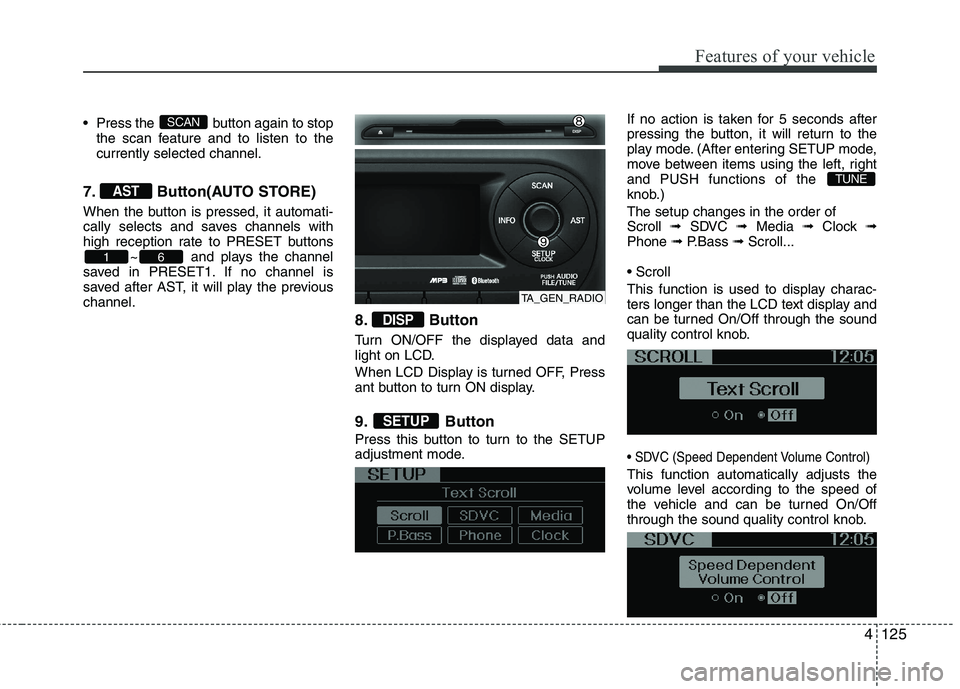
7. Button(AUTO STORE)
When the button is pressed, it automati-
cally selects and saves channels with
high reception rate to PRESET buttons ~ and plays the channel
saved in PRESET1. If no channel is
saved after AST, it will play the previouschannel.
8. Button
Turn ON/OFF the displayed data and
light on LCD.
When LCD Display is turned OFF, Press
ant button to turn ON display.
9. Button
Press this button to turn to the SETUP
adjustment mode.If no action is taken for 5 seconds after
pressing the button, it will return to the
play mode. (After entering SETUP mode,
move between items using the left, rightand PUSH functions of the
knob.) The setup changes in the order of Scroll
➟ SDVC ➟ Media ➟ Clock ➟
Phone ➟ P.Bass ➟ Scroll...
This function is used to display charac-
ters longer than the LCD text display and
can be turned On/Off through the sound
quality control knob.
This function automatically adjusts the
volume level according to the speed of
the vehicle and can be turned On/Off
through the sound quality control knob.
TUNE
SETUP
DISP
61
AST
SCAN
TA_GEN_RADIO
Page 618 of 1003
Features of your vehicle
126
4
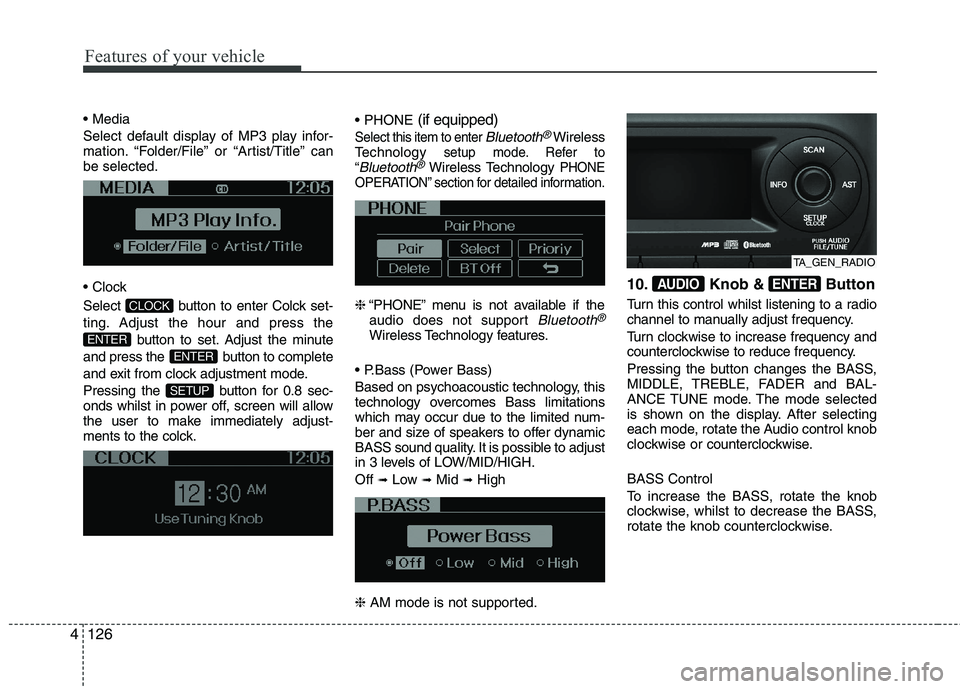
Select default display of MP3 play infor-
mation. “Folder/File” or “Artist/Title” canbe selected.
Select button to enter Colck set-
ting. Adjust the hour and press the
button to set. Adjust the minute
and press the button to complete
and exit from clock adjustment mode.
Pressing the button for 0.8 sec-
onds whilst in power off, screen will allow
the user to make immediately adjust-
ments to the colck.
(if equipped)
Select this item to enter Bluetooth®Wireless
Technologysetup mode. Refer to
“Bluetooth®Wireless TechnologyPHONE
OPERATION” section for detailed information.
❈ “PHONE” menu is not available if the
audio does not support Bluetooth®
Wireless Technology features.
Based on psychoacoustic technology, this
technology overcomes Bass limitations
which may occur due to the limited num-
ber and size of speakers to offer dynamic
BASS sound quality. It is possible to adjust
in 3 levels of LOW/MID/HIGH. Off ➟
Low ➟Mid ➟High
❈ AM mode is not supported. 10. Knob & Button
Turn this control whilst listening to a radio
channel to manually adjust frequency.
Turn clockwise to increase frequency and
counterclockwise to reduce frequency.
Pressing the button changes the BASS,
MIDDLE, TREBLE, FADER and BAL-
ANCE TUNE mode. The mode selected
is shown on the display. After selecting
each mode, rotate the Audio control knob
clockwise or
counterclockwise.
BASS Control
To increase the BASS, rotate the knob
clockwise, whilst to decrease the BASS,
rotate the knob counterclockwise.
ENTERAUDIO
SETUP
ENTER
ENTER
CLOCK
TA_GEN_RADIO
Page 619 of 1003
4127
Features of your vehicle
MIDDLE Control
To increase the MIDDLE, rotate the knob
clockwise, whilst to decrease the MID-
DLE, rotate the knob counterclockwise. TREBLE Control
To increase the TREBLE, rotate the knob
clockwise, whilst to decrease the TRE-
BLE, rotate the knob counterclockwise.
FADER Control
Turn the control knob clockwise to
emphasize rear speaker sound(front
speaker sound will be attenuated).
When the control knob is turned counter-
clockwise, front speaker sound will be
emphasized(rear speaker sound will be
attenuated). BALANCE Control
Rotate the knob clockwise to emphasize
right speaker sound(left speaker sound
will be attenuated).
When the control knob is turned counter
clockwise, left speaker sound will be
emphasized(right speaker sound will be
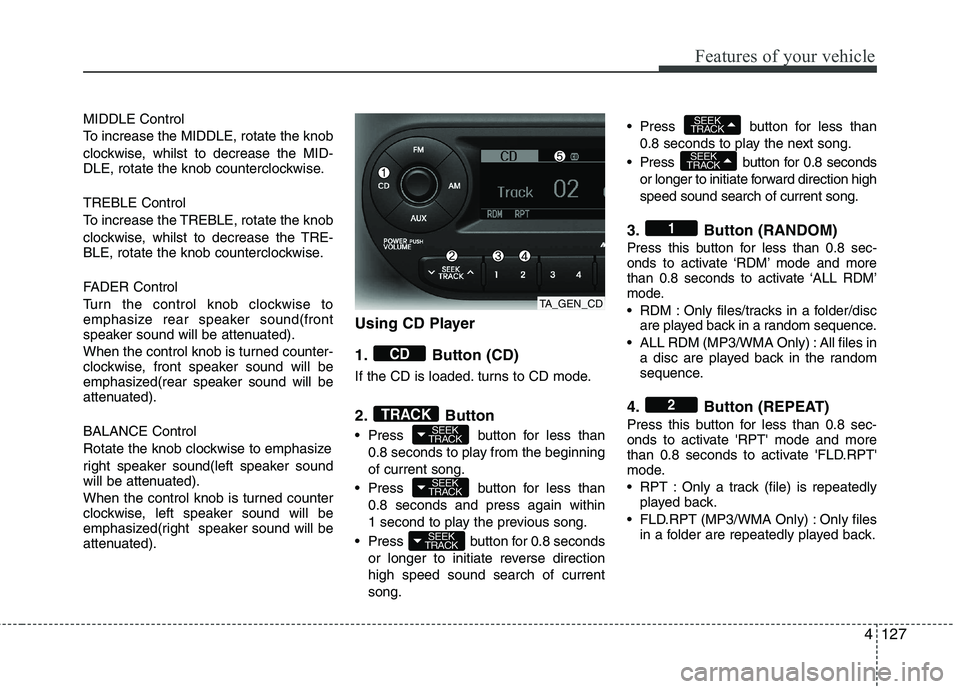
attenuated).Using CD Player
1. Button (CD)
If the CD is loaded. turns to CD mode.
2. Button
Press button for less than
0.8 seconds to play from the beginning of current song.
Press button for less than 0.8 seconds and press again within
1 second to play the previous song.
Press button for 0.8 seconds or longer to initiate reverse directionhigh speed sound search of currentsong. Press button for less than
0.8 seconds to play the next song.
Press button for 0.8 seconds or longer to initiate forward direction highspeed sound search of current song.
3. Button (RANDOM)
Press this button for less than 0.8 sec-
onds to activate ‘RDM’ mode and more
than 0.8 seconds to activate ‘ALL RDM’
mode.
RDM : Only files/tracks in a folder/disc are played back in a random sequence.
ALL RDM (MP3/WMA Only) : All files in a disc are played back in the random
sequence.
4. Button (REPEAT)
Press this button for less than 0.8 sec-
onds to activate 'RPT' mode and more
than 0.8 seconds to activate 'FLD.RPT'
mode.
RPT : Only a track (file) is repeatedly played back.
FLD.RPT (MP3/WMA Only) : Only files in a folder are repeatedly played back.
2
1
SEEK
TRACK
SEEK
TRACK
SEEK
TRACK
SEEK
TRACK
SEEK
TRACKTRACK
CD
TA_GEN_CD
Page 620 of 1003
Features of your vehicle
128
4
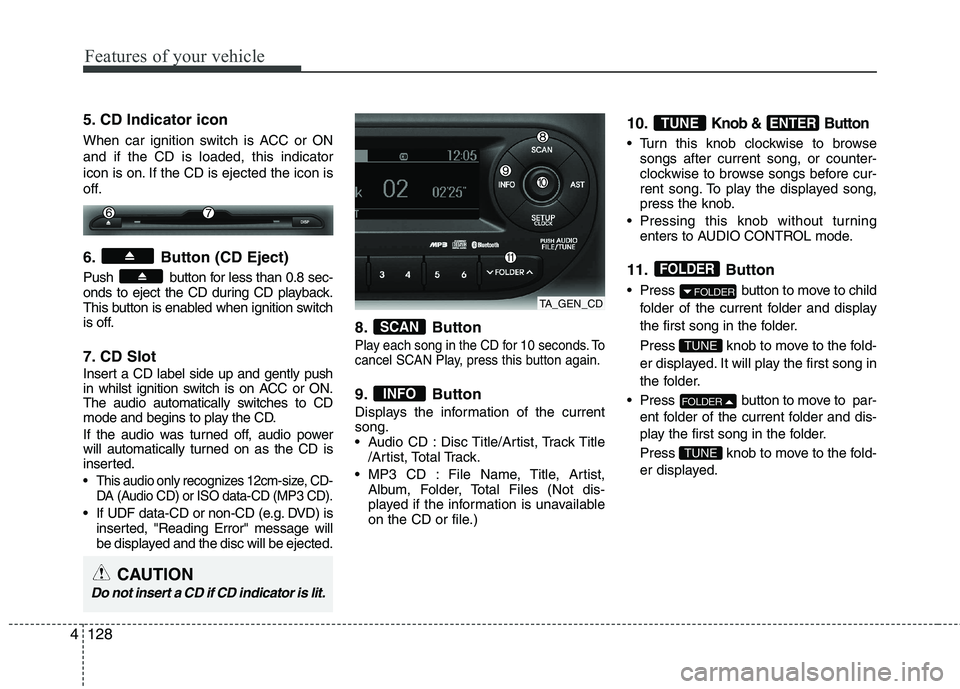
5. CD Indicator icon
When car ignition switch is ACC or ON and if the CD is loaded, this indicator
icon is on. If the CD is ejected the icon is
off.
6. Button (CD Eject)
Push button for less than 0.8 sec-
onds to eject the CD during CD playback.
This button is enabled when ignition switch
is off.
7. CD Slot
Insert a CD label side up and gently push
in whilst ignition switch is on ACC or ON.
The audio automatically switches to CD
mode and begins to play the CD.
If the audio was turned off, audio power
will automatically turned on as the CD is
inserted.
This audio only recognizes 12cm-size, CD-
DA (Audio CD) or ISO data-CD (MP3 CD).
If UDF data-CD or non-CD (e.g. DVD) isinserted, "Reading Error" message will
be displayed and the disc will be ejected. 8. Button
Play each song in the CD for 10 seconds. To
cancel SCAN Play, press this button again.
9. Button
Displays the information of the current song.
Audio CD : Disc Title/Artist, Track Title
/Artist, Total Track.
MP3 CD : File Name, Title, Artist, Album, Folder, Total Files (Not dis-
played if the information is unavailable
on the CD or file.) 10.
Knob & Button
Turn this knob clockwise to browse
songs after current song, or counter-
clockwise to browse songs before cur-
rent song. To play the displayed song,
press the knob.
Pressing this knob without turning enters to AUDIO CONTROL mode.
11. Button
Press button to move to child folder of the current folder and display
the first song in the folder.
Press knob to move to the fold-
er displayed. It will play the first song in
the folder.
Press button to move to par- ent folder of the current folder and dis-
play the first song in the folder.
Press knob to move to the fold-
er displayed.
TUNE
FOLDER
TUNE
FOLDER
FOLDER
ENTERTUNE
INFO
SCAN
TA_GEN_CD
CAUTION
Do not insert a CD if CD indicator is lit.