KIA QUORIS 2017 Owner's Manual
Manufacturer: KIA, Model Year: 2017, Model line: QUORIS, Model: KIA QUORIS 2017Pages: 514, PDF Size: 35.2 MB
Page 21 of 514
Safety features of your vehicle
4
3
WARNING
Do not adjust the seat while wearing seat belts. Moving the
seat cushion forward may
cause strong pressure on theabdomen.
Use extreme caution so that hands or other objects are not
caught in the seat mechanisms
while the seat is moving.
Use extreme caution when picking small objects trappedunder the seats or betweenthe seat and the center con-
sole. Your hands might be cut
or injured by the sharp edges
of the seats mechanism.
Do not put a cigarette lighter on the floor or seat. When you
operate the seat, gas maygush out of the lighter and
cause fire.
If there are occupants in the rear seats, be careful while
adjusting the front seat posi-tion.(Continued)
In order to avoid unnecessaryand perhaps severe air bag
injuries, always sit as far back
as possible from the steeringwheel while maintaining com-
fortable control of the vehicle.
We recommend that your chest
be at least 250 mm (10 inches)
away from the steering wheel.WARNING - Driver’s seat
Never attempt to adjust the seat while the vehicle is mov-
ing. This could result in loss
of control, and an accident
causing death, serious injury,
or property damage.
Do not allow anything to inter- fere with the normal position
of the seatback. Storing items
against a seatback or in any
other way interfering with
proper locking of a seatbackcould result in serious or fatal
injury in a sudden stop or col-lision.
Always drive and ride with your seatback upright and the lap
portion of the seat belt snug
and low across the hips. This
is the best position to protect
you in case of an accident.
(Continued)
Page 22 of 514
35
Safety features of your vehicle
Front seat adjustment
The front seat can be adjusted by
using the control switch located on
the doors. Before driving, adjust theseat to the proper position so as to
easily control the steering wheel,
pedals and switches on the instru-ment panel.Forward and backward
Push the control switch forward or
rearward to move the seat to the
desired position. Release the switchonce the seat reaches the desiredposition. When adjusting the seat position, the
headrest will be adjusted simultane-
ously to the proper position. (ifequipped)
CAUTION
The power seat is driven by anelectric motor. Stop operatingonce the adjustment is com- pleted. Excessive operationmay damage the electricalequipment.
When in operation, the power seat consumes a largeamount of electrical power. Toprevent unnecessary chargingsystem drain, don’t adjust the power seat longer than neces-sary while the engine is notrunning.
Do not operate two or more power seat control knobs atthe same time. Doing so mayresult in power seat motor orelectrical component malfunc- tion.
WARNING
The power seat is operable with
the engine start/stop button in
OFF.
Therefore, children should
never be left unattended in the
vehicle.
OKH032002
Page 23 of 514

Safety features of your vehicle
6
3
Cushion length adjustment
(for driver’s seat)
Push the control switch forward or
backward to move the seat cushion
to the desired length. Release the
switch once the seat cushion reach-es the desired length.
Seatback angle
Push the upper part of the control
switch forward or backward to move
the seatback to the desired angle.
Release the switch once the seatreaches the desired position.
Seat cushion height (if equipped)
Push the front portion of the control
switch up to raise or down to lower
the front part of the seat cushion.
Push the rear portion of the control
switch up to raise or down to lowerthe height of the seat cushion.
Release the switch once the seatreaches the desired position.
OKH033006CNOKH032005OKH032004
Page 24 of 514
37
Safety features of your vehicle
Lumbar support (for driver’s seat)
The lumbar support can be adjusted
by pressing the lumbar support
switch. Press the front portion of the
switch (1) to increase support or the
rear portion of the switch (2) to
decrease support.
To move the support position up or
down, press the switch (3) or (4).
Release the switch once the seat reaches the desired position.Driver position memory system (if equipped)
A driver position memory system is
provided to store and recall the driver
seat, outside rearview mirror, HUD*
(Head-Up Display), bright ness of the
instrument cluster illumination and
steering wheel positions with a sim-
ple button operation. By saving thedesired positions into the system
memory, different drivers can reposi-
tion the driver seat, outside rearview
mirror and steering wheel based
upon their driving preference.
* : if equipped
OKH032007
OKH042039
WARNING
Never attempt to operate the
driver position memory system
while the vehicle is moving. This could result in loss of con-
trol, and an accident causing
death, serious injury, or property
damage.
Page 25 of 514

Safety features of your vehicle
8
3
Storing positions into memory
using the buttons on the door
Storing driver’s seat positions
1. Shift the shift lever into P while the engine start/stop button is ON.
2. Adjust the driver seat, outside rearview mirror, HUD* (Head-up
Display), bright ness of the instru-ment cluster illumination and
steering wheel to positions com-
fortable for the driver.
3. Press SET button on the control panel. The system will beep once.
4. Press one of the memory buttons (1 or 2) within 5 seconds after
pressing the SET button. The sys-tem will beep twice when the mem-
ory has been successfully stored. 5.
"Driver 1 (or 2) settings saved" will
appear on the LCD display.
* : if equipped Recalling positions from memory
1. Shift the shift lever into P while the
engine start/stop button is ON.
2. To recall the position in memory, press the desired memory button
(1 or 2). The system will beep
once, then the driver seat, outside
rearview mirror and steeringwheel will automatically adjust to
the stored positions.
3.
"Driver 1(or 2) settings is applied" will
appear on the LCD display.
Adjusting one of the control knobs for
the driver seat, outside rearview mir-
ror and steering wheel while the sys-tem is recalling the stored positions
will cause the movement for that
component to stop and move in thedirection that the control knob is
moved. Other components will con-
tinue to the recalled position.
OKH045570L/OKH045571L
OKH045568L/OKH045569L
Page 26 of 514
39
Safety features of your vehicle
Easy access function
The steering wheel will move away
from the driver and the seat will move
rearward, when the engine start/stop
button is turned to the OFF position
and front driver’s door is opened.
The steering wheel will move toward
the driver and the seat will move for-
ward, when the engine start/stop but-
ton is turned to the ACC position or
when you insert the smart key into
the smart key holder with the shift
lever in the P position.
✽✽NOTICE
You can activate or deactivate the
easy access function in the instru-
ment cluster.
If you want detailed informations,
refer to the chapter 4.
Headrest (for front seat)
The driver's and front passenger's seats are equipped with a headrest
for the occupant's safety and comfort.
The headrest not only provides com-
fort for the driver and front passenger,
but also helps to protect the head and
neck in the event of a collision.WARNING
Use caution when recalling
adjustment memory while sitting
in the vehicle. Push the seat posi-
tion control knob to the desired
position immediately if the seat
moves too far in any direction.
OBH038075L
Page 27 of 514
Safety features of your vehicle
10
3
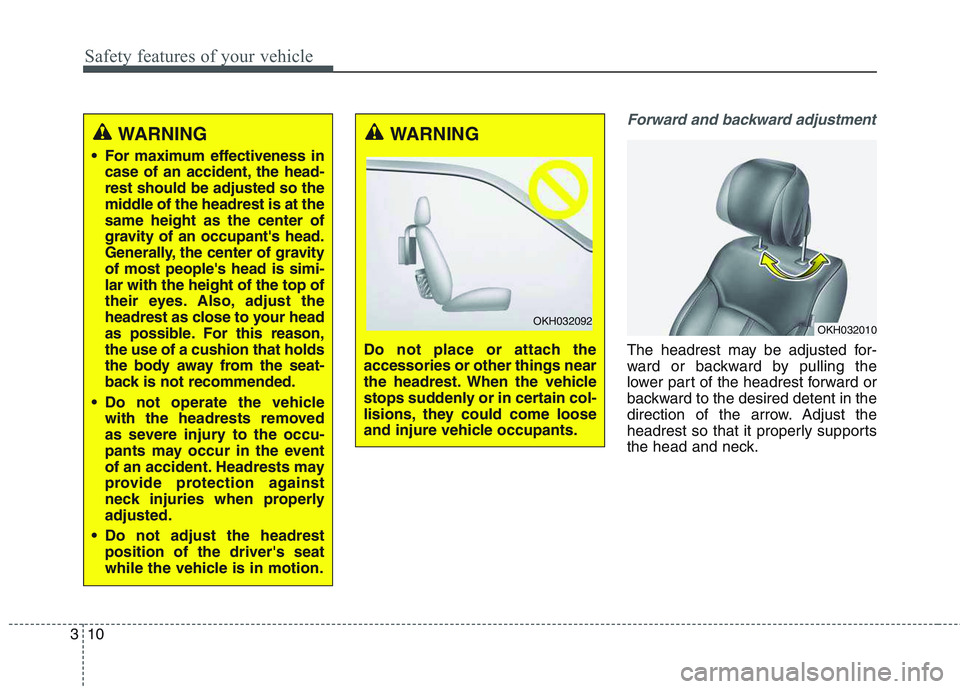
Forward and backward adjustment
The headrest may be adjusted for-
ward or backward by pulling the
lower part of the headrest forward or
backward to the desired detent in the
direction of the arrow. Adjust the
headrest so that it properly supports
the head and neck.
WARNING
For maximum effectiveness in case of an accident, the head- rest should be adjusted so the
middle of the headrest is at thesame height as the center of
gravity of an occupant's head.
Generally, the center of gravityof most people's head is simi-lar with the height of the top of
their eyes. Also, adjust the
headrest as close to your head
as possible. For this reason,the use of a cushion that holds
the body away from the seat-
back is not recommended.
Do not operate the vehicle with the headrests removed
as severe injury to the occu-
pants may occur in the event
of an accident. Headrests may
provide protection against
neck injuries when properlyadjusted.
Do not adjust the headrest position of the driver's seat
while the vehicle is in motion.WARNING
Do not place or attach the accessories or other things near
the headrest. When the vehicle
stops suddenly or in certain col-
lisions, they could come loose
and injure vehicle occupants.
OKH032092OKH032010
Page 28 of 514

311
Safety features of your vehicle
Adjusting the height up and down
For manual type
To raise the headrest, pull it up to the
desired position (1). To lower theheadrest, push and hold the release
button (2) on the headrest support
and lower the headrest to the desiredposition (3).For power type
Push the control switch up to raise or
down to lower the headrest. Release
the switch once the headrest reach-es the desired position.
OKH032008CAUTION
If you recline the seatback
towards the front with the head-rest and seat cushion raised, the headrest may come in con-tact with the sunvisor or otherparts of the vehicle.
OYFH034205OKH032011
Page 29 of 514

Safety features of your vehicle
12
3
Removal
1. Recline the seatback (2) with the
recliner control switch (1). For manual type
2. Raise it as far as it can go.
3. Press the release button (3) while
pulling upward (4). For power type
2. Raise it as far as it can go by
pulling the switch up (3).
3. Pull the headrest up (4).
OKH033095
OKH033096OKH033098L
Page 30 of 514

313
Safety features of your vehicle
Installation
1. Recline the seatback (2) with therecliner control switch (1). For manual type
2. Put the headrest poles (3) into the
holes while pressing the release
button (4).
3. Recline the seatback (6) with the recliner control switch (5).
4. Adjust the headrest to the appro- priate height. For power type
2. Raise it as far as it can go by
pulling the switch up (3).
3. Put the headrest poles (4) into the holes and then pull the switch
down (5) until the headrest moves
to the lowest position.
4. To install the headrest securely, move the headrest up and down 2
or 3 times by pulling the switch up
and down.
5. Recline the seatback (7) with the recliner control switch (6).
6. Adjust the headrest to the appro- priate height.
OKH033101
OKH033100
OKH033102