height KIA Rio 2008 2.G Owner's Manual
[x] Cancel search | Manufacturer: KIA, Model Year: 2008, Model line: Rio, Model: KIA Rio 2008 2.GPages: 219, PDF Size: 5.17 MB
Page 26 of 219
317
Knowing your vehicle
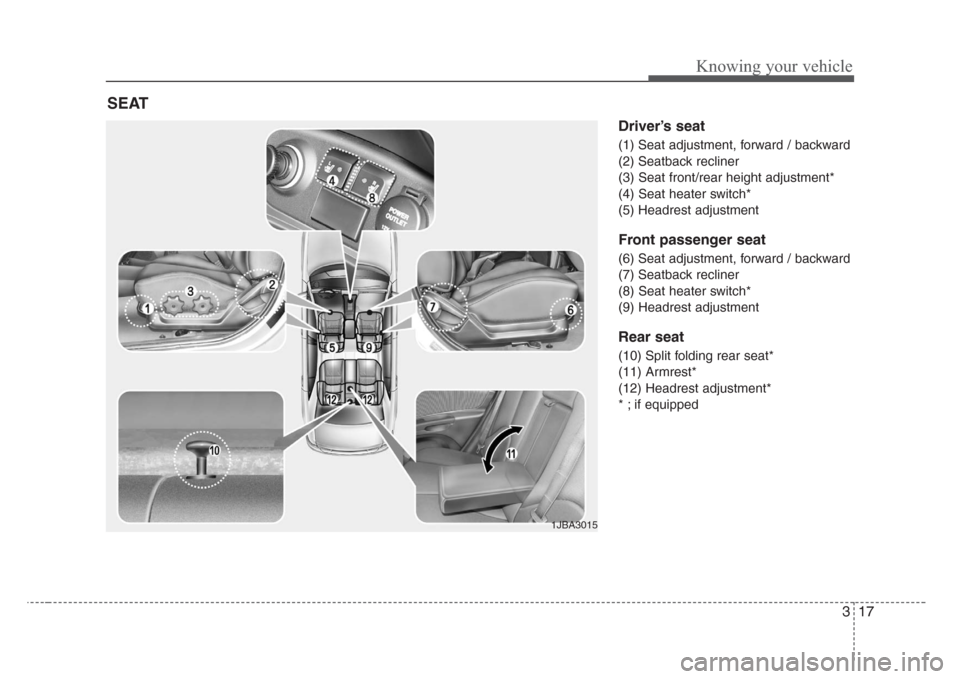
Driver’s seat
(1) Seat adjustment, forward / backward
(2) Seatback recliner
(3) Seat front/rear height adjustment*
(4) Seat heater switch*
(5) Headrest adjustment
Front passenger seat
(6) Seat adjustment, forward / backward
(7) Seatback recliner
(8) Seat heater switch*
(9) Headrest adjustment
Rear seat
(10) Split folding rear seat*
(11) Armrest*
(12) Headrest adjustment*
* ; if equipped
SEAT
1JBA3015
Page 28 of 219
319
Knowing your vehicle
Adjusting height of the driver’s seat
cushion (if equipped)
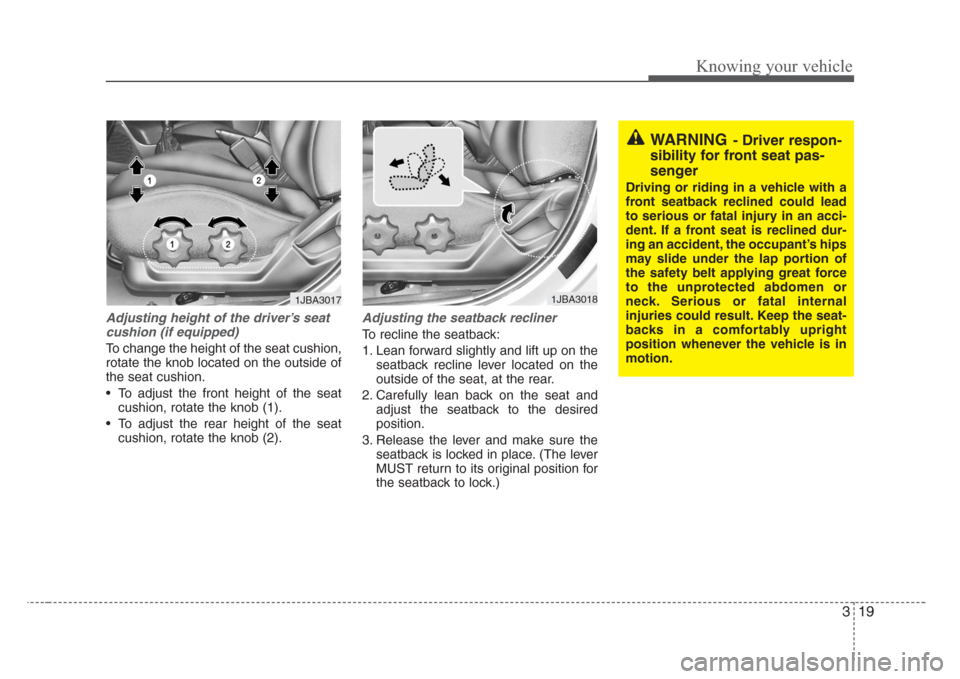
To change the height of the seat cushion,
rotate the knob located on the outside of
the seat cushion.
• To adjust the front height of the seat
cushion, rotate the knob (1).
• To adjust the rear height of the seat
cushion, rotate the knob (2).
Adjusting the seatback recliner
To recline the seatback:
1. Lean forward slightly and lift up on the
seatback recline lever located on the
outside of the seat, at the rear.
2. Carefully lean back on the seat and
adjust the seatback to the desired
position.
3. Release the lever and make sure the
seatback is locked in place. (The lever
MUST return to its original position for
the seatback to lock.)
1JBA30171JBA3018
WARNING- Driver respon-
sibility for front seat pas-
senger
Driving or riding in a vehicle with a
front seatback reclined could lead
to serious or fatal injury in an acci-
dent. If a front seat is reclined dur-
ing an accident, the occupant’s hips
may slide under the lap portion of
the safety belt applying great force
to the unprotected abdomen or
neck. Serious or fatal internal
injuries could result. Keep the seat-
backs in a comfortably upright
position whenever the vehicle is in
motion.
Page 30 of 219
321
Knowing your vehicle
Headrest adjustment
Adjusting the height up and down
The headrest not only provides comfort
for the driver and passengers, but also
helps to protect the head and neck in the
event of a collision.
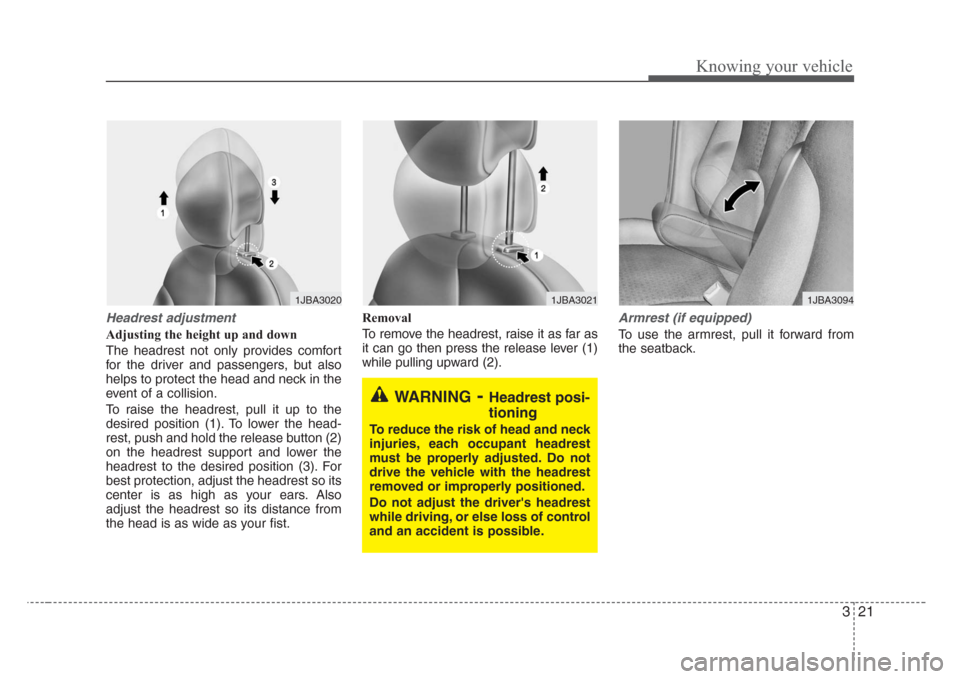
To raise the headrest, pull it up to the
desired position (1). To lower the head-
rest, push and hold the release button (2)
on the headrest support and lower the
headrest to the desired position (3). For
best protection, adjust the headrest so its
center is as high as your ears. Also
adjust the headrest so its distance from
the head is as wide as your fist.Removal
To remove the headrest, raise it as far as
it can go then press the release lever (1)
while pulling upward (2).
Armrest (if equipped)
To use the armrest, pull it forward from
the seatback.
1JBA30201JBA30211JBA3094
WARNING-Headrest posi-
tioning
To reduce the risk of head and neck
injuries, each occupant headrest
must be properly adjusted. Do not
drive the vehicle with the headrest
removed or improperly positioned.
Do not adjust the driver's headrest
while driving, or else loss of control
and an accident is possible.
Page 35 of 219
Knowing your vehicle
26 3
Armrest (if equipped)
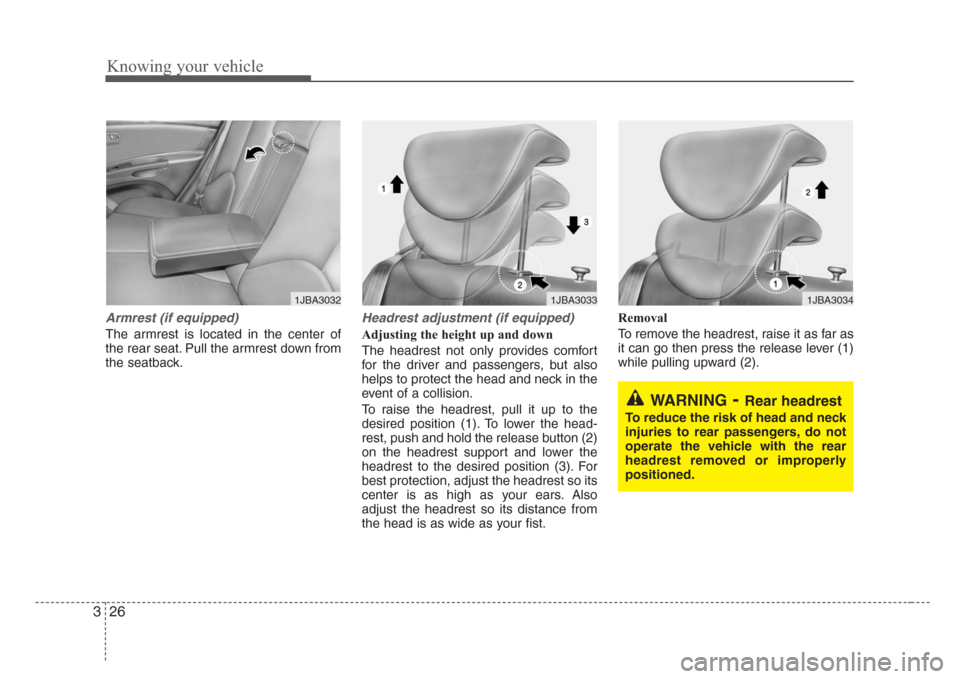
The armrest is located in the center of
the rear seat. Pull the armrest down from
the seatback.
Headrest adjustment (if equipped)
Adjusting the height up and down
The headrest not only provides comfort
for the driver and passengers, but also
helps to protect the head and neck in the
event of a collision.
To raise the headrest, pull it up to the
desired position (1). To lower the head-
rest, push and hold the release button (2)
on the headrest support and lower the
headrest to the desired position (3). For
best protection, adjust the headrest so its
center is as high as your ears. Also
adjust the headrest so its distance from
the head is as wide as your fist.Removal
To remove the headrest, raise it as far as
it can go then press the release lever (1)
while pulling upward (2).
1JBA30321JBA30331JBA3034
WARNING-Rear headrest
To reduce the risk of head and neck
injuries to rear passengers, do not
operate the vehicle with the rear
headrest removed or improperly
positioned.
Page 42 of 219
333
Knowing your vehicle
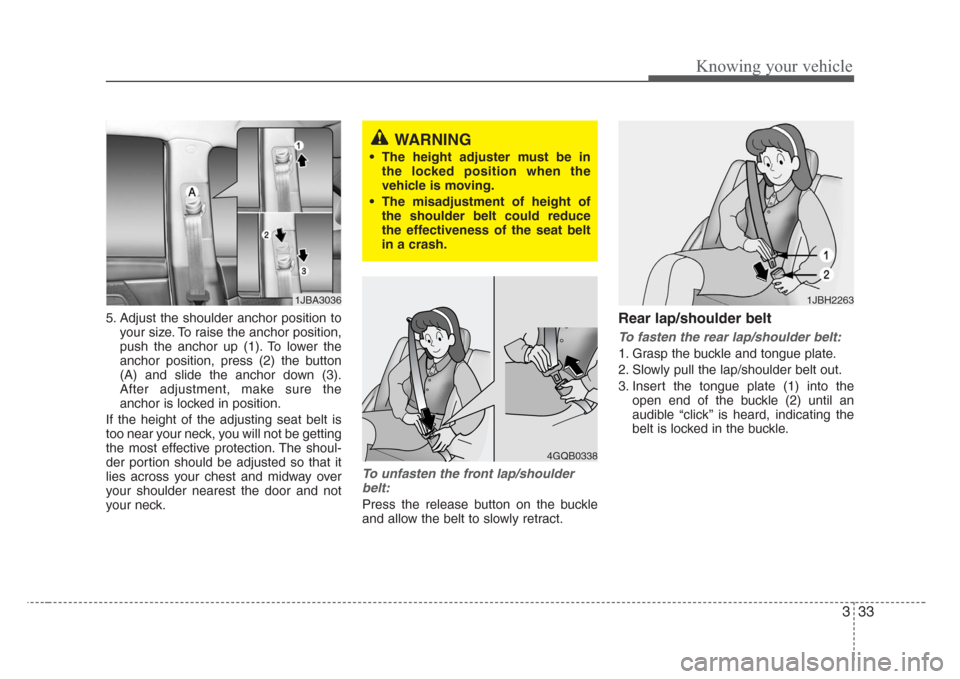
5. Adjust the shoulder anchor position to
your size. To raise the anchor position,
push the anchor up (1). To lower the
anchor position, press (2) the button
(A) and slide the anchor down (3).
After adjustment, make sure the
anchor is locked in position.
If the height of the adjusting seat belt is
too near your neck, you will not be getting
the most effective protection. The shoul-
der portion should be adjusted so that it
lies across your chest and midway over
your shoulder nearest the door and not
your neck.
To unfasten the front lap/shoulder
belt:
Press the release button on the buckle
and allow the belt to slowly retract.
Rear lap/shoulder belt
To f asten the rear lap/shoulder belt:
1. Grasp the buckle and tongue plate.
2. Slowly pull the lap/shoulder belt out.
3. Insert the tongue plate (1) into the
open end of the buckle (2) until an
audible “click’’ is heard, indicating the
belt is locked in the buckle.
4GQB0338
1JBA30361JBH2263
WARNING
• The height adjuster must be in
the locked position when the
vehicle is moving.
• The misadjustment of height of
the shoulder belt could reduce
the effectiveness of the seat belt
in a crash.
Page 74 of 219
365
Knowing your vehicle
Closing the hood
1. Before closing the hood, check the fol-
lowing:
• All filler caps in engine compartment
must be correctly installed.
• Gloves, rags or any other com-
bustible material must be removed
from the engine compartment.
2. Secure the support rod in its clip.
3. Lower the hood to about 30 cm (12
inches) height and then let it drop to
properly lock in place.
Make sure the hood is properly locked
before driving.
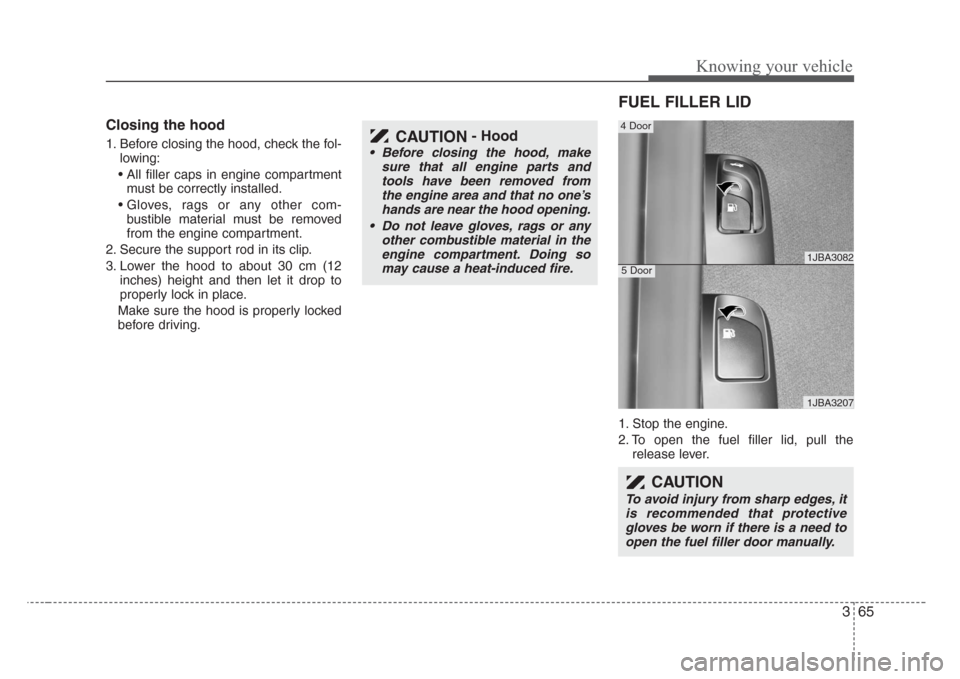
FUEL FILLER LID
1. Stop the engine.
2. To open the fuel filler lid, pull the
release lever.
CAUTION- Hood
• Before closing the hood, make
sure that all engine parts and
tools have been removed from
the engine area and that no one’s
hands are near the hood opening.
• Do not leave gloves,rags or any
other combustible material in the
engine compartment. Doing so
may cause a heat-induced fire.
1JBA3082
1JBA3207
4 Door
5 Door
CAUTION
To avoid injury from sharp edges,it
is recommended that protective
gloves be worn if there is a need to
open the fuel filler door manually.
Page 203 of 219
727
Maintenance
Wheel replacement
When replacing the metal wheels for
any reason, make sure the new
wheels are equivalent to the original
factory units in diameter, rim width
and offset.WARNING - Replacing
tires
• Driving on worn-out tires is
very hazardous and will
reduce braking effectiveness,
steering accuracy, and trac-
tion.
• Your vehicle is equipped with
tires designed to provide for
safe ride and handling capa-
bility. Do not use a size and
type of tire and wheel that is
different from the one that is
originally installed on your
vehicle. It can affect the safety
and performance of your vehi-
cle, which could lead to han-
dling failure or rollover and
serious injury. When replacing
the tires, be sure to equip all
four tires with the tire and
wheel of the same size, type,
tread, brand and load-carrying
capacity.
(Continued)(Continued)
If you nevertheless decide to
equip your vehicle with any
tire/wheel combination not
recommended by Kia for off
road driving, you should not
use these tires for highway
driving.
• The use of any other tire size
or type may seriously affect
ride, handling, ground clear-
ance,stopping distance, body
to tire clearance,snow tire
clearance, and speedometer
reliability.
• It is best to replace all four
tires at the same time. If that is
not possible, or necessary,
then replace the two front or
two rear tires as a pair.
Replacing just one tire can
seriously affect your vehicle’s
handling.
WARNING
A wheel that is not the correct
size may adversely affect wheel
and bearing life, braking and
stopping abilities, handling
characteristics, ground clear-
ance, body-to-tire clearance,
snow chain clearance,
speedometer calibration, head-
light aim and bumper height.
Page 204 of 219
Maintenance
28 7
Tire maintenance
In addition to proper inflation, correct
wheel alignment helps to decrease
tire wear. If you find a tire is worn
unevenly, have your dealer check the
wheel alignment.
When you have new tires installed,
make sure they are balanced. This
will increase vehicle ride comfort and
tire life. Additionally, a tire should
always be rebalanced if it is removed
from the wheel.
Tire traction
Tire traction can be reduced if you
drive on worn tires, tires that are
improperly inflated or on slippery
road surfaces. Tires should be
replaced when tread wear indicators
appear. To reduce the possibility of
losing control, slow down whenever
there is rain, snow or ice on the road.
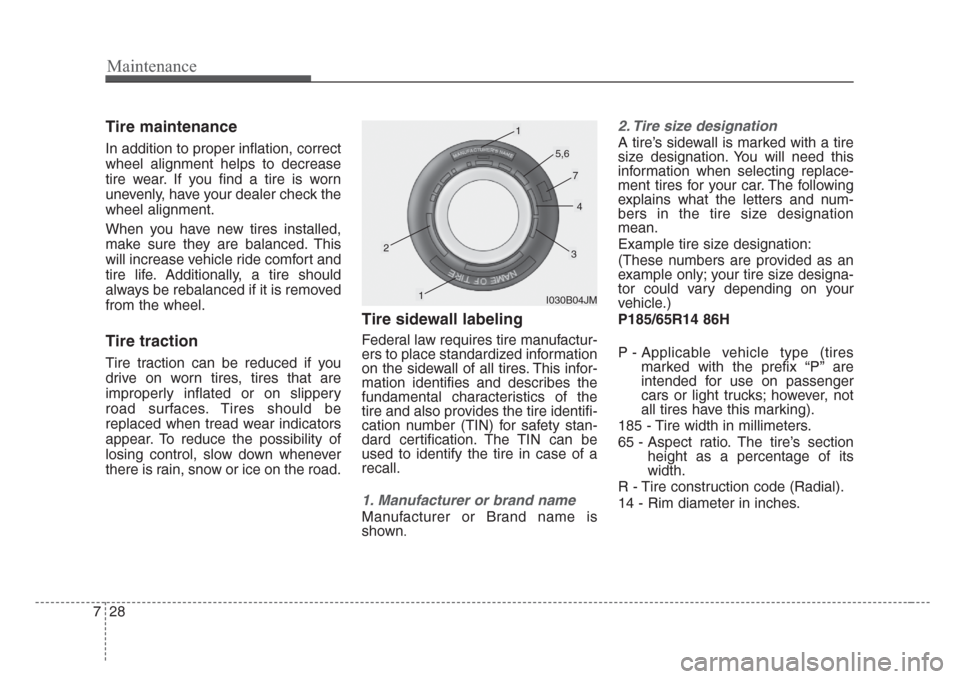
Tire sidewall labeling
Federal law requires tire manufactur-
ers to place standardized information
on the sidewall of all tires. This infor-
mation identifies and describes the
fundamental characteristics of the
tire and also provides the tire identifi-
cation number (TIN) for safety stan-
dard certification. The TIN can be
used to identify the tire in case of a
recall.
1. Manufacturer or brand name
Manufacturer or Brand name is
shown
.
2. Tire size designation
A tire’s sidewall is marked with a tire
size designation. You will need this
information when selecting replace-
ment tires for your car. The following
explains what the letters and num-
bers in the tire size designation
mean.
Example tire size designation:
(These numbers are provided as an
example only; your tire size designa-
tor could vary depending on your
vehicle.)
P185/65R14 86H
P - Applicable vehicle type (tires
marked with the prefix “P’’ are
intended for use on passenger
cars or light trucks; however, not
all tires have this marking).
185 - Tire width in millimeters.
65 - Aspect ratio. The tire’s section
height as a percentage of its
width.
R - Tire construction code (Radial).
14 - Rim diameter in inches.
I030B04JM
1
1
23
4
5,6
7
Page 214 of 219
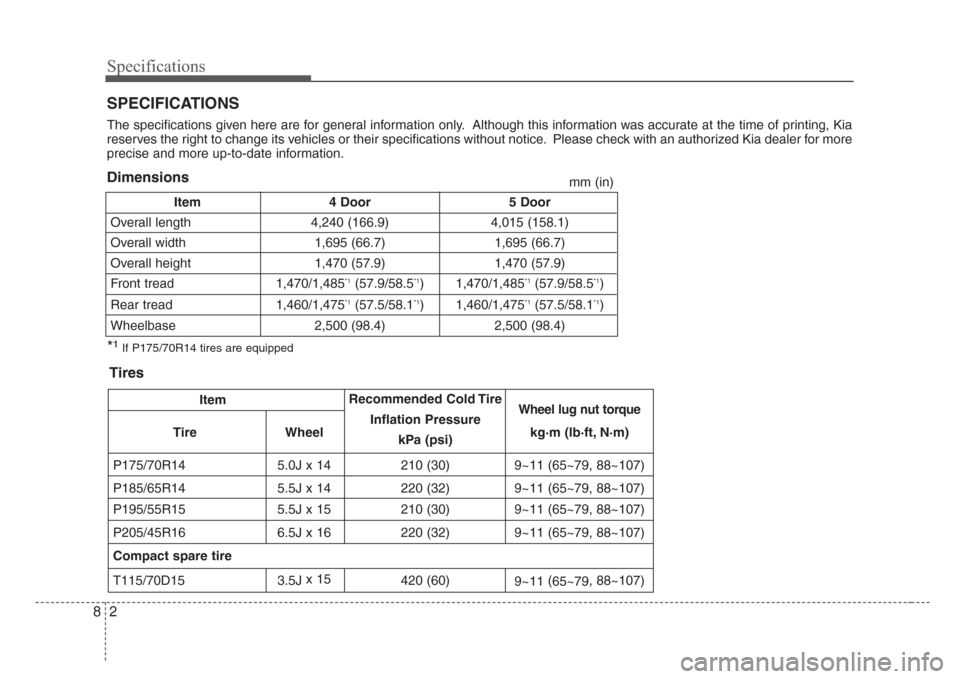
Specifications
2 8
Item 4 Door 5 Door
Overall length 4,240 (166.9) 4,015 (158.1)
Overall width 1,695 (66.7) 1,695 (66.7)
Overall height 1,470 (57.9) 1,470 (57.9)
Front tread 1,470/1,485
*1(57.9/58.5*1) 1,470/1,485*1(57.9/58.5*1)
Rear tread 1,460/1,475
*1(57.5/58.1*1) 1,460/1,475*1(57.5/58.1*1)
Wheelbase 2,500 (98.4) 2,500 (98.4)
*¹If P175/70R14 tires are equipped
mm (in)
SPECIFICATIONS
The specifications given here are for general information only. Although this information was accurate at the time of printing, Kia
reserves the right to change its vehicles or their specifications without notice. Please check with an authorized Kia dealer for more
precise and more up-to-date information.
ItemRecommended Cold TireWheel lug nut torque
Tire WheelInflation Pressure
kPa (psi)kg·m (lb·ft, N·m)
P175/70R14 5.0J x 14 210 (30) 9~11 (65~79, 88~107)
P185/65R14 5.5J x 14 220 (32) 9~11 (65~79, 88~107)
P195/55R15 5.5J x 15 210 (30) 9~11 (65~79, 88~107)
P205/45R16 6.5J x 16 220 (32) 9~11 (65~79, 88~107)
Compact spare tire
T115/70D15 3.5Jx 15
420 (60)
9~11(
65~79, 88~107)
Tires Dimensions