display KIA Rio 2009 2.G Owner's Manual
[x] Cancel search | Manufacturer: KIA, Model Year: 2009, Model line: Rio, Model: KIA Rio 2009 2.GPages: 219, PDF Size: 2.47 MB
Page 85 of 219
Knowing your vehicle76
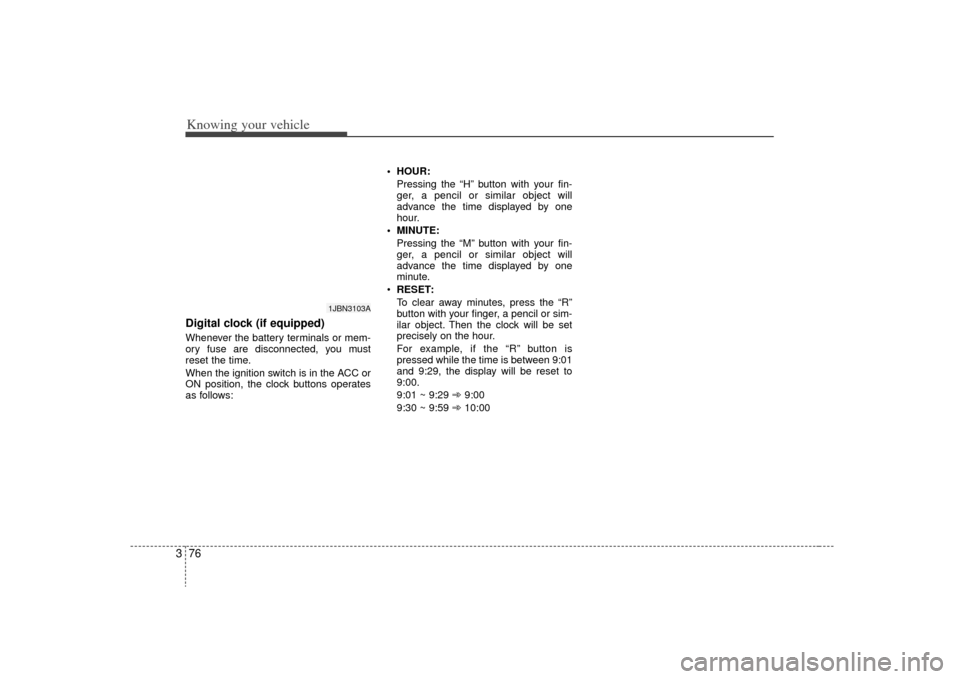
3Digital clock (if equipped)Whenever the battery terminals or mem-
ory fuse are disconnected, you must
reset the time.
When the ignition switch is in the ACC or
ON position, the clock buttons operates
as follows: HOUR:
Pressing the “H” button with your fin-
ger, a pencil or similar object will
advance the time displayed by one
hour.
MINUTE: Pressing the “M” button with your fin-
ger, a pencil or similar object will
advance the time displayed by one
minute.
RESET:
To clear away minutes, press the “R”
button with your finger, a pencil or sim-
ilar object. Then the clock will be set
precisely on the hour.
For example, if the “R” button is
pressed while the time is between 9:01
and 9:29, the display will be reset to
9:00.
9:01 ~ 9:29 ➾ 9:00
9:30 ~ 9:59 ➾ 10:00
1JBN3103A
Page 95 of 219
Knowing your vehicle86
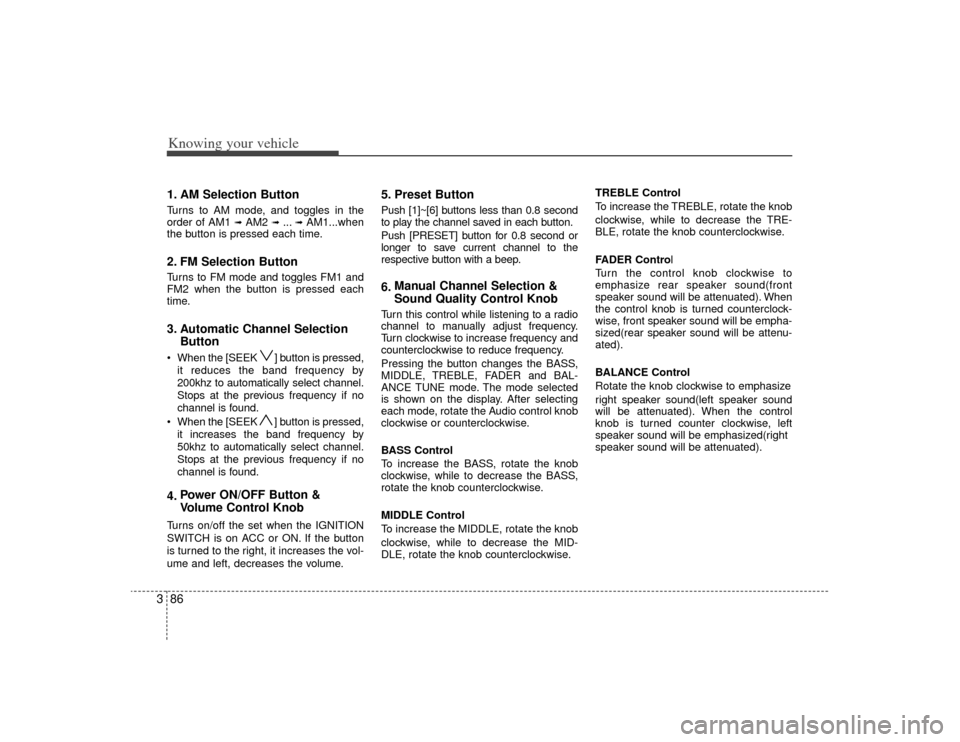
31. AM Selection ButtonTurns to AM mode, and toggles in the
order of AM1
➟ AM2
➟ ...➟ AM1...when
the button is pressed each time.
2. FM Selection ButtonTurns to FM mode and toggles FM1 and
FM2 when the button is pressed each
time.3. Automatic Channel Selection Button When the [SEEK ] button is pressed,
it reduces the band frequency by
200khz to automatically select channel.
Stops at the previous frequency if no
channel is found.
When the [SEEK ] button is pressed, it increases the band frequency by
50khz to automatically select channel.
Stops at the previous frequency if no
channel is found.4. Power ON/OFF Button &
Volume Control KnobTurns on/off the set when the IGNITION
SWITCH is on ACC or ON. If the button
is turned to the right, it increases the vol-
ume and left, decreases the volume.
5. Preset ButtonPush [1]~[6] buttons less than 0.8 second
to play the channel saved in each button.
Push [PRESET] button for 0.8 second or
longer to save current channel to the
respective button with a beep.6.Manual Channel Selection &
Sound Quality Control KnobTurn this control while listening to a radio
channel to manually adjust frequency.
Turn clockwise to increase frequency and
counterclockwise to reduce frequency.
Pressing the button changes the BASS,
MIDDLE, TREBLE, FADER and BAL-
ANCE TUNE mode. The mode selected
is shown on the display. After selecting
each mode, rotate the Audio control knob
clockwise or counterclockwise.
BASS Control
To increase the BASS, rotate the knob
clockwise, while to decrease the BASS,
rotate the knob counterclockwise.
MIDDLE Control
To increase the MIDDLE, rotate the knob
clockwise, while to decrease the MID-
DLE, rotate the knob counterclockwise. TREBLE Control
To increase the TREBLE, rotate the knob
clockwise, while to decrease the TRE-
BLE, rotate the knob counterclockwise.
FADER Control
Turn the control knob clockwise to
emphasize rear speaker sound(front
speaker sound will be attenuated). When
the control knob is turned counterclock-
wise, front speaker sound will be empha-
sized(rear speaker sound will be attenu-
ated).
BALANCE Control
Rotate the knob clockwise to emphasize
right speaker sound(left speaker sound
will be attenuated). When the control
knob is turned counter clockwise, left
speaker sound will be emphasized(right
speaker sound will be attenuated).
Page 98 of 219
389
Knowing your vehicle
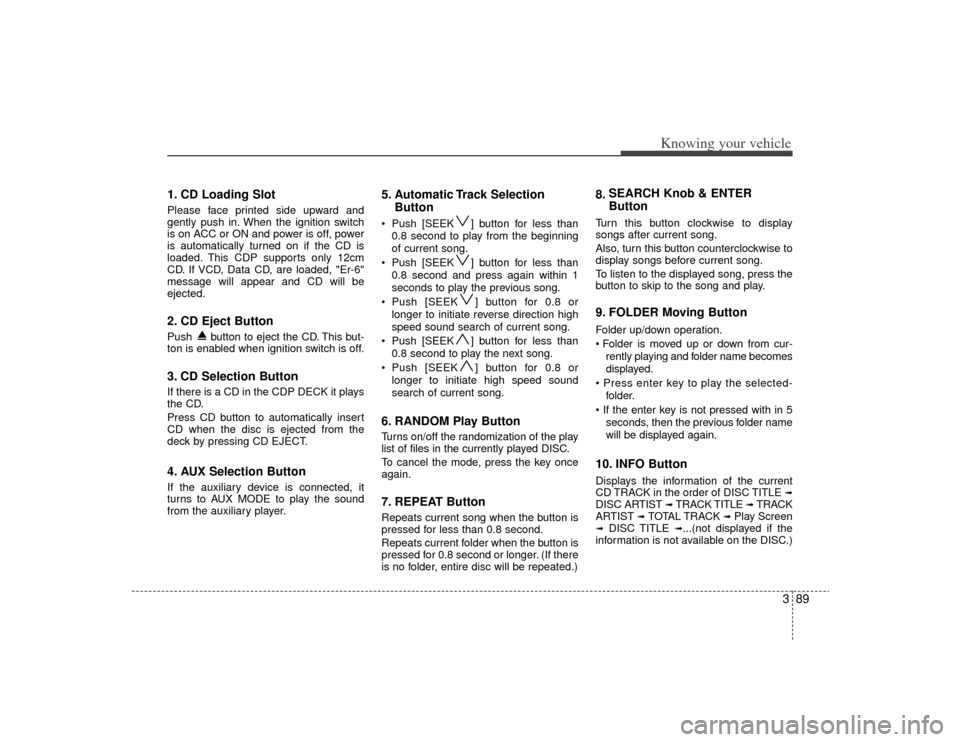
1. CD Loading SlotPlease face printed side upward and
gently push in. When the ignition switch
is on ACC or ON and power is off, power
is automatically turned on if the CD is
loaded. This CDP supports only 12cm
CD. If VCD, Data CD, are loaded, "Er-6"
message will appear and CD will be
ejected.2. CD Eject ButtonPush button to eject the CD. This but-
ton is enabled when ignition switch is off.3. CD Selection ButtonIf there is a CD in the CDP DECK it plays
the CD.
Press CD button to automatically insert
CD when the disc is ejected from the
deck by pressing CD EJECT.4. AUX Selection ButtonIf the auxiliary device is connected, it
turns to AUX MODE to play the sound
from the auxiliary player.
5. Automatic Track SelectionButton Push [SEEK ] button for less than
0.8 second to play from the beginning
of current song.
Push [SEEK ] button for less than 0.8 second and press again within 1
seconds to play the previous song.
Push [SEEK ] button for 0.8 or longer to initiate reverse direction high
speed sound search of current song.
Push [SEEK ] button for less than 0.8 second to play the next song.
Push [SEEK ] button for 0.8 or longer to initiate high speed sound
search of current song.6. RANDOM Play ButtonTurns on/off the randomization of the play
list of files in the currently played DISC.
To cancel the mode, press the key once
again.7. REPEAT ButtonRepeats current song when the button is
pressed for less than 0.8 second.
Repeats current folder when the button is
pressed for 0.8 second or longer. (If there
is no folder, entire disc will be repeated.)
8. SEARCH Knob & ENTER
ButtonTurn this button clockwise to display
songs after current song.
Also, turn this button counterclockwise to
display songs before current song.
To listen to the displayed song, press the
button to skip to the song and play.9. FOLDER Moving ButtonFolder up/down operation.
rently playing and folder name becomes
displayed.
folder.
seconds, then the previous folder name
will be displayed again.10. INFO ButtonDisplays the information of the current
CD TRACK in the order of DISC TITLE
➟
DISC AR TIST
➟ TRACK TITLE
➟ TRACK
ARTIST
➟ TOTAL TRACK
➟ Play Screen
➟
DISC TITLE
➟...(not displayed if the
information is not available on the DISC.)
Page 103 of 219
Knowing your vehicle94
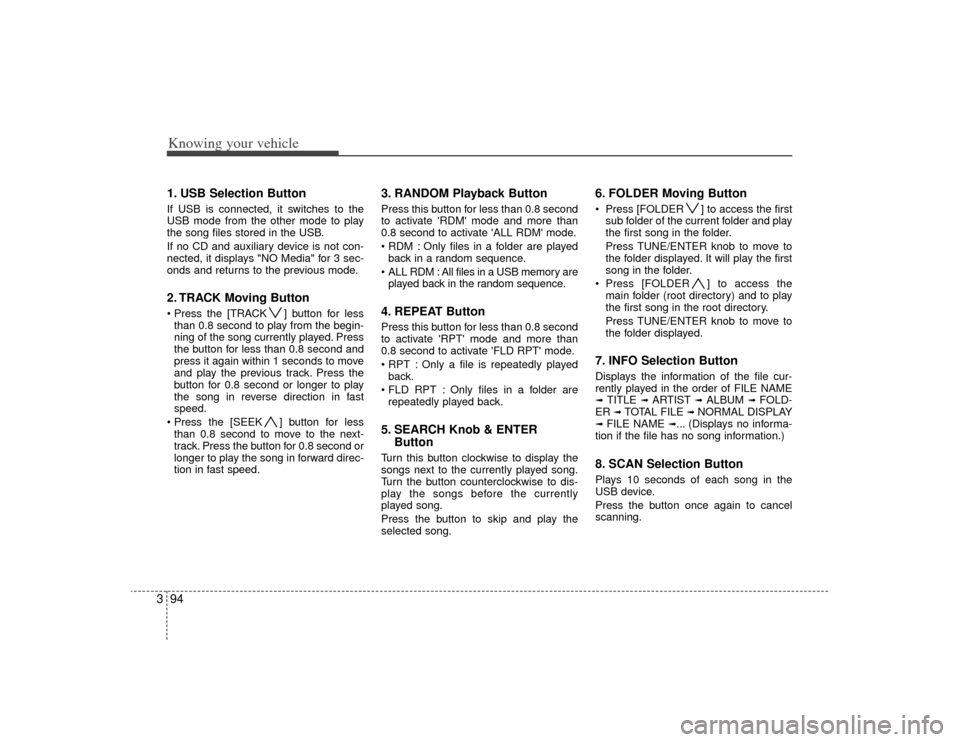
31. USB Selection ButtonIf USB is connected, it switches to the
USB mode from the other mode to play
the song files stored in the USB.
If no CD and auxiliary device is not con-
nected, it displays "NO Media" for 3 sec-
onds and returns to the previous mode.2. TRACK Moving Button ] button for less
than 0.8 second to play from the begin-
ning of the song currently played. Press
the button for less than 0.8 second and
press it again within 1 seconds to move
and play the previous track. Press the
button for 0.8 second or longer to play
the song in reverse direction in fast
speed.
] button for less than 0.8 second to move to the next-
track. Press the button for 0.8 second or
longer to play the song in forward direc-
tion in fast speed.
3. RANDOM Playback ButtonPress this button for less than 0.8 second
to activate 'RDM' mode and more than
0.8 second to activate 'ALL RDM' mode.
Only files in a folder are playedback in a random sequence.
ALL RDM : All files in a USB memory are played back in the random sequence.4. REPEAT ButtonPress this button for less than 0.8 second
to activate 'RPT' mode and more than
0.8 second to activate 'FLD RPT' mode.
Only a file is repeatedly playedback.
Only files in a folder are repeatedly played back.5. SEARCH Knob & ENTER ButtonTurn this button clockwise to display the
songs next to the currently played song.
Turn the button counterclockwise to dis-
play the songs before the currently
played song.
Press the button to skip and play the
selected song.
6. FOLDER Moving Button Press [FOLDER ] to access the first
sub folder of the current folder and play
the first song in the folder.
Press TUNE/ENTER knob to move to
the folder displayed. It will play the first
song in the folder.
Press [FOLDER ] to access the main folder (root directory) and to play
the first song in the root directory.
Press TUNE/ENTER knob to move to
the folder displayed.7. INFO Selection ButtonDisplays the information of the file cur-
rently played in the order of FILE NAME➟ TITLE
➟ ARTIST
➟ ALBUM
➟ FOLD-
ER
➟ TOTAL FILE
➟ NORMAL DISPLAY
➟ FILE NAME
➟... (Displays no informa-
tion if the file has no song information.)
8. SCAN Selection ButtonPlays 10 seconds of each song in the
USB device.
Press the button once again to cancel
scanning.
Page 105 of 219
Knowing your vehicle96
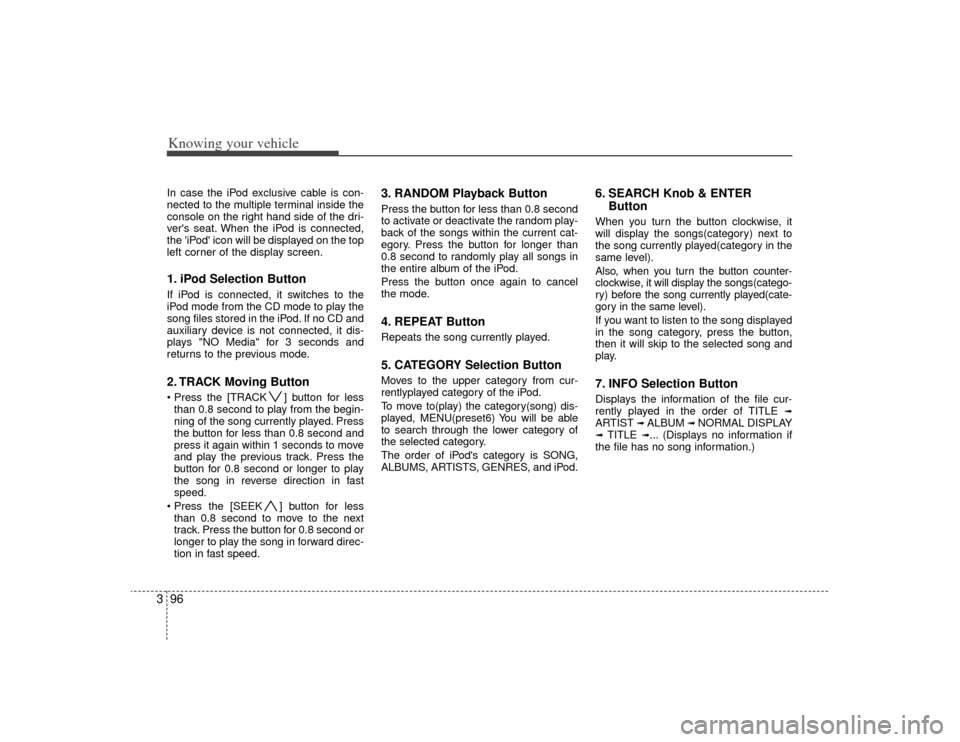
3In case the iPod exclusive cable is con-
nected to the multiple terminal inside the
console on the right hand side of the dri-
ver's seat. When the iPod is connected,
the 'iPod' icon will be displayed on the top
left corner of the display screen.1. iPod Selection ButtonIf iPod is connected, it switches to the
iPod mode from the CD mode to play the
song files stored in the iPod. If no CD and
auxiliary device is not connected, it dis-
plays "NO Media" for 3 seconds and
returns to the previous mode.2. TRACK Moving Button ] button for less
than 0.8 second to play from the begin-
ning of the song currently played. Press
the button for less than 0.8 second and
press it again within 1 seconds to move
and play the previous track. Press the
button for 0.8 second or longer to play
the song in reverse direction in fast
speed.
] button for less than 0.8 second to move to the next
track. Press the button for 0.8 second or
longer to play the song in forward direc-
tion in fast speed.
3. RANDOM Playback ButtonPress the button for less than 0.8 second
to activate or deactivate the random play-
back of the songs within the current cat-
egory. Press the button for longer than
0.8 second to randomly play all songs in
the entire album of the iPod.
Press the button once again to cancel
the mode.4. REPEAT ButtonRepeats the song currently played.5. CATEGORY Selection ButtonMoves to the upper category from cur-
rentlyplayed category of the iPod.
To move to(play) the category(song) dis-
played, MENU(preset6) You will be able
to search through the lower category of
the selected category.
The order of iPod's category is SONG,
ALBUMS, ARTISTS, GENRES, and iPod.
6. SEARCH Knob & ENTER ButtonWhen you turn the button clockwise, it
will display the songs(category) next to
the song currently played(category in the
same level).
Also, when you turn the button counter-
clockwise, it will display the songs(catego-
ry) before the song currently played(cate-
gory in the same level).
If you want to listen to the song displayed
in the song category, press the button,
then it will skip to the selected song and
play.7. INFO Selection ButtonDisplays the information of the file cur-
rently played in the order of TITLE
➟
ARTIST
➟ ALBUM
➟ NORMAL DISPLAY
➟ TITLE
➟... (Displays no information if
the file has no song information.)
Page 106 of 219
397
Knowing your vehicle
✽
✽NOTICE FOR USING iPod
DEVICE• Some iPod models might not sup- port the communication protocol
and the files will not be played.
(iPod models supported: Mini, 4G,
Photo, Nano, 5G)
• The order of search or playback of songs in the iPod can be different
from the order searched in the
audio system.
• If the iPod crashes due to its own trouble, reset the iPod. (Reset:
Refer to iPod manual)
• An iPod may not operate normally on low battery.
CAUTION IN USING
iPod DEVICE
You need the power cable exclu-
sive for an iPod in order to oper-ate an iPod with the buttons on the audio system. The PC cableprovided by Apple may cause amalfunction and do not use it for vehicle use.
When connecting the device with an iPod cable, push in the jackfully to not to interfere with com-munication.
When adjusting the sound effects of an iPod and the audio system,the sound effects of both deviceswill overlap and might reduce ordistort the quality of the sound.
Deactivate (turn off) the equalizer function of an iPod when adjust-ing the audio system’s volume, and turn off the equalizer of theaudio system when using the equalizer of an iPod.
(Continued)
(Continued) When the iPod cable is connected, the system can be switched to theAUX mode even without the iPod device and can cause noise.Disconnect the iPod cable when you are not using the iPod device.
When the iPod is not used for the audio system, the iPod cable hasto be separate from iPod device. Original display of iPod may not bedisplayed.
Page 205 of 219
729
Maintenance
86 - Load Index, a numerical codeassociated with the maximum
load the tire can carry.
H - Speed Rating Symbol. See the speed rating chart in this section
for additional information.Wheel size designation Wheels are also marked with impor-
tant information that you need if you
ever have to replace one. The follow-
ing explains what the letters and
numbers in the wheel size designa-
tion mean.
Example wheel size designation:
5.5JX14
5.5 - Rim width in inches.
J - Rim contour designation.
14 - Rim diameter in inches.
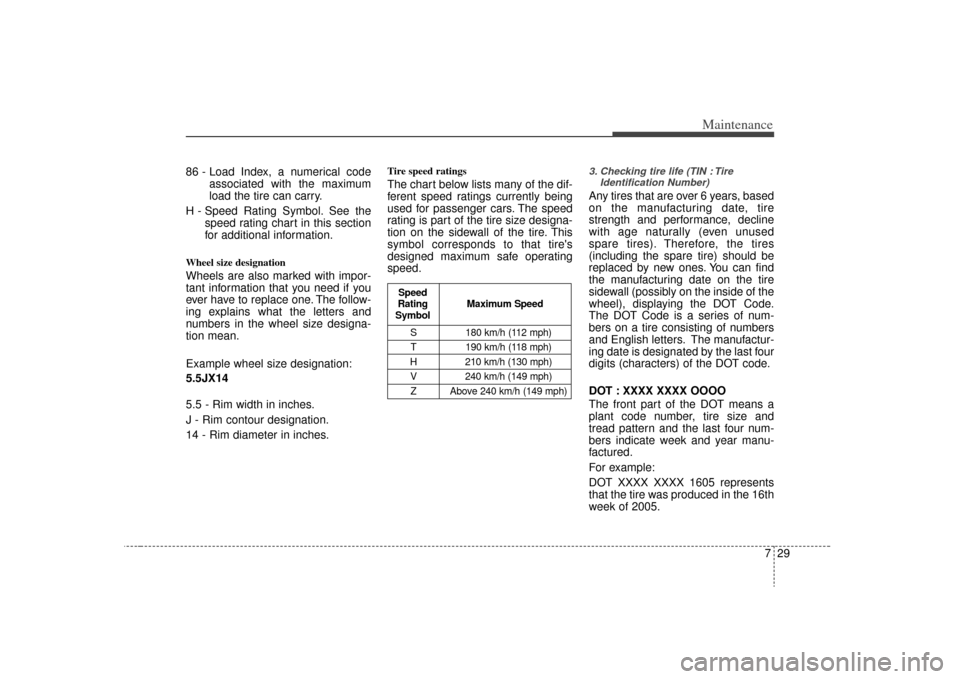
Tire speed ratings The chart below lists many of the dif-
ferent speed ratings currently being
used for passenger cars. The speed
rating is part of the tire size designa-
tion on the sidewall of the tire. This
symbol corresponds to that tire's
designed maximum safe operating
speed.
3. Checking tire life (TIN : Tire
Identification Number) Any tires that are over 6 years, based
on the manufacturing date, tire
strength and performance, decline
with age naturally (even unused
spare tires). Therefore, the tires
(including the spare tire) should be
replaced by new ones. You can find
the manufacturing date on the tire
sidewall (possibly on the inside of the
wheel), displaying the DOT Code.
The DOT Code is a series of num-
bers on a tire consisting of numbers
and English letters. The manufactur-
ing date is designated by the last four
digits (characters) of the DOT code.
DOT : XXXX XXXX OOOO
The front part of the DOT means a
plant code number, tire size and
tread pattern and the last four num-
bers indicate week and year manu-
factured.
For example:
DOT XXXX XXXX 1605 represents
that the tire was produced in the 16th
week of 2005.
S 180 km/h (112 mph)
T 190 km/h (118 mph)
H 210 km/h (130 mph) V 240 km/h (149 mph)Z Above 240 km/h (149 mph)
Maximum Speed
Speed
Rating
Symbol