turn signal KIA Rio 2011 2.G Owner's Manual
[x] Cancel search | Manufacturer: KIA, Model Year: 2011, Model line: Rio, Model: KIA Rio 2011 2.GPages: 240, PDF Size: 4.68 MB
Page 8 of 240
23
Your vehicle at a glance
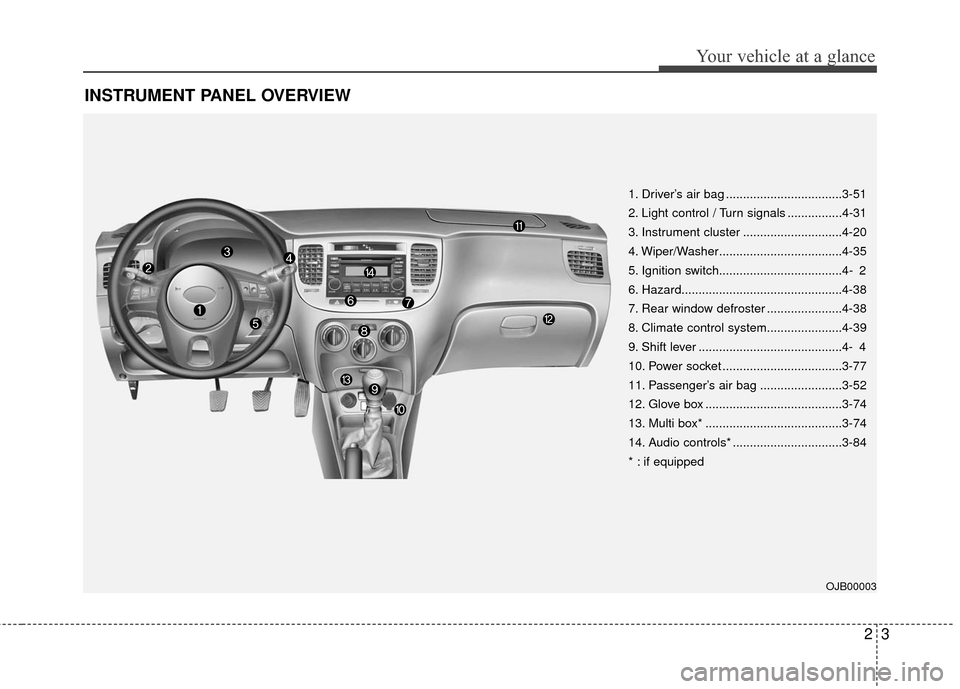
INSTRUMENT PANEL OVERVIEW
1. Driver’s air bag ..................................3-51
2. Light control / Turn signals ................4-31
3. Instrument cluster .............................4-20
4. Wiper/Washer....................................4-35
5. Ignition switch....................................4- 2
6. Hazard...............................................4-38
7. Rear window defroster ......................4-38
8. Climate control system......................4-39
9. Shift lever ..........................................4- 4
10. Power socket ...................................3-77
11. Passenger’s air bag ........................3-52
12. Glove box ........................................3-74
13. Multi box* ........................................3-74
14. Audio controls* ................................3-84
* : if equipped
OJB00003
Page 12 of 240
33
Knowing your vehicle
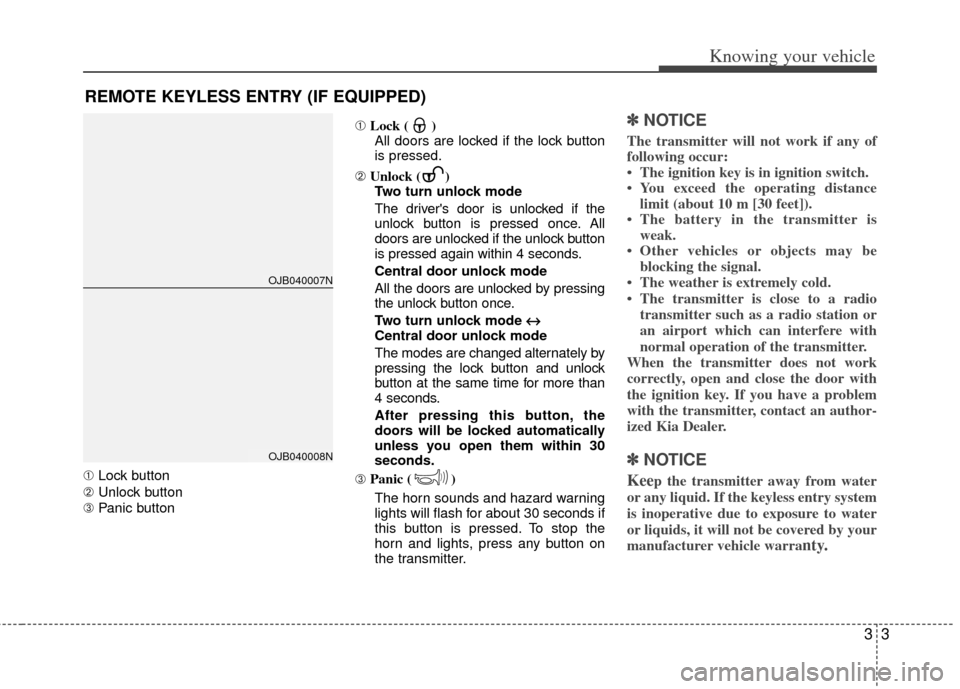
➀Lock button
➁ Unlock button
➂ Panic button ➀
Lock ( )
All doors are locked if the lock button
is pressed.
➁ Unlock ( )
Two turn unlock mode
The driver's door is unlocked if the
unlock button is pressed once. All
doors are unlocked if the unlock button
is pressed again within 4 seconds.
Central door unlock mode
All the doors are unlocked by pressing
the unlock button once.
Two turn unlock mode ↔ ↔
Central door unlock mode
The modes are changed alternately by
pressing the lock button and unlock
button at the same time for more than
4 seconds.
After pressing this button, the
doors will be locked automatically
unless you open them within 30
seconds.
➂ Panic ( )
The horn sounds and hazard warning
lights will flash for about 30 seconds if
this button is pressed. To stop the
horn and lights, press any button on
the transmitter.
✽ ✽ NOTICE
The transmitter will not work if any of
following occur:
• The ignition key is in ignition switch.
• You exceed the operating distance
limit (about 10 m [30 feet]).
• The battery in the transmitter is weak.
• Other vehicles or objects may be blocking the signal.
• The weather is extremely cold.
• The transmitter is close to a radio transmitter such as a radio station or
an airport which can interfere with
normal operation of the transmitter.
When the transmitter does not work
correctly, open and close the door with
the ignition key. If you have a problem
with the transmitter, contact an author-
ized Kia Dealer.
✽ ✽ NOTICE
Keep the transmitter away from water
or any liquid. If the keyless entry system
is inoperative due to exposure to water
or liquids, it will not be covered by your
manufacturer vehicle warra
nty.
REMOTE KEYLESS ENTRY (IF EQUIPPED)
OJB040007N
OJB040008N
Page 16 of 240
37
Knowing your vehicle
Your vehicle is equipped with an elec-
tronic engine immobilizer system to
reduce the risk of unauthorized vehicle
use.
Your immobilizer system is comprised of
a small transponder in the ignition key,
and antenna coil in the key cylinder and
Immobilizer Control Unit (or Smartra
Unit).
With this system, whenever you insert
your ignition key into the ignition switch
and turn it to ON, the antenna coil in the
ignition switch receives a signal from the
transponder in the ignition key and then
sends the signal to the ECU (Engine
Control Unit).
The ECU checks the signal whether the
ignition key is valid.
If the key is determined to be valid, the
engine will start.
If the key is determined to be invalid, the
engine will not start.
To deactivate the immobilizer
system:
Insert the ignition key into the key cylin-
der and turn it to the ON position.
To activate the immobilizer sys-
tem:
Turn the ignition key to the OFF position.
The immobilizer system activates auto-
matically. Without a valid ignition key for
your vehicle, the engine will not start.
✽ ✽NOTICE
When starting the engine, do not use the
key with other immobilizer keys around.
Otherwise the engine may not start or
may stop soon after it starts. Keep each
key separately not to have any malfunc-
tion after you receive your new vehicle.
Limp home (override) procedure
When you turn the ignition key to the ON
position, if the IMMO indicator goes off
after blinking 5 times, your transponder
equipped in the ignition key is out of order.
You cannot start the engine without the
lime home procedure. To start the engine,
you have to input your password by using
the ignition switch.
The following procedure is how to input
your password of “2345” as an example.
1. Turn the ignition key to the ON position.
The IMMO indicator ( ) will blink 5
times and go off indicating the begin-
ning of the limp home procedure.
2. Turn the ignition key to the ACC posi- tion.
IMMOBILIZER SYSTEM (IF EQUIPPED)
CAUTION
Do not put metal accessories nearthe key or ignition key.
The engine may not start for themetal accessories may interrupt thetransponder signal from normally transmitting.
WARNING
In order to prevent theft of your
vehicle, do not leave spare keys
anywhere in your vehicle. Your
Immobilizer password is a cus-
tomer unique password and should
be kept confidential. Do not leave
this number anywhere in your vehi-
cle.
Page 111 of 240
Knowing your vehicle
102
3
How to Use SIRIUS Satellite
Radio
Your vehicle is equipped with a 3 month
complimentary period of SIRIUS Satellite
Radio so you have access to over 130
channels of music, information, and
entertainment programming.
Activation
In order to extend or reactivate your sub-
scription to SIRIUS Satellite Radio, you
will need to contact SIRIUS Customer
Care at 888-539-7474. Have your 12 digit
SID (Sirius Identification Number)/ESN
(Electronic Serial Number) ready. To
retrieve the SID/ESN, turn on the radio,
press the [SAT] button and tune to chan-
nel zero. Please note that the vehicle will
need to be turned on, in Sirius mode, and
have an unobstructed view of the sky in
order for the radio to receive the activa-
tion signal.
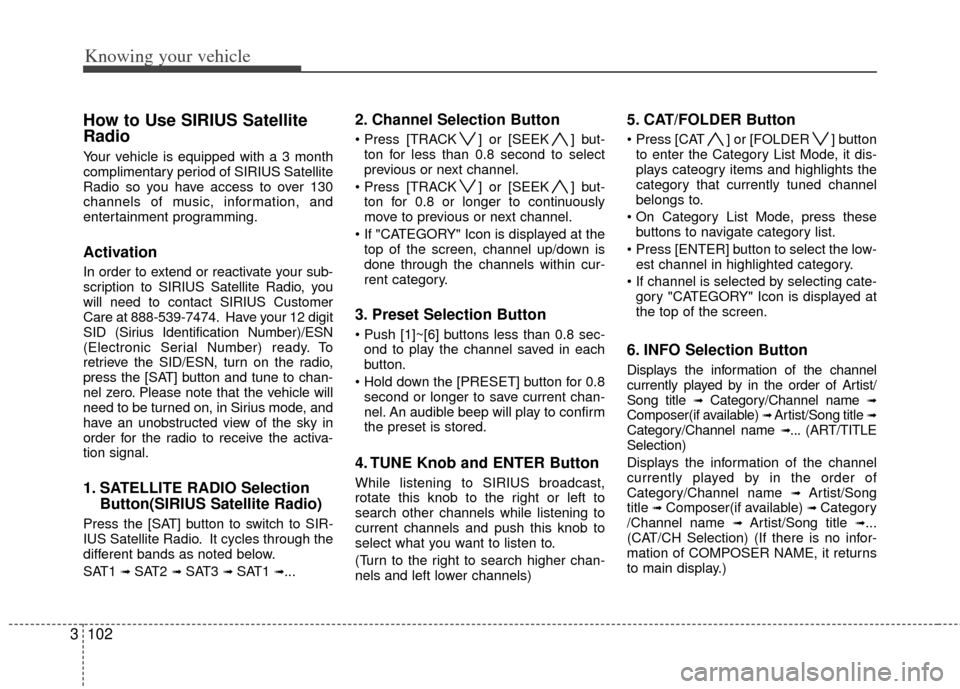
1. SATELLITE RADIO Selection
Button(SIRIUS Satellite Radio)
Press the [SAT] button to switch to SIR-
IUS Satellite Radio. It cycles through the
different bands as noted below.
SAT1
➟ SAT2 ➟ SAT3 ➟ SAT1 ➟...
2. Channel Selection Button
] or [SEEK ] but-
ton for less than 0.8 second to select
previous or next channel.
] or [SEEK ] but- ton for 0.8 or longer to continuously
move to previous or next channel.
top of the screen, channel up/down is
done through the channels within cur-
rent category.
3. Preset Selection Button
ond to play the channel saved in each
button.
second or longer to save current chan-
nel. An audible beep will play to confirm
the preset is stored.
4. TUNE Knob and ENTER Button
While listening to SIRIUS broadcast,
rotate this knob to the right or left to
search other channels while listening to
current channels and push this knob to
select what you want to listen to.
(Turn to the right to search higher chan-
nels and left lower channels)
5. CAT/FOLDER Button
] or [FOLDER ] buttonto enter the Category List Mode, it dis-
plays cateogry items and highlights the
category that currently tuned channel
belongs to.
buttons to navigate category list.
Press [ENTER] button to select the low- est channel in highlighted category.
gory "CATEGORY" Icon is displayed at
the top of the screen.
6. INFO Selection Button
Displays the information of the channel
currently played by in the order of Artist/
Song title
➟Category/Channel name ➟Composer(if available) ➟ Artist/Song title ➟Category/Channel name ➟... (ART/TITLE
Selection)
Displays the information of the channel
currently played by in the order of
Category/Channel name
➟ Artist/Song
title ➟Composer(if available) ➟ Category
/Channel name ➟ Artist/Song title ➟...
(CAT/CH Selection) (If there is no infor-
mation of COMPOSER NAME, it returns
to main display.)
Page 112 of 240
3103
Knowing your vehicle
7. SETUP Button
Press this button to adjust to the SCROLL,
SIRIUS and adjustment mode.
If no action is taken for 5 seconds after
pressing the button, it will return to the pre-
vious radio mode.(After entering SETUP
mode, move between items using the
left,right and PUSH functions of the
[TUNE] button.)
The setup item changes from SCROLL
➟SIRIUS ➟ SCROLL ➟...
8. SCAN Button
ically scans the radio stations upwards.
channel, starting from the initial chan-
nel, for ten seconds.
the scan feature and to listen to the cur-
rently selected channel.
top of the screen, channel changing is
done through the channels in current
category.
✽ ✽ Troubleshooting
1. Antenna Error
If this message is displayed, the anten-
na or antenna cable is broken or
unplugged. Please consult with your
Kia dealership.
2. Acquiring Signal If this message is displayed, it means
that the antenna is covered and that
the SIRIUS Satellite Radio signal is
not available. Ensure the antenna is
uncovered and has a clear view of the
sky.
Page 132 of 240
Driving your vehicle
20
4
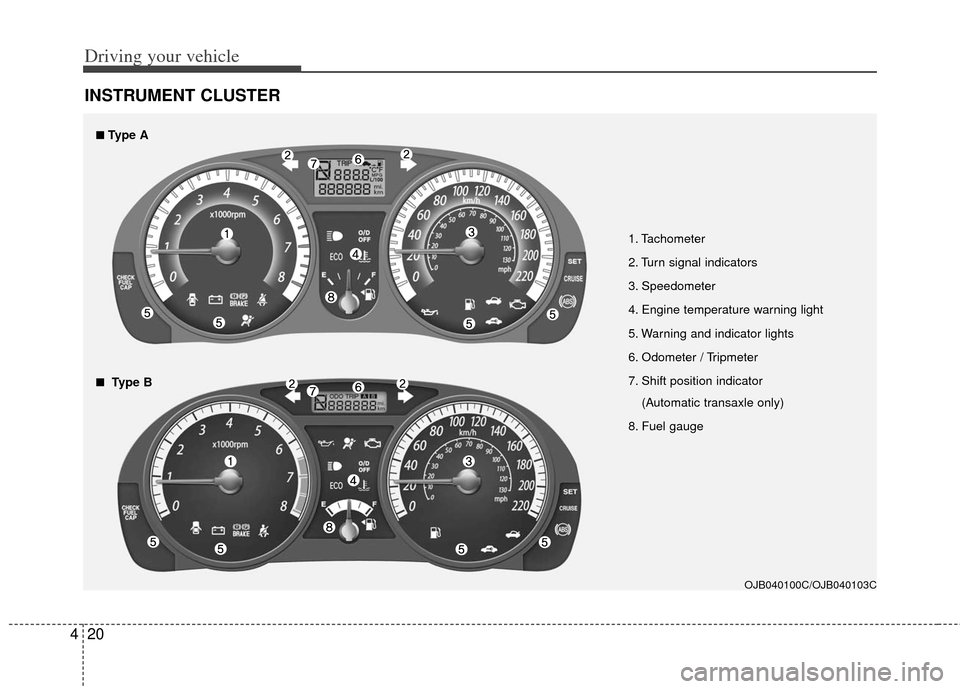
INSTRUMENT CLUSTER
1. Tachometer
2. Turn signal indicators
3. Speedometer
4. Engine temperature warning light
5. Warning and indicator lights
6. Odometer / Tripmeter
7. Shift position indicator
(Automatic transaxle only)
8. Fuel gauge
OJB040100C/OJB040103C
■
■Type A
■
■Type B
Page 140 of 240
Driving your vehicle
28
4
Low brake fluid level warning
If the warning light remains on, it may
indicate that the brake fluid level in the
reservoir is low.
If the warning light remains on:
1. Drive carefully to the nearest safe
location and stop your vehicle.
2. With the engine stopped, check the brake fluid level immediately and add
fluid as required. Then check all brake
components for fluid leaks.
3. Do not drive the vehicle if leaks are found, the warning light remains on or
the brakes do not operate properly.
Have it towed to any authorized Kia
dealer for a brake system inspection
and necessary repairs.
To check bulb operation, check whether
the parking brake and brake fluid warning
light illuminates when the ignition switch
is in the ON position.
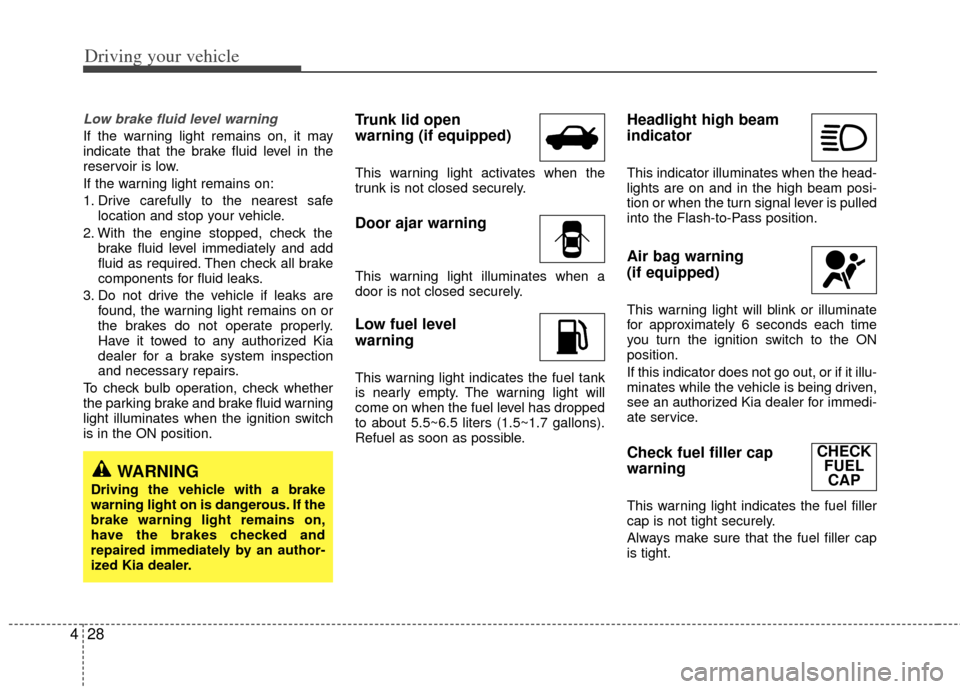
Trunk lid open
warning (if equipped)
This warning light activates when the
trunk is not closed securely.
Door ajar warning
This warning light illuminates when a
door is not closed securely.
Low fuel level
warning
This warning light indicates the fuel tank
is nearly empty. The warning light will
come on when the fuel level has dropped
to about 5.5~6.5 liters (1.5~1.7 gallons).
Refuel as soon as possible.
Headlight high beam
indicator
This indicator illuminates when the head-
lights are on and in the high beam posi-
tion or when the turn signal lever is pulled
into the Flash-to-Pass position.
Air bag warning
(if equipped)
This warning light will blink or illuminate
for approximately 6 seconds each time
you turn the ignition switch to the ON
position.
If this indicator does not go out, or if it illu-
minates while the vehicle is being driven,
see an authorized Kia dealer for immedi-
ate service.
Check fuel filler cap
warning
This warning light indicates the fuel filler
cap is not tight securely.
Always make sure that the fuel filler cap
is tight.
WARNING
Driving the vehicle with a brake
warning light on is dangerous. If the
brake warning light remains on,
have the brakes checked and
repaired immediately by an author-
ized Kia dealer.
CHECK FUELCAP
Page 145 of 240
433
Driving your vehicle
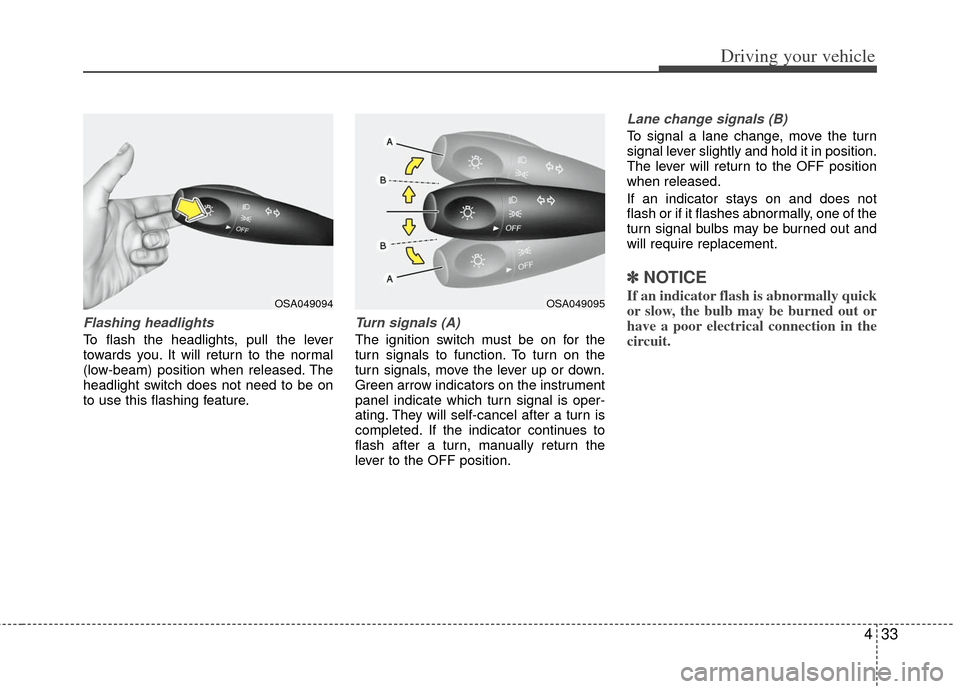
Flashing headlights
To flash the headlights, pull the lever
towards you. It will return to the normal
(low-beam) position when released. The
headlight switch does not need to be on
to use this flashing feature.
Turn signals (A)
The ignition switch must be on for the
turn signals to function. To turn on the
turn signals, move the lever up or down.
Green arrow indicators on the instrument
panel indicate which turn signal is oper-
ating. They will self-cancel after a turn is
completed. If the indicator continues to
flash after a turn, manually return the
lever to the OFF position.
Lane change signals (B)
To signal a lane change, move the turn
signal lever slightly and hold it in position.
The lever will return to the OFF position
when released.
If an indicator stays on and does not
flash or if it flashes abnormally, one of the
turn signal bulbs may be burned out and
will require replacement.
✽ ✽NOTICE
If an indicator flash is abnormally quick
or slow, the bulb may be burned out or
have a poor electrical connection in the
circuit.OSA049094OSA049095
Page 150 of 240
Driving your vehicle
38
4
HAZARD WARNING FLASHER
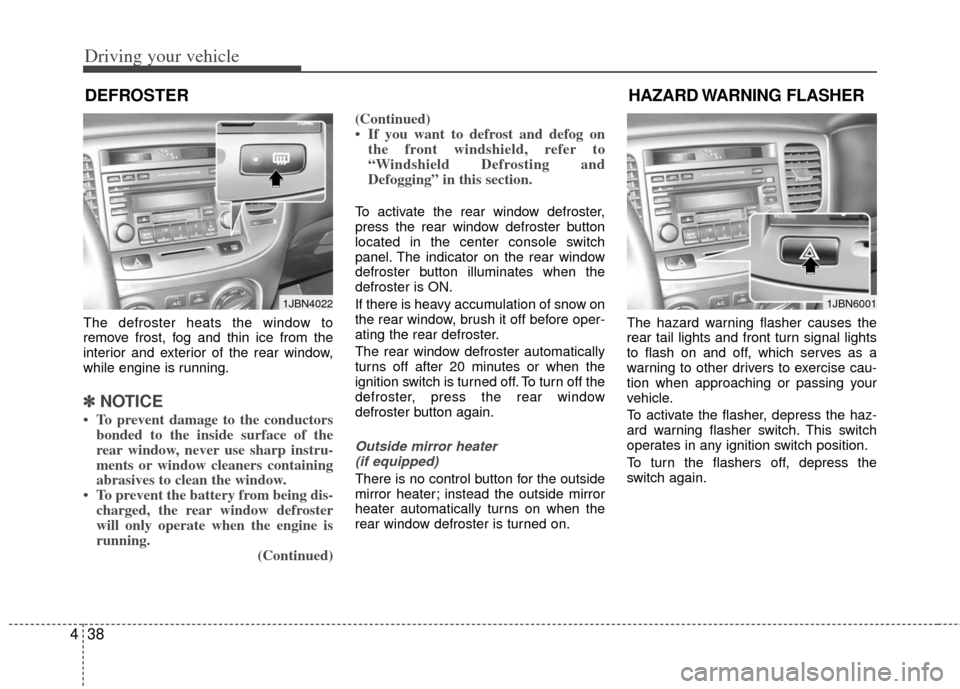
The defroster heats the window to
remove frost, fog and thin ice from the
interior and exterior of the rear window,
while engine is running.
✽ ✽
NOTICE
• To prevent damage to the conductors
bonded to the inside surface of the
rear window, never use sharp instru-
ments or window cleaners containing
abrasives to clean the window.
• To prevent the battery from being dis- charged, the rear window defroster
will only operate when the engine is
running. (Continued)(Continued)
• If you want to defrost and defog on
the front windshield, refer to
“Windshield Defrosting and
Defogging” in this section.
To activate the rear window defroster,
press the rear window defroster button
located in the center console switch
panel. The indicator on the rear window
defroster button illuminates when the
defroster is ON.
If there is heavy accumulation of snow on
the rear window, brush it off before oper-
ating the rear defroster.
The rear window defroster automatically
turns off after 20 minutes or when the
ignition switch is turned off. To turn off the
defroster, press the rear window
defroster button again.
Outside mirror heater
(if equipped)
There is no control button for the outside
mirror heater; instead the outside mirror
heater automatically turns on when the
rear window defroster is turned on. The hazard warning flasher causes the
rear tail lights and front turn signal lights
to flash on and off, which serves as a
warning to other drivers to exercise cau-
tion when approaching or passing your
vehicle.
To activate the flasher, depress the haz-
ard warning flasher switch. This switch
operates in any ignition switch position.
To turn the flashers off, depress the
switch again.
DEFROSTER
1JBN40221JBN6001
Page 171 of 240
In case of an emergency
26
ROAD WARNING
Hazard warning flasher
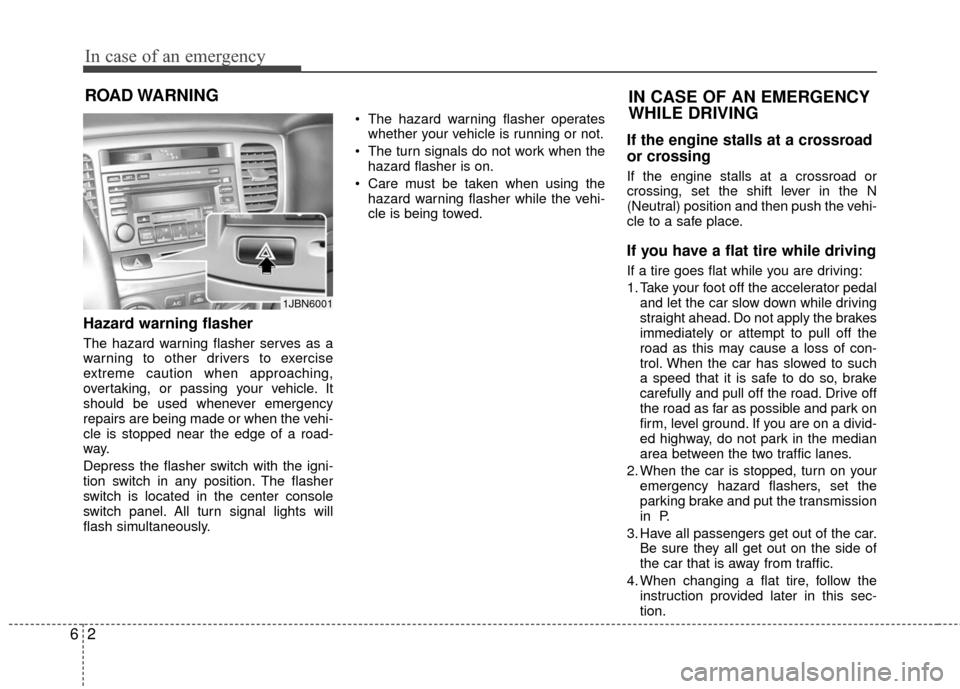
The hazard warning flasher serves as a
warning to other drivers to exercise
extreme caution when approaching,
overtaking, or passing your vehicle. It
should be used whenever emergency
repairs are being made or when the vehi-
cle is stopped near the edge of a road-
way.
Depress the flasher switch with the igni-
tion switch in any position. The flasher
switch is located in the center console
switch panel. All turn signal lights will
flash simultaneously.• The hazard warning flasher operates
whether your vehicle is running or not.
The turn signals do not work when the hazard flasher is on.
Care must be taken when using the hazard warning flasher while the vehi-
cle is being towed.
If the engine stalls at a crossroad
or crossing
If the engine stalls at a crossroad or
crossing, set the shift lever in the N
(Neutral) position and then push the vehi-
cle to a safe place.
If you have a flat tire while driving
If a tire goes flat while you are driving:
1. Take your foot off the accelerator pedaland let the car slow down while driving
straight ahead. Do not apply the brakes
immediately or attempt to pull off the
road as this may cause a loss of con-
trol. When the car has slowed to such
a speed that it is safe to do so, brake
carefully and pull off the road. Drive off
the road as far as possible and park on
firm, level ground. If you are on a divid-
ed highway, do not park in the median
area between the two traffic lanes.
2. When the car is stopped, turn on your emergency hazard flashers, set the
parking brake and put the transmission
in P.
3. Have all passengers get out of the car. Be sure they all get out on the side of
the car that is away from traffic.
4. When changing a flat tire, follow the instruction provided later in this sec-
tion.
1JBN6001
IN CASE OF AN EMERGENCY
WHILE DRIVING