sensor KIA Rio 2013 3.G User Guide
[x] Cancel search | Manufacturer: KIA, Model Year: 2013, Model line: Rio, Model: KIA Rio 2013 3.GPages: 385, PDF Size: 9.68 MB
Page 72 of 385
Safety features of your vehicle
50
3
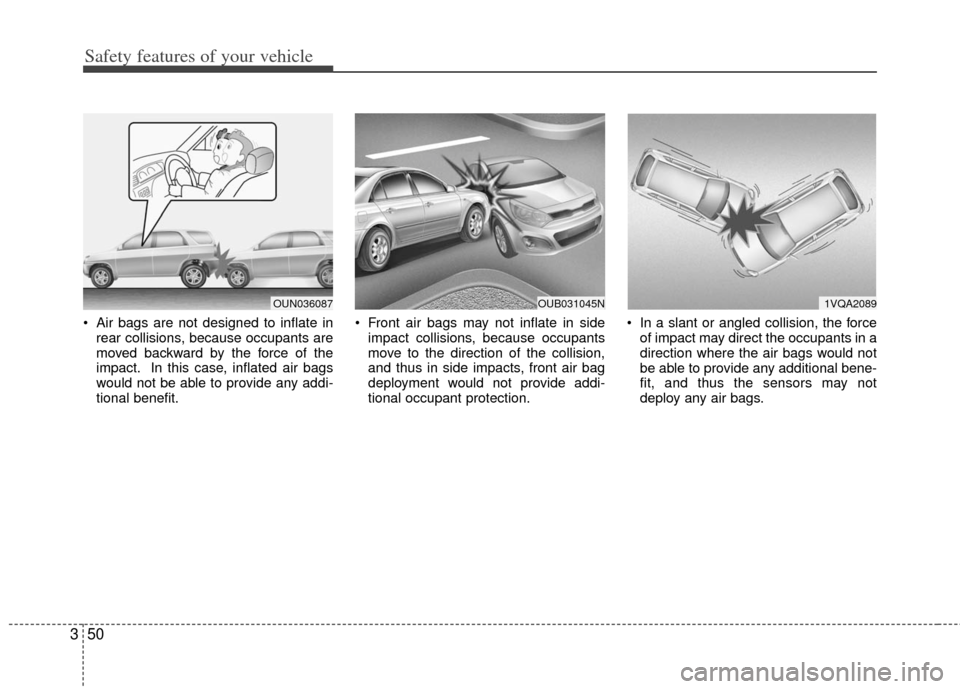
Air bags are not designed to inflate in
rear collisions, because occupants are
moved backward by the force of the
impact. In this case, inflated air bags
would not be able to provide any addi-
tional benefit. Front air bags may not inflate in side
impact collisions, because occupants
move to the direction of the collision,
and thus in side impacts, front air bag
deployment would not provide addi-
tional occupant protection. In a slant or angled collision, the force
of impact may direct the occupants in a
direction where the air bags would not
be able to provide any additional bene-
fit, and thus the sensors may not
deploy any air bags.
OUN0360871VQA2089OUB031045N
Page 73 of 385
351
Safety features of your vehicle
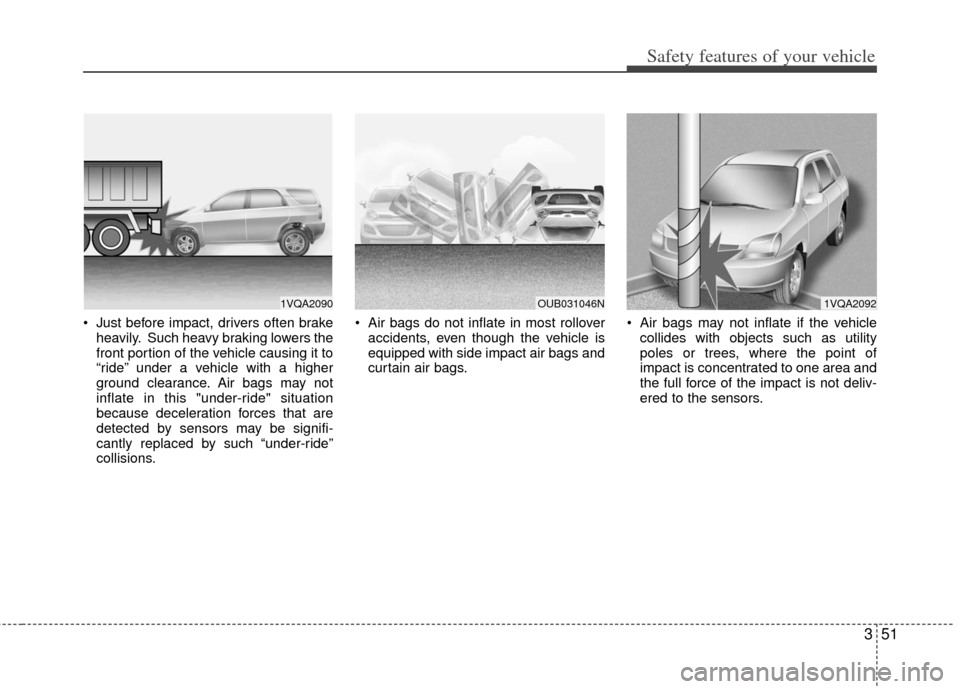
Just before impact, drivers often brakeheavily. Such heavy braking lowers the
front portion of the vehicle causing it to
“ride” under a vehicle with a higher
ground clearance. Air bags may not
inflate in this "under-ride" situation
because deceleration forces that are
detected by sensors may be signifi-
cantly replaced by such “under-ride”
collisions. Air bags do not inflate in most rollover
accidents, even though the vehicle is
equipped with side impact air bags and
curtain air bags. Air bags may not inflate if the vehicle
collides with objects such as utility
poles or trees, where the point of
impact is concentrated to one area and
the full force of the impact is not deliv-
ered to the sensors.
1VQA2090OUB031046N1VQA2092
Page 146 of 385
471
Features of your vehicle
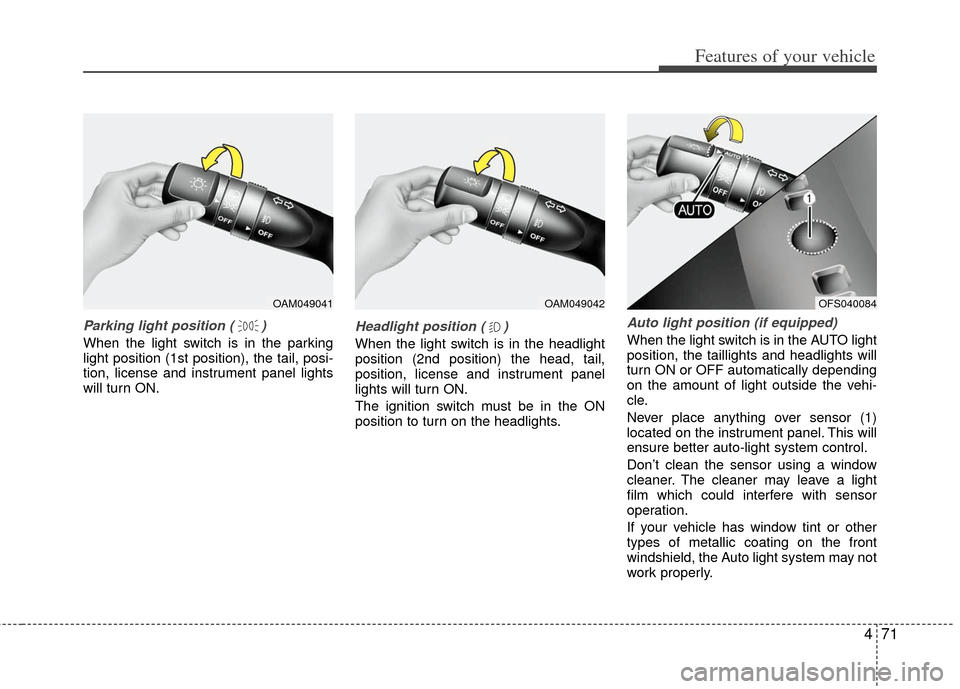
Parking light position ( )
When the light switch is in the parking
light position (1st position), the tail, posi-
tion, license and instrument panel lights
will turn ON.
Headlight position ( )
When the light switch is in the headlight
position (2nd position) the head, tail,
position, license and instrument panel
lights will turn ON.
The ignition switch must be in the ON
position to turn on the headlights.
Auto light position (if equipped)
When the light switch is in the AUTO light
position, the taillights and headlights will
turn ON or OFF automatically depending
on the amount of light outside the vehi-
cle.
Never place anything over sensor (1)
located on the instrument panel. This will
ensure better auto-light system control.
Don’t clean the sensor using a window
cleaner. The cleaner may leave a light
film which could interfere with sensor
operation.
If your vehicle has window tint or other
types of metallic coating on the front
windshield, the Auto light system may not
work properly.
OAM049041OAM049042OFS040084
Page 150 of 385
475
Features of your vehicle
Windshield wipers
Operates as follows when the ignition
switch is turned ON.
MIST : For a single wiping cycle, move thelever upward and release it. The
wipers will operate continuously if
the lever is held in this position.
OFF : Wiper is not in operation
INT : Wiper operates intermittently at the same wiping intervals. Use this
mode in a light rain or mist. To vary
the speed setting, turn the speed
control knob.
LO : Normal wiper speed
HI : Fast wiper speed
If there is heavy accumulation of snow or
ice on the windshield, defrost the wind-
shield for about 10 minutes, or until the
snow and/or ice is removed before using
the windshield wipers to ensure proper
operation.
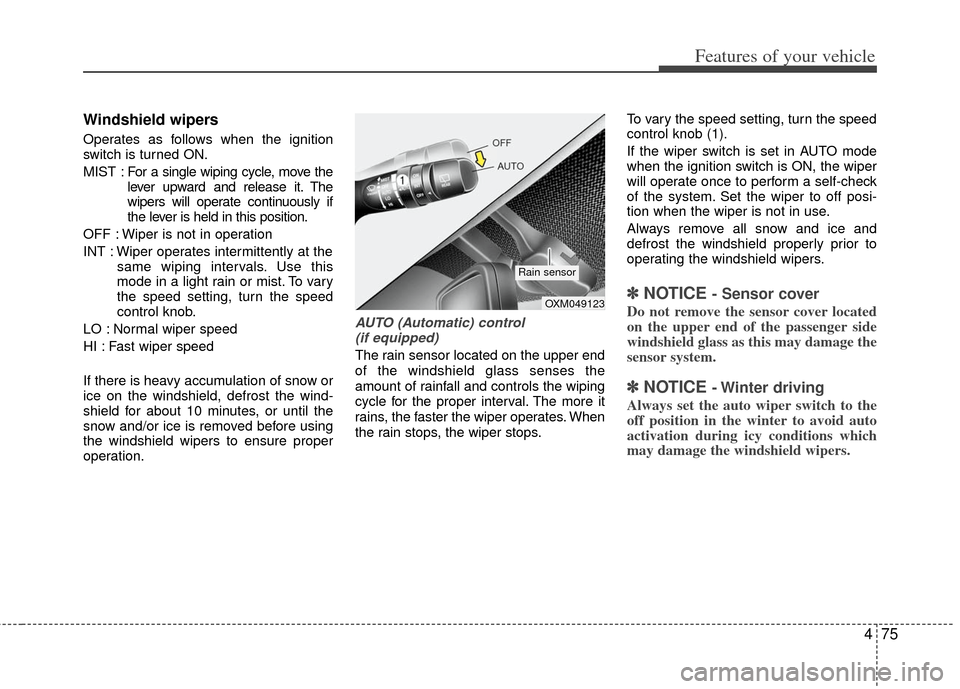
AUTO (Automatic) control (if equipped)
The rain sensor located on the upper end
of the windshield glass senses the
amount of rainfall and controls the wiping
cycle for the proper interval. The more it
rains, the faster the wiper operates. When
the rain stops, the wiper stops. To vary the speed setting, turn the speed
control knob (1).
If the wiper switch is set in AUTO mode
when the ignition switch is ON, the wiper
will operate once to perform a self-check
of the system. Set the wiper to off posi-
tion when the wiper is not in use.
Always remove all snow and ice and
defrost the windshield properly prior to
operating the windshield wipers.
✽ ✽
NOTICE - Sensor cover
Do not remove the sensor cover located
on the upper end of the passenger side
windshield glass as this may damage the
sensor system.
✽ ✽NOTICE - Winter driving
Always set the auto wiper switch to the
off position in the winter to avoid auto
activation during icy conditions which
may damage the windshield wipers.
OXM049123
Rain sensor
Page 263 of 385
Driving your vehicle
40
5
ISG system malfunction
The system may not operate when:
- The ISG related sensors or system
error occurs.
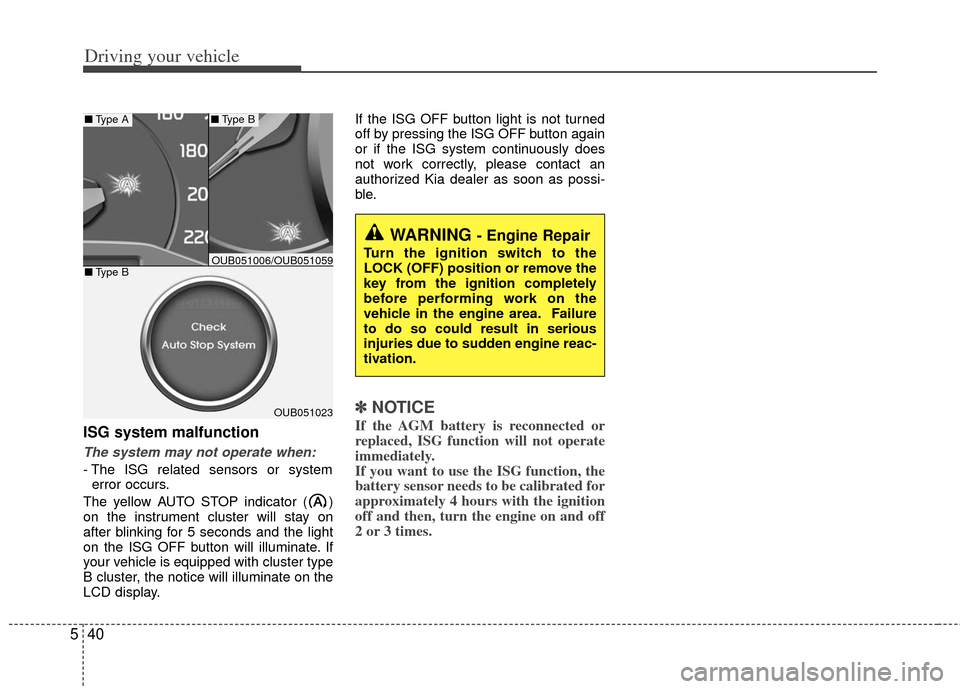
The yellow AUTO STOP indicator ( )
on the instrument cluster will stay on
after blinking for 5 seconds and the light
on the ISG OFF button will illuminate. If
your vehicle is equipped with cluster type
B cluster, the notice will illuminate on the
LCD display. If the ISG OFF button light is not turned
off by pressing the ISG OFF button again
or if the ISG system continuously does
not work correctly, please contact an
authorized Kia dealer as soon as possi-
ble.
✽ ✽
NOTICE
If the AGM battery is reconnected or
replaced, ISG function will not operate
immediately.
If you want to use the ISG function, the
battery sensor needs to be calibrated for
approximately 4 hours with the ignition
off and then, turn the engine on and off
2 or 3 times.OUB051023
■ Type A■Type B
■Type BOUB051006/OUB051059
WARNING - Engine Repair
Turn the ignition switch to the
LOCK (OFF) position or remove the
key from the ignition completely
before performing work on the
vehicle in the engine area. Failure
to do so could result in serious
injuries due to sudden engine reac-
tivation.
Page 284 of 385
65
What to do in an emergency
Jump starting procedure
Absorbent Glass Matt (AGM) batteries
are maintenance-free and should only be
serviced by an authorized Kia dealer. For
charging your AGM battery, use only fully
automatic battery chargers that are spe-
cially developed for AGM batteries.
When replacing the AGM battery, use
only the Kia genuine battery for the ISG
system.
✽ ✽NOTICE
If the AGM battery is reconnected or
replaced, ISG function will not operate
immediately.
If you want to use the ISG function, the
battery sensor needs to be calibrated for
approximately 4 hours with the ignition
off and then, turn the engine on and off
2 or 3 times.
1. Make sure the booster battery is 12-
volt and that its negative terminal is
grounded.
2. If the booster battery is in another vehicle, do not allow the vehicles to
touch.
3. Turn off all unnecessary electrical loads.
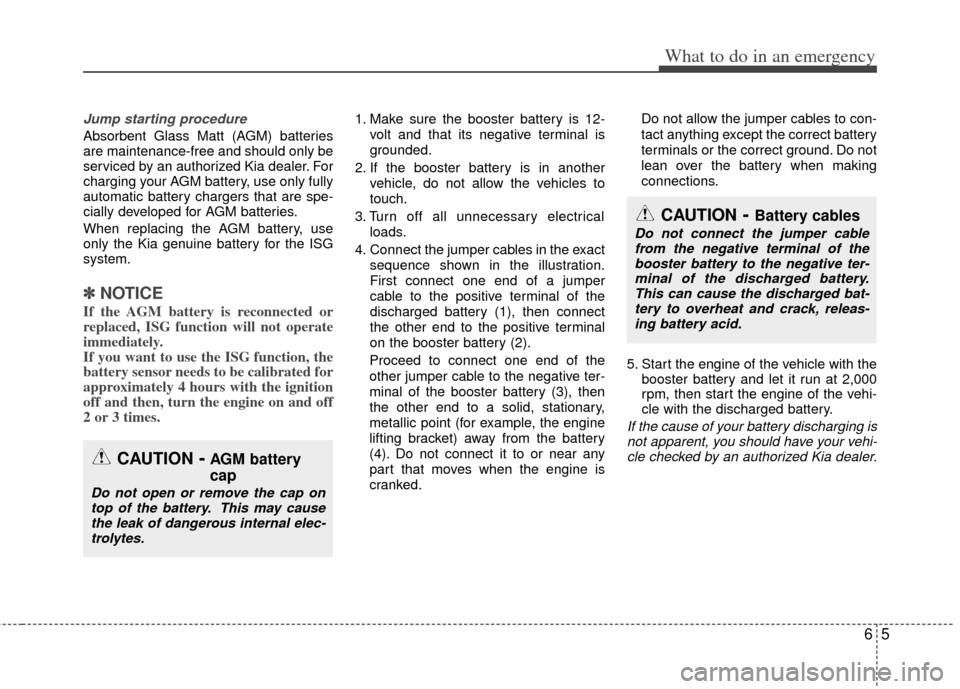
4. Connect the jumper cables in the exact sequence shown in the illustration.
First connect one end of a jumper
cable to the positive terminal of the
discharged battery (1), then connect
the other end to the positive terminal
on the booster battery (2).
Proceed to connect one end of the
other jumper cable to the negative ter-
minal of the booster battery (3), then
the other end to a solid, stationary,
metallic point (for example, the engine
lifting bracket) away from the battery
(4). Do not connect it to or near any
part that moves when the engine is
cranked. Do not allow the jumper cables to con-
tact anything except the correct battery
terminals or the correct ground. Do not
lean over the battery when making
connections.
5. Start the engine of the vehicle with the booster battery and let it run at 2,000
rpm, then start the engine of the vehi-
cle with the discharged battery.
If the cause of your battery discharging isnot apparent, you should have your vehi-cle checked by an authorized Kia dealer.
CAUTION- Battery cables
Do not connect the jumper cable from the negative terminal of thebooster battery to the negative ter- minal of the discharged battery.This can cause the discharged bat-tery to overheat and crack, releas-ing battery acid.
CAUTION-AGM battery
cap
Do not open or remove the cap on top of the battery. This may causethe leak of dangerous internal elec-trolytes.
Page 290 of 385
611
What to do in an emergency
Changing a tire with TPMS
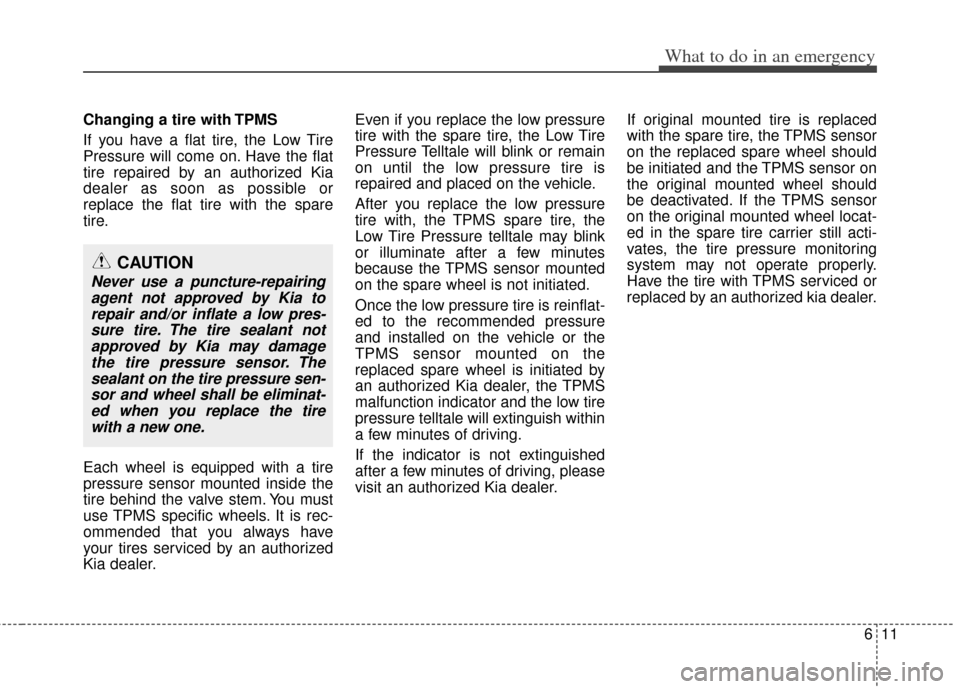
If you have a flat tire, the Low Tire
Pressure will come on. Have the flat
tire repaired by an authorized Kia
dealer as soon as possible or
replace the flat tire with the spare
tire.
Each wheel is equipped with a tire
pressure sensor mounted inside the
tire behind the valve stem. You must
use TPMS specific wheels. It is rec-
ommended that you always have
your tires serviced by an authorized
Kia dealer.Even if you replace the low pressure
tire with the spare tire, the Low Tire
Pressure Telltale will blink or remain
on until the low pressure tire is
repaired and placed on the vehicle.
After you replace the low pressure
tire with, the TPMS spare tire, the
Low Tire Pressure telltale may blink
or illuminate after a few minutes
because the TPMS sensor mounted
on the spare wheel is not initiated.
Once the low pressure tire is reinflat-
ed to the recommended pressure
and installed on the vehicle or the
TPMS sensor mounted on the
replaced spare wheel is initiated by
an authorized Kia dealer, the TPMS
malfunction indicator and the low tire
pressure telltale will extinguish within
a few minutes of driving.
If the indicator is not extinguished
after a few minutes of driving, please
visit an authorized Kia dealer.
If original mounted tire is replaced
with the spare tire, the TPMS sensor
on the replaced spare wheel should
be initiated and the TPMS sensor on
the original mounted wheel should
be deactivated. If the TPMS sensor
on the original mounted wheel locat-
ed in the spare tire carrier still acti-
vates, the tire pressure monitoring
system may not operate properly.
Have the tire with TPMS serviced or
replaced by an authorized kia dealer.
CAUTION
Never use a puncture-repairing
agent not approved by Kia torepair and/or inflate a low pres-sure tire. The tire sealant notapproved by Kia may damagethe tire pressure sensor. Thesealant on the tire pressure sen-sor and wheel shall be eliminat-ed when you replace the tirewith a new one.
Page 304 of 385
625
What to do in an emergency
Distributing the sealant
11. Immediately drive approximately7~10km (4~6miles or, about
10min) to evenly distribute the
sealant in the tire.
Do not exceed a speed of 80 km/h
(50 mph). If possible, do not fall
below a speed of 20 km/h (12 mph).
While driving, if you experience any
unusual vibration, ride disturbance or
noise, reduce your speed and drive
with caution until you can safely pull
off of the side of the road.
Call for road side service or towing.
When you use the Tire Mobility Kit,
the tire pressure sensors and wheel
may be damaged by sealant, remove
the sealant stained with tire pressure
sensors and wheel and inspect in
authorized dealer. Checking the tire inflation pres-
sure
1.After driving approximately
7~10km (4 ~6miles or about
10min), stop at a safety location.
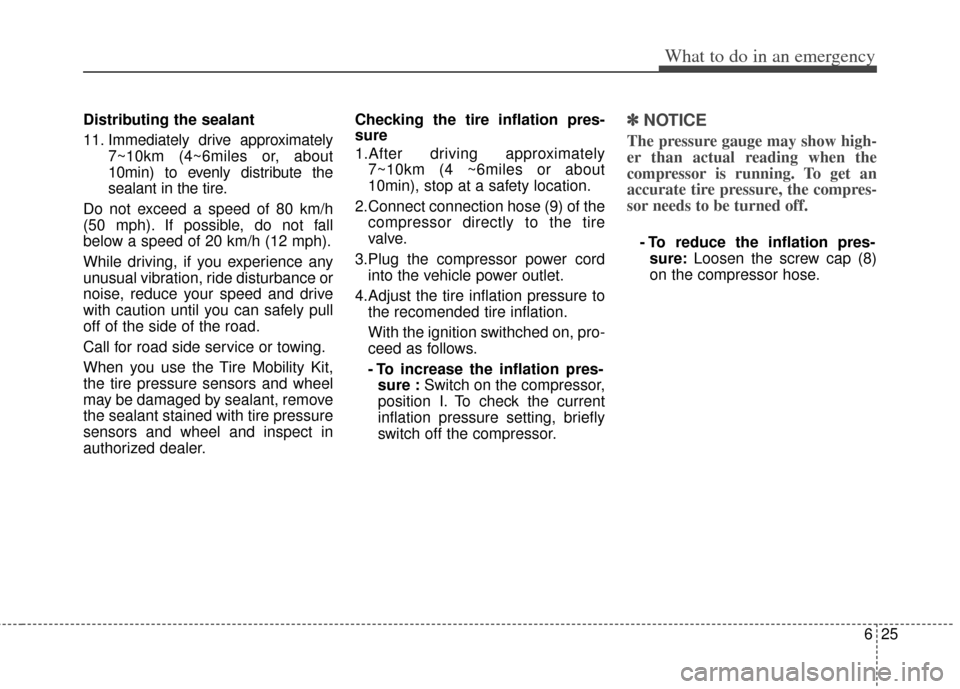
2.Connect connection hose (9) of the compressor directly to the tire
valve.
3.Plug the compressor power cord into the vehicle power outlet.
4.Adjust the tire inflation pressure to the recomended tire inflation.
With the ignition swithched on, pro-
ceed as follows.
- To increase the inflation pres-sure : Switch on the compressor,
position I. To check the current
inflation pressure setting, briefly
switch off the compressor.✽ ✽ NOTICE
The pressure gauge may show high-
er than actual reading when the
compressor is running. To get an
accurate tire pressure, the compres-
sor needs to be turned off.
- To reduce the inflation pres-
sure: Loosen the screw cap (8)
on the compressor hose.
Page 305 of 385
What to do in an emergency
26
6
Technical Data
System voltage: DC 12 V
Working voltage: DC 10 - 15 V
Amperage rating: max. 15 A
Suitable for use at temperatures:
-30 ~ +70°C (-22 ~ +158°F)
Max. working pressure: 6 bar (87 psi)
Size
Compressor: 170 x 150 x 60 mm (6.7 x 5.9 x 2.4 in.)
Sealant bottle: 85 x ø 77 mm (3.3 x ø 3.0 in.)
Compressor weight: 0.8 kg (1.8 lbs)
Sealant volume: 200 ml (12.2 cu. in.)CAUTION - Tire pressuresensor
When you use the Tire MobilityKit including sealant notapproved by Kia, the tire pres-sure sensors may be damagedby sealant. The sealant on thetire pressure sensor and wheelshould be removed when youreplace the tire with a new oneand inspect the tire pressuresensors in authorized dealer.
Page 340 of 385
731
Maintenance
PARKING BRAKE
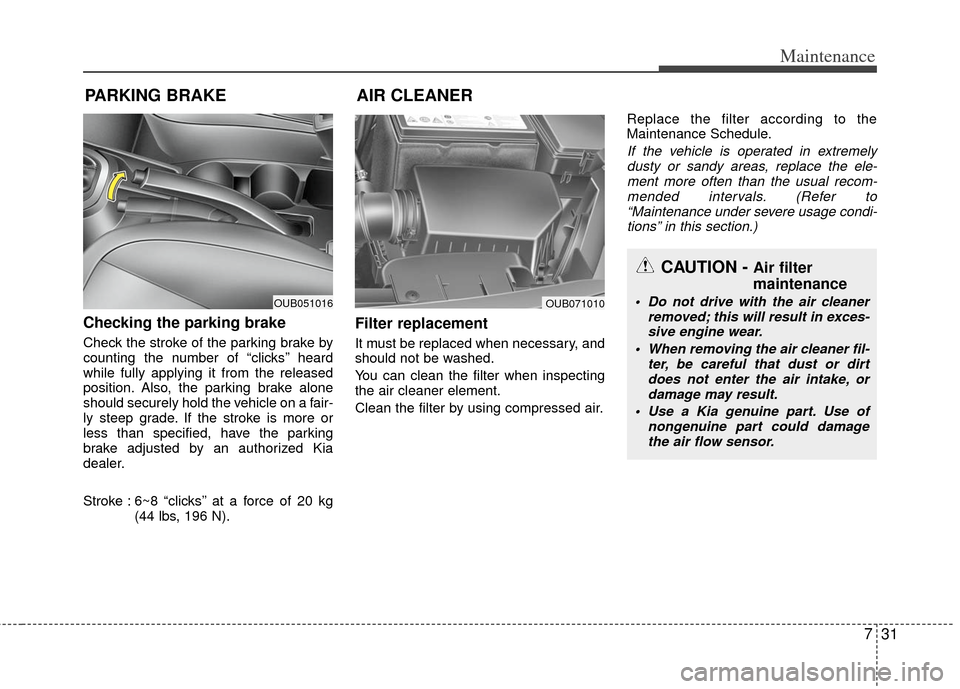
Checking the parking brake
Check the stroke of the parking brake by
counting the number of “clicks’’ heard
while fully applying it from the released
position. Also, the parking brake alone
should securely hold the vehicle on a fair-
ly steep grade. If the stroke is more or
less than specified, have the parking
brake adjusted by an authorized Kia
dealer.
Stroke : 6~8 “clicks’’ at a force of 20 kg (44 lbs, 196 N).
Filter replacement
It must be replaced when necessary, and
should not be washed.
You can clean the filter when inspecting
the air cleaner element.
Clean the filter by using compressed air. Replace the filter according to the
Maintenance Schedule.
If the vehicle is operated in extremely
dusty or sandy areas, replace the ele- ment more often than the usual recom-mended intervals. (Refer to“Maintenance under severe usage condi- tions” in this section.)
AIR CLEANER
OUB051016OUB071010
CAUTION - Air filter
maintenance
Do not drive with the air cleaner removed; this will result in exces-sive engine wear.
When removing the air cleaner fil- ter, be careful that dust or dirtdoes not enter the air intake, or damage may result.
Use a Kia genuine part. Use of nongenuine part could damagethe air flow sensor.