key KIA Rio 2014 3.G Manual PDF
[x] Cancel search | Manufacturer: KIA, Model Year: 2014, Model line: Rio, Model: KIA Rio 2014 3.GPages: 397, PDF Size: 7.56 MB
Page 233 of 397
59
Driving your vehicle
Starting the engine with an igni-
tion key (if equipped)
1. Make sure the parking brake isapplied.
2. Manual Transaxle - Depress the
clutch pedal fully and shift the
transaxle into Neutral. Keep the clutch
pedal and brake pedal depressed
while turning the ignition switch to the
start position.
Automatic Transaxle - Place the
transaxle shift lever in P (Park).
Depress the brake pedal fully.
You can also start the engine when the shift lever is in the N (Neutral)position.
3. Turn the ignition switch to START and
hold it there until the engine starts (a
maximum of 10 seconds), then
release the key.
It should be started without depress-ing the accelerator.
4. Do not wait for the engine to warm up while the vehicle remains stationary.
Start driving at moderate engine
speeds. (Steep accelerating and decel-
erating should be avoided.)
If the engine stalls while the vehicle is in
motion, do not attempt to move the shift
lever to the P (Park) position. If traffic and
road conditions permit, you may put the
shift lever in the N (Neutral) position
while the vehicle is still moving and turn
the ignition switch to the START position
in an attempt to restart the engine.
STARTING THE ENGINE
WARNING - Proper footwear
Always wear appropriate shoes
when operating your vehicle.
Unsuitable shoes (high heels, ski
boots, sandals, etc.) may interfere
with your ability to use the brake
and accelerator pedal.
CAUTION - Starter
Do not engage the starter for morethan 10 seconds. If the engine stallsor fails to start, wait 5 to 10 seconds before re-engaging the starter.Improper use of the starter maydamage it.
Page 234 of 397
Driving your vehicle
10
5
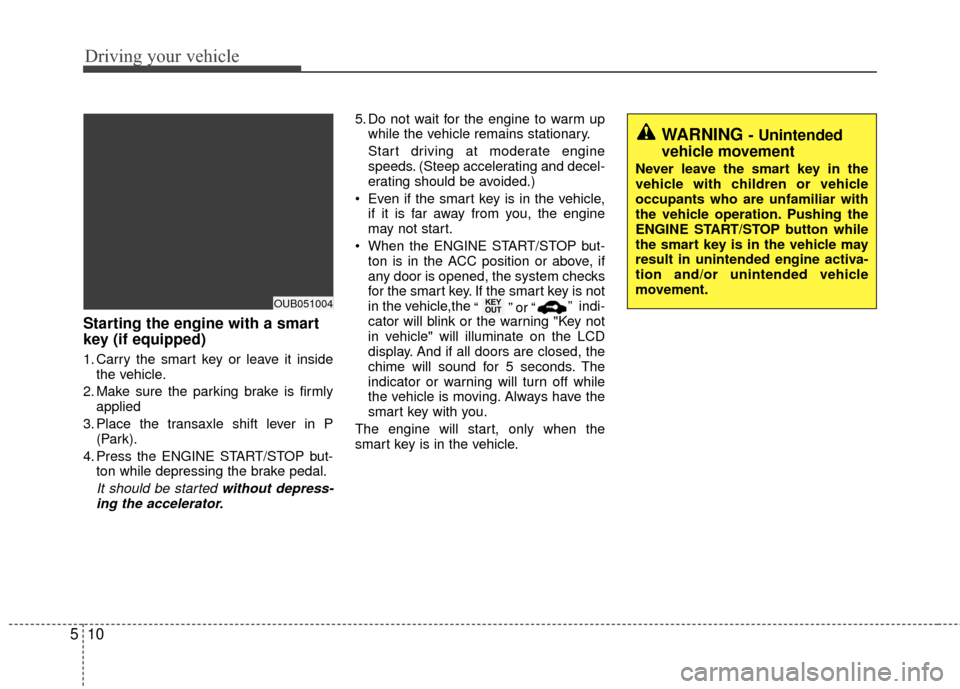
Starting the engine with a smart
key (if equipped)
1. Carry the smart key or leave it inside
the vehicle.
2. Make sure the parking brake is firmly applied
3. Place the transaxle shift lever in P (Park).
4. Press the ENGINE START/STOP but- ton while depressing the brake pedal.
It should be started without depress-ing the accelerator.
5. Do not wait for the engine to warm up while the vehicle remains stationary.
Start driving at moderate engine
speeds. (Steep accelerating and decel-
erating should be avoided.)
Even if the smart key is in the vehicle, if it is far away from you, the engine
may not start.
When the ENGINE START/STOP but- ton is in the ACC position or above, if
any door is opened, the system checks
for the smart key. If the smart key is not
in the vehicle,the “ ” or “” indi-
cator will blink or the warning "Key not
in vehicle" will illuminate on the LCD
display. And if all doors are closed, the
chime will sound for 5 seconds. The
indicator or warning will turn off while
the vehicle is moving. Always have the
smart key with you.
The engine will start, only when the
smart key is in the vehicle.
KEY
OUT
WARNING - Unintended
vehicle movement
Never leave the smart key in the
vehicle with children or vehicle
occupants who are unfamiliar with
the vehicle operation. Pushing the
ENGINE START/STOP button while
the smart key is in the vehicle may
result in unintended engine activa-
tion and/or unintended vehicle
movement.
OUB051004
Page 235 of 397
511
Driving your vehicle
✽
✽
NOTICE
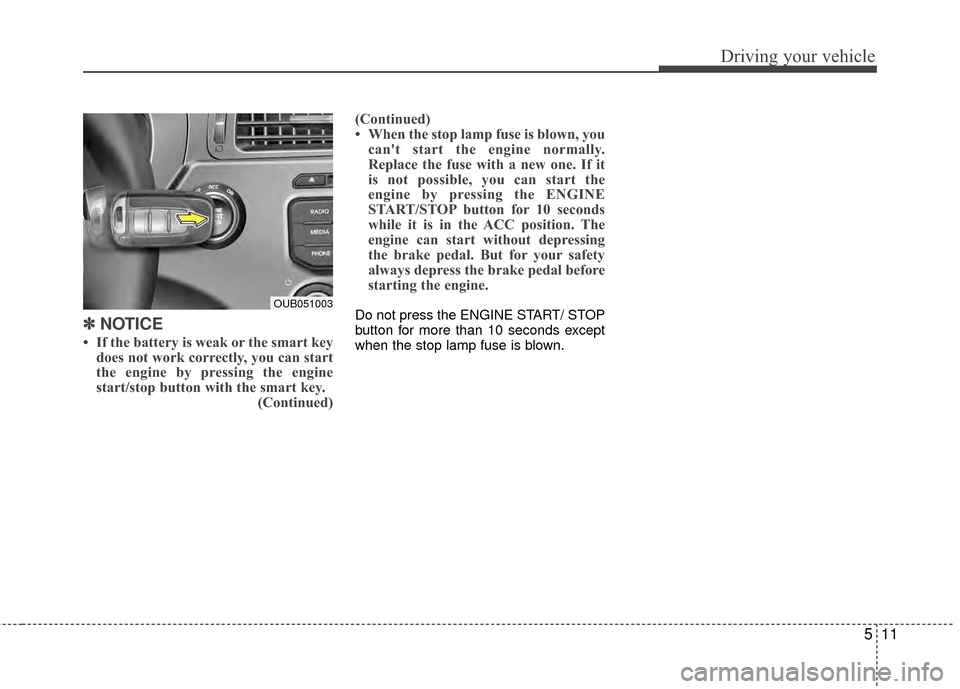
• If the battery is weak or the smart key
does not work correctly, you can start
the engine by pressing the engine
start/stop button with the smart key. (Continued)(Continued)
• When the stop lamp fuse is blown, you
can't start the engine normally.
Replace the fuse with a new one. If it
is not possible, you can start the
engine by pressing the ENGINE
START/STOP button for 10 seconds
while it is in the ACC position. The
engine can start without depressing
the brake pedal. But for your safety
always depress the brake pedal before
starting the engine.
Do not press the ENGINE START/ STOP
button for more than 10 seconds except
when the stop lamp fuse is blown.OUB051003
Page 243 of 397
519
Driving your vehicle
Shift lock system (if equipped)
Shift-lock override (without smart key
system)
For your safety, the automatic transaxle
has a shift lock system which prevents
shifting the transaxle out of P (Park)
unless the brake pedal is depressed.
To shift the transaxle from P (Park) into R
(Reverse):
1. Depress and hold the brake pedal.
2. Start the engine or turn the ignitionswitch to the ON position.
3. Move the shift lever.
If the brake pedal is repeatedly
depressed and released with the shift
lever in the P (Park) position, a chattering
noise near the shift lever may be heard.
This is a normal condition. Shift-lock override (with smart key sys-
tem)
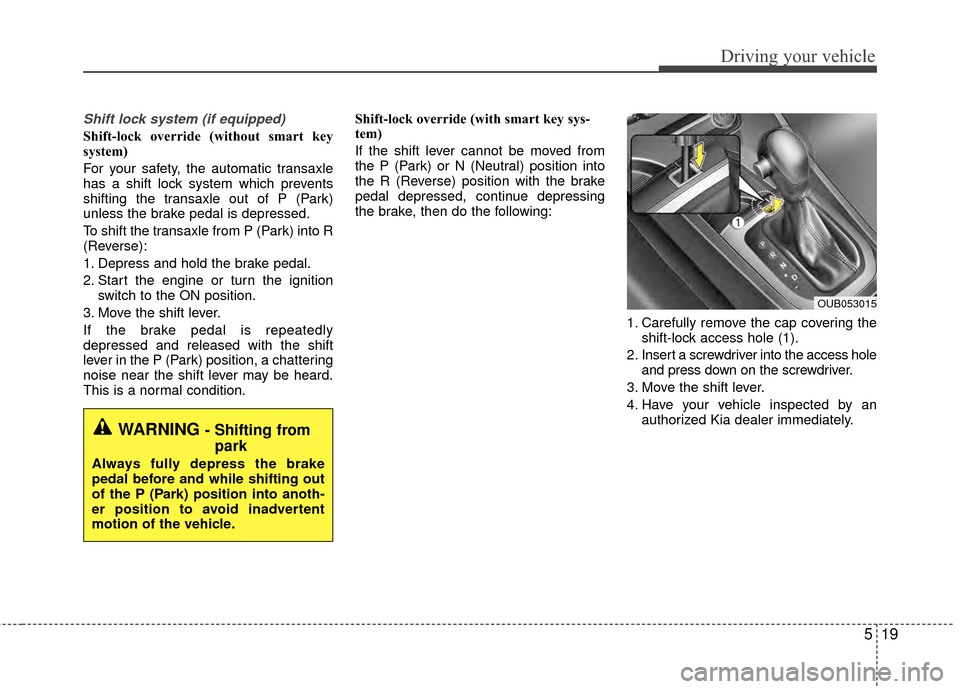
If the shift lever cannot be moved from
the P (Park) or N (Neutral) position into
the R (Reverse) position with the brake
pedal depressed, continue depressing
the brake, then do the following:
1. Carefully remove the cap covering theshift-lock access hole (1).
2. Insert a screwdriver into the access hole and press down on the screwdriver.
3. Move the shift lever.
4. Have your vehicle inspected by an authorized Kia dealer immediately.
OUB053015
WARNING - Shifting frompark
Always fully depress the brake
pedal before and while shifting out
of the P (Park) position into anoth-
er position to avoid inadvertent
motion of the vehicle.
Page 244 of 397
Driving your vehicle
20
5
Ignition key interlock system
(if equipped)
The ignition key cannot be removed
unless the shift lever is in the P (Park)
position.
Good driving practices
Never move the shift lever from P (Park) or N (Neutral) to any other posi-
tion with the accelerator pedal
depressed.
Never move the shift lever into P (Park) when the vehicle is in motion.
Slow down before shifting to a lower gear. Otherwise, the lower gear may
not be engaged.
Always use the parking brake. Do not depend on placing the transaxle in P
(Park) to keep the vehicle from moving.
Optimum vehicle performance and economy is obtained by smoothly
depressing and releasing the accelera-
tor pedal.
Moving up a steep grade from astanding start
To move up a steep grade from a stand-
ing start, depress the brake pedal, shift
the shift lever to D (Drive). Select the
appropriate gear depending on load
weight and steepness of the grade, and
release the parking brake. Depress the
accelerator gradually while releasing the
service brakes.
Page 264 of 397
Driving your vehicle
40
5
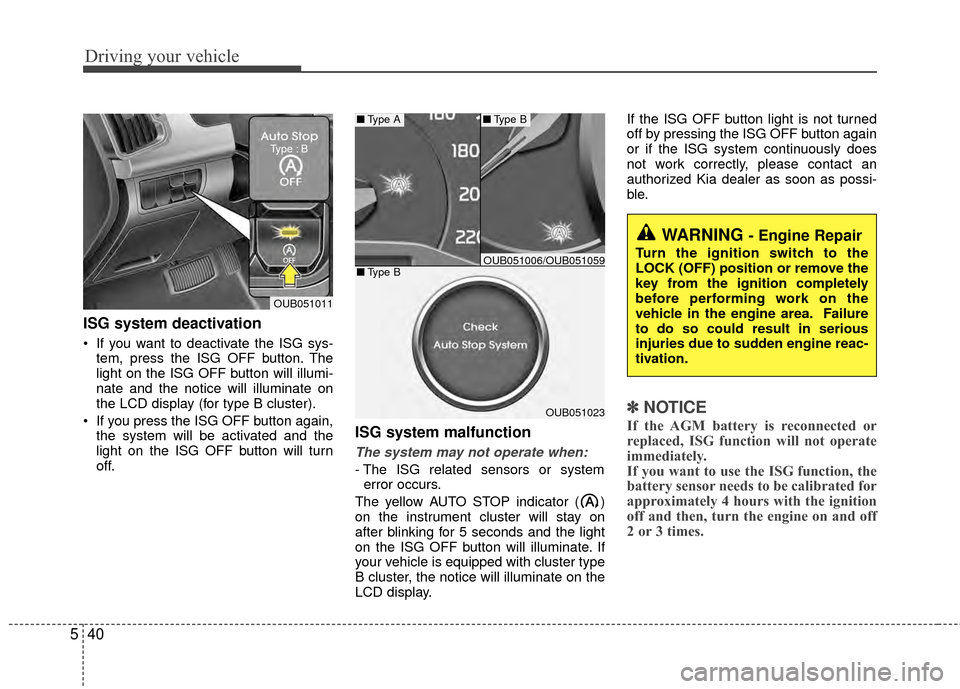
ISG system deactivation
If you want to deactivate the ISG sys-
tem, press the ISG OFF button. The
light on the ISG OFF button will illumi-
nate and the notice will illuminate on
the LCD display (for type B cluster).
If you press the ISG OFF button again, the system will be activated and the
light on the ISG OFF button will turn
off.
ISG system malfunction
The system may not operate when:
- The ISG related sensors or systemerror occurs.
The yellow AUTO STOP indicator ( )
on the instrument cluster will stay on
after blinking for 5 seconds and the light
on the ISG OFF button will illuminate. If
your vehicle is equipped with cluster type
B cluster, the notice will illuminate on the
LCD display. If the ISG OFF button light is not turned
off by pressing the ISG OFF button again
or if the ISG system continuously does
not work correctly, please contact an
authorized Kia dealer as soon as possi-
ble.
✽ ✽
NOTICE
If the AGM battery is reconnected or
replaced, ISG function will not operate
immediately.
If you want to use the ISG function, the
battery sensor needs to be calibrated for
approximately 4 hours with the ignition
off and then, turn the engine on and off
2 or 3 times.OUB051023
■ Type A■Type B
■Type BOUB051006/OUB051059
WARNING - Engine Repair
Turn the ignition switch to the
LOCK (OFF) position or remove the
key from the ignition completely
before performing work on the
vehicle in the engine area. Failure
to do so could result in serious
injuries due to sudden engine reac-
tivation.
OUB051011
Type : B
Page 273 of 397
549
Driving your vehicle
Use high quality ethylene glycol
coolant
Your vehicle is delivered with high quality
ethylene glycol coolant in the cooling
system. It is the only type of coolant that
should be used because it helps prevent
corrosion in the cooling system, lubri-
cates the water pump and prevents
freezing. Be sure to replace or replenish
your coolant in accordance with the
maintenance schedule in section 7.
Before winter, have your coolant tested to
assure that its freezing point is sufficient
for the temperatures anticipated during
the winter.
Check battery and cables
Winter puts additional burdens on the
battery system. Visually inspect the bat-
tery and cables as described in section
7. The level of charge in your battery can
be checked by an authorized Kia dealer
or a service station.
Change to "winter weight" oil if
necessary
In some climates it is recommended that
a lower viscosity "winter weight" oil be
used during cold weather. See section 8
for recommendations. If you aren't sure
what weight oil you should use, consult
an authorized Kia dealer.
Check spark plugs and ignition
system
Inspect your spark plugs as described in
section 7 and replace them if necessary.
Also check all ignition wiring and compo-
nents to be sure they are not cracked,
worn or damaged in any way.
To keep locks from freezing
To keep the locks from freezing, squirt an
approved de-icer fluid or glycerine into
the key opening. If a lock is covered with
ice, squirt it with an approved de-icing
fluid to remove the ice. If the lock is
frozen internally, you may be able to thaw
it out by using a heated key. Handle the
heated key with care to avoid injury.
Use approved window washer
anti-freeze in system
To keep the water in the window washer
system from freezing, add an approved
window washer anti-freeze solution in
accordance with instructions on the con-
tainer. Window washer anti-freeze is
available from an authorized Kia dealer
and most auto parts outlets. Do not use
engine coolant or other types of anti-
freeze as these may damage the paint
finish.
Page 365 of 397
755
Maintenance
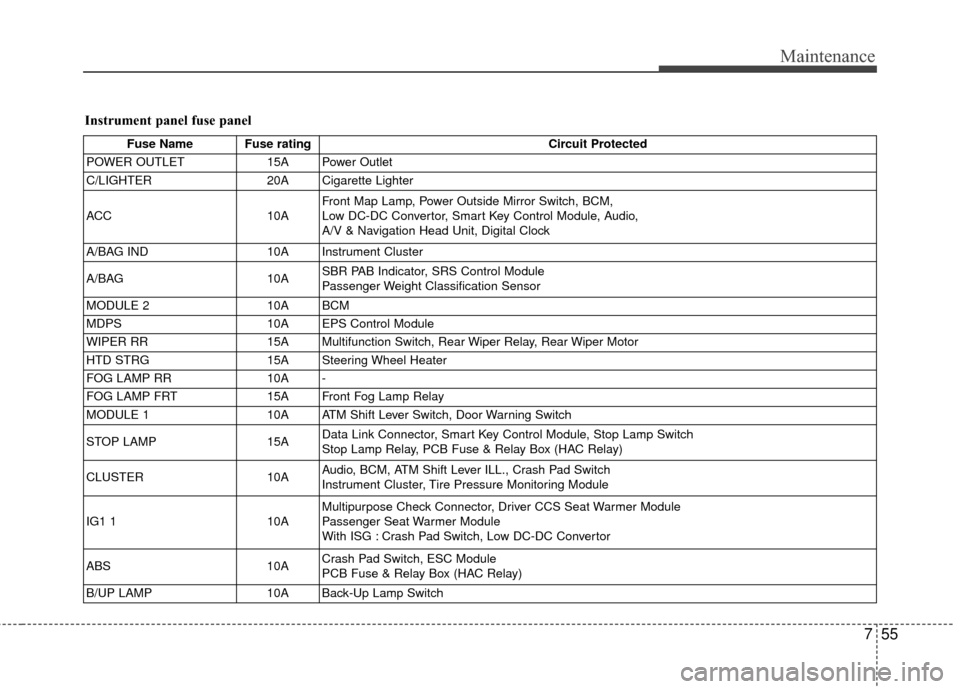
Instrument panel fuse panel
Fuse Name Fuse ratingCircuit Protected
POWER OUTLET 15A Power Outlet
C/LIGHTER 20A Cigarette Lighter
ACC 10AFront Map Lamp, Power Outside Mirror Switch, BCM,
Low DC-DC Convertor, Smart Key Control Module, Audio,
A/V & Navigation Head Unit, Digital Clock
A/BAG IND 10A Instrument Cluster
A/BAG 10ASBR PAB Indicator, SRS Control Module
Passenger Weight Classification Sensor
MODULE 2 10A BCM
MDPS 10A EPS Control Module
WIPER RR 15A Multifunction Switch, Rear Wiper Relay, Rear Wiper Motor
HTD STRG 15A Steering Wheel Heater
FOG LAMP RR 10A -
FOG LAMP FRT 15A Front Fog Lamp Relay
MODULE 1 10A ATM Shift Lever Switch, Door Warning Switch
STOP LAMP 15AData Link Connector, Smart Key Control Module, Stop Lamp Switch
Stop Lamp Relay, PCB Fuse & Relay Box (HAC Relay)
CLUSTER 10AAudio, BCM, ATM Shift Lever ILL., Crash Pad Switch
Instrument Cluster, Tire Pressure Monitoring Module
IG1 1 10AMultipurpose Check Connector, Driver CCS Seat Warmer Module
Passenger Seat Warmer Module
With ISG : Crash Pad Switch, Low DC-DC Convertor
ABS 10ACrash Pad Switch, ESC Module
PCB Fuse & Relay Box (HAC Relay)
B/UP LAMP 10A Back-Up Lamp Switch
Page 366 of 397
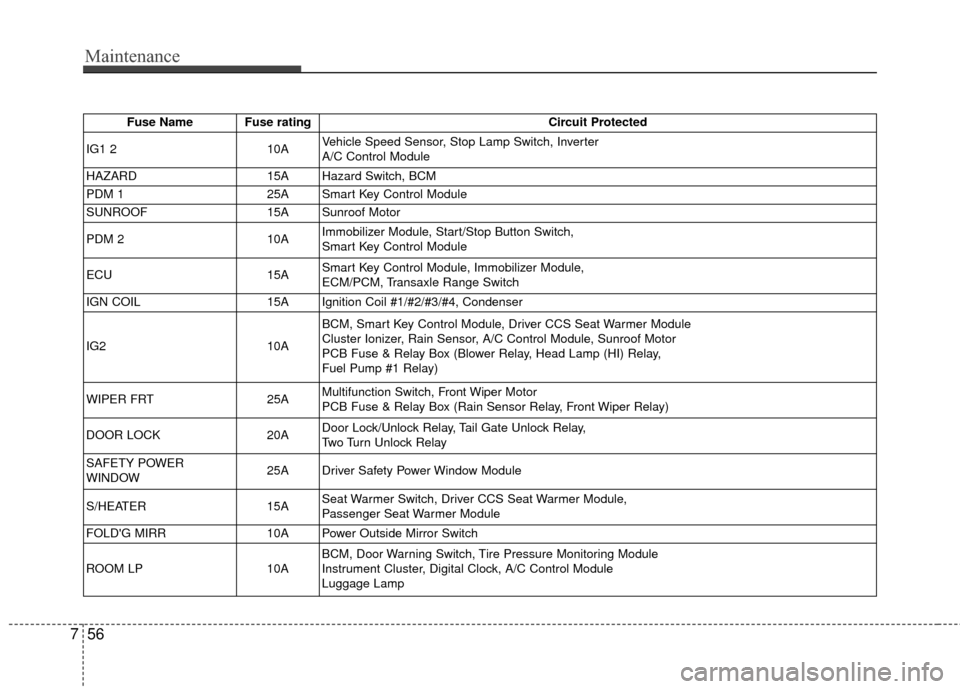
Maintenance
56
7
Fuse Name Fuse rating Circuit Protected
IG1 2 10AVehicle Speed Sensor, Stop Lamp Switch, Inverter
A/C Control Module
HAZARD 15A Hazard Switch, BCM
PDM 1 25A Smart Key Control Module
SUNROOF 15A Sunroof Motor
PDM 2 10AImmobilizer Module, Start/Stop Button Switch,
Smart Key Control Module
ECU 15ASmart Key Control Module, Immobilizer Module,
ECM/PCM, Transaxle Range Switch
IGN COIL 15A Ignition Coil #1/#2/#3/#4, Condenser
IG2 10ABCM, Smart Key Control Module, Driver CCS Seat Warmer Module
Cluster Ionizer, Rain Sensor, A/C Control Module, Sunroof Motor
PCB Fuse & Relay Box (Blower Relay, Head Lamp (HI) Relay,
Fuel Pump #1 Relay)
WIPER FRT 25AMultifunction Switch, Front Wiper Motor
PCB Fuse & Relay Box (Rain Sensor Relay, Front Wiper Relay)
DOOR LOCK 20ADoor Lock/Unlock Relay, Tail Gate Unlock Relay,
Two Turn Unlock Relay
SAFETY POWER
WINDOW 25A Driver Safety Power Window Module
S/HEATER 15ASeat Warmer Switch, Driver CCS Seat Warmer Module,
Passenger Seat Warmer Module
FOLD'G MIRR 10A Power Outside Mirror Switch
ROOM LP 10ABCM, Door Warning Switch, Tire Pressure Monitoring Module
Instrument Cluster, Digital Clock, A/C Control Module
Luggage Lamp
Page 367 of 397
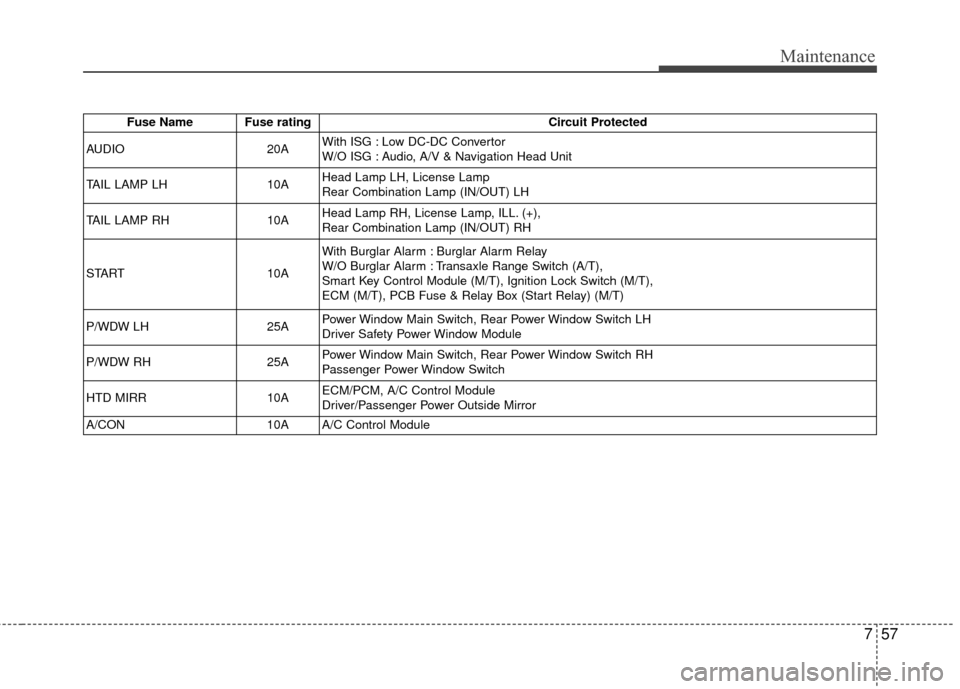
757
Maintenance
Fuse Name Fuse ratingCircuit Protected
AUDIO 20AWith ISG : Low DC-DC Convertor
W/O ISG : Audio, A/V & Navigation Head Unit
TAIL LAMP LH 10AHead Lamp LH, License Lamp
Rear Combination Lamp (IN/OUT) LH
TAIL LAMP RH 10AHead Lamp RH, License Lamp, ILL. (+),
Rear Combination Lamp (IN/OUT) RH
START 10AWith Burglar Alarm : Burglar Alarm Relay
W/O Burglar Alarm : Transaxle Range Switch (A/T),
Smart Key Control Module (M/T), Ignition Lock Switch (M/T),
ECM (M/T), PCB Fuse & Relay Box (Start Relay) (M/T)
P/WDW LH 25APower Window Main Switch, Rear Power Window Switch LH
Driver Safety Power Window Module
P/WDW RH 25APower Window Main Switch, Rear Power Window Switch RH
Passenger Power Window Switch
HTD MIRR 10AECM/PCM, A/C Control Module
Driver/Passenger Power Outside Mirror
A/CON 10A A/C Control Module