AUX KIA RIO 2017 Features and Functions Guide
[x] Cancel search | Manufacturer: KIA, Model Year: 2017, Model line: RIO, Model: KIA RIO 2017Pages: 46, PDF Size: 3.43 MB
Page 3 of 46
Air Conditioning / Climate Control . . . . . . . . . . . . . . . . . .23
Active ECO System* . . . . . . . . . . . . . . . . . . . . . . . . . . . .08
Audio System - Standard Audio System ( Type A)* . . . . . .19
Audio System - Standard Audio System ( Type B)* . . . . . .20
Audio System - UVO eServices System* . . . . . . . . . . . . .21
Audio System - UVO eServices with Navigation* . . . . . . .22
Aux/USB/iPod® Port & Power Outlets* . . . . . . . . . . . . . . .23
Bluetooth® Wireless Technology* . . . . . . . . . . . . . . . . . . .16
Cruise Control* . . . . . . . . . . . . . . . . . . . . . . . . . . . . . . . . . 18
Digital Clock . . . . . . . . . . . . . . . . . . . . . . . . . . . . . . . . . . .23
Folding Rear Seatback . . . . . . . . . . . . . . . . . . . . . . . . . . .28
Idle, Stop and Go (ISG) System* . . . . . . . . . . . . . . . . . . . .09
Manual Gear Shift* . . . . . . . . . . . . . . . . . . . . . . . . . . . . . . 26
Passenger Airbag Off Indicator . . . . . . . . . . . . . . . . . . . .35
Smart Key* . . . . . . . . . . . . . . . . . . . . . . . . . . . . . . . . . . . .29
Tire Mobility Kit . . . . . . . . . . . . . . . . . . . . . . . . . . . . . . . .35
Tire Pressure Monitoring System (TPMS) . . . . . . . . . . . .05
Windshield/Rear Wipers & Washers* . . . . . . . . . . . . . . . .14
VIDEOS & QR CODES . . . . . . . . . . . . . . . . . . . . . . .02
INSTRUMENT CLUSTER
Instrument Cluster Overview . . . . . . . . . . . . . . . . . . . . . . .03
Indicators & Warning Lights . . . . . . . . . . . . . . . . . . . . . . . .04
Tire Pressure Monitoring System (TPMS) . . . . . . . . . . . . . .05
Trip Computer / Tripmeter . . . . . . . . . . . . . . . . . . . . . . . . . .06
Instant Fuel Consumption Mode . . . . . . . . . . . . . . . . . . . . .06
Fuel Economy . . . . . . . . . . . . . . . . . . . . . . . . . . . . . . . . . . .06
User Settings* . . . . . . . . . . . . . . . . . . . . . . . . . . . . . . . . . .07
Service Mode (Maintenance)* . . . . . . . . . . . . . . . . . . . . . .07
Active ECO System* . . . . . . . . . . . . . . . . . . . . . . . . . . . . . .08
DRIVER’S PANEL
Idle, Stop and Go (ISG) System* . . . . . . . . . . . . . . . . . . . . .09
Instrument Panel Dimmer . . . . . . . . . . . . . . . . . . . . . . . . . .10
Electronic Stability Control (ESC) . . . . . . . . . . . . . . . . . . . .10
Hill-Start Assist Control (HAC) . . . . . . . . . . . . . . . . . . . . . . .10
Power Windows, Window Lock & Central Door Lock* . . . . . . . . . . . . . . . . . . . . . . . . . . . . . .11
Power/Heated Outside Mirrors*
. . . . . . . . . . . . . . . . . . . . . .11
Power Folding Outside Mirrors* . . . . . . . . . . . . . . . . . . . . .11
Engine Start/Stop Button* . . . . . . . . . . . . . . . . . . . . . . . . . .12
STEERING WHEEL CONTROLS
Headlights & High Beams . . . . . . . . . . . . . . . . . . . . . . . . . .13
Turn Signals & Fog Lights* . . . . . . . . . . . . . . . . . . . . . . . . .13
Windshield Wipers & Washers . . . . . . . . . . . . . . . . . . . . . . .14
Rear Wiper & Washer* . . . . . . . . . . . . . . . . . . . . . . . . . . . . .14
Tilt/ Telescoping Steering Wheel* . . . . . . . . . . . . . . . . . . . .15
Bluetooth® Wireless Technology* . . . . . . . . . . . . . . . . . . . .16
Audio Controls . . . . . . . . . . . . . . . . . . . . . . . . . . . . . . . . . . .18
Cruise Control* . . . . . . . . . . . . . . . . . . . . . . . . . . . . . . . . . .18
AUDIO SYSTEMS
Standard Audio System ( Type A)* . . . . . . . . . . . . . . . . . . . .19
Standard Audio System ( Type B)* . . . . . . . . . . . . . . . . . . . .20
UVO eServices System* . . . . . . . . . . . . . . . . . . . . . . . . . . .21
UVO eServices with Navigation* . . . . . . . . . . . . . . . . . . . . .22
CENTER PANEL
Digital Clock . . . . . . . . . . . . . . . . . . . . . . . . . . . . . . . . . . . .23
Aux/USB/iPod® Port & Power Outlets . . . . . . . . . . . . . . . . .23
Manual Climate Control . . . . . . . . . . . . . . . . . . . . . . . . . . . .24
Automatic Gear Shift / Sportmatic® Shifting* . . . . . . . . . . .25
Manual Gear Shift* . . . . . . . . . . . . . . . . . . . . . . . . . . . . . . .26
S E AT I N G
Seat Warmers* . . . . . . . . . . . . . . . . . . . . . . . . . . . . . . . . . .27
6-Way Adjustable Driver’s Seat . . . . . . . . . . . . . . . . . . . . . .27
Front Seat Headrest Adjustment . . . . . . . . . . . . . . . . . . . . .27
Folding Rear Seatback . . . . . . . . . . . . . . . . . . . . . . . . . . . .28
OTHER KEY FEATURES
Smart Key* . . . . . . . . . . . . . . . . . . . . . . . . . . . . . . . . . . . . .29
Remote Keyless Entry (Folding Key)* . . . . . . . . . . . . . . . . .30
Double-Turn Lock /Unlock All* . . . . . . . . . . . . . . . . . . . . . . .30
Fuel Cap / Malfunction Indicator . . . . . . . . . . . . . . . . . . . . .30
Hood Release Lever and Latch . . . . . . . . . . . . . . . . . . . . . .31
Fuel Door Release Lever . . . . . . . . . . . . . . . . . . . . . . . . . . .31
Trunk Release Lever . . . . . . . . . . . . . . . . . . . . . . . . . . . . . .31
Sunvisor . . . . . . . . . . . . . . . . . . . . . . . . . . . . . . . . . . . . . . .31
Map/Room Lamps* . . . . . . . . . . . . . . . . . . . . . . . . . . . . . . .32
Sunroof Operation* . . . . . . . . . . . . . . . . . . . . . . . . . . . . . . .33
Rear-Camera Display* . . . . . . . . . . . . . . . . . . . . . . . . . . . . .34
Child Safety Locks . . . . . . . . . . . . . . . . . . . . . . . . . . . . . . . .35
Tire Mobility Kit . . . . . . . . . . . . . . . . . . . . . . . . . . . . . . . . . .35
SAFETY FEATURES
Occupant Detection System (ODS)/ Passenger Airbag Off Indicator . . . . . . . . . . . . . . . . . . . . . .36
Seat Belts . . . . . . . . . . . . . . . . . . . . . . . . . . . . . . . . . . . . . .36
Seat Belt Retractor Locks . . . . . . . . . . . . . . . . . . . . . . . . . .36
NORMAL MAINTENANCE SCHEDULE . . . . .37
LEGAL DISCLAIMERS (See Back Inside Cover Page)
Driving while distracted can result in a loss of vehicle control that may lead to an accident, severe personal injury and death. The driver’s primary responsibility is in the safe and legal operation of a vehicle, and use of any handheld devices, other equipment or vehicle systems which take the driver’s eyes, attention and focus away from the safe operation of a vehicle or that are not permissible by law should never be used during operation of the vehicle.
RIO FE ATURES & FUNCTIONS GUIDE*IF EQUIPPED
ESSENTIAL FEATURES
Page 20 of 46
18
Cruise Control* Audio Controls
CRUISE
For further audio system operations, refer to pages 19 – 22
Your vehicle’s steering wheel buttons may differ from those in the illustrations. See your Owner’s Manual for more details.
Pressing the Audio MODE button for more than 1 second will turn Audio Mode ON/OFF
QUICK TIP
•Cruise Control is designed to function above approximately 25 mph •The cruise control system will not activate until the brake pedal has been depressed at least once after ignition ON or engine starting
QUICK TIPS
AB
DC
F
G
HE
( Type B)
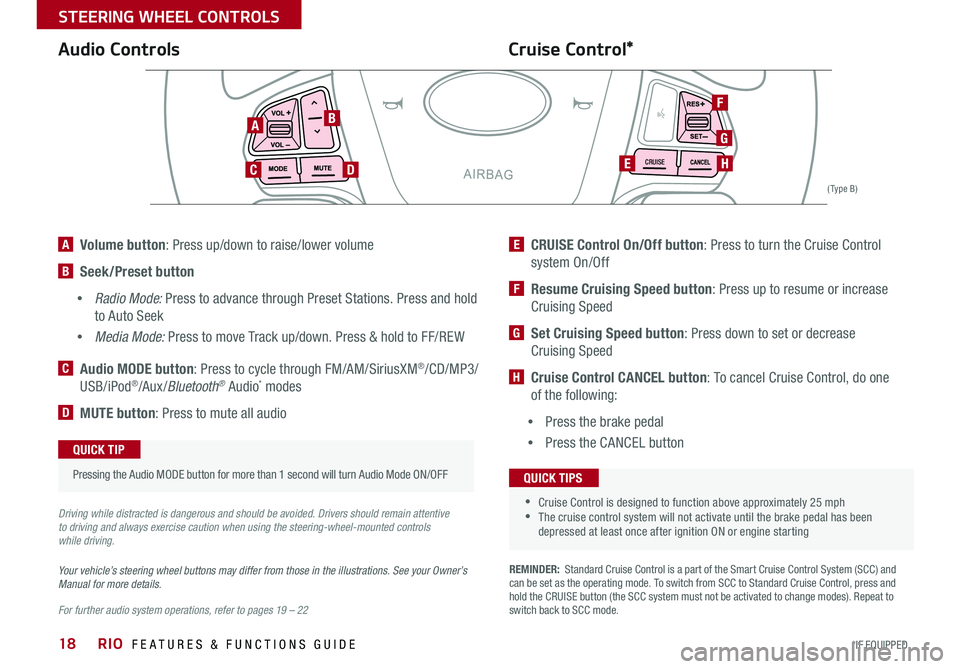
A Volume button: Press up/down to raise/lower volume
B Seek/Preset button
• Radio Mode: Press to advance through Preset Stations . Press and hold
to Auto Seek
•Media Mode: Press to move Track up/down . Press & hold to FF/REW
C Audio MODE button: Press to cycle through FM/AM/SiriusXM®/CD/MP3/
USB/iPod®/Aux /Bluetooth® Audio* modes
D MUTE button: Press to mute all audio
E CRUISE Control On/Off button: Press to turn the Cruise Control
system On/Off
F Resume Cruising Speed button: Press up to resume or increase
Cruising Speed
G Set Cruising Speed button: Press down to set or decrease
Cruising Speed
H Cruise Control CANCEL button: To cancel Cruise Control, do one
of the following:
•Press the brake pedal
•Press the CANCEL button
REMINDER: Standard Cruise Control is a part of the Smart Cruise Control System (SCC) and can be set as the operating mode . To switch from SCC to Standard Cruise Control, press and hold the CRUISE button (the SCC system must not be activated to change modes) . Repeat to switch back to SCC mode .
Driving while distracted is dangerous and should be avoided. Drivers should remain attentive to driving and always exercise caution when using the steering-wheel-mounted controls while driving.
RIO FEATURES & FUNCTIONS GUIDE
*IF EQUIPPED
STEERING WHEEL CONTROLS
Page 21 of 46
19
(with Bluetooth® Wireless Technology*)
Standard Audio System (Type A)*
– FM/AM/SiriusXM®/Media (CD, USB, iPod®, Aux, My Music, Bluetooth® Au dio)*
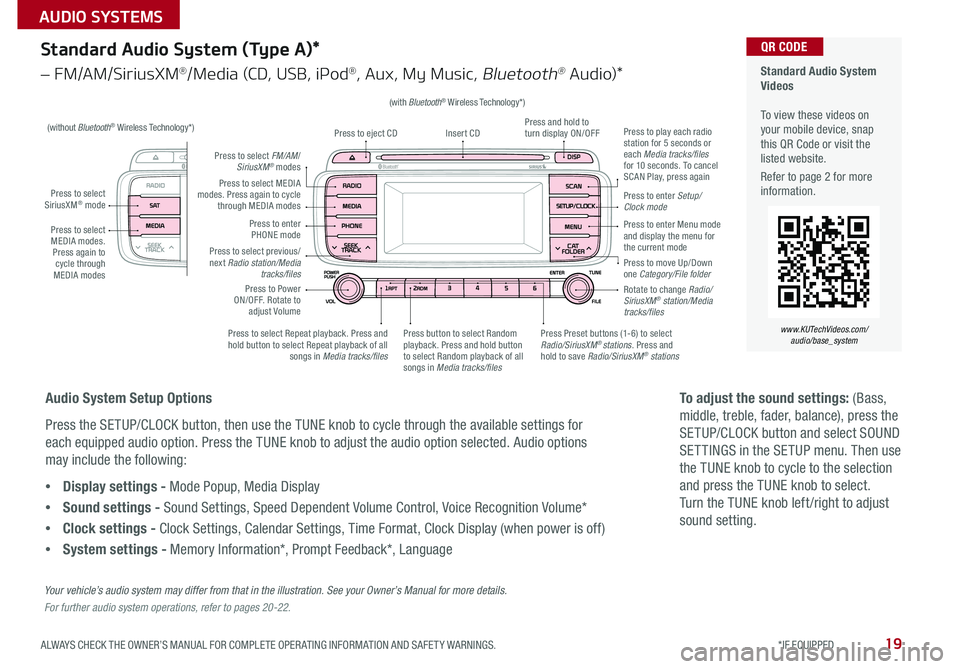
Press to select MEDIA modes . Press again to cycle through MEDIA modes
Press to select SiriusXM® mode
Standard Audio System Videos To view these videos on your mobile device, snap this QR Code or visit the listed website .
Refer to page 2 for more information .
www.KUTechVideos.com/ audio/base_system
QR CODE
Press to select MEDIA modes . Press again to cycle through MEDIA modes
Press to Power ON/OFF . Rotate to adjust Volume
Press to select Repeat playback . Press and hold button to select Repeat playback of all songs in Media tracks/files
Press to select previous/next Radio station/Media tracks/files
Press Preset buttons (1-6) to select Radio/SiriusXM® stations . Press and hold to save Radio/SiriusXM® stations
Press to select FM/AM/SiriusXM® modes
Press to enter PHONE mode
Press to play each radio station for 5 seconds or each Media tracks/files for 10 seconds . To cancel SCAN Play, press again
Press and hold to turn display ON/OFFInsert CDPress to eject CD
Press to enter Setup/ Clock mode
Rotate to change Radio/SiriusXM® station/Media tracks/files
Press to move Up/Down one Category/File folder
Press to enter Menu mode and display the menu for the current mode
Press button to select Random playback . Press and hold button to select Random playback of all songs in Media tracks/files
(without Bluetooth® Wireless Technology*)
Audio System Setup Options
Press the SETUP/CLOCK button, then use the TUNE knob to cycle through the available settings for
each equipped audio option . Press the TUNE knob to adjust the audio option selected . Audio options
may include the following:
•Display settings - Mode Popup, Media Display
•Sound settings - Sound Settings, Speed Dependent Volume Control, Voice Recognition Volume*
•Clock settings - Clock Settings, Calendar Settings, Time Format, Clock Display (when power is off)
•System settings - Memory Information*, Prompt Feedback*, Language
To adjust the sound settings: (Bass,
middle, treble, fader, balance), press the
SETUP/CLOCK button and select SOUND
SET TINGS in the SETUP menu . Then use
the TUNE knob to cycle to the selection
and press the TUNE knob to select .
Turn the TUNE knob left /right to adjust
sound setting .
Your vehicle’s audio system may differ from that in the illustration. See your Owner’s Manual for more details.
For further audio system operations, refer to pages 20-22.
ALWAYS CHECK THE OWNER’S MANUAL FOR COMPLETE OPER ATING INFORMATION AND SAFET Y WARNINGS. *IF EQUIPPED
AUDIO SYSTEMS
Page 22 of 46
20
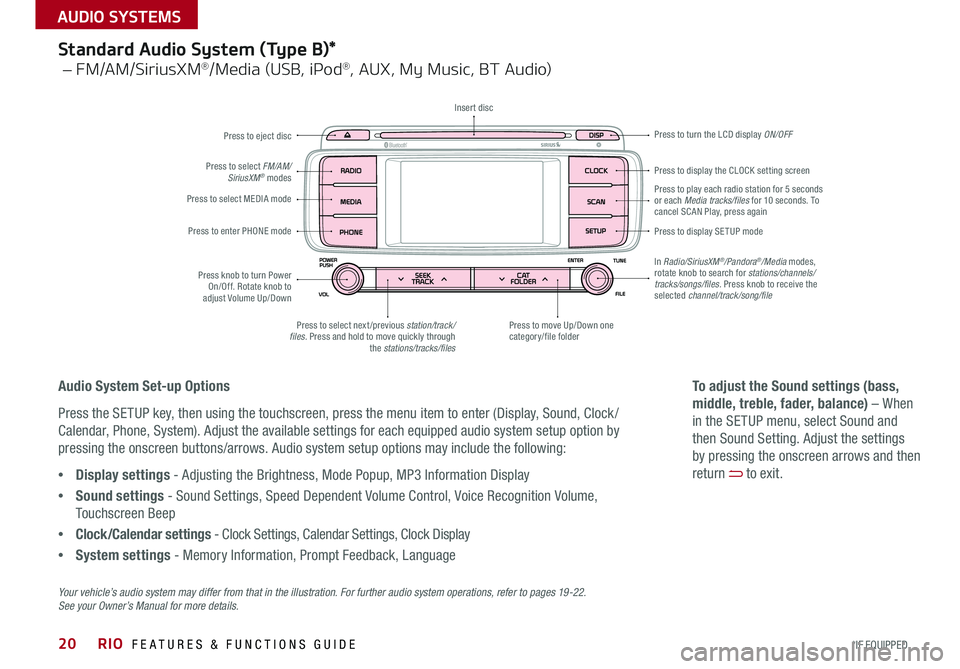
Press to eject disc
Press to play each radio station for 5 seconds or each Media tracks/files for 10 seconds . To cancel SCAN Play, press again
Press to display SE TUP mode
Press to display the CLOCK setting screen
Press to turn the LCD display ON/OFF
Press to move Up/Down one category/file folderPress to select next /previous station/track/files. Press and hold to move quickly through the stations/tracks/files
Press knob to turn Power On/Off . Rotate knob to adjust Volume Up/Down
Press to enter PHONE mode
Press to select MEDIA mode
Press to select FM/AM/SiriusXM® modes
In Radio/SiriusXM®/Pandora®/Media modes, rotate knob to search for stations/channels/tracks/songs/files. Press knob to receive the selected channel/track/song/file
Insert disc
Standard Audio System (Type B)*
– FM/AM/SiriusXM®/Media (USB, iPod®, AUX, My Music, BT Audio)
Audio System Set-up Options
Press the SETUP key, then using the touchscreen, press the menu item to enter (Display, Sound, Clock /
Calendar, Phone, System) . Adjust the available settings for each equipped audio system setup option by
pressing the onscreen buttons/arrows . Audio system setup options may include the following:
•Display settings - Adjusting the Brightness, Mode Popup, MP3 Information Display
•Sound settings - Sound Settings, Speed Dependent Volume Control, Voice Recognition Volume,
Touchscreen Beep
•Clock/Calendar settings - Clock Settings, Calendar Settings, Clock Display
•System settings - Memory Information, Prompt Feedback, Language
To adjust the Sound settings (bass,
middle, treble, fader, balance) – When
in the SETUP menu, select Sound and
then Sound Setting . Adjust the settings
by pressing the onscreen arrows and then
return to exit .
Your vehicle’s audio system may differ from that in the illustration. For further audio system operations, refer to pages 19-22. See your Owner’s Manual for more details.
RIO FEATURES & FUNCTIONS GUIDE
*IF EQUIPPED
AUDIO SYSTEMS
Page 23 of 46
21
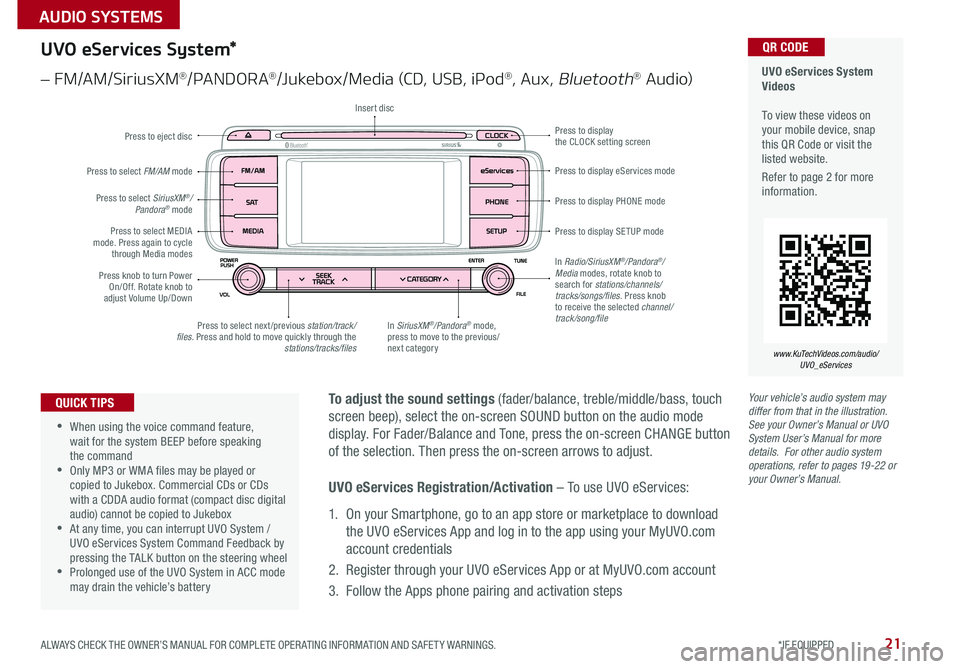
Your vehicle’s audio system may differ from that in the illustration. See your Owner’s Manual or UVO System User’s Manual for more details. For other audio system operations, refer to pages 19-22 or your Owner’s Manual.
To adjust the sound settings (fader/balance, treble/middle/bass, touch
screen beep), select the on-screen SOUND button on the audio mode
display . For Fader/Balance and Tone, press the on-screen CHANGE button
of the selection . Then press the on-screen arrows to adjust .
•
•When using the voice command feature, wait for the system BEEP before speaking the command •Only MP3 or WMA files may be played or copied to Jukebox . Commercial CDs or CDs with a CDDA audio format (compact disc digital audio) cannot be copied to Jukebox •At any time, you can interrupt UVO System / UVO eServices System Command Feedback by pressing the TALK button on the steering wheel •Prolonged use of the UVO System in ACC mode may drain the vehicle’s battery
QUICK TIPS
UVO eServices System Videos To view these videos on your mobile device, snap this QR Code or visit the listed website .
Refer to page 2 for more information .
www.KuTechVideos.com/audio/ UVO_eServices
QR CODEUVO eServices System*
– FM/AM/SiriusXM®/PA N DO R A®/Jukebox/Media (CD, USB, iPod®, Aux, Bluetooth® Au dio)
Press to eject disc
Press to display PHONE mode
Press to display SE TUP mode
Press to display eServices mode
Press to display the CLOCK setting screen
In SiriusXM®/Pandora® mode, press to move to the previous/next category
Press to select next /previous station/track/files. Press and hold to move quickly through the stations/tracks/files
Press knob to turn Power On/Off . Rotate knob to adjust Volume Up/Down
Press to select MEDIA mode . Press again to cycle through Media modes
Press to select SiriusXM®/Pandora® mode
Press to select FM/AM mode
In Radio/SiriusXM®/Pandora®/Media modes, rotate knob to search for stations/channels/tracks/songs/files. Press knob to receive the selected channel/track/song/file
Insert disc
UVO eServices Registration/Activation – To use UVO eServices:
1 . On your Smartphone, go to an app store or marketplace to download
the UVO eServices App and log in to the app using your MyUVO .com
account credentials
2 . Register through your UVO eServices App or at MyUVO .com account
3 . Follow the Apps phone pairing and activation steps
ALWAYS CHECK THE OWNER’S MANUAL FOR COMPLETE OPER ATING INFORMATION AND SAFET Y WARNINGS. *IF EQUIPPED
AUDIO SYSTEMS
Page 24 of 46
22
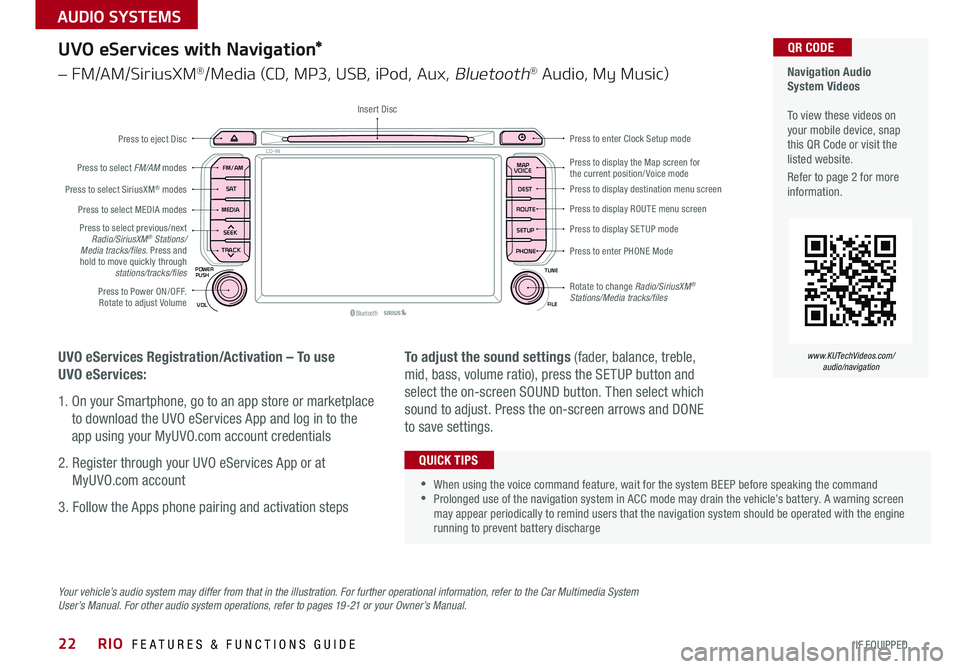
Your vehicle’s audio system may differ from that in the illustration. For further operational information, refer to the Car Multimedia System User’s Manual. For other audio system operations, refer to pages 19-21 or your Owner’s Manual.
UVO eServices with Navigation*
– FM/AM/SiriusXM®/Media (CD, MP3, USB, iPod, Aux, Bluetooth® Audio, My Music)
UVO eServices Registration/Activation – To use
UVO eServices:
1 . On your Smartphone, go to an app store or marketplace
to download the UVO eServices App and log in to the
app using your MyUVO .com account credentials
2 . Register through your UVO eServices App or at
MyUVO .com account
3 . Follow the Apps phone pairing and activation steps
To adjust the sound settings (fader, balance, treble,
mid, bass, volume ratio), press the SETUP button and
select the on-screen SOUND button . Then select which
sound to adjust . Press the on-screen arrows and DONE
to save settings .
•When using the voice command feature, wait for the system BEEP before speaking the command •Prolonged use of the navigation system in ACC mode may drain the vehicle’s battery . A warning screen may appear periodically to remind users that the navigation system should be operated with the engine running to prevent battery discharge
QUICK TIPS
Navigation Audio System Videos To view these videos on your mobile device, snap this QR Code or visit the listed website .
Refer to page 2 for more information .
www.KUTechVideos.com/audio/navigation
QR CODE
MAP
Bluetooth®VOL
POWER
ROUTE MAP
VOICE
TUNE
FILE
PUSH
SEEK
PHONESETUP
S AT
FM/AM
CD-IN
DEST
MEDIA
TRACK
Press to display the Map screen for the current position/ Voice modePress to display destination menu screen
Press to display ROUTE menu screen
Press to display SE TUP mode
Press to enter PHONE Mode
Press to Power ON/OFF . Rotate to adjust Volume
Press to select previous/next Radio/SiriusXM® Stations/Media tracks/files. Press and hold to move quickly through stations/tracks/files
Press to select FM/AM modes
Press to eject Disc
Insert Disc
Press to select SiriusXM® modes
Press to select MEDIA modes
Press to enter Clock Setup mode
Rotate to change Radio/SiriusXM® Stations/Media tracks/files
RIO FEATURES & FUNCTIONS GUIDE
*IF EQUIPPED
AUDIO SYSTEMS
Page 25 of 46
23
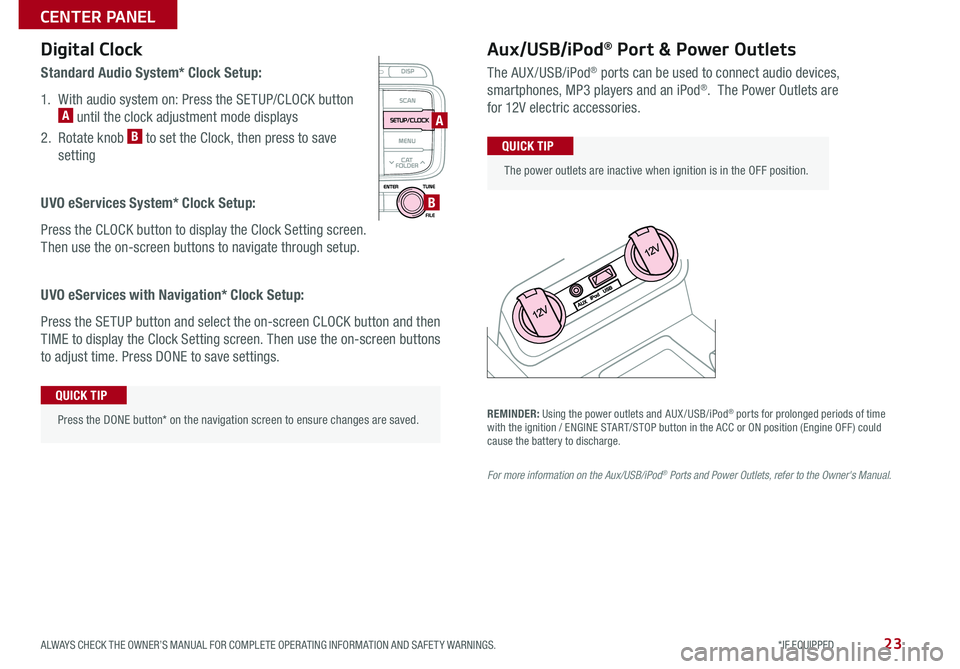
Aux/USB/iPod® Port & Power Outlets
The AUX/USB/iPod® ports can be used to connect audio devices,
smartphones, MP3 players and an iPod® . The Power Outlets are
for 12V electric accessories .
Press the DONE button* on the navigation screen to ensure changes are saved .
QUICK TIP
The power outlets are inactive when ignition is in the OFF position .
QUICK TIP
Digital Clock
Standard Audio System* Clock Setup:
1 . With audio system on: Press the SETUP/CLOCK button A until the clock adjustment mode displays
2 . Rotate knob B to set the Clock, then press to save
setting
UVO eServices System* Clock Setup:
Press the CLOCK button to display the Clock Setting screen .
Then use the on-screen buttons to navigate through setup .
UVO eServices with Navigation* Clock Setup:
Press the SETUP button and select the on-screen CLOCK button and then
TIME to display the Clock Setting screen . Then use the on-screen buttons
to adjust time . Press DONE to save settings .
A
B
REMINDER: Using the power outlets and AUX /USB/iPod® ports for prolonged periods of time with the ignition / ENGINE START/STOP button in the ACC or ON position (Engine OFF ) could cause the battery to discharge .
For more information on the Aux/USB/iPod® Ports and Power Outlets, refer to the Owner's Manual.
ALWAYS CHECK THE OWNER’S MANUAL FOR COMPLETE OPER ATING INFORMATION AND SAFET Y WARNINGS. *IF EQUIPPED
CENTER PANEL
Page 44 of 46
RIO
CUSTOMER DELIVERY CHECKLIST
KEY FEATURE WALKTHROUGHDURING DELIVERY Sales Consultant:
______________________________________________________________
Date:
____________________
Sales Manager:
________________________________________________________________
Date:
____________________
Customer:
_____________________________________________________________________
Date:
____________________
*if equipped
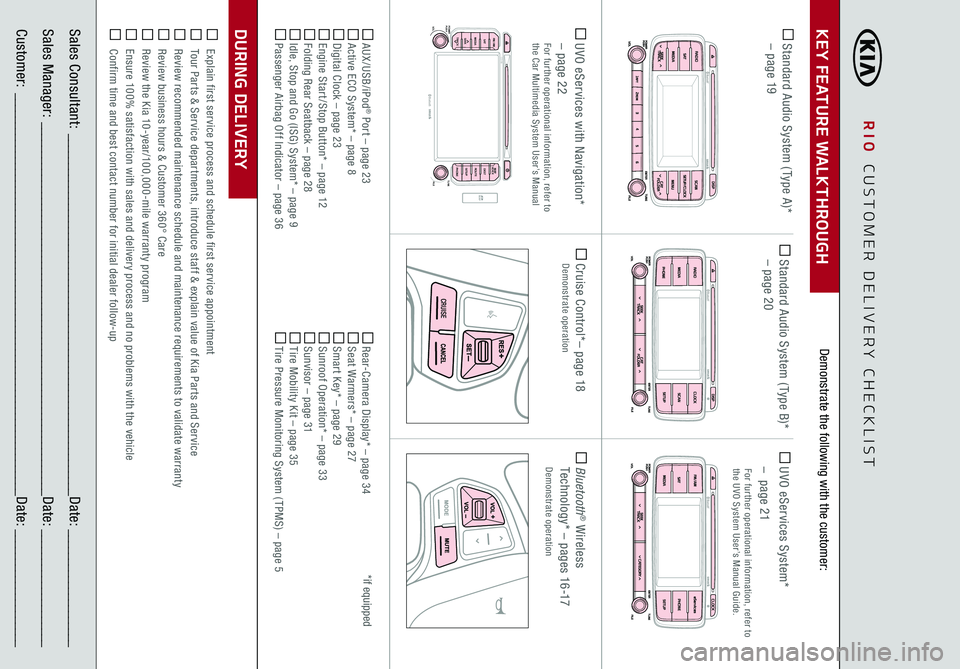
Explain first service process and schedule first service appointment Tour Parts & Service departments, introduce staff & explain value of Kia Parts and Service Review recommended maintenance schedule and maintenance requirements to validate warranty Review business hours & Customer 360° Care Review the Kia 10-year/100,000-mile warranty program Ensure 100% satisfaction with sales and delivery process and no problems with the vehicle Confirm time and best contact number for initial dealer follow-up Standard Audio System ( Type A)*
– page 19
Cruise Control*
– page 18
Demonstrate operation
CRUISE
MAP
B luetooth®
VOLPOWER
ROUTEMAP
VOICETUNE
FILE
PUSHSEEK PHONESETUP
S AT
FM/AM
CD-IN
DEST
MEDIA
TRACK
UVO eServices with Navigation*
– page 22
For further operational information, refer to the Car Multimedia System User’s Manual
Bluetooth
® Wireless
Technology*
– p a g e s 16 -17
Demonstrate operation
Standard Audio System ( Type B)*
– page 20
UVO eServices System*
– page 21For further operational information, refer to the UVO System User’s Manual Guide.
AUX /USB/iPod
® Port – page 23
Active ECO System* – page 8 Digital Clock – page 23 Engine Start /Stop Button* – page 12 Folding Rear Seatback – page 28 Idle, Stop and Go (ISG) System* – page 9 Passenger Airbag Off Indicator – page 36
Rear-Camera Display* – page 34 Seat Warmers* – page 27 Smart Key* – page 29 Sunroof Operation* – page 33 Sunvisor – page 31 Tire Mobility Kit – page 35 Tire Pressure Monitoring System ( TPMS) – page 5
Demonstrate the following with the customer: