clock setting KIA RIO 2017 Owners Manual
[x] Cancel search | Manufacturer: KIA, Model Year: 2017, Model line: RIO, Model: KIA RIO 2017Pages: 449, PDF Size: 14.88 MB
Page 189 of 449

Features of your vehicle
118
4
Digital clock and calendar
(if equipped)
Whenever the battery terminals or relat-
ed fuses are disconnected, you must
reset the clock and the calendar.
When the ignition switch is in the ACC or
ON position, the clock buttons operate as
follows:
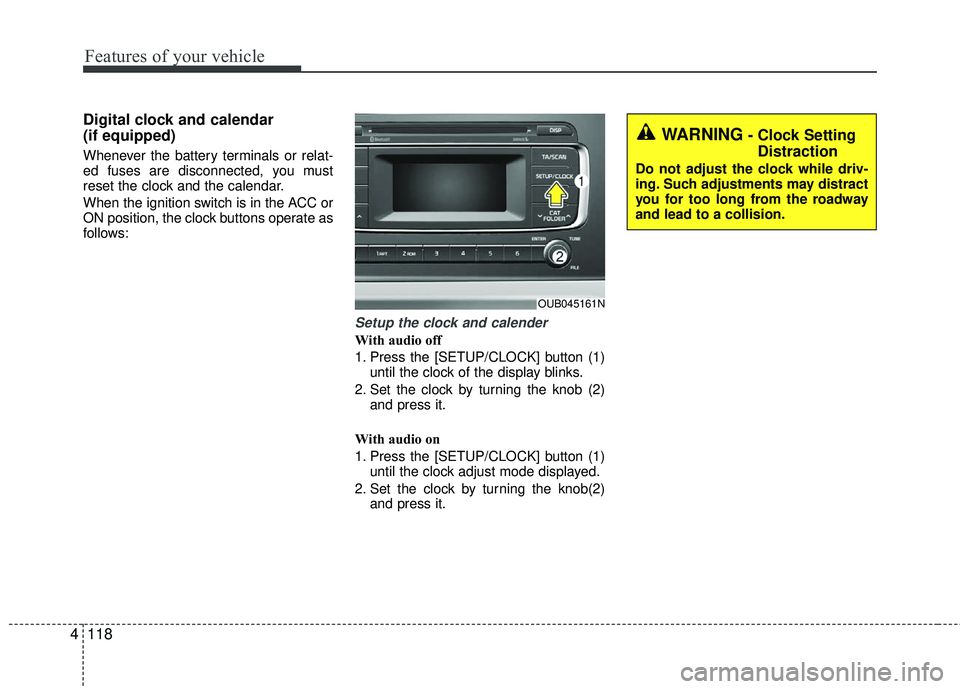
Setup the clock and calender
With audio off
1. Press the [SETUP/CLOCK] button (1)
until the clock of the display blinks.
2. Set the clock by turning the knob (2) and press it.
With audio on
1. Press the [SETUP/CLOCK] button (1) until the clock adjust mode displayed.
2. Set the clock by turning the knob(2) and press it.
OUB045161N
WARNING- Clock SettingDistraction
Do not adjust the clock while driv-
ing. Such adjustments may distract
you for too long from the roadway
and lead to a collision.
Page 207 of 449

Features of your vehicle
136
4
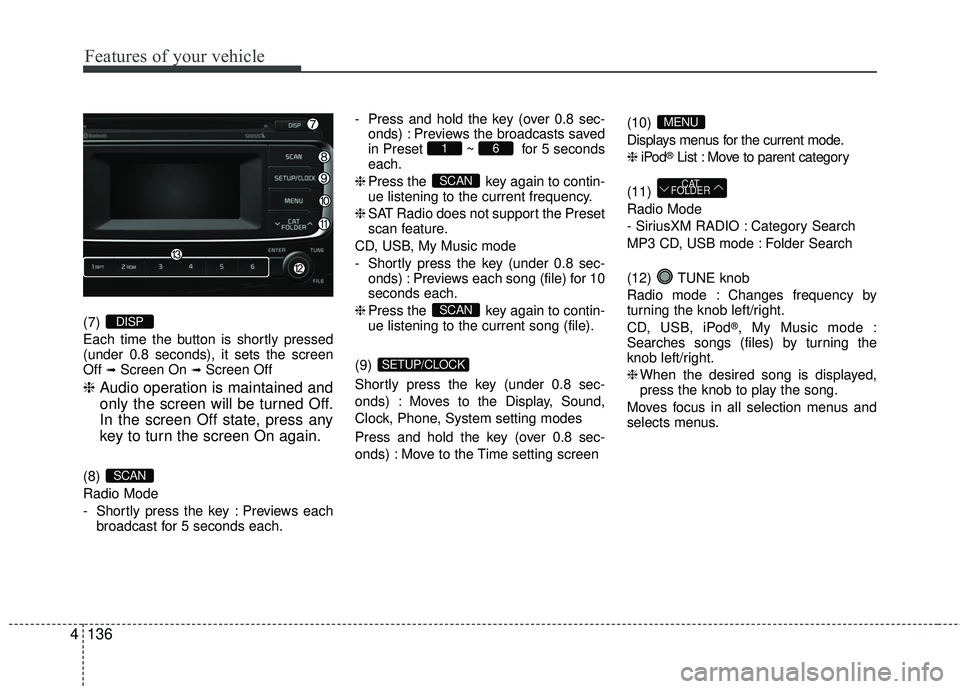
(7)
Each time the button is shortly pressed
(under 0.8 seconds), it sets the screen
Off
➟Screen On ➟Screen Off
❈ Audio operation is maintained and
only the screen will be turned Off.
In the screen Off state, press any
key to turn the screen On again.
(8)
Radio Mode
- Shortly press the key : Previews each
broadcast for 5 seconds each. - Press and hold the key (over 0.8 sec-
onds) : Previews the broadcasts saved
in Preset ~ for 5 seconds
each.
❈ Press the key again to contin-
ue listening to the current frequency.
❈ SAT Radio does not support the Preset
scan feature.
CD, USB, My Music mode
- Shortly press the key (under 0.8 sec- onds) : Previews each song (file) for 10
seconds each.
❈ Press the key again to contin-
ue listening to the current song (file).
(9)
Shortly press the key (under 0.8 sec-
onds) : Moves to the Display, Sound,
Clock, Phone, System setting modes
Press and hold the key (over 0.8 sec-
onds) : Move to the Time setting screen (10)
Displays menus for the current mode.
❈
iPod
®List : Move to parent category
(11)
Radio Mode
- SiriusXM RADIO : Category Search
MP3 CD, USB mode : Folder Search
(12) TUNE knob
Radio mode : Changes frequency by
turning the knob left/right.
CD, USB, iPod
®, My Music mode :
Searches songs (files) by turning the
knob left/right.
❈ When the desired song is displayed,
press the knob to play the song.
Moves focus in all selection menus and
selects menus.
CAT
FOLDER
MENU
SETUP/CLOCK
SCAN
SCAN
61
SCAN
DISP
Page 210 of 449
![KIA RIO 2017 Owners Manual Features of your vehicle
4139
SETUP
Display Settings
Press the key Select
[Display] through TUNE knob or
key Select menu through TUNE knob
Mode Pop up
[Mode Pop up] Changes /
selection mode
or ke KIA RIO 2017 Owners Manual Features of your vehicle
4139
SETUP
Display Settings
Press the key Select
[Display] through TUNE knob or
key Select menu through TUNE knob
Mode Pop up
[Mode Pop up] Changes /
selection mode
or ke](/img/2/40419/w960_40419-209.png)
Features of your vehicle
4139
SETUP
Display Settings
Press the key Select
[Display] through TUNE knob or
key Select menu through TUNE knob
Mode Pop up
[Mode Pop up] Changes /
selection mode
or key to display the mode
change pop up screen.
Media Display
When playing an MP3 file, select the
desired display info from ‘Folder/File’ or
‘Album/Artist/Song’.
MEDIARADIO
OffOn
1 RPT
SETUP/CLOCK
Page 211 of 449
![KIA RIO 2017 Owners Manual Features of your vehicle
140
4
SOUND SETTINGS
Press the key Select
[Sound] through TUNE knob or
key Select menu through TUNE knob
Tone
This menu allows you to set the Bass,
Middle, Treble.
Select KIA RIO 2017 Owners Manual Features of your vehicle
140
4
SOUND SETTINGS
Press the key Select
[Sound] through TUNE knob or
key Select menu through TUNE knob
Tone
This menu allows you to set the Bass,
Middle, Treble.
Select](/img/2/40419/w960_40419-210.png)
Features of your vehicle
140
4
SOUND SETTINGS
Press the key Select
[Sound] through TUNE knob or
key Select menu through TUNE knob
Tone
This menu allows you to set the Bass,
Middle, Treble.
Select [Tone] Select menu through
TUNE knobTu r n TUNE knobleft/right to set
Bass, Middle, Treble : Selects the soundtone.
Default : Restores default settings.
❈ Return : While adjusting values, press-
ing the TUNE knob will restore the
parent menu.
Position
This menu allows you to set the Fader,
Balance.
Select [Position] Select menu through TUNE knob Turn TUNE knobleft/right to set
Fader, Balance : Selects the sound fader and balance.
Default : Restores default settings.
❈ Return : While adjusting values, press-
ing the TUNE knob will restore the
parent menu.
Speed Dependent Volume Control
This feature is used to automatically con-
trol the volume level according to the
speed of the vehicle.
Select [Speed Dependent Vol.] Set
[Off/On] of
TUNEknob
Voice Recognition Volume
(if equipped)
Adjusts voice recognition volume.
Select [Voice Recognition Vol.] Set vol-
ume of
TUNEknob
2 RDM
SETUP/CLOCK
Page 212 of 449
![KIA RIO 2017 Owners Manual Features of your vehicle
4141
CLOCK SETTINGS
Press the key Select
[Clock] through TUNE knob or
key Select menu through TUNE knob
Clock Settings
This menu is used to set the time.
Select [Clock Sett KIA RIO 2017 Owners Manual Features of your vehicle
4141
CLOCK SETTINGS
Press the key Select
[Clock] through TUNE knob or
key Select menu through TUNE knob
Clock Settings
This menu is used to set the time.
Select [Clock Sett](/img/2/40419/w960_40419-211.png)
Features of your vehicle
4141
CLOCK SETTINGS
Press the key Select
[Clock] through TUNE knob or
key Select menu through TUNE knob
Clock Settings
This menu is used to set the time.
Select [Clock Settings] Set through
TUNE knob Press TUNE knob
❈ Adjust the number currently in focus to
set the [hour] and press the tune knob
to set the [minute] and [AM/PM].
Calendar Settings
This menu is used to set the date.
Select [Calendar Settings] Set through
TUNE knob Press TUNE knob
❈ Adjust the number currently in focus to
make the settings and press the tune
knob to move to the next setting.
Time Format
This function is used to set the 12/24
hour time format of the audio system.
Select [Time Format] Set 12Hr / 24Hr
through TUNE knob.
Clock Display when Power is OFF
Select [Clock Disp.(Pwr Off)] Set /through TUNEknob
: Displays time/date on screen
: Turn off.
Off
On
OffOn
3
SETUP/CLOCK
WARNING- Clock Setting Distraction
Do not adjust the clock while driv-
ing. You may lose your steering
control and cause severe personal
injury or accidents.
Page 213 of 449
![KIA RIO 2017 Owners Manual Features of your vehicle
142
4
SYSTEM SETTINGS
Press the key Select
[System] Select menu through
TUNE knob
Memory Information
(if equipped)
Displays currently used memory and
total system memory. KIA RIO 2017 Owners Manual Features of your vehicle
142
4
SYSTEM SETTINGS
Press the key Select
[System] Select menu through
TUNE knob
Memory Information
(if equipped)
Displays currently used memory and
total system memory.](/img/2/40419/w960_40419-212.png)
Features of your vehicle
142
4
SYSTEM SETTINGS
Press the key Select
[System] Select menu through
TUNE knob
Memory Information
(if equipped)
Displays currently used memory and
total system memory.
Select [Memory Information] OK
The currently used memory is displayed
on the left side while the total system
memory is displayed on the right side.
Prompt Feedback (if equipped)
This feature is used to change voice
command feedback between Normal and
Expert modes.
Select [Prompt Feedback] Set through
TUNEknob
On : This mode is for beginner users and provides detailed instructions dur-
ing voice command operation.
Off : This mode is for expert users and omits some information during voice
command operation. (When using
Expert mode, guidance instructions
can be heard through the [Help] or
[Menu] commands.
Language
This menu is used to set the display and
voice recognition language.
Select [Language] Set through TUNE knob
❈ The system will reboot after the lan-
guage is changed.
❈ Language support by region
- English, Francais, Espanol
SETUP/CLOCK
Page 228 of 449
![KIA RIO 2017 Owners Manual Features of your vehicle
4157
Pairing through [PHONE] Setup
Press the key Select
[Phone] Select [Pair Phone] Select TUNE knob
1. The following steps are the same as those described in the section "W KIA RIO 2017 Owners Manual Features of your vehicle
4157
Pairing through [PHONE] Setup
Press the key Select
[Phone] Select [Pair Phone] Select TUNE knob
1. The following steps are the same as those described in the section "W](/img/2/40419/w960_40419-227.png)
Features of your vehicle
4157
Pairing through [PHONE] Setup
Press the key Select
[Phone] Select [Pair Phone] Select TUNE knob
1. The following steps are the same as those described in the section "When
No Devices have been Paired" on the
previous page.
Bluetooth®Wireless Technology fea-
tures supported within the vehicle are
as follows. Some features may not be
supported depending on your
Bluetooth®Wireless Technology
device.
- Outgoing/Incoming Handsfree calls
- Operations during a call (Switch to Private, Switch to call waiting, MIC
on/off)
- Downloading Call History
- Downloading Mobile Contacts
-
Bluetooth®Wireless Technology
device auto connection
- Bluetooth Audio Streaming
Up to five
Bluetooth®Wireless
Technology devices can be paired to
the Car Handsfree system.
Only one
Bluetooth®device can be
connected at a time.
Only one
Bluetooth®Wireless
Technology device can be connected
at a time.
Other devices cannot be paired while a
Bluetooth®Wireless Technology device
is connected. Only
Bluetooth®Wireless Technology
Handsfree and Bluetooth audio related
features are supported.
Bluetooth related operations are possi- ble only within devices that support
Handsfree or audio features, such as a
Bluetooth®Wireless Technology mobile
phone or a Bluetooth audio device.
If a connected
Bluetooth®Wireless
Technology device becomes discon-
nected due to being out of communica-
tion range, turning the device OFF, or a
Bluetooth®Wireless Technology com-
munication error, corresponding
Bluetooth®Wireless Technology
devices are automatically searched
and reconnected.
If the system becomes unstable due to communication errors between the car
Handsfree and the
Bluetooth®Wireless
Technology device, reset the device by
turning off and back on again. Upon
resetting
Bluetooth®Wireless
Technology device, the system will be
restored.
SETUP/CLOCK
Page 235 of 449

Features of your vehicle
164
4
Bluetooth®Wireless Technology
Setting
The Bluetooth®word mark and logos are
registered trademarks owned by
Bluetooth SIG, Inc. and any use of such
marks by Kia is under license. Other
trademarks and trade names are those
of their respective owners. A Bluetooth
®
enabled cell phone is required to useBluetooth®Wireless Technology.
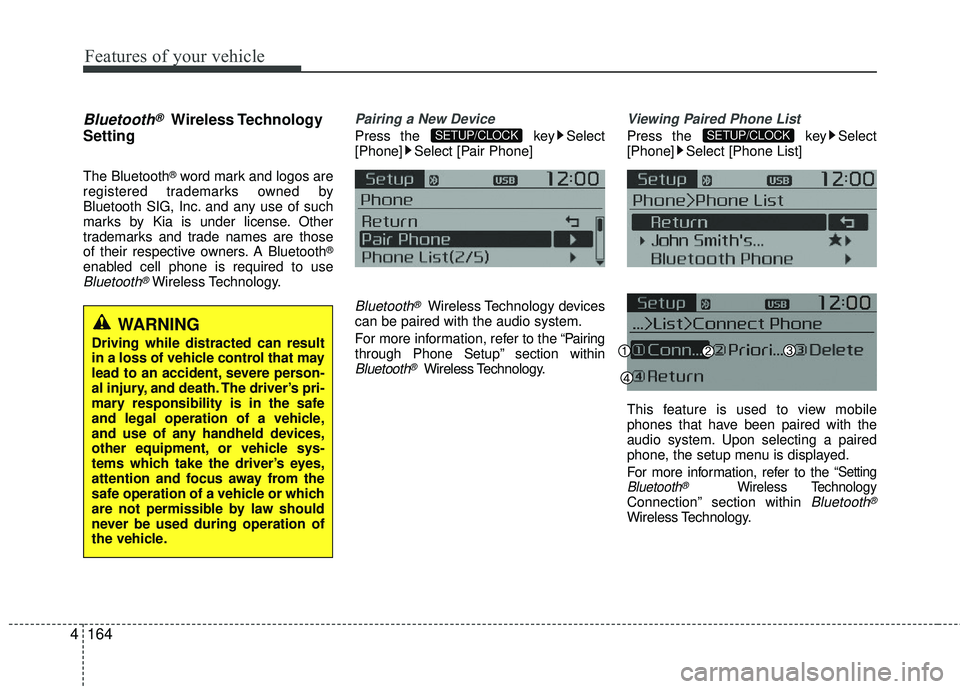
Pairing a New Device
Press the key Select
[Phone] Select [Pair Phone]
Bluetooth®Wireless Technology devices
can be paired with the audio system.
For more information, refer to the “Pairing
through Phone Setup” section within
Bluetooth®Wireless Technology.
Viewing Paired Phone List
Press the key Select
[Phone] Select [Phone List]
This feature is used to view mobile
phones that have been paired with the
audio system. Upon selecting a paired
phone, the setup menu is displayed.
For more information, refer to the
“SettingBluetooth®Wireless TechnologyConnection” section within Bluetooth®
Wireless Technology.
SETUP/CLOCKSETUP/CLOCK
WARNING
Driving while distracted can result
in a loss of vehicle control that may
lead to an accident, severe person-
al injury, and death. The driver’s pri-
mary responsibility is in the safe
and legal operation of a vehicle,
and use of any handheld devices,
other equipment, or vehicle sys-
tems which take the driver’s eyes,
attention and focus away from the
safe operation of a vehicle or which
are not permissible by law should
never be used during operation of
the vehicle.
Page 445 of 449

I5
Index
If the engine stalls at a crossroad or crossing ···············6-3
If you have a flat tire while driving··················\
·············6-3
Instrument cluster ··················\
··················\
··················\
····4-43 Automatic transaxle shift position indicator ···············4-51
Car option (only for Type B cluster) ··················\
·········4-52
Gauges ··················\
··················\
··················\
··················\
·4-44
Illumination intensity ··················\
··················\
··············4-51
Instrument panel illumination ··················\
··················\
·4-44
Maintenance system (only for Type B cluster) ···········4-53
Manual transaxle shift indicator ··················\
················4-50
User Settings (only for Type B cluster)···············\
········4-51
Warnings and indicators ··················\
··················\
··········4-55
Instrument panel overview··················\
··················\
···········2-5
Interior features··················\
··················\
··················\
······4-114 Ashtray ··················\
··················\
··················\
················4-114
Cigarette lighter ··················\
··················\
··················\
···4-114
Clothes hanger ··················\
··················\
··················\
·····4-119
Cup holder ··················\
··················\
··················\
···········4-115
Digital clock and calendar ··················\
··················\
·····4-118
Floor mat anchor(s) ··················\
··················\
···············4-119
Navigation system ··················\
··················\
·················4-12\
0
Power outlet ··················\
··················\
··················\
·········4-117
Shopping bag holder··················\
··················\
··············4-117
Sliding armrest ··················\
··················\
··················\
····4-116
Sunvisor ··················\
··················\
··················\
···············4-116
Interior light ··················\
··················\
··················\
·············4-81 Glove box lamp ··················\
··················\
··················\
·····4-82
Luggage room lamp··················\
··················\
·················4-82\
Map lamp ··················\
··················\
··················\
··············4-81
Room lamp ··················\
··················\
··················\
············4-81
Vanity mirror lamp ··················\
··················\
··················\
4-82
Interior overview··················\
··················\
··················\
········2-4
ISG (Idle Stop and Go) system ··················\
··················\
·5-39 Auto start ··················\
··················\
··················\
···············5-40
Auto stop ··················\
··················\
··················\
···············5-39
Condition of ISG system operation ··················\
···········5-41
ISG system deactivation ··················\
··················\
··········5-42
ISG system malfunction ··················\
··················\
··········5-42
Key positions ··················\
··················\
··················\
·············5-5 Ignition switch position ··················\
··················\
·············5-5
Illuminated ignition switch··················\
··················\
········5-5
Keys ··················\
··················\
··················\
··················\
·········4-3 Key operations ··················\
··················\
··················\
·········4-3
Record your key number ··················\
··················\
···········4-3
Light bulbs ··················\
··················\
··················\
···············7-73 Headlight, position light, turn signal light, sidemarker light and front fog light bulb replacement ····7-74
High mounted stop light replacement ··················\
·······7-83
K
L