clock KIA RIO 2021 Owners Manual
[x] Cancel search | Manufacturer: KIA, Model Year: 2021, Model line: RIO, Model: KIA RIO 2021Pages: 534, PDF Size: 13.49 MB
Page 119 of 534

Features of your vehicle
38
4
Always double check to make sure
all arms, hands, head and other
obstructions are safely out of the way
before closing a window.Manual windows (if equipped)
To raise or lower the window, turn the
window regulator handle clockwise
or counterclockwise.
WARNING
When opening or closing the
windows, make sure your pas-
senger's arms, hands and body
are safely out of the way.
OSA028222
SC PE USA 4.QXP 10/23/2020 5:41 PM Page 38
Page 123 of 534
Features of your vehicle
42
4
Opening the fuel filler door
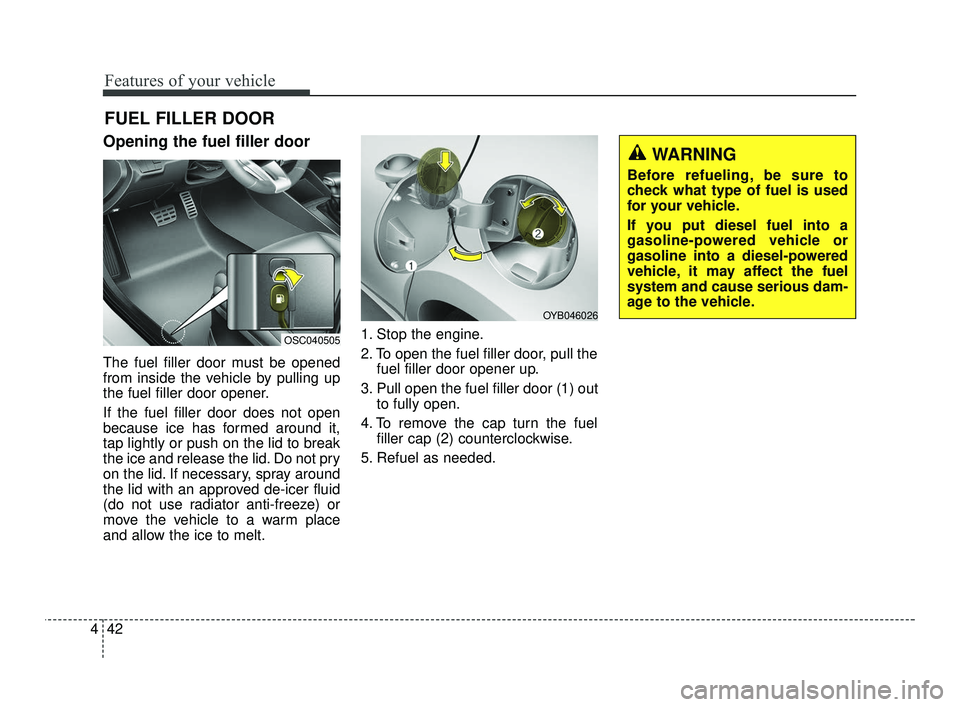
The fuel filler door must be opened
from inside the vehicle by pulling up
the fuel filler door opener.
If the fuel filler door does not open
because ice has formed around it,
tap lightly or push on the lid to break
the ice and release the lid. Do not pry
on the lid. If necessary, spray around
the lid with an approved de-icer fluid
(do not use radiator anti-freeze) or
move the vehicle to a warm place
and allow the ice to melt. 1. Stop the engine.
2. To open the fuel filler door, pull the
fuel filler door opener up.
3. Pull open the fuel filler door (1) out to fully open.
4. To remove the cap turn the fuel filler cap (2) counterclockwise.
5. Refuel as needed.
FUEL FILLER DOOR
OSC040505
OYB046026
WARNING
Before refueling, be sure to
check what type of fuel is used
for your vehicle.
If you put diesel fuel into a
gasoline-powered vehicle or
gasoline into a diesel-powered
vehicle, it may affect the fuel
system and cause serious dam-
age to the vehicle.
SC PE USA 4.QXP 10/23/2020 5:41 PM Page 42
Page 124 of 534

443
Features of your vehicle
Closing the fuel filler door
1. To install the cap, turn it clockwiseuntil it “clicks” one time. This indi-
cates that the cap is securely tight-
ened.
2. Close the fuel filler door and push it lightly and make sure that it is
securely closed.
✽ ✽
NOTICE
When refueling on unlevel ground,
the fuel gauge may not point to the F
position.
It is not a malfunction. If you move
your vehicle to level ground, the fuel
gauge will move to the full position.
✽ ✽
NOTICE
Tighten the cap until it clicks one
time,otherwise the check engine
warning indicator light will illumi-
nate.
Always check that the fuel cap is
installed securely to prevent fuel
spillage in the event of an accident.
WARNING - Fire/
explosion risk
Read and follow all warnings
posted at the gas station facili-
ty. Failure to follow all warnings
will result in severe personal
injury, severe burns or death
due to fire or explosion.
WARNING - Static electricity
Before touching the fuel noz- zle, you should eliminate
potentially dangerous static
electricity discharge by touch-
ing another metal part of the
vehicle, a safe distance away
from the fuel filler neck, noz-
zle, or other gas source.
Do not get back into a vehicle once you have begun refuel-
ing since you can generate
static electricity by touching,
rubbing or sliding against any
item or fabric (polyester, satin,
nylon, etc.) capable of produc-
ing static electricity. Static
electricity discharge can
ignite fuel vapors resulting in
rapid burning. If you must re-
enter the vehicle, you should
once again eliminate poten-
tially dangerous static elec-
tricity discharge by touching a
metal part of the vehicle, away
from the fuel filler neck, noz-
zle or other gasoline source.
WARNING - Refueling
Always remove the fuel cap
carefully and slowly. If the cap
is venting fuel or if you hear a
hissing sound, wait until the
condition stops before com-
pletely removing the cap.
If pressurized fuel sprays out, it
can cover your clothes or skin
and subject you to the risk of
fire and burns.
SC PE USA 4.QXP 10/23/2020 5:41 PM Page 43
Page 231 of 534

Features of your vehicle
150
4
✽ ✽
NOTICE
If you install an aftermarket HID
head lamp, your vehicle’s audio and
electronic device may malfunction.
❈ If your vehicle is equipped with
Infotainment system, refer to a
separately supplied manual for
detailed information.
Antenna
Micro pole antenna
The micro pole antenna receives
data transmitted from base stations
and satellites (e.g. AM/FM, SXM,
GPS, LTE) and also transmits to
base stations (e.g. LTE). The anten-
na pole is removable type.
To remove the antenna, turn it coun-
terclockwise. To install the antenna,
turn it clockwise. When reinstalling your antenna, it is
important that it is fully tightened and
adjusted to the upright position to
ensure proper reception. But it could
be removed when parking the vehi-
cle or when loading cargo on the roof
rack.
When cargo is loaded on the roof
rack, do not place the cargo near the
antenna pole to ensure proper
reception.
INFOTAINMENT SYSTEM
CAUTION
Before entering a place with a
low height clearance or a carwash, remove surely the anten-na by rotating it counter-clock-wise. If not, the antenna may bedamaged.OYB046453
SC PE USA 4.QXP 10/23/2020 5:47 PM Page 150
Page 379 of 534
What to do in an emergency
20
6
Always move the vehicle completely
off the road and onto the shoulder
before trying to change a tire. The
jack should be used on firm level
ground. If you cannot find a firm level
place off the road, call a towing serv-
ice company for assistance.
Be sure to use the correct front and
rear jacking positions on the vehicle;
never use the bumpers or any other
part of the vehicle for jack support. Do not allow anyone to remain in the
vehicle while it is on the jack.
Make sure any children present are
in a secure place away from the road
and from the vehicle to be raised with
the jack.Removing and storing the
spare tire
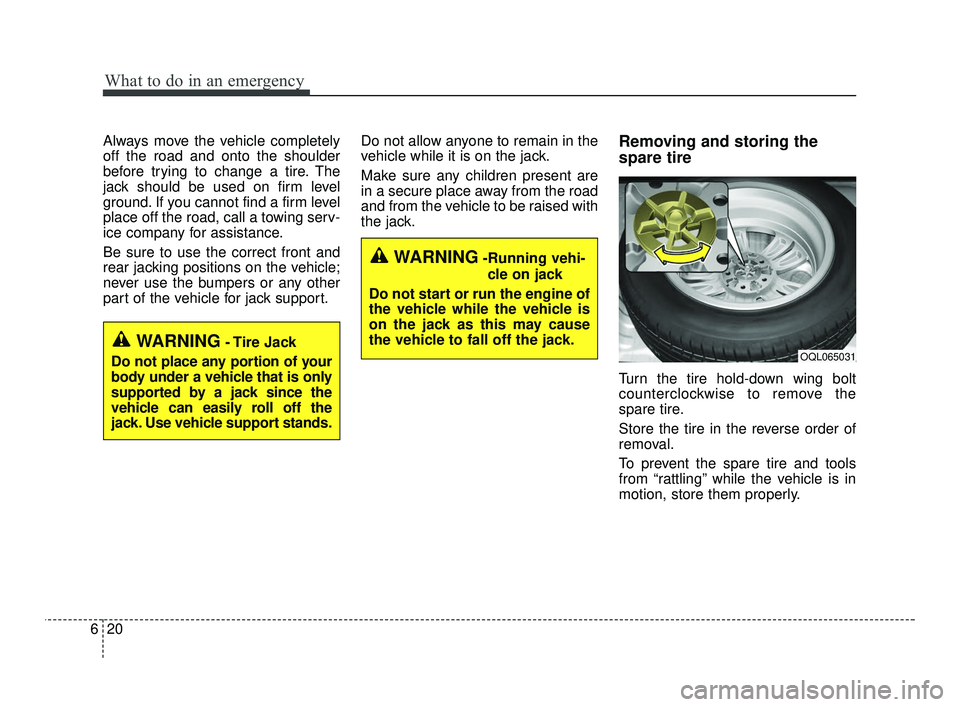
Turn the tire hold-down wing bolt
counterclockwise to remove the
spare tire.
Store the tire in the reverse order of
removal.
To prevent the spare tire and tools
from “rattling” while the vehicle is in
motion, store them properly.
WARNING- Tire Jack
Do not place any portion of your
body under a vehicle that is only
supported by a jack since the
vehicle can easily roll off the
jack. Use vehicle support stands.
WARNING-Running vehi- cle on jack
Do not start or run the engine of
the vehicle while the vehicle is
on the jack as this may cause
the vehicle to fall off the jack.
OQL065031
SC PE USA 6.qxp 10/23/2020 6:03 PM Page 20
Page 380 of 534
621
What to do in an emergency
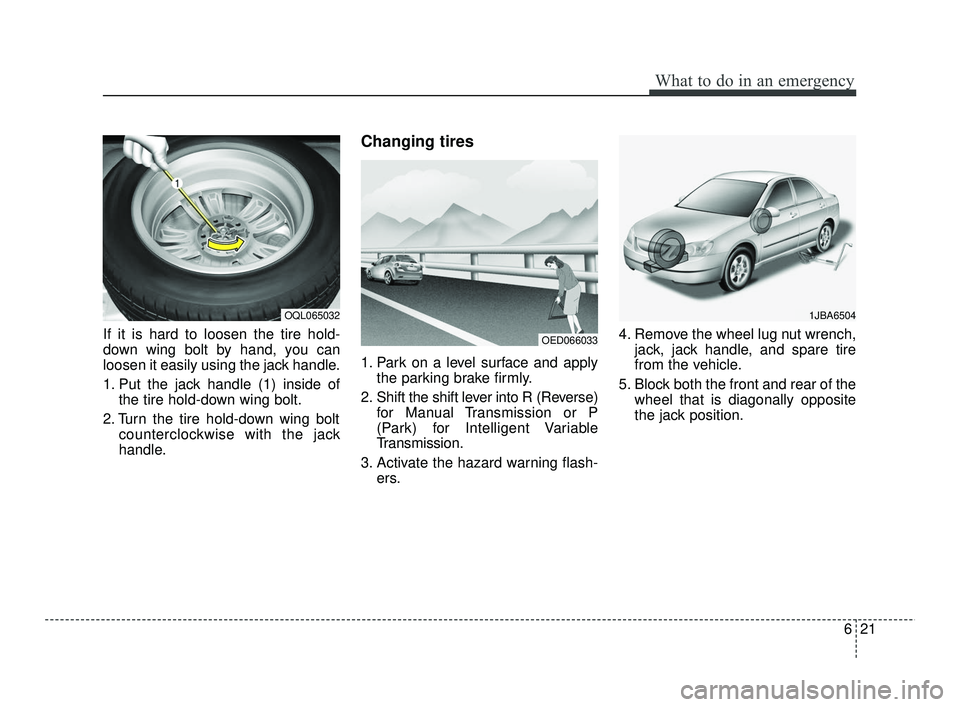
If it is hard to loosen the tire hold-
down wing bolt by hand, you can
loosen it easily using the jack handle.
1. Put the jack handle (1) inside ofthe tire hold-down wing bolt.
2. Turn the tire hold-down wing bolt counterclockwise with the jack
handle.
Changing tires
1. Park on a level surface and applythe parking brake firmly.
2. Shift the shift lever into R (Reverse) for Manual Transmission or P
(Park) for Intelligent Variable
Transmission.
3. Activate the hazard warning flash- ers. 4. Remove the wheel lug nut wrench,
jack, jack handle, and spare tire
from the vehicle.
5. Block both the front and rear of the wheel that is diagonally opposite
the jack position.
OED066033
1JBA6504OQL065032
SC PE USA 6.qxp 10/23/2020 6:03 PM Page 21
Page 381 of 534
What to do in an emergency
22
6
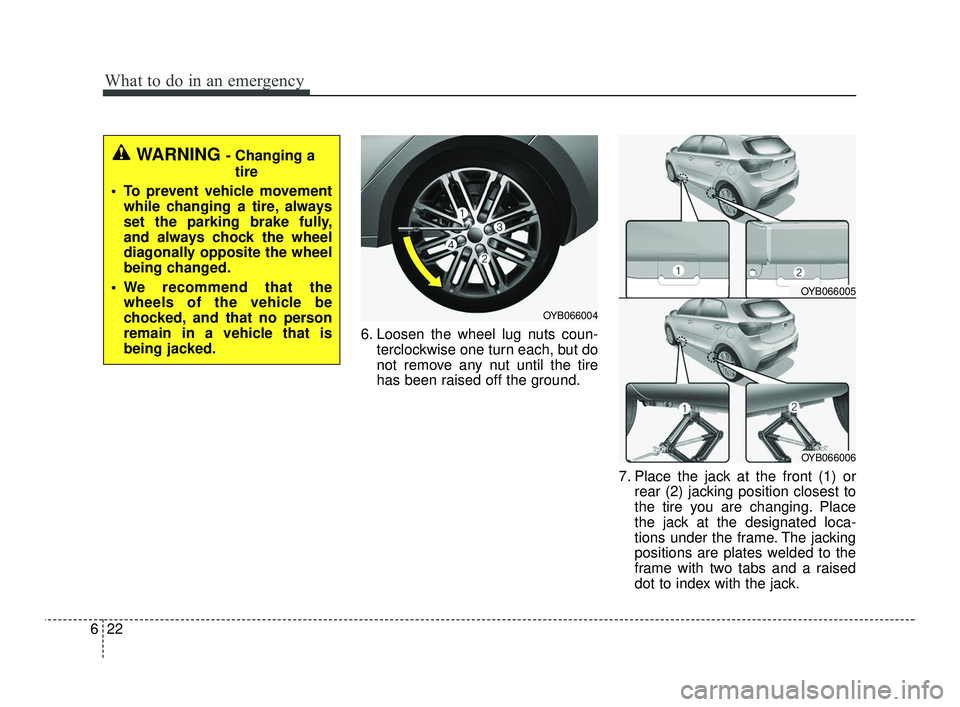
6. Loosen the wheel lug nuts coun-
terclockwise one turn each, but do
not remove any nut until the tire
has been raised off the ground.
7. Place the jack at the front (1) orrear (2) jacking position closest to
the tire you are changing. Place
the jack at the designated loca-
tions under the frame. The jacking
positions are plates welded to the
frame with two tabs and a raised
dot to index with the jack.
OYB066004
WARNING - Changing a
tire
• To prevent vehicle movement while changing a tire, always
set the parking brake fully,
and always chock the wheel
diagonally opposite the wheel
being changed.
We recommend that the wheels of the vehicle be
chocked, and that no person
remain in a vehicle that is
being jacked.
OYB066005
OYB066006
SC PE USA 6.qxp 10/23/2020 6:03 PM Page 22
Page 382 of 534

623
What to do in an emergency
8. Insert the jack handle into the jackand turn it clockwise, raising the
vehicle until the tire just clears the
ground. This measurement is
approximately 1 in (30 mm).
Before removing the wheel lug
nuts, make sure the vehicle is sta-
ble and that there is no chance for
movement or slippage. 9. Loosen the wheel nuts and
remove them with your fingers.
Slide the wheel off the studs and
lay it flat so it cannot roll away. To
put the wheel on the hub, pick up
the spare tire, line up the holes
with the studs and slide the wheel
onto them. If this is difficult, tip the
wheel slightly and get the top hole
in the wheel lined up with the top
stud. Then jiggle the wheel back
and forth until the wheel can be
slid over the other studs.
Wheels and wheel covers may have
sharp edges. Handle them carefully
to avoid possible injury. Before put-
ting the wheel into place, be sure
that there is nothing on the hub or
wheel (such as mud, tar, gravel, etc.)
that prevents the wheel from fitting
solidly against the hub.
WARNING - Jack location
To reduce the possibility of
injury, be sure to use only the
jack provided with the vehicle in
the correct jack position; never
use any other part of the vehicle
for jack support.
OYB066007
SC PE USA 6.qxp 10/23/2020 6:03 PM Page 23
Page 383 of 534

What to do in an emergency
24
6
10. To install the wheel, hold it on the
studs, put the wheel nuts on the
studs and tighten them finger
tight. Jiggle the tire to be sure it is
completely seated, then tighten
the nuts as much as possible
with your fingers again.
11. Lower the vehicle to the ground by turning the wheel nut wrench
counterclockwise. Then position the wrench as shown in
the drawing and tighten the wheel
nuts. Be sure the socket is seated
completely over the nut. Do not stand
on the wrench handle or use an exten-
sion pipe over the wrench handle.
Go around the wheel tightening every
nut following the numerical sequence
shown in the image until they are tight.
Then double-check each nut for tight-
ness. After changing the wheels, have
an authorized Kia dealer tighten the
wheel nuts to their proper torque as
soon as possible.
Wheel nut tightening torque:
Steel wheel & aluminium alloy wheel:
79 ~ 94 lbf·ft (11 ~ 13 kgf·m) If you have a tire gauge, remove the
valve cap and check the air pressure.
If the pressure is lower than recom-
mended, drive slowly to the nearest
service station and inflate to the cor-
rect pressure. If it is too high, adjust it
until it is correct. Always reinstall the
valve cap after checking or adjusting
the tire pressure. If the cap is not
replaced, air may leak from the tire. If
you lose a valve cap, buy another and
install it as soon as possible.
After you have changed wheels,
always secure the flat tire in its place
and return the jack and tools to their
proper storage locations.
WARNING- Installing a
wheel
Make sure the wheel makes
good contact with the hub when
installed. If the contact of the
mounting surface between the
wheel and hub is not good, the
wheel nuts could come loose
and cause the loss of a wheel.
Loss of a wheel may result in
loss of control of the vehicle.
OYB066008
CAUTION
When replacing the tires, after driving for about 30 miles (50km), tighten the wheel nuts tocheck that there is no looseness.
Recheck and tighten the wheelnuts again after driving forabout 620 miles (1,000 km).
SC PE USA 6.qxp 10/23/2020 6:03 PM Page 24
Page 389 of 534
What to do in an emergency
30
6
When towing your vehicle in an
emergency without wheel dollies :
1. Set the ignition switch in the ACC
position.
2. Place the transmission shift lever in N (Neutral).
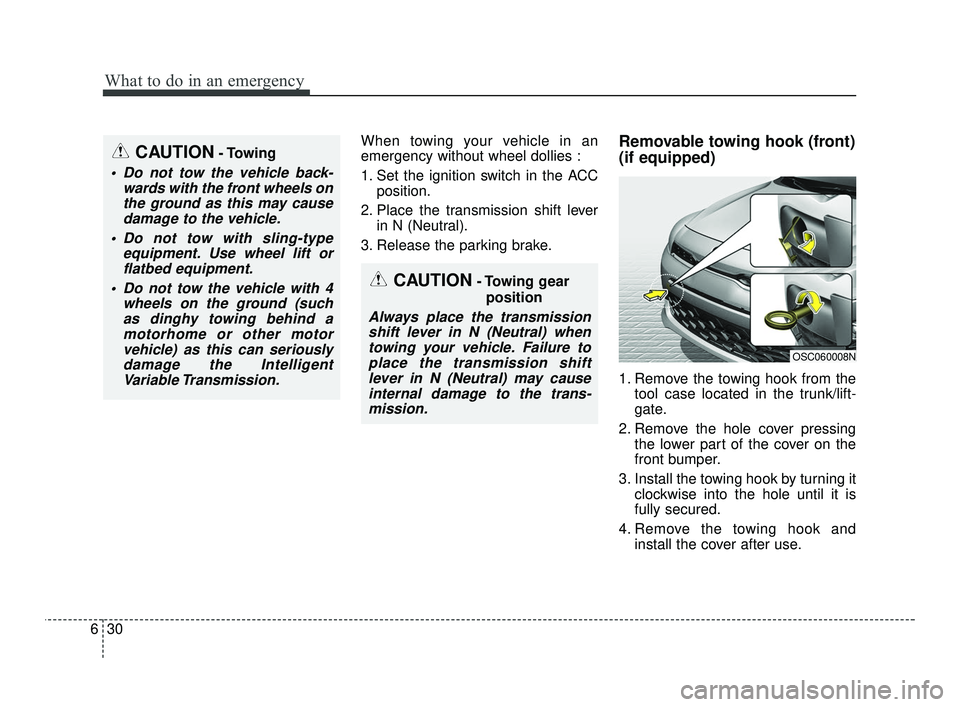
3. Release the parking brake.Removable towing hook (front)
(if equipped)
1. Remove the towing hook from the tool case located in the trunk/lift-
gate.
2. Remove the hole cover pressing the lower part of the cover on the
front bumper.
3. Install the towing hook by turning it clockwise into the hole until it is
fully secured.
4. Remove the towing hook and install the cover after use.
CAUTION- Towing gear
position
Always place the transmissionshift lever in N (Neutral) whentowing your vehicle. Failure toplace the transmission shiftlever in N (Neutral) may causeinternal damage to the trans-mission.
OSC060008N
CAUTION- Towing
Do not tow the vehicle back- wards with the front wheels onthe ground as this may causedamage to the vehicle.
Do not tow with sling-type equipment. Use wheel lift orflatbed equipment.
Do not tow the vehicle with 4 wheels on the ground (suchas dinghy towing behind amotorhome or other motorvehicle) as this can seriouslydamage the IntelligentVariable Transmission.
SC PE USA 6.qxp 10/23/2020 6:03 PM Page 30