battery KIA RIO HATCHBACK 2008 Owners Manual
[x] Cancel search | Manufacturer: KIA, Model Year: 2008, Model line: RIO HATCHBACK, Model: KIA RIO HATCHBACK 2008Pages: 219, PDF Size: 5.17 MB
Page 9 of 219
Your vehicle at a glance
4 2
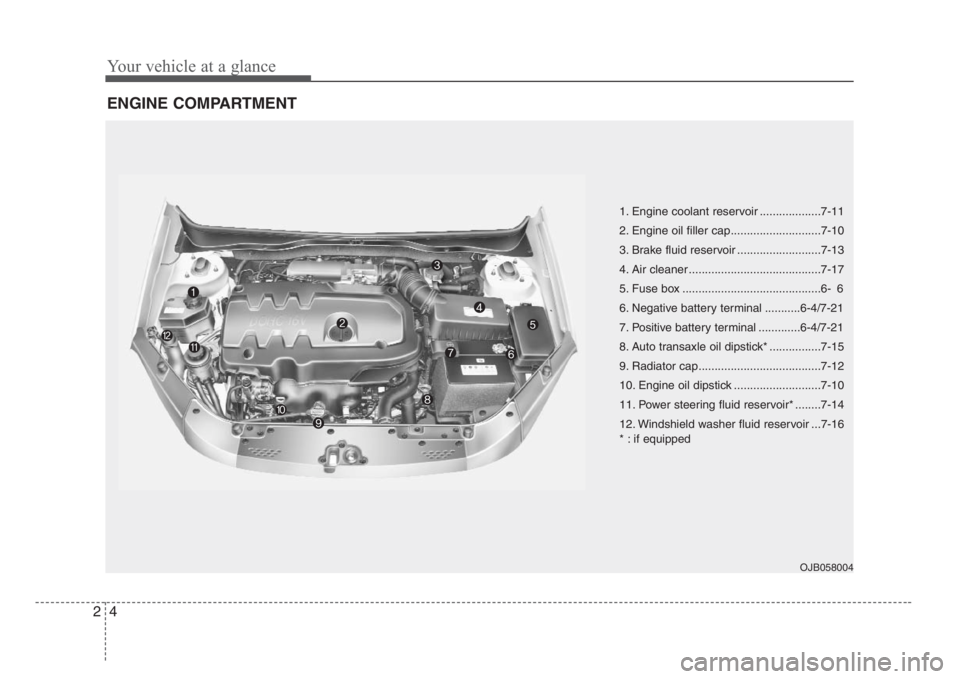
ENGINE COMPARTMENT
OJB058004
1. Engine coolant reservoir ...................7-11
2. Engine oil filler cap............................7-10
3. Brake fluid reservoir ..........................7-13
4. Air cleaner .........................................7-17
5. Fuse box ...........................................6- 6
6. Negative battery terminal ...........6-4/7-21
7. Positive battery terminal .............6-4/7-21
8. Auto transaxle oil dipstick* ................7-15
9. Radiator cap......................................7-12
10. Engine oil dipstick ...........................7-10
11. Power steering fluid reservoir* ........7-14
12. Windshield washer fluid reservoir ...7-16
* : if equipped
Page 12 of 219
33
Knowing your vehicle
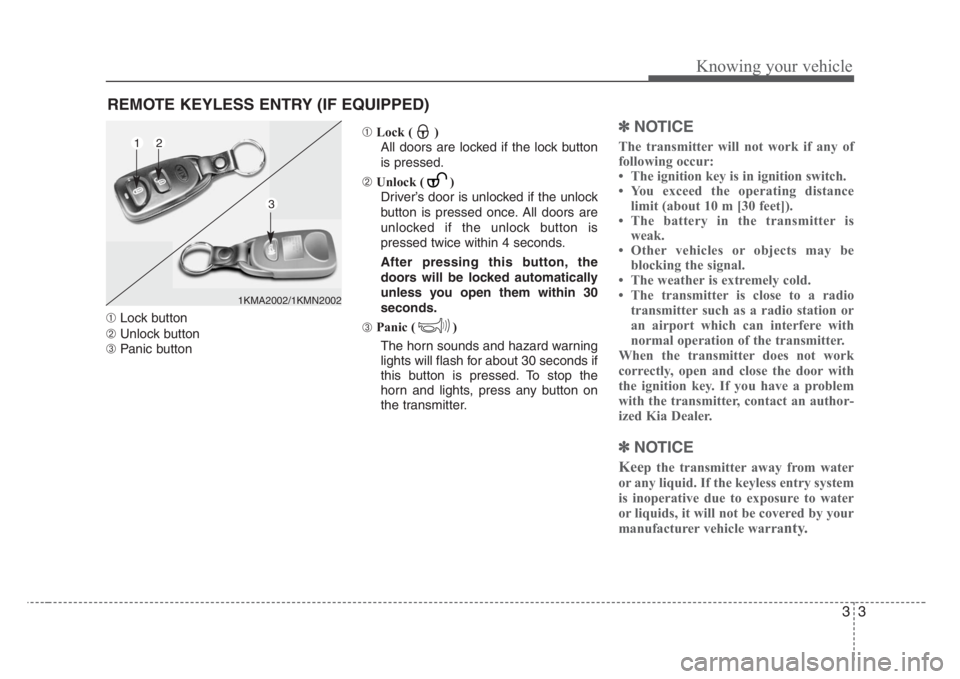
➀Lock button
➁Unlock button
➂Panic button➀Lock ( )
All doors are locked if the lock button
is pressed.
➁Unlock ( )
Driver’s door is unlocked if the unlock
button is pressed once. All doors are
unlocked if the unlock button is
pressed twice within 4 seconds.
After pressing this button, the
doors will be locked automatically
unless you open them within 30
seconds.
➂ Panic ( )
The horn sounds and hazard warning
lights will flash for about 30 seconds if
this button is pressed. To stop the
horn and lights, press any button on
the transmitter.
✽
NOTICE
The transmitter will not work if any of
following occur:
• The ignition key is in ignition switch.
• You exceed the operating distance
limit (about 10 m [30 feet]).
• The battery in the transmitter is
weak.
• Other vehicles or objects may be
blocking the signal.
• The weather is extremely cold.
• The transmitter is close to a radio
transmitter such as a radio station or
an airport which can interfere with
normal operation of the transmitter.
When the transmitter does not work
correctly, open and close the door with
the ignition key. If you have a problem
with the transmitter, contact an author-
ized Kia Dealer.
✽
NOTICE
Keep the transmitter away from water
or any liquid. If the keyless entry system
is inoperative due to exposure to water
or liquids, it will not be covered by your
manufacturer vehicle warra
nty.
REMOTE KEYLESS ENTRY (IF EQUIPPED)
1KMA2002/1KMN2002
12
3
Page 13 of 219
Knowing your vehicle
4 3
Operational distance may vary depend-
ing upon the area the transmitter is used
in. For example, if the vehicle is parked
near police stations, government and
public offices, broadcasting stations, mil-
itary installations, airports, or transmit-
ting towers, etc.
This device complies with Industry
Canada Standard RSS-210.Operation
is subject to the following two conditions:
1. This device may not cause interfer-
ence, and
2. This device must accept any interfer-
ence, including interference that may
cause undesired operation of the
device.
Battery replacement
Transmitter uses a 3 volt lithium battery
which will normally last for several years.
When replacement is necessary, use the
following procedure.
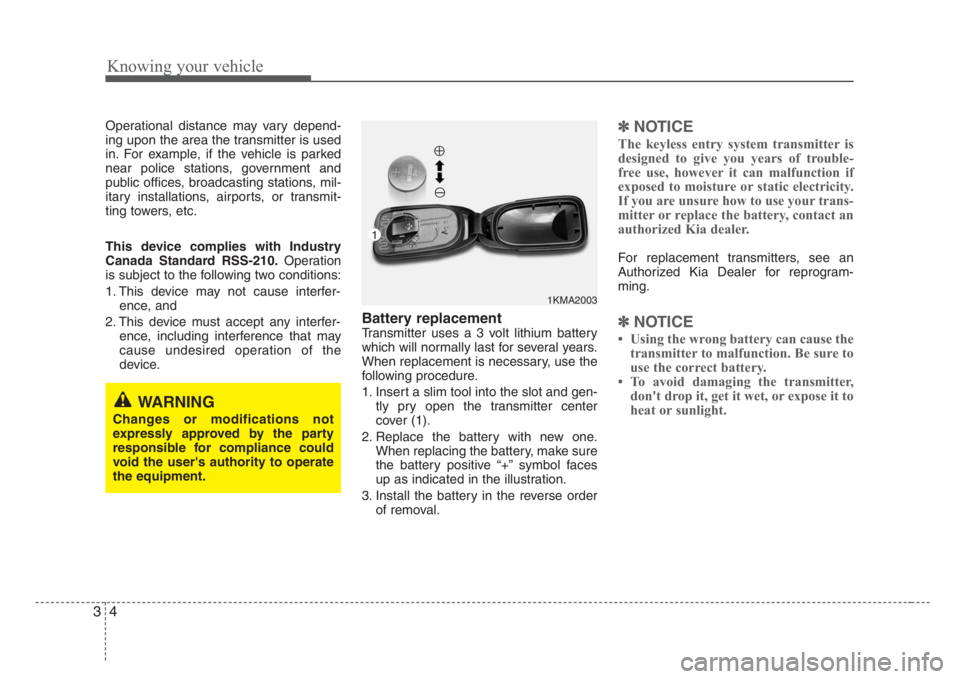
1. Insert a slim tool into the slot and gen-
tly pry open the transmitter center
cover (1).
2. Replace the battery with new one.
When replacing the battery, make sure
the battery positive “+” symbol faces
up as indicated in the illustration.
3. Install the battery in the reverse order
of removal.
✽
NOTICE
The keyless entry system transmitter is
designed to give you years of trouble-
free use, however it can malfunction if
exposed to moisture or static electricity.
If you are unsure how to use your trans-
mitter or replace the battery, contact an
authorized Kia dealer.
For replacement transmitters, see an
Authorized Kia Dealer for reprogram-
ming.
✽
NOTICE
• Using the wrong battery can cause the
transmitter to malfunction. Be sure to
use the correct battery.
• To avoid damaging the transmitter,
don't drop it, get it wet, or expose it to
heat or sunlight.
1KMA2003
1
WARNING
Changes or modifications not
expressly approved by the party
responsible for compliance could
void the user's authority to operate
the equipment.
Page 22 of 219
313
Knowing your vehicle
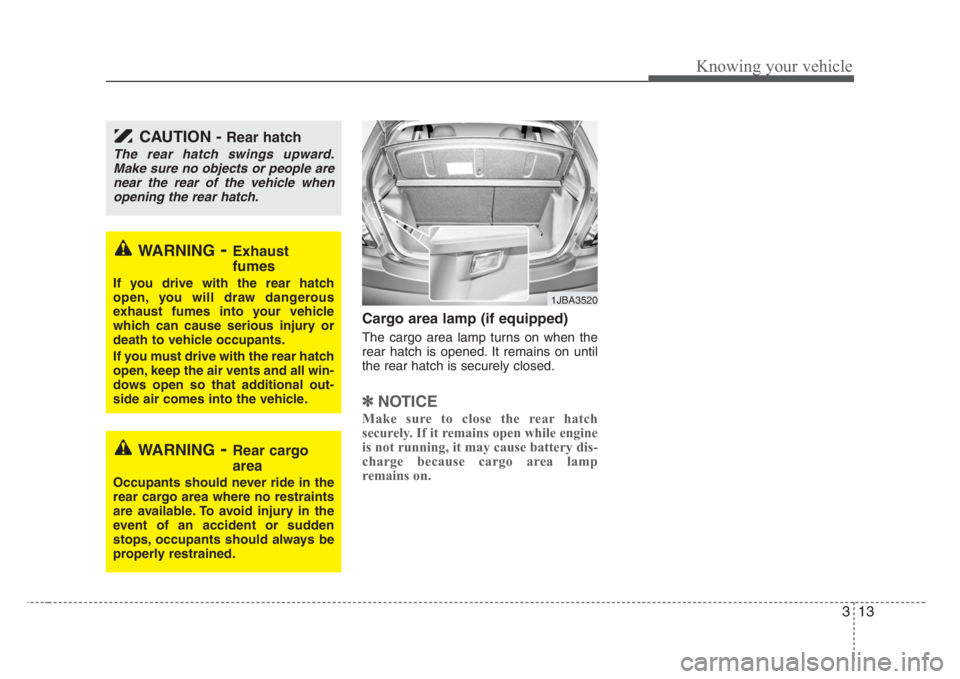
Cargo area lamp (if equipped)
The cargo area lamp turns on when the
rear hatch is opened. It remains on until
the rear hatch is securely closed.
✽
NOTICE
Make sure to close the rear hatch
securely. If it remains open while engine
is not running, it may cause battery dis-
charge because cargo area lamp
remains on.
CAUTION - Rear hatch
The rear hatch swings upward.
Make sure no objects or people are
near the rear of the vehicle when
opening the rear hatch.
WARNING-Exhaust
fumes
If you drive with the rear hatch
open, you will draw dangerous
exhaust fumes into your vehicle
which can cause serious injury or
death to vehicle occupants.
If you must drive with the rear hatch
open, keep the air vents and all win-
dows open so that additional out-
side air comes into the vehicle.
WARNING-Rear cargo
area
Occupants should never ride in the
rear cargo area where no restraints
are available. To avoid injury in the
event of an accident or sudden
stops, occupants should always be
properly restrained.
1JBA3520
Page 71 of 219
Knowing your vehicle
62 3
Outside the vehicle
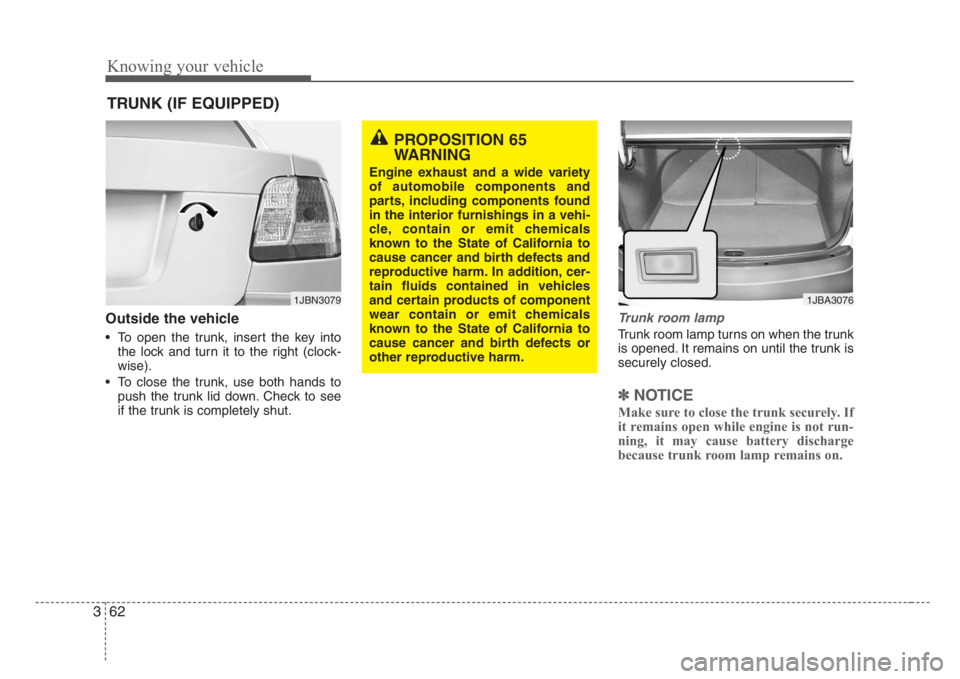
• To open the trunk, insert the key into
the lock and turn it to the right (clock-
wise).
• To close the trunk, use both hands to
push the trunk lid down. Check to see
if the trunk is completely shut.
Trunk room lamp
Trunk room lamp turns on when the trunk
is opened. It remains on until the trunk is
securely closed.
✽
NOTICE
Make sure to close the trunk securely. If
it remains open while engine is not run-
ning, it may cause battery discharge
because trunk room lamp remains on.
TRUNK (IF EQUIPPED)
1JBN30791JBA3076
PROPOSITION 65
WARNING
Engine exhaust and a wide variety
of automobile components and
parts, including components found
in the interior furnishings in a vehi-
cle, contain or emit chemicals
known to the State of California to
cause cancer and birth defects and
reproductive harm. In addition, cer-
tain fluids contained in vehicles
and certain products of component
wear contain or emit chemicals
known to the State of California to
cause cancer and birth defects or
other reproductive harm.
Page 80 of 219
371
Knowing your vehicle
Map light (if equipped)
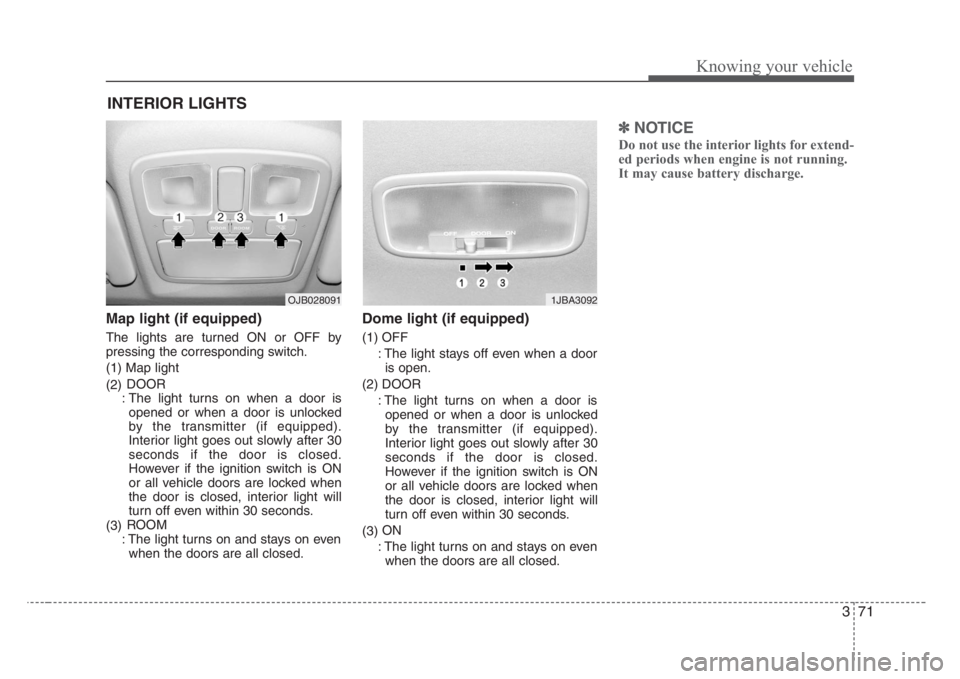
The lights are turned ON or OFF by
pressing the corresponding switch.
(1) Map light
(2)DOOR
: The light turns on when a door is
opened or when a door is unlocked
by the transmitter (if equipped).
Interior light goes out slowly after 30
seconds if the door is closed.
However if the ignition switch is ON
or all vehicle doors are locked when
the door is closed, interior light will
turn off even within 30 seconds.
(3)ROOM
: The light turns on and stays on even
when the doors are all closed.
Dome light (if equipped)
(1) OFF
: The light stays off even when a door
is open.
(2) DOOR
: The light turns on when a door is
opened or when a door is unlocked
by the transmitter (if equipped).
Interior light goes out slowly after 30
seconds if the door is closed.
However if the ignition switch is ON
or all vehicle doors are locked when
the door is closed, interior light will
turn off even within 30 seconds.
(3)ON
: The light turns on and stays on even
when the doors are all closed.
✽
NOTICE
Do not use the interior lights for extend-
ed periods when engine is not running.
It may cause battery discharge.
INTERIOR LIGHTS
1JBA3092OJB028091
Page 84 of 219
375
Knowing your vehicle
✽
NOTICE
• Use the power outlet when the engine
is running, and remove a plug from
the power outlet after using the elec-
tric appliance. Using the power outlet
excessively or while the engine is not
running or leaving appliances plugged
into the power outlet when not in use
will cause battery discharge
• Only use the electric appliances which
are less than 12V and 10A in electric
capacity.
• Adjust the air-conditioner or heater to
the lowest operation level when you
have to use the power socket while
using air-conditioner or heater.
• Close the cover when not in use.
• Some electronic devices can cause
electronic interference when plugged
into a vehicle’s power outlet. These
devices may cause excessive audio
static and malfunctions in other elec-
tronic systems or devices used in your
vehicle.
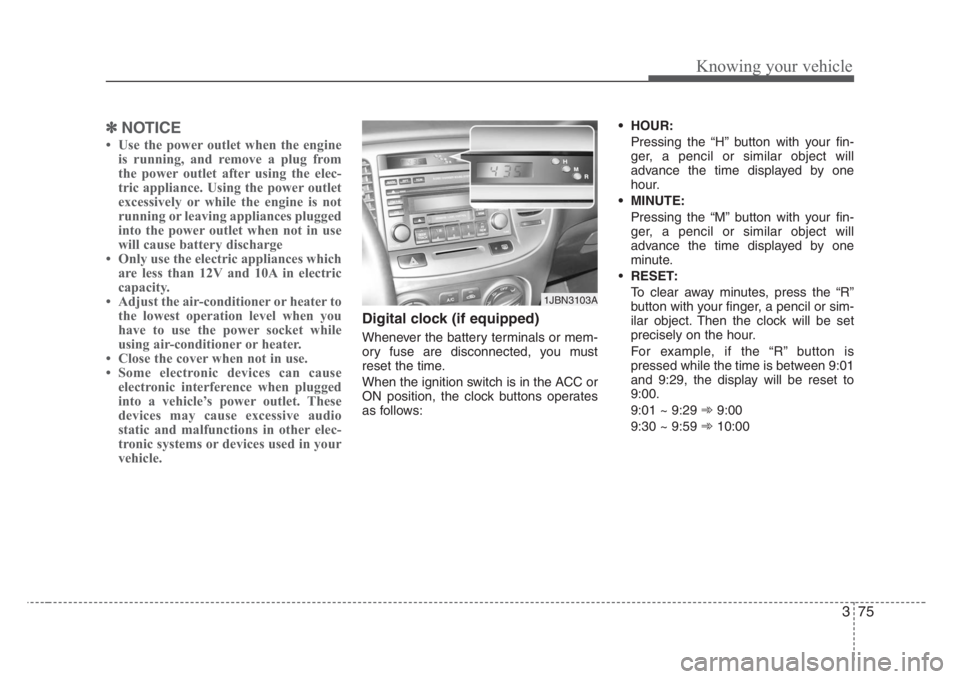
Digital clock (if equipped)
Whenever the battery terminals or mem-
ory fuse are disconnected, you must
reset the time.
When the ignition switch is in the ACC or
ON position, the clock buttons operates
as follows:• HOUR:
Pressing the “H” button with your fin-
ger, a pencil or similar object will
advance the time displayed by one
hour.
• MINUTE:
Pressing the “M” button with your fin-
ger, a pencil or similar object will
advance the time displayed by one
minute.
•RESET:
To clear away minutes, press the “R”
button with your finger, a pencil or sim-
ilar object. Then the clock will be set
precisely on the hour.
For example, if the “R” button is
pressed while the time is between 9:01
and 9:29, the display will be reset to
9:00.
9:01 ~ 9:29 ➾9:00
9:30 ~ 9:59 ➾10:00
1JBN3103A
Page 87 of 219
Knowing your vehicle
78 3
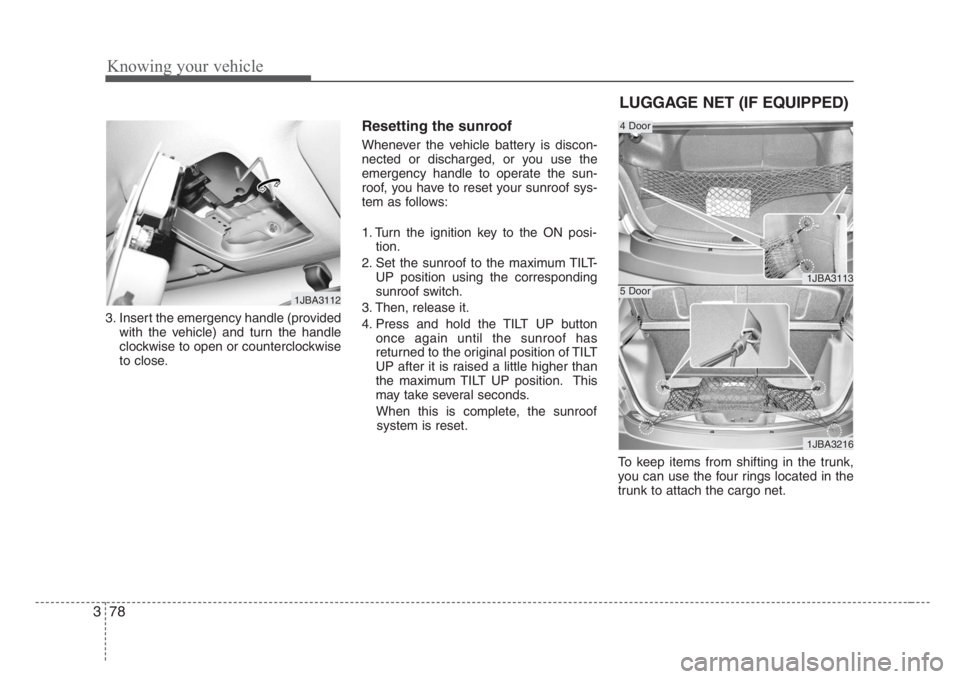
3. Insert the emergency handle (provided
with the vehicle) and turn the handle
clockwise to open or counterclockwise
to close.
Resetting the sunroof
Whenever the vehicle battery is discon-
nected or discharged, or you use the
emergency handle to operate the sun-
roof, you have to reset your sunroof sys-
tem as follows:
1. Turn the ignition key to the ON posi-
tion.
2. Set the sunroof to the maximum TILT-
UP position using the corresponding
sunroof switch.
3. Then, release it.
4. Press and hold the TILT UP button
once again until the sunroof has
returned to the original position of TILT
UP after it is raised a little higher than
the maximum TILT UP position. This
may take several seconds.
When this is complete, the sunroof
system is reset.
To keep items from shifting in the trunk,
you can use the four rings located in the
trunk to attach the cargo net.
1JBA3112
1JBA3113
1JBA3216
4 Door
5 Door
LUGGAGE NET (IF EQUIPPED)
Page 97 of 219
Knowing your vehicle
88 3
2. TRACK UP/DOWN Button
• The desired track on the disc currently
being played can be selected using the
track number.
• Press button once to skip forward
to the beginning of the next track.
Press within a second after play-
back begins to quickly move backward
through a CD.
If you press after more than a sec-
ond, it will take you to the beginning of
the track you are now listening to.
3. FF/REW Button
If you want to fast forward or reverse
through the compact disc track, push and
hold the FF or REW button.
When you release the button, the com-
pact disc player will resume playing.
4. REPEAT (RPT) Button
• To repeat the track you are currently
listening to, press the RPT button. To
cancel, press it again.
• If you do not release RPT operation
when the track ends, it will automati-
cally be replayed.
This process will be continued until you
push the button again or turn the radio
OFF then ON.
5. SCAN Button
• To playback the first 10 seconds of
each track, press the SCAN button.
• Press the SCAN button again within 10
sec. when you have reached the
desired track.
6. CD EJECT Button
When the button is pressed with a CD
loaded, the CD will eject.
Forcing to eject : To force to eject a
CD, press this button for more than 3
seconds.
(Do this only when a CD is jammed and
you can not eject it in the normal way -
e.g.) in case that you have inserted 2
CDs by mistake)
7. RANDOM(RDM)
Press the RDM button to listen the tracks
in random, rather than sequential, order.
Press it again to cancel random play.
✽
NOTICE
• To assure proper operation of the unit,
keep the vehicle interior temperature
within a normal range by using the
vehicle's air conditioning or heating
system.
• When replacing the fuse, replace it
with a fuse having the correct capaci-
ty.
• All stored bookmarks are all erased
when the car battery is disconnected
or power to the vehicle is lost. If this
occurs, the bookmarks will have to be
reset.
• This equipment is designed to be used
only in a 12 volt DC battery system
with negative ground.
• This unit is made of precision parts.
Do not attempt to disassemble or
adjust any parts.
(Continued)
Page 106 of 219
397
Knowing your vehicle
✽
NOTICE
• To assure proper operation of the unit,
keep the vehicle interior temperature
within a normal range by using the
vehicle's air conditioning or heating
system.
• When replacing the fuse, replace it
with a fuse having the correct capacity.
• All stored bookmarks are all erased
when the car battery is disconnected
or power to the vehicle is lost. If this
occurs, the bookmarks will have to be
reset.
• This equipment is designed to be used
only in a 12 volt DC battery system
with negative ground.
• This unit is made of precision parts.
Do not attempt to disassemble or
adjust any parts.
• When driving your vehicle, be sure to
keep the volume of the unit set low
enough to allow you to hear sounds
coming from the outside.
• Do not expose this equipment (includ-
ing the speakers and tape) to water or
excessive moisture.
✽
NOTICE
• Do not insert warped or poor quality
discs into the CD player as damage to
the unit may occur.
• Do not insert anything like coins into
the player slot as damage to the unit
may occur.
• Do not place beverages close to the
audio system. The playback mecha-
nism may be damaged if you spill
them.
• Do not strike or allow anything to
impact the audio system, damage to
the system mechanisms could occur.
• Off-road or rough surface driving
may cause the compact disc to skip.
Do not use the compact disc when
driving in such conditions as damage
to the compact disc face could occur.
• Do not attempt to grab or pull the
compact disc out while the disc is
being pulled into the audio unit by the
self-loading mechanism. Damage to
the audio unit and compact disc could
occur.
• Avoid using recorded compact discs in
your audio unit. Original compact
discs are recommended.