height adjustment KIA RIO HATCHBACK 2008 Owners Manual
[x] Cancel search | Manufacturer: KIA, Model Year: 2008, Model line: RIO HATCHBACK, Model: KIA RIO HATCHBACK 2008Pages: 219, PDF Size: 5.17 MB
Page 26 of 219

317
Knowing your vehicle
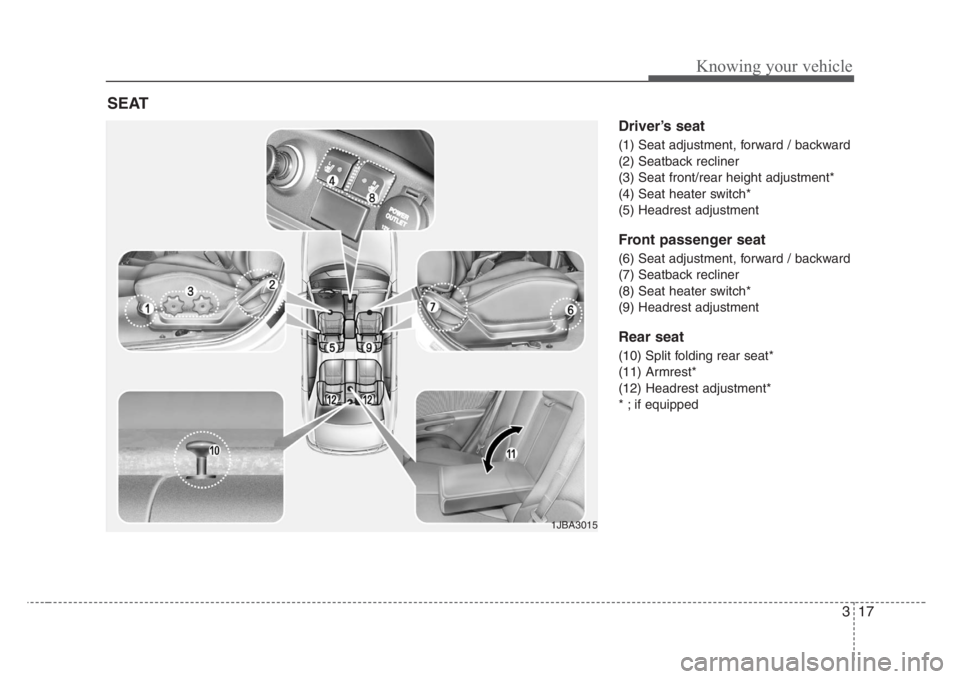
Driver’s seat
(1) Seat adjustment, forward / backward
(2) Seatback recliner
(3) Seat front/rear height adjustment*
(4) Seat heater switch*
(5) Headrest adjustment
Front passenger seat
(6) Seat adjustment, forward / backward
(7) Seatback recliner
(8) Seat heater switch*
(9) Headrest adjustment
Rear seat
(10) Split folding rear seat*
(11) Armrest*
(12) Headrest adjustment*
* ; if equipped
SEAT
1JBA3015
Page 30 of 219

321
Knowing your vehicle
Headrest adjustment
Adjusting the height up and down
The headrest not only provides comfort
for the driver and passengers, but also
helps to protect the head and neck in the
event of a collision.
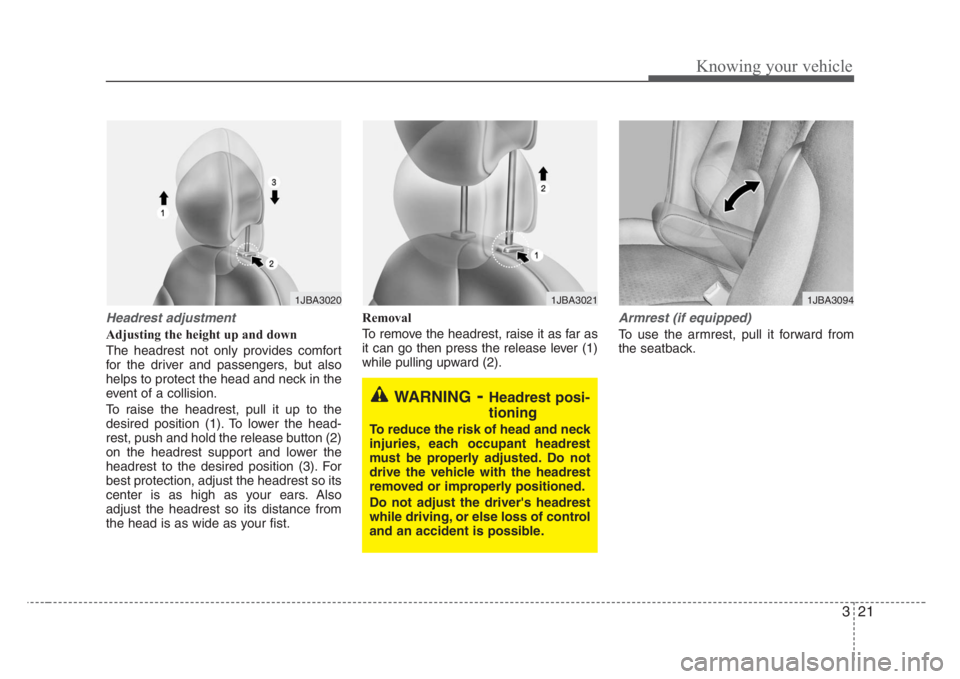
To raise the headrest, pull it up to the
desired position (1). To lower the head-
rest, push and hold the release button (2)
on the headrest support and lower the
headrest to the desired position (3). For
best protection, adjust the headrest so its
center is as high as your ears. Also
adjust the headrest so its distance from
the head is as wide as your fist.Removal
To remove the headrest, raise it as far as
it can go then press the release lever (1)
while pulling upward (2).
Armrest (if equipped)
To use the armrest, pull it forward from
the seatback.
1JBA30201JBA30211JBA3094
WARNING-Headrest posi-
tioning
To reduce the risk of head and neck
injuries, each occupant headrest
must be properly adjusted. Do not
drive the vehicle with the headrest
removed or improperly positioned.
Do not adjust the driver's headrest
while driving, or else loss of control
and an accident is possible.
Page 35 of 219

Knowing your vehicle
26 3
Armrest (if equipped)
The armrest is located in the center of
the rear seat. Pull the armrest down from
the seatback.
Headrest adjustment (if equipped)
Adjusting the height up and down
The headrest not only provides comfort
for the driver and passengers, but also
helps to protect the head and neck in the
event of a collision.
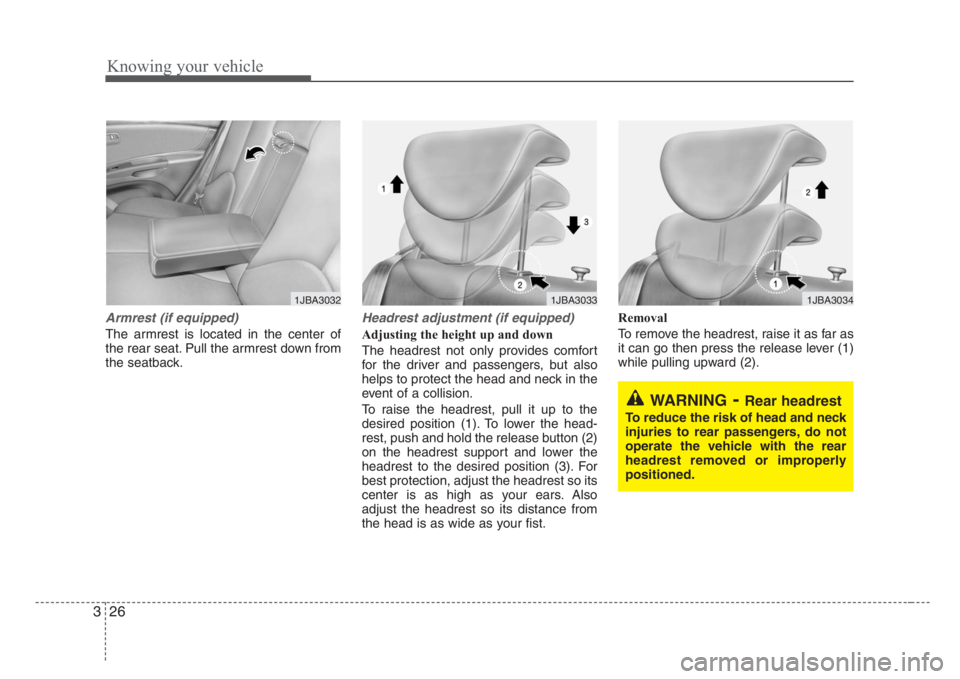
To raise the headrest, pull it up to the
desired position (1). To lower the head-
rest, push and hold the release button (2)
on the headrest support and lower the
headrest to the desired position (3). For
best protection, adjust the headrest so its
center is as high as your ears. Also
adjust the headrest so its distance from
the head is as wide as your fist.Removal
To remove the headrest, raise it as far as
it can go then press the release lever (1)
while pulling upward (2).
1JBA30321JBA30331JBA3034
WARNING-Rear headrest
To reduce the risk of head and neck
injuries to rear passengers, do not
operate the vehicle with the rear
headrest removed or improperly
positioned.
Page 42 of 219

333
Knowing your vehicle
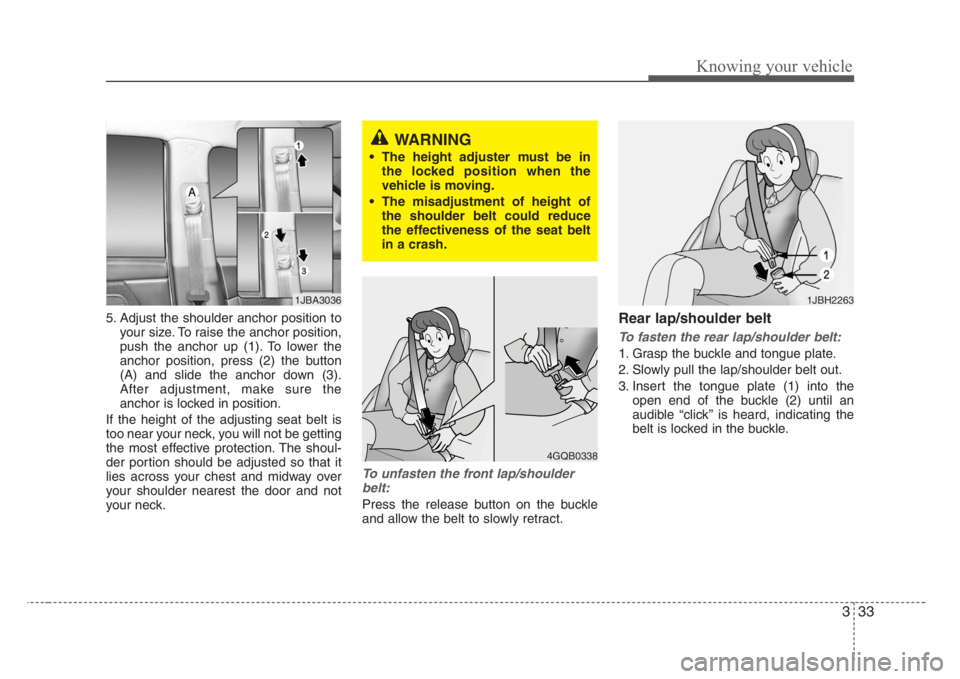
5. Adjust the shoulder anchor position to
your size. To raise the anchor position,
push the anchor up (1). To lower the
anchor position, press (2) the button
(A) and slide the anchor down (3).
After adjustment, make sure the
anchor is locked in position.
If the height of the adjusting seat belt is
too near your neck, you will not be getting
the most effective protection. The shoul-
der portion should be adjusted so that it
lies across your chest and midway over
your shoulder nearest the door and not
your neck.
To unfasten the front lap/shoulder
belt:
Press the release button on the buckle
and allow the belt to slowly retract.
Rear lap/shoulder belt
To f asten the rear lap/shoulder belt:
1. Grasp the buckle and tongue plate.
2. Slowly pull the lap/shoulder belt out.
3. Insert the tongue plate (1) into the
open end of the buckle (2) until an
audible “click’’ is heard, indicating the
belt is locked in the buckle.
4GQB0338
1JBA30361JBH2263
WARNING
• The height adjuster must be in
the locked position when the
vehicle is moving.
• The misadjustment of height of
the shoulder belt could reduce
the effectiveness of the seat belt
in a crash.