door KIA RIO HATCHBACK 2014 Owners Manual
[x] Cancel search | Manufacturer: KIA, Model Year: 2014, Model line: RIO HATCHBACK, Model: KIA RIO HATCHBACK 2014Pages: 446, PDF Size: 12.98 MB
Page 4 of 446
ii
1
2
3
4
5
6
7
8I
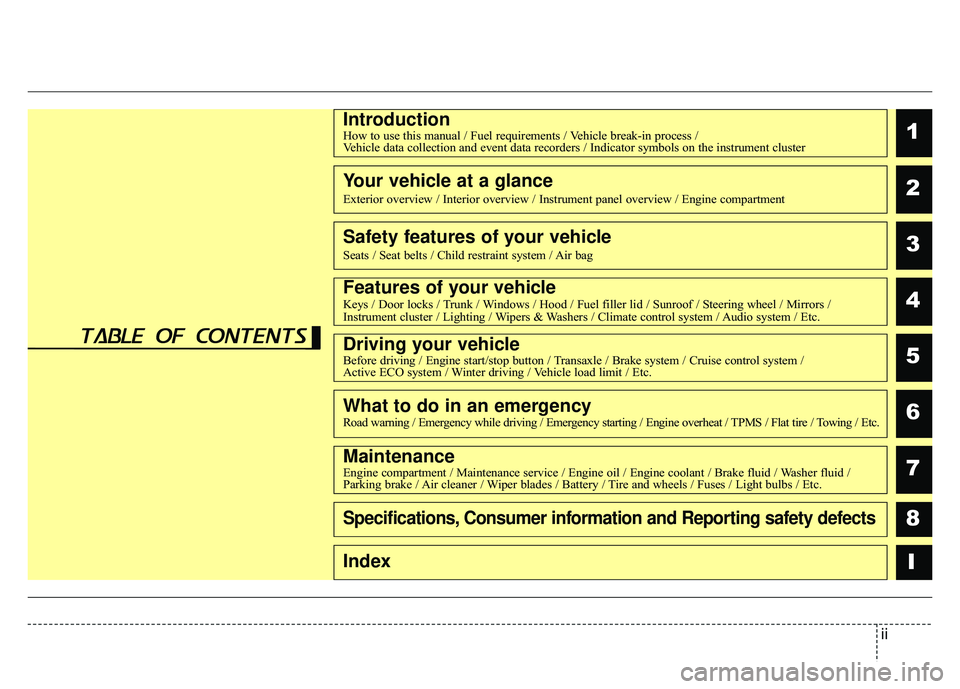
IntroductionHow to use this manual / Fuel requirements / Vehicle break-in process / Vehicle data collection and event data recorders / Indicator symbols on t\
he instrument cluster
Your vehicle at a glance
Exterior overview / Interior overview / Instrument panel overview / Engi\
ne compartment
Safety features of your vehicle
Seats / Seat belts / Child restraint system / Air bag
Features of your vehicleKeys / Door locks / Trunk / Windows / Hood / Fuel filler lid / Sunroof / Steering wheel / Mirrors /
Instrument cluster / Lighting / Wipers & Washers / Climate control system / Audio system / Etc.
Driving your vehicleBefore driving / Engine start/stop button / Transaxle / Brake system / Cruise control system /
Active ECO system / Winter driving / Vehicle load limit / Etc.
What to do in an emergencyRoad warning / Emergency while driving / Emergency starting / Engine overheat / TPMS / Flat tire / Towing / Etc.
MaintenanceEngine compartment / Maintenance service / Engine oil / Engine coolant /\
Brake fluid / Washer fluid /
Parking brake / Air cleaner / Wiper blades / Battery / Tire and wheels / Fuses / Light bulbs / Etc.
Specifications, Consumer information and Reporting safety defects
Index
table of contents
Page 11 of 446
17
Introduction
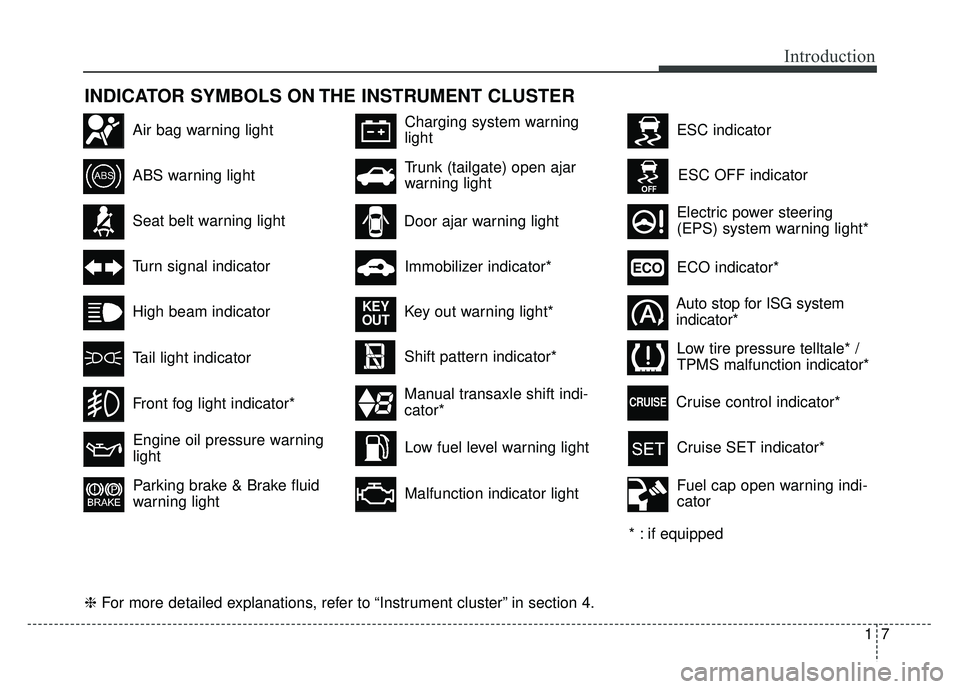
INDICATOR SYMBOLS ON THE INSTRUMENT CLUSTER
Seat belt warning light
High beam indicator
Turn signal indicator
ABS warning light
Parking brake & Brake fluid
warning light
Engine oil pressure warning
light
ESC indicator
ESC OFF indicator
Malfunction indicator light
Air bag warning light
Immobilizer indicator*
Low fuel level warning light* : if equipped
Charging system warning
light
Tail light indicator
Trunk (tailgate) open ajar
warning light
Front fog light indicator*
Electric power steering
(EPS) system warning light*Door ajar warning light
Shift pattern indicator*
Manual transaxle shift indi-
cator* Key out warning light*
KEY
OUT
ECO indicator*ECO
Auto stop for ISG system
indicator*
❈ For more detailed explanations, refer to “Instrument cluster” in section 4. Low tire pressure telltale* /
TPMS malfunction indicator*
Cruise SET indicator*
Cruise control indicator*
CRUISE
Fuel cap open warning indi-
cator
Page 14 of 446
23
Your vehicle at a glance
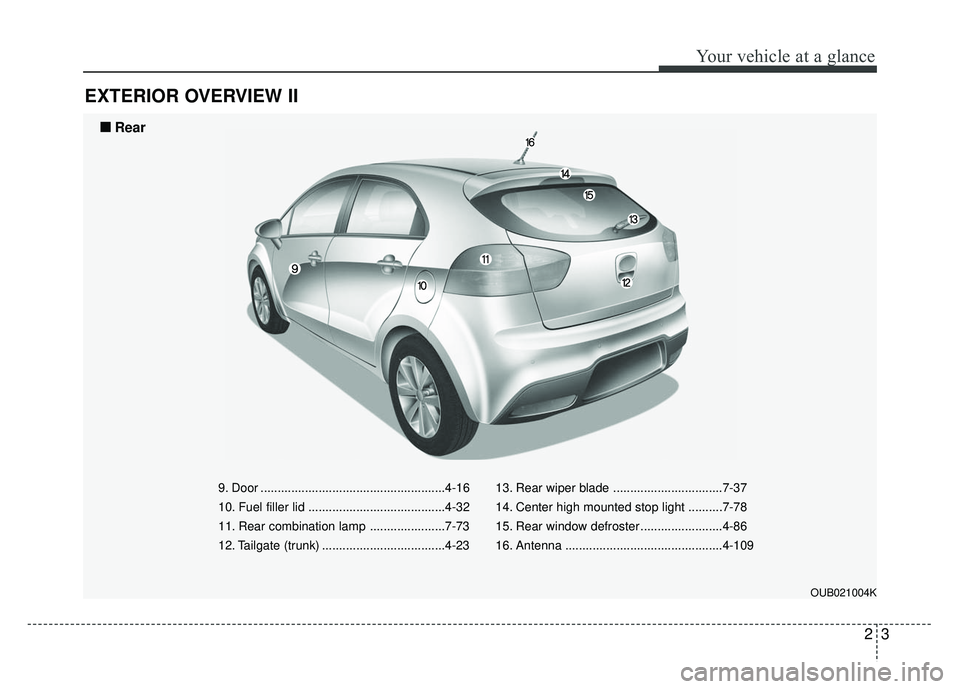
EXTERIOR OVERVIEW II
9. Door ......................................................4-16
10. Fuel filler lid ........................................4-32
11. Rear combination lamp ......................7-73
12. Tailgate (trunk) ....................................4-2313. Rear wiper blade ................................7-37
14. Center high mounted stop light ..........7-78
15. Rear window defroster ........................4-86
16. Antenna ..............................................4-109
OUB021004K
■
■
Rear
Page 15 of 446
Your vehicle at a glance
42
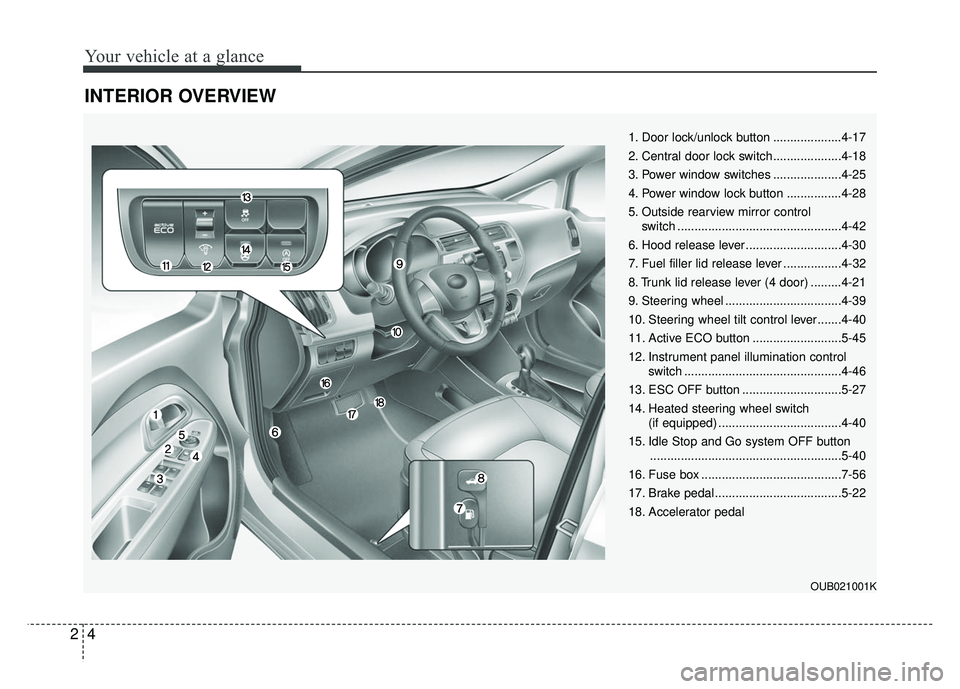
INTERIOR OVERVIEW
OUB021001K
1. Door lock/unlock button ....................4-17
2. Central door lock switch....................4-18
3. Power window switches ....................4-25
4. Power window lock button ................4-28
5. Outside rearview mirror control switch ................................................4-42
6. Hood release lever ............................4-30
7. Fuel filler lid release lever .................4-32
8. Trunk lid release lever (4 door) .........4-21
9. Steering wheel ..................................4-39
10. Steering wheel tilt control lever.......4-40
11. Active ECO button ..........................5-45
12. Instrument panel illumination control switch ..............................................4-46
13. ESC OFF button .............................5-27
14. Heated steering wheel switch (if equipped) ....................................4-40
15. Idle Stop and Go system OFF button ........................................................5-40
16. Fuse box .........................................7-56
17. Brake pedal .....................................5-22
18. Accelerator pedal
Page 19 of 446
Safety features of your vehicle
23
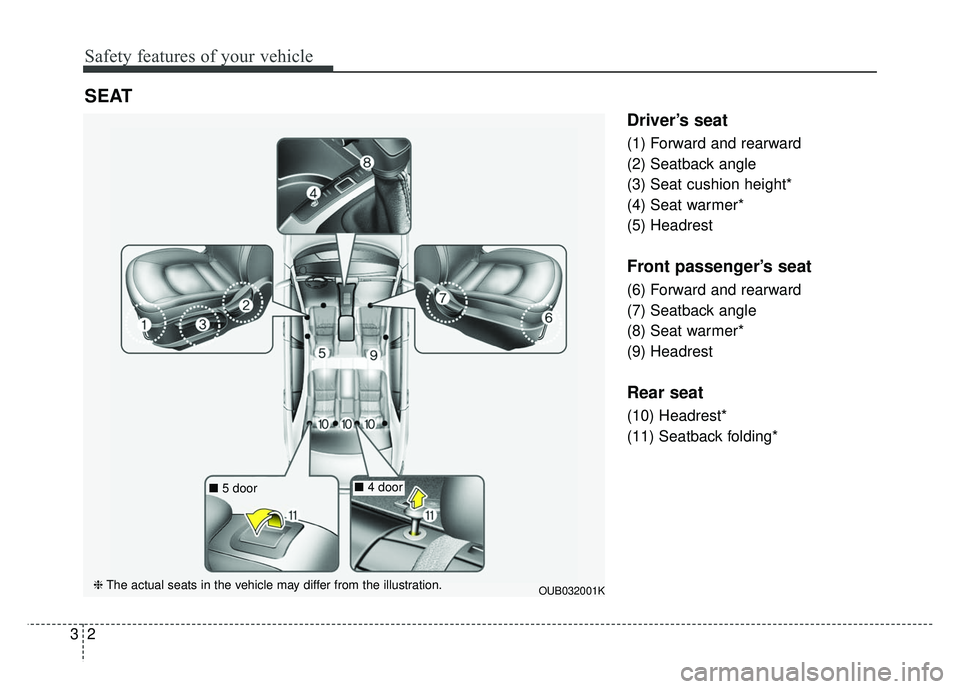
Driver’s seat
(1) Forward and rearward
(2) Seatback angle
(3) Seat cushion height*
(4) Seat warmer*
(5) Headrest
Front passenger’s seat
(6) Forward and rearward
(7) Seatback angle
(8) Seat warmer*
(9) Headrest
Rear seat
(10) Headrest*
(11) Seatback folding*
SEAT
OUB032001K
■5 door■4 door
❈ The actual seats in the vehicle may differ from the illustration.
Page 33 of 446
Safety features of your vehicle
16
3
If you are not able to pull out the seat
belt from the retractor, firmly pull the
belt out and release it. Then you will
be able to pull the belt out smoothly.
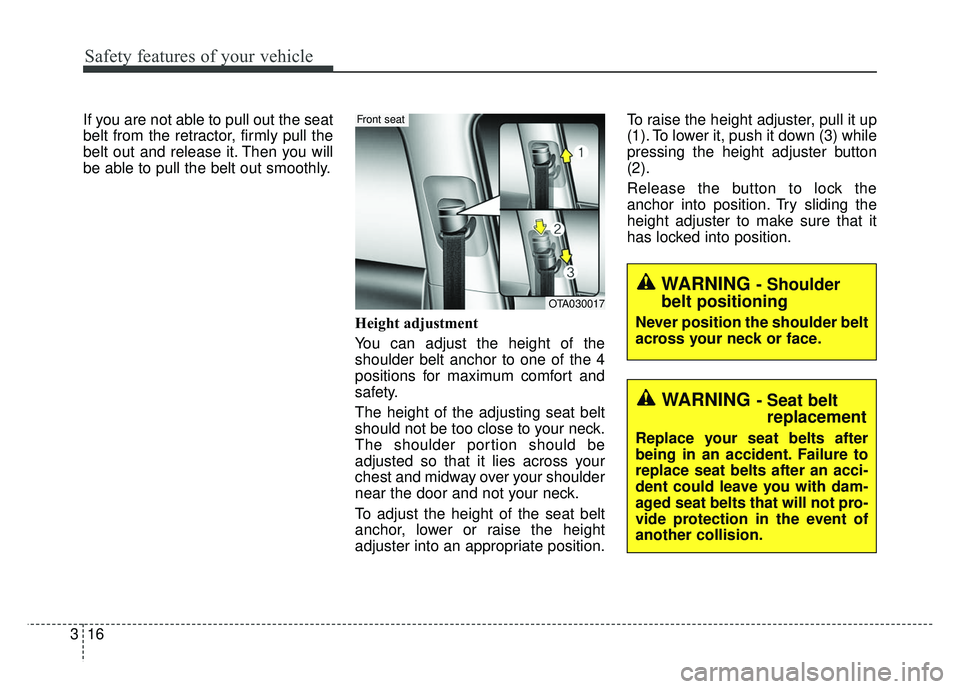
Height adjustment
You can adjust the height of the
shoulder belt anchor to one of the 4
positions for maximum comfort and
safety.
The height of the adjusting seat belt
should not be too close to your neck.
The shoulder portion should be
adjusted so that it lies across your
chest and midway over your shoulder
near the door and not your neck.
To adjust the height of the seat belt
anchor, lower or raise the height
adjuster into an appropriate position.To raise the height adjuster, pull it up
(1). To lower it, push it down (3) while
pressing the height adjuster button
(2).
Release the button to lock the
anchor into position. Try sliding the
height adjuster to make sure that it
has locked into position.
OTA030017
Front seat
WARNING - Shoulder
belt positioning
Never position the shoulder belt
across your neck or face.
WARNING - Seat belt replacement
Replace your seat belts after
being in an accident. Failure to
replace seat belts after an acci-
dent could leave you with dam-
aged seat belts that will not pro-
vide protection in the event of
another collision.
Page 39 of 446
Safety features of your vehicle
22
3
Injured person
A seat belt should be used when an
injured person is being transported.
When this is necessary, you should
consult a physician for recommenda-
tions.
One person per belt
Two people (including children)
should never attempt to use a single
seat belt. This could increase the
severity of injuries in case of an acci-
dent.
Do not lie down
To reduce the chance of injuries in
the event of an accident and to
achieve maximum effectiveness of
the restraint system, all passengers
should be sitting up and the front
seats should be in an upright posi-
tion when the vehicle is moving. A
seat belt cannot provide proper pro-
tection if the person is lying down in
the rear seat or if the front seat is in
a reclined position.
Care of seat belts
Seat belt systems should never be
disassembled or modified. In addi-
tion, care should be taken to assure
that seat belts and belt hardware are
not damaged by seat hinges, doors
or other abuse.
Periodic inspection
All seat belts should be inspected
periodically for wear or damage of
any kind. Any damaged parts should
be replaced as soon as possible.
Keep belts clean and dry
Seat belts should be kept clean and
dry. If belts become dirty, they can be
cleaned by using a mild soap solu-
tion and warm water. Bleach, dye,
strong detergents or abrasives
should not be used because they
may damage and weaken the fabric.
When to replace seat belts
The entire in-use seat belt assembly
or assemblies should be replaced if
the vehicle has been involved in an
accident. This should be done even if
no damage is visible. Additional
questions concerning seat belt oper-
ation should be directed to an
authorized Kia dealer.
WARNING - Pinched
seat belt
Make sure that the webbing
and/or buckle does not get
caught or pinched in the rear
seat when returning the rear
seatback to its upright position.
A caught or pinched
webbing/buckle may become
damaged and could fail during a
collision or sudden stop.
Page 44 of 446
327
Safety features of your vehicle
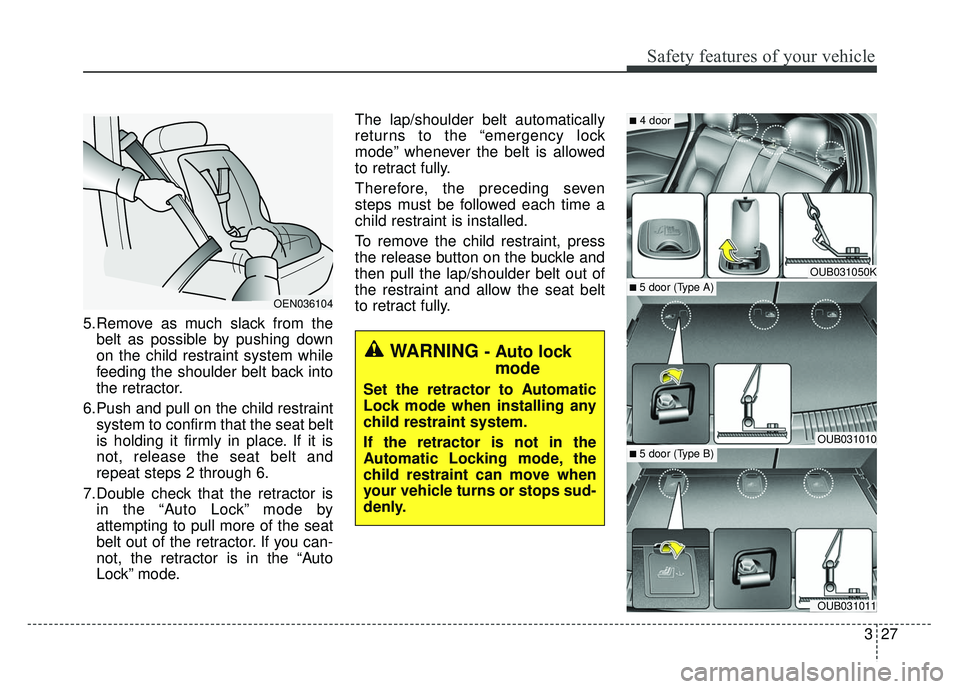
5.Remove as much slack from thebelt as possible by pushing down
on the child restraint system while
feeding the shoulder belt back into
the retractor.
6.Push and pull on the child restraint system to confirm that the seat belt
is holding it firmly in place. If it is
not, release the seat belt and
repeat steps 2 through 6.
7.Double check that the retractor is in the “Auto Lock” mode by
attempting to pull more of the seat
belt out of the retractor. If you can-
not, the retractor is in the “Auto
Lock” mode. The lap/shoulder belt automatically
returns to the “emergency lock
mode” whenever the belt is allowed
to retract fully.
Therefore, the preceding seven
steps must be followed each time a
child restraint is installed.
To remove the child restraint, press
the release button on the buckle and
then pull the lap/shoulder belt out of
the restraint and allow the seat belt
to retract fully.
OEN036104
WARNING - Auto lock
mode
Set the retractor to Automatic
Lock mode when installing any
child restraint system.
If the retractor is not in the
Automatic Locking mode, the
child restraint can move when
your vehicle turns or stops sud-
denly.
OUB031050K
OUB031010
OUB031011
■ 5 door (Type A)
■4 door
■ 5 door (Type B)
Page 50 of 446
333
Safety features of your vehicle
Noise and smoke
When the air bags inflate, they make
a loud noise and they leave smoke
and powder in the air inside of the
vehicle. This is normal and is a result
of the ignition of the air bag inflator.
After the air bag inflates, you may
feel substantial discomfort in breath-
ing due to the contact of your chest
to both the seat belt and the air bag,
as well as from breathing the smoke
and powder.Open your doors
and/or windows as soon as possi-
ble after the impact in order to
reduce discomfort and prevent
prolonged exposure to smoke and
powder.
Though smoke and powder are non-
toxic, it may cause irritation to the
skin (eyes, nose and throat etc). If
this is the case, wash and rinse with
the cold water immediately and con-
sult the doctor if the symptom per-
sists.
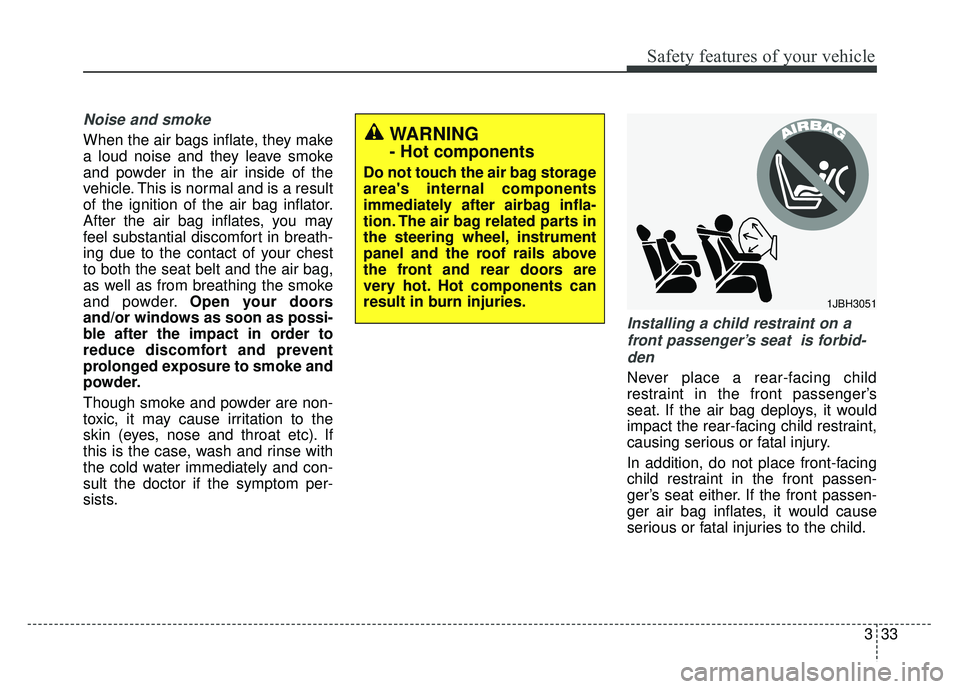
Installing a child restraint on a
front passenger’s seat is forbid-den
Never place a rear-facing child
restraint in the front passenger’s
seat. If the air bag deploys, it would
impact the rear-facing child restraint,
causing serious or fatal injury.
In addition, do not place front-facing
child restraint in the front passen-
ger’s seat either. If the front passen-
ger air bag inflates, it would cause
serious or fatal injuries to the child.
1JBH3051
WARNING
- Hot components
Do not touch the air bag storage
area's internal components
immediately after airbag infla-
tion. The air bag related parts in
the steering wheel, instrument
panel and the roof rails above
the front and rear doors are
very hot. Hot components can
result in burn injuries.
Page 51 of 446
Safety features of your vehicle
34
3
Air bag warning light
The purpose of the air bag warning
light in your instrument panel is to
alert you of a potential problem with
your air bag-Supplemental Restraint
System (SRS). When the ignition
switch is turned ON, the indicator
light should illuminate for approxi-
mately 6 seconds, then go off.
Have the system checked by an
authorized Kia dealer if:
The light does not turn on briefly
when you turn the ignition ON.
The light stays on after illuminating for approximately 6 seconds.
The light comes on while the vehi- cle is in motion.
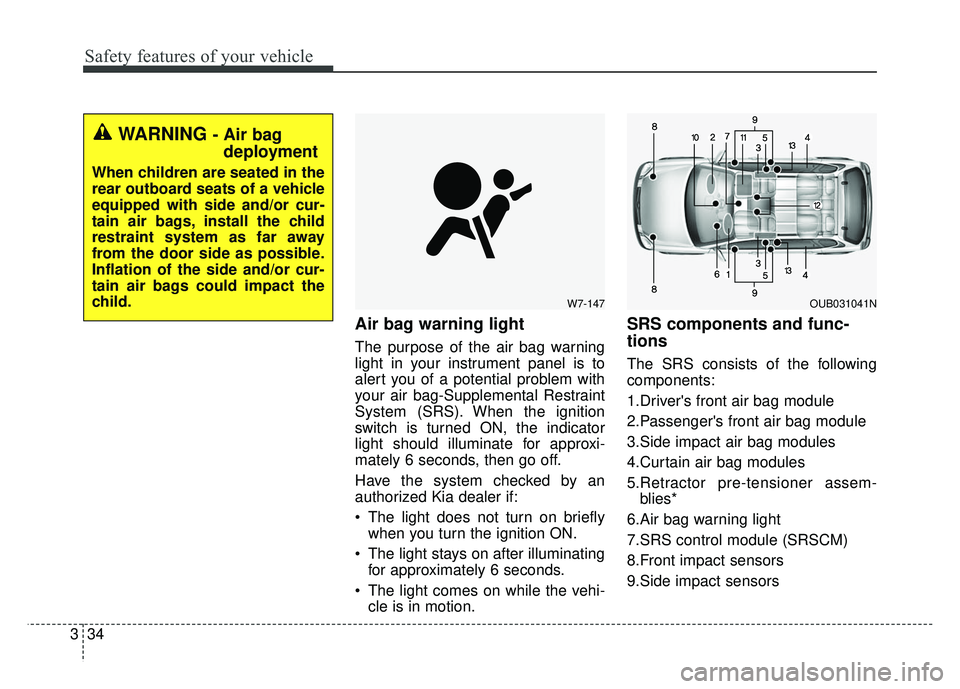
SRS components and func-
tions
The SRS consists of the following
components:
1.Driver's front air bag module
2.Passenger's front air bag module
3.Side impact air bag modules
4.Curtain air bag modules
5.Retractor pre-tensioner assem-blies*
6.Air bag warning light
7.SRS control module (SRSCM)
8.Front impact sensors
9.Side impact sensors
W7-147
WARNING - Air bag deployment
When children are seated in the
rear outboard seats of a vehicle
equipped with side and/or cur-
tain air bags, install the child
restraint system as far away
from the door side as possible.
Inflation of the side and/or cur-
tain air bags could impact the
child.
OUB031041N