door lock KIA RIO HATCHBACK 2014 Owners Manual
[x] Cancel search | Manufacturer: KIA, Model Year: 2014, Model line: RIO HATCHBACK, Model: KIA RIO HATCHBACK 2014Pages: 446, PDF Size: 12.98 MB
Page 4 of 446
ii
1
2
3
4
5
6
7
8I
IntroductionHow to use this manual / Fuel requirements / Vehicle break-in process / Vehicle data collection and event data recorders / Indicator symbols on t\
he instrument cluster
Your vehicle at a glance
Exterior overview / Interior overview / Instrument panel overview / Engi\
ne compartment
Safety features of your vehicle
Seats / Seat belts / Child restraint system / Air bag
Features of your vehicleKeys / Door locks / Trunk / Windows / Hood / Fuel filler lid / Sunroof / Steering wheel / Mirrors /
Instrument cluster / Lighting / Wipers & Washers / Climate control system / Audio system / Etc.
Driving your vehicleBefore driving / Engine start/stop button / Transaxle / Brake system / Cruise control system /
Active ECO system / Winter driving / Vehicle load limit / Etc.
What to do in an emergencyRoad warning / Emergency while driving / Emergency starting / Engine overheat / TPMS / Flat tire / Towing / Etc.
MaintenanceEngine compartment / Maintenance service / Engine oil / Engine coolant /\
Brake fluid / Washer fluid /
Parking brake / Air cleaner / Wiper blades / Battery / Tire and wheels / Fuses / Light bulbs / Etc.
Specifications, Consumer information and Reporting safety defects
Index
table of contents
Page 15 of 446
Your vehicle at a glance
42
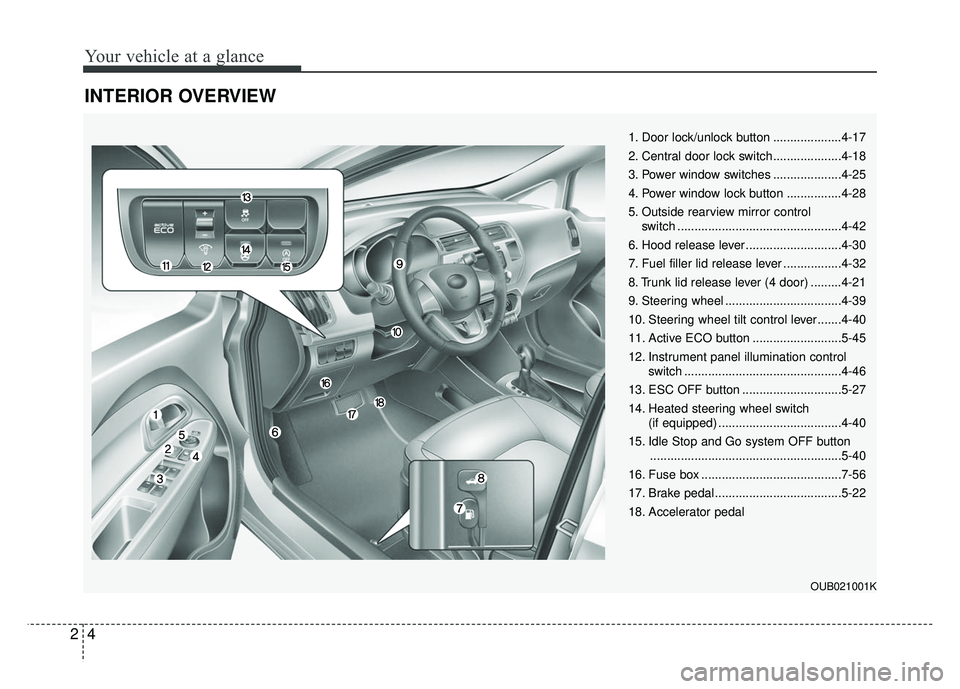
INTERIOR OVERVIEW
OUB021001K
1. Door lock/unlock button ....................4-17
2. Central door lock switch....................4-18
3. Power window switches ....................4-25
4. Power window lock button ................4-28
5. Outside rearview mirror control switch ................................................4-42
6. Hood release lever ............................4-30
7. Fuel filler lid release lever .................4-32
8. Trunk lid release lever (4 door) .........4-21
9. Steering wheel ..................................4-39
10. Steering wheel tilt control lever.......4-40
11. Active ECO button ..........................5-45
12. Instrument panel illumination control switch ..............................................4-46
13. ESC OFF button .............................5-27
14. Heated steering wheel switch (if equipped) ....................................4-40
15. Idle Stop and Go system OFF button ........................................................5-40
16. Fuse box .........................................7-56
17. Brake pedal .....................................5-22
18. Accelerator pedal
Page 33 of 446
Safety features of your vehicle
16
3
If you are not able to pull out the seat
belt from the retractor, firmly pull the
belt out and release it. Then you will
be able to pull the belt out smoothly.
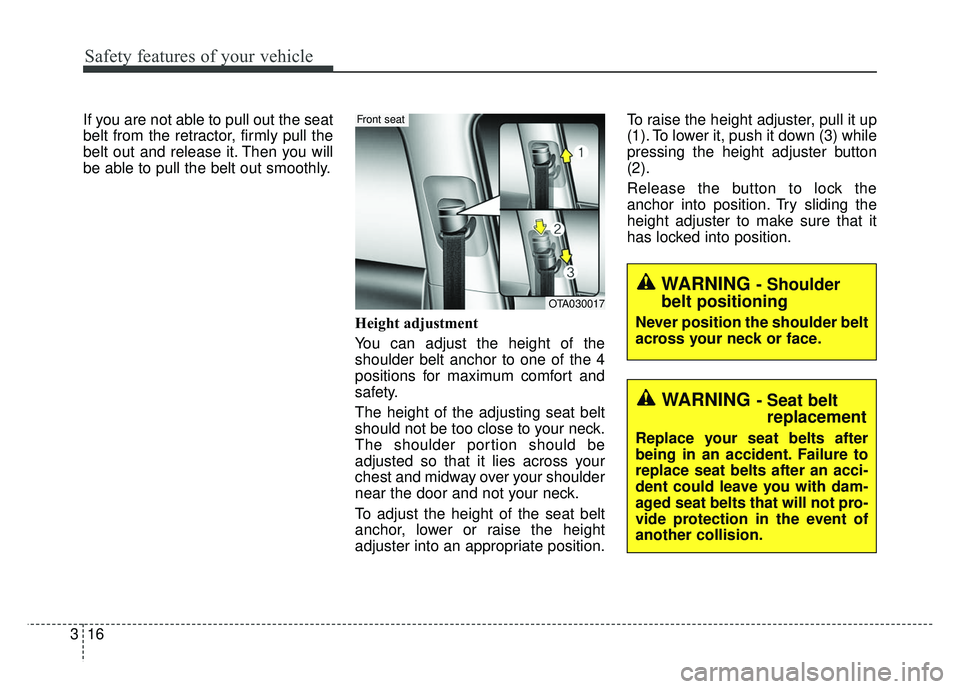
Height adjustment
You can adjust the height of the
shoulder belt anchor to one of the 4
positions for maximum comfort and
safety.
The height of the adjusting seat belt
should not be too close to your neck.
The shoulder portion should be
adjusted so that it lies across your
chest and midway over your shoulder
near the door and not your neck.
To adjust the height of the seat belt
anchor, lower or raise the height
adjuster into an appropriate position.To raise the height adjuster, pull it up
(1). To lower it, push it down (3) while
pressing the height adjuster button
(2).
Release the button to lock the
anchor into position. Try sliding the
height adjuster to make sure that it
has locked into position.
OTA030017
Front seat
WARNING - Shoulder
belt positioning
Never position the shoulder belt
across your neck or face.
WARNING - Seat belt replacement
Replace your seat belts after
being in an accident. Failure to
replace seat belts after an acci-
dent could leave you with dam-
aged seat belts that will not pro-
vide protection in the event of
another collision.
Page 44 of 446
327
Safety features of your vehicle
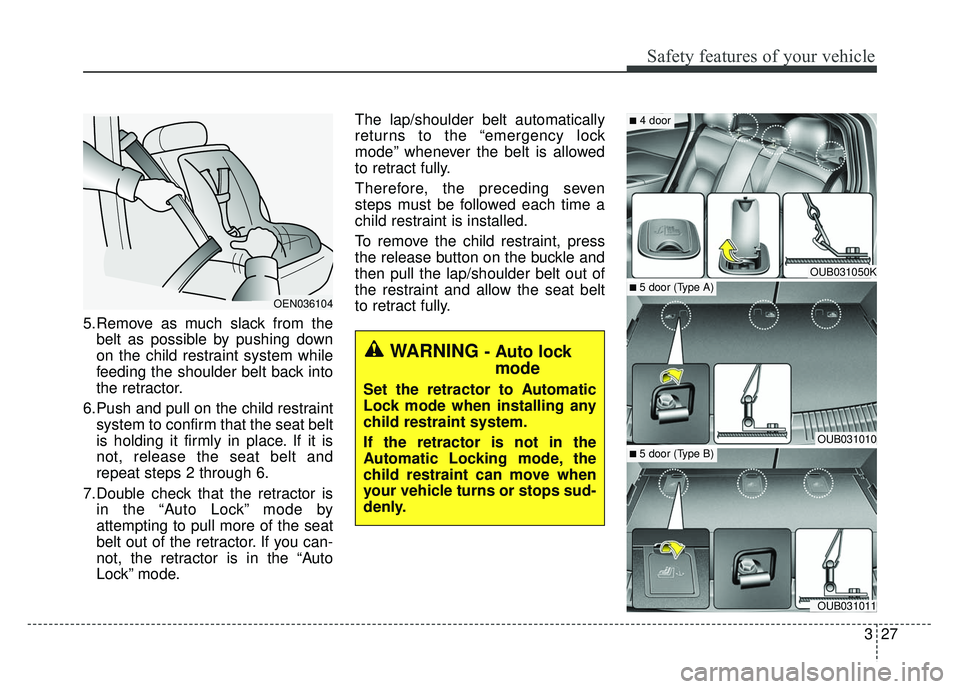
5.Remove as much slack from thebelt as possible by pushing down
on the child restraint system while
feeding the shoulder belt back into
the retractor.
6.Push and pull on the child restraint system to confirm that the seat belt
is holding it firmly in place. If it is
not, release the seat belt and
repeat steps 2 through 6.
7.Double check that the retractor is in the “Auto Lock” mode by
attempting to pull more of the seat
belt out of the retractor. If you can-
not, the retractor is in the “Auto
Lock” mode. The lap/shoulder belt automatically
returns to the “emergency lock
mode” whenever the belt is allowed
to retract fully.
Therefore, the preceding seven
steps must be followed each time a
child restraint is installed.
To remove the child restraint, press
the release button on the buckle and
then pull the lap/shoulder belt out of
the restraint and allow the seat belt
to retract fully.
OEN036104
WARNING - Auto lock
mode
Set the retractor to Automatic
Lock mode when installing any
child restraint system.
If the retractor is not in the
Automatic Locking mode, the
child restraint can move when
your vehicle turns or stops sud-
denly.
OUB031050K
OUB031010
OUB031011
■ 5 door (Type A)
■4 door
■ 5 door (Type B)
Page 72 of 446
Features of your vehicle
Keys . . . . . . . . . . . . . . . . . . . . . . . . . . . . . . . . . . . . \
. 4-3
• Record your key number . . . . . . . . . . . . . . . . . . . . . 4-3
. . . . . . . . . . . . . . . . . . . . . . . . . . . . . . 4-3
Smart key . . . . . . . . . . . . . . . . . . . . . . . . . . . . . . . . 4-5
. . . . . . . . . . . . . . . . . . . . . . . . . . 4-5
. . . . . . . . . . . . . . . . . . . . . . . . 4-7
Remote keyless entry . . . . . . . . . . . . . . . . . . . . . . . 4-8
. . . . . . . . . 4-8
. . . . . . . . . . . . . . . . . . . . . . 4-9
. . . . . . . . . . . . . . . . . . . . . . . . . 4-10
. . . . . . . . . . . . . . . . . . . . . . . . . . 4-11
Theft-alarm system . . . . . . . . . . . . . . . . . . . . . . . . 4-13
Door locks . . . . . . . . . . . . . . . . . . . . . . . . . . . . . . . . 4-16
. . . . . . . . . . . . . . . . . . . . . . . . . . . 4-16
. . . . . . . . . . . . . . . . . . . . . . . . . . . . 4-17
. . . . . . . . . . . . . . . . . . . . . 4-19
. . . . . . . . . . . . . . . . . 4-19
Trunk . . . . . . . . . . . . . . . . . . . . . . . . . . . . . . . . . . . 4-\
21
Tailgate . . . . . . . . . . . . . . . . . . . . . . . . . . . . . . . . . . 4-23\
Windows . . . . . . . . . . . . . . . . . . . . . . . . . . . . . . . . . 4-25
Hood . . . . . . . . . . . . . . . . . . . . . . . . . . . . . . . . . . . . \
4-30
Fuel filler lid . . . . . . . . . . . . . . . . . . . . . . . . . . . . . . 4-32
Sunroof . . . . . . . . . . . . . . . . . . . . . . . . . . . . . . . . . . 4-35\
Steering wheel . . . . . . . . . . . . . . . . . . . . . . . . . . . . 4-39
4-39
. . . . . . . . . . . . . . . . . . . 4-40
. . . . . . . . . . . . . . . . . . . . . . . . 4-40
. . . . . . . . . . . . . . . . . . . . . . . . . . . . . . . . . . . . \
. . 4-41
Mirrors . . . . . . . . . . . . . . . . . . . . . . . . . . . . . . . . . . 4-42\
. . . . . . . . . . . . . . . . . . . . . . . 4-42
. . . . . . . . . . . . . . . . . . . . . . 4-42
Instrument cluster . . . . . . . . . . . . . . . . . . . . . . . . . 4-45
. . . . . . . . . . . . . . . . . 4-46
. . . . . . . . . . . . . . . . . . . . . . . . . . . . . . . . . . . . \
. 4-46
. . . . . . . . . . . . . . . . . . . . . . . . . . . . . . . . 4-49
- Trip computer . . . . . . . . . . . . . . . . . . . . . . . . . . . . . 4-49
- User settings . . . . . . . . . . . . . . . . . . . . . . . . . . . . . . . 4-54
- Maintenance system . . . . . . . . . . . . . . . . . . . . . . . . 4-56
- Warnings and indicators . . . . . . . . . . . . . . . . . . . . . 4-69
. . . . . . 4-58
Rear-Camera Display . . . . . . . . . . . . . . . . . . . . . . 4-75
Hazard warning flasher . . . . . . . . . . . . . . . . . . . . 4-76
4
Page 74 of 446
43
Features of your vehicle
Record your key number
The key code num-
ber is stamped on
the key code tag
attached to the key
set. Should you
lose your keys, this number will
enable an authorized Kia dealer to
duplicate the keys easily. After
recording the key code number,
remove the tag and store it in a safe
place. It is recommended that you
store the number in a safe place, but
not the vehicle.
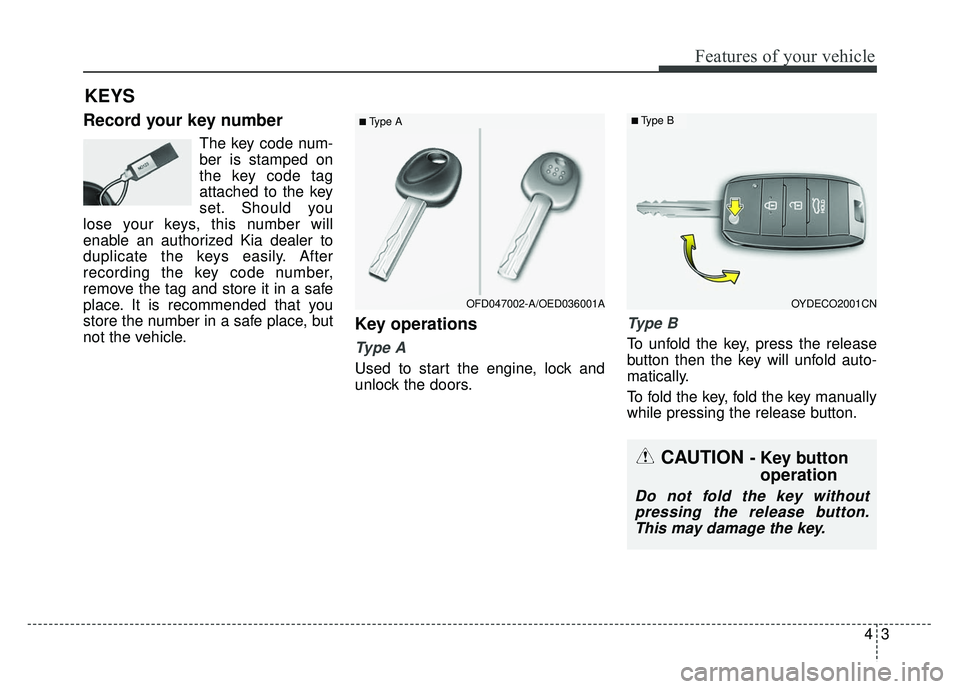
Key operations
Type A
Used to start the engine, lock and
unlock the doors.
Ty p e B
To unfold the key, press the release
button then the key will unfold auto-
matically.
To fold the key, fold the key manually
while pressing the release button.
KEYS
■Type A
OYDECO2001CN
■Type B
OFD047002-A/OED036001A
CAUTION - Key button operation
Do not fold the key without
pressing the release button.This may damage the key.
Page 76 of 446
45
Features of your vehicle
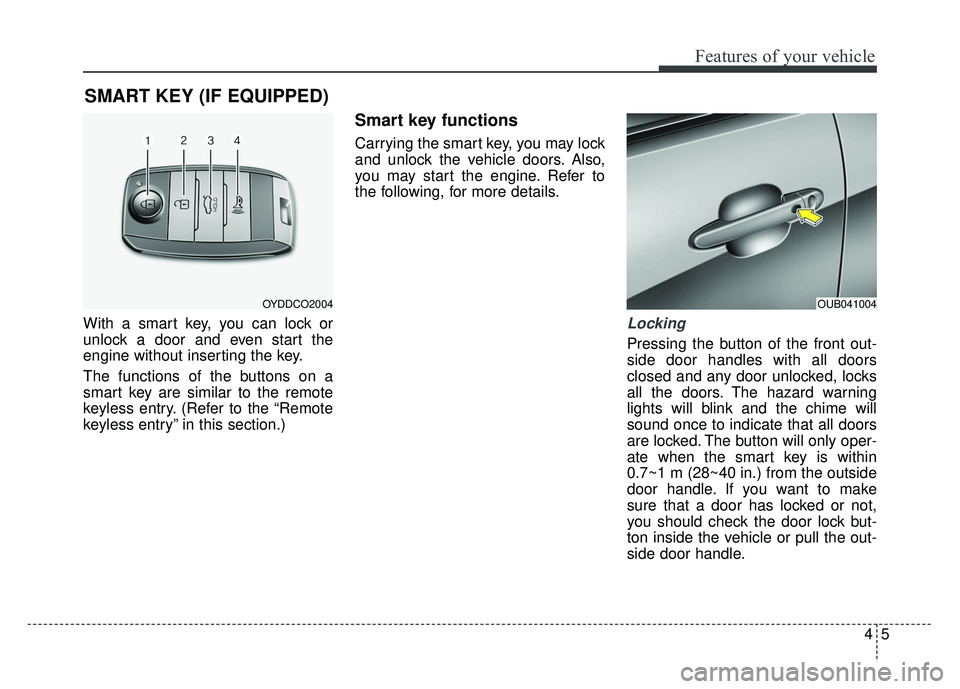
With a smart key, you can lock or
unlock a door and even start the
engine without inserting the key.
The functions of the buttons on a
smart key are similar to the remote
keyless entry. (Refer to the “Remote
keyless entry” in this section.)
Smart key functions
Carrying the smart key, you may lock
and unlock the vehicle doors. Also,
you may start the engine. Refer to
the following, for more details.
Locking
Pressing the button of the front out-
side door handles with all doors
closed and any door unlocked, locks
all the doors. The hazard warning
lights will blink and the chime will
sound once to indicate that all doors
are locked. The button will only oper-
ate when the smart key is within
0.7~1 m (28~40 in.) from the outside
door handle. If you want to make
sure that a door has locked or not,
you should check the door lock but-
ton inside the vehicle or pull the out-
side door handle.
SMART KEY (IF EQUIPPED)
OUB041004OYDDCO2004
Page 77 of 446
Features of your vehicle
64
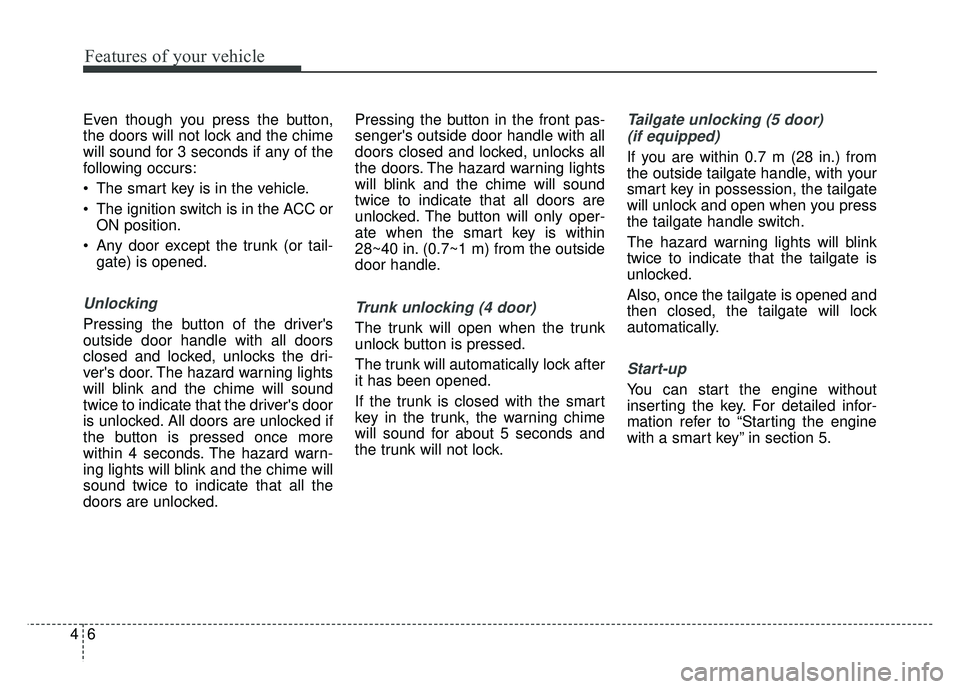
Even though you press the button,
the doors will not lock and the chime
will sound for 3 seconds if any of the
following occurs:
The smart key is in the vehicle.
The ignition switch is in the ACC orON position.
Any door except the trunk (or tail- gate) is opened.
Unlocking
Pressing the button of the driver's
outside door handle with all doors
closed and locked, unlocks the dri-
ver's door. The hazard warning lights
will blink and the chime will sound
twice to indicate that the driver's door
is unlocked. All doors are unlocked if
the button is pressed once more
within 4 seconds. The hazard warn-
ing lights will blink and the chime will
sound twice to indicate that all the
doors are unlocked. Pressing the button in the front pas-
senger's outside door handle with all
doors closed and locked, unlocks all
the doors. The hazard warning lights
will blink and the chime will sound
twice to indicate that all doors are
unlocked. The button will only oper-
ate when the smart key is within
28~40 in. (0.7~1 m) from the outside
door handle.
Trunk unlocking (4 door)
The trunk will open when the trunk
unlock button is pressed.
The trunk will automatically lock after
it has been opened.
If the trunk is closed with the smart
key in the trunk, the warning chime
will sound for about 5 seconds and
the trunk will not lock.
Tailgate unlocking (5 door)
(if equipped)
If you are within 0.7 m (28 in.) from
the outside tailgate handle, with your
smart key in possession, the tailgate
will unlock and open when you press
the tailgate handle switch.
The hazard warning lights will blink
twice to indicate that the tailgate is
unlocked.
Also, once the tailgate is opened and
then closed, the tailgate will lock
automatically.
Start-up
You can start the engine without
inserting the key. For detailed infor-
mation refer to “Starting the engine
with a smart key” in section 5.
Page 78 of 446
47
Features of your vehicle
Smart key precautions
If you lose your smart key, you willnot be able to start the engine.
Towing the vehicle to an authorized
dealer may be necessary.
A maximum of 2 smart keys can be registered to a single vehicle. If a
smart key is lost, take the vehicle
and remaining key to your author-
ized Kia dealer for reprogramming.
This will not allow the lost key from
starting the vehicle and will protect
from potential theft.
The smart key will not work if any of following occurs:
- If the vehicle key is close to aradio transmitter such as a radio
station it can interfere with normal
operation of the smart key sys-
tem
- The smart key near a mobile two- way radio system or a cellular
phone.
- Another vehicle’s smart key is being operated close to your
vehicle.
(Continued)(Continued)
When the smart key does not work
correctly, open and close the door
with the mechanical key. If you
have a problem with the smart key,
contact an authorized Kia dealer.
If the smart key is in close proximi- ty to your cell phone or smart
phone, the signal from the smart
key could be blocked by normal
operation of your cell phone or
smart phone. This is especially
important when the phone is active
such as making calls, receiving
calls, text messaging, and/or send-
ing/receiving emails. Pleacing the
Smart Key and cell phone in close
proximity can disrupt the signals of
the Smart Key This device complies with Part 15
of the FCC rules.
Operation is subject to the following
two conditions:
1.This device may not cause harmful
interference, and
2.This device must accept any inter- ference received, including inter-
ference that may cause undesired
operation.
✽ ✽
NOTICE
Changes or modifications not
expressly approved by the party
responsible for compliance could
void the user’s authority to operate
the equipment. If the keyless entry
system is inoperative due to changes
or modifications not expressly
approved by the party responsible
for compliance, it will not be cov-
ered by your manufacturer’s vehicle
warranty.
CAUTION- Transmitter
Keep the smart key away from
water or any liquid as it canbecome damaged and not func-tion properly.
Page 79 of 446
Features of your vehicle
84
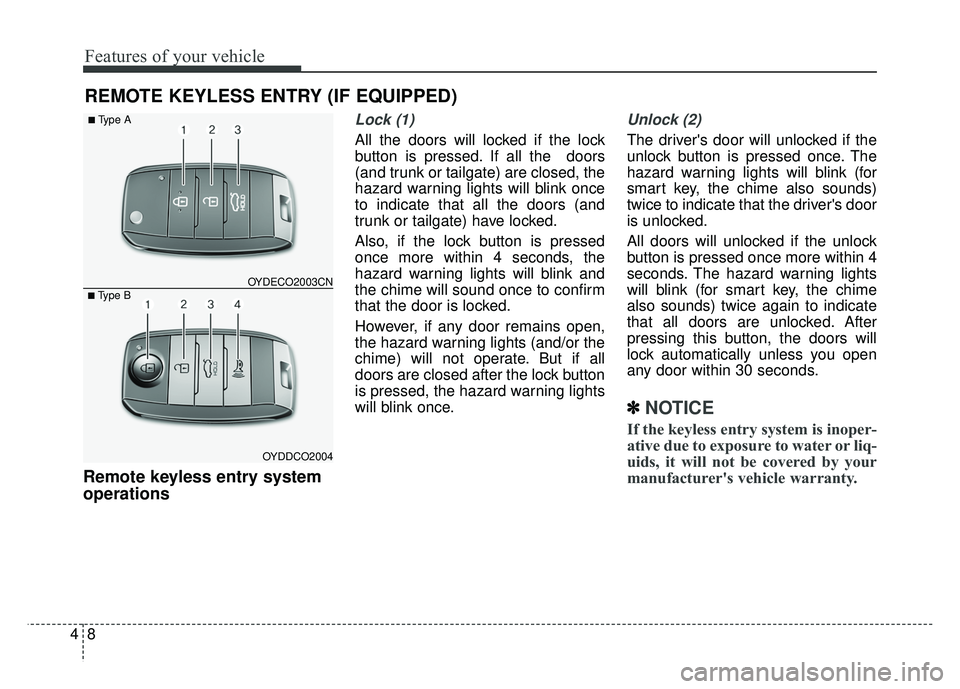
Remote keyless entry system
operations
Lock (1)
All the doors will locked if the lock
button is pressed. If all the doors
(and trunk or tailgate) are closed, the
hazard warning lights will blink once
to indicate that all the doors (and
trunk or tailgate) have locked.
Also, if the lock button is pressed
once more within 4 seconds, the
hazard warning lights will blink and
the chime will sound once to confirm
that the door is locked.
However, if any door remains open,
the hazard warning lights (and/or the
chime) will not operate. But if all
doors are closed after the lock button
is pressed, the hazard warning lights
will blink once.
Unlock (2)
The driver's door will unlocked if the
unlock button is pressed once. The
hazard warning lights will blink (for
smart key, the chime also sounds)
twice to indicate that the driver's door
is unlocked.
All doors will unlocked if the unlock
button is pressed once more within 4
seconds. The hazard warning lights
will blink (for smart key, the chime
also sounds) twice again to indicate
that all doors are unlocked. After
pressing this button, the doors will
lock automatically unless you open
any door within 30 seconds.
✽ ✽
NOTICE
If the keyless entry system is inoper-
ative due to exposure to water or liq-
uids, it will not be covered by your
manufacturer's vehicle warranty.
REMOTE KEYLESS ENTRY (IF EQUIPPED)
■Type B OYDECO2003CN
■Type A
OYDDCO2004