headrest KIA RIO HATCHBACK 2014 Owners Manual
[x] Cancel search | Manufacturer: KIA, Model Year: 2014, Model line: RIO HATCHBACK, Model: KIA RIO HATCHBACK 2014Pages: 446, PDF Size: 12.98 MB
Page 19 of 446
Safety features of your vehicle
23
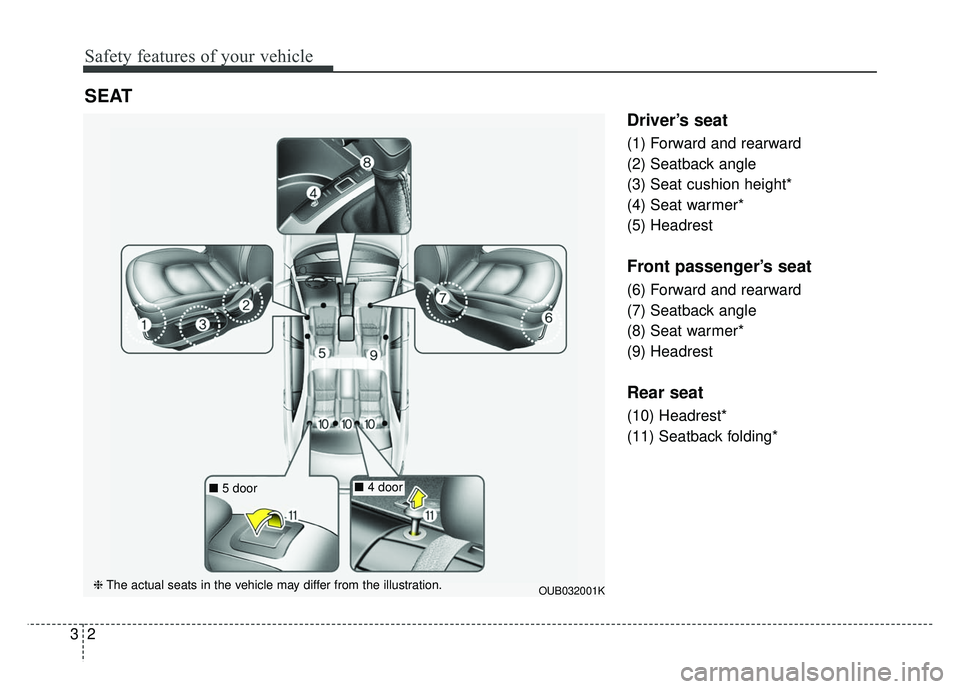
Driver’s seat
(1) Forward and rearward
(2) Seatback angle
(3) Seat cushion height*
(4) Seat warmer*
(5) Headrest
Front passenger’s seat
(6) Forward and rearward
(7) Seatback angle
(8) Seat warmer*
(9) Headrest
Rear seat
(10) Headrest*
(11) Seatback folding*
SEAT
OUB032001K
■5 door■4 door
❈ The actual seats in the vehicle may differ from the illustration.
Page 22 of 446
35
Safety features of your vehicle
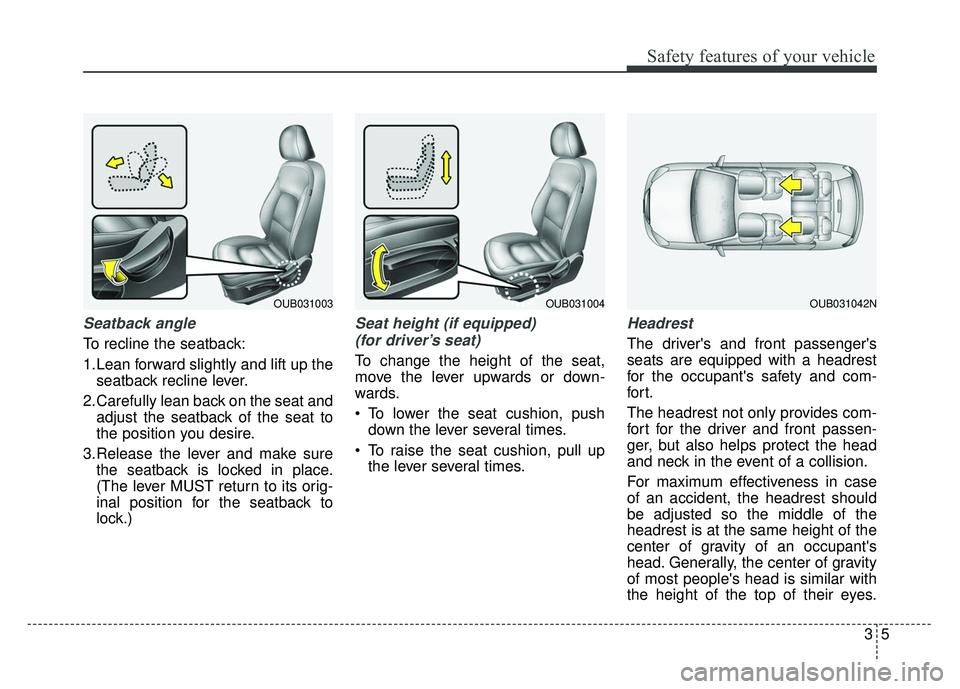
Seatback angle
To recline the seatback:
1.Lean forward slightly and lift up theseatback recline lever.
2.Carefully lean back on the seat and adjust the seatback of the seat to
the position you desire.
3.Release the lever and make sure the seatback is locked in place.
(The lever MUST return to its orig-
inal position for the seatback to
lock.)
Seat height (if equipped)
(for driver’s seat)
To change the height of the seat,
move the lever upwards or down-
wards.
• To lower the seat cushion, push down the lever several times.
To raise the seat cushion, pull up the lever several times.
Headrest
The driver's and front passenger's
seats are equipped with a headrest
for the occupant's safety and com-
for t.
The headrest not only provides com-
fort for the driver and front passen-
ger, but also helps protect the head
and neck in the event of a collision.
For maximum effectiveness in case
of an accident, the headrest should
be adjusted so the middle of the
headrest is at the same height of the
center of gravity of an occupant's
head. Generally, the center of gravity
of most people's head is similar with
the height of the top of their eyes.
OUB031003OUB031004OUB031042N
Page 23 of 446
Safety features of your vehicle
63
Also, adjust the headrest as close to
your head as possible.
For this reason, the use of a cushion
that holds the body away from the
seatback is not recommended.Forward and backward adjustment
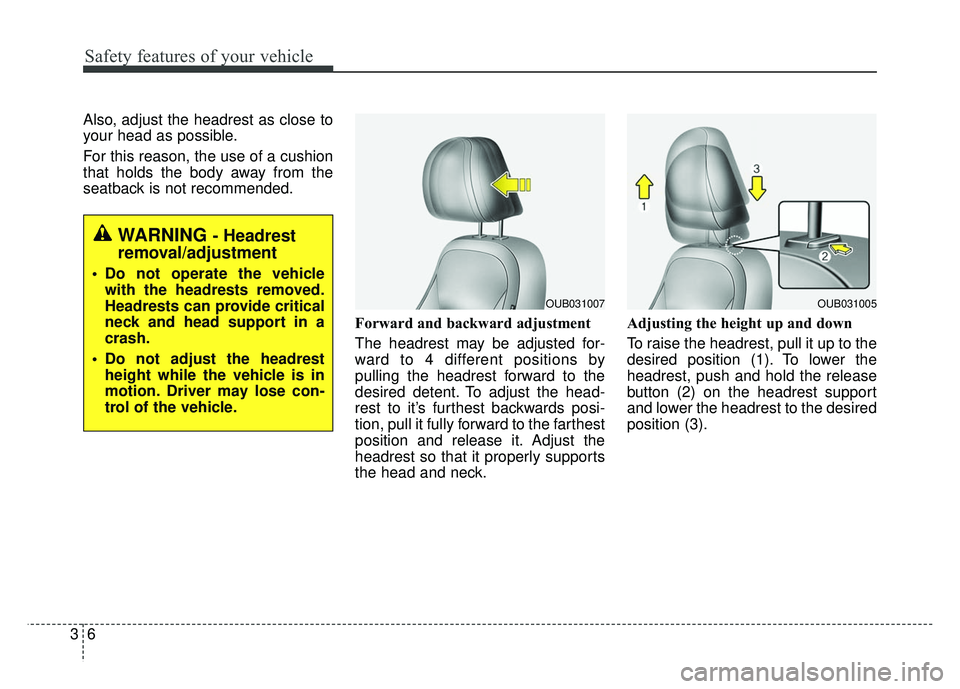
The headrest may be adjusted for-
ward to 4 different positions by
pulling the headrest forward to the
desired detent. To adjust the head-
rest to it’s furthest backwards posi-
tion, pull it fully forward to the farthest
position and release it. Adjust the
headrest so that it properly supports
the head and neck.Adjusting the height up and down
To raise the headrest, pull it up to the
desired position (1). To lower the
headrest, push and hold the release
button (2) on the headrest support
and lower the headrest to the desired
position (3).
WARNING - Headrest
removal/adjustment
Do not operate the vehicle
with the headrests removed.
Headrests can provide critical
neck and head support in a
crash.
Do not adjust the headrest height while the vehicle is in
motion. Driver may lose con-
trol of the vehicle.
OUB031005OUB031007
Page 24 of 446
37
Safety features of your vehicle
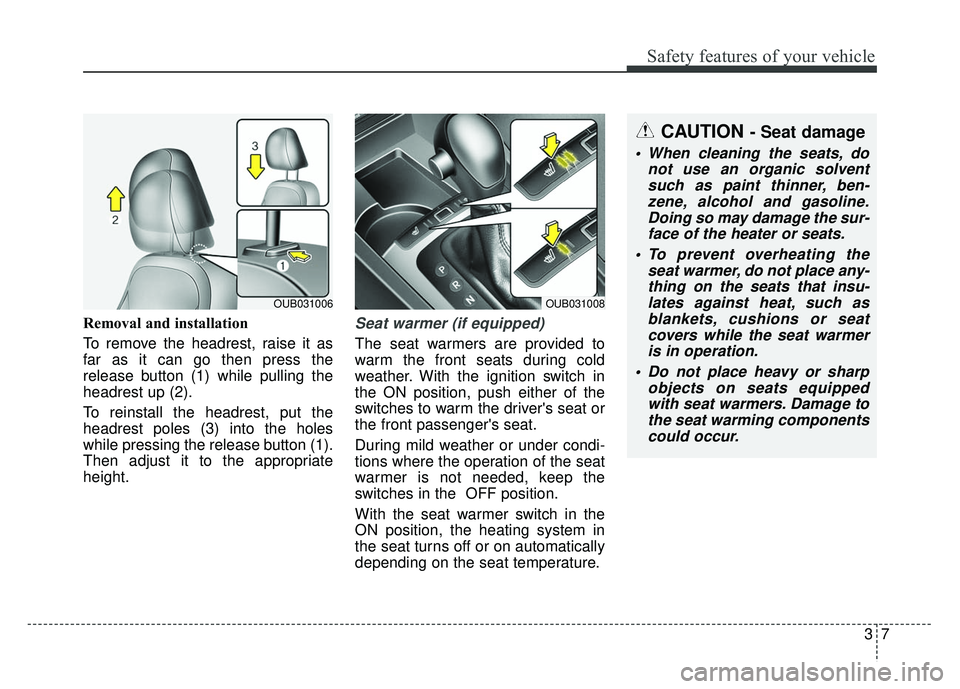
Removal and installation
To remove the headrest, raise it as
far as it can go then press the
release button (1) while pulling the
headrest up (2).
To reinstall the headrest, put the
headrest poles (3) into the holes
while pressing the release button (1).
Then adjust it to the appropriate
height.Seat warmer (if equipped)
The seat warmers are provided to
warm the front seats during cold
weather. With the ignition switch in
the ON position, push either of the
switches to warm the driver's seat or
the front passenger's seat.
During mild weather or under condi-
tions where the operation of the seat
warmer is not needed, keep the
switches in the OFF position.
With the seat warmer switch in the
ON position, the heating system in
the seat turns off or on automatically
depending on the seat temperature.
OUB031006OUB031008
CAUTION - Seat damage
When cleaning the seats, donot use an organic solventsuch as paint thinner, ben-zene, alcohol and gasoline.Doing so may damage the sur-face of the heater or seats.
To prevent overheating the seat warmer, do not place any-thing on the seats that insu-lates against heat, such asblankets, cushions or seatcovers while the seat warmeris in operation.
Do not place heavy or sharp objects on seats equippedwith seat warmers. Damage tothe seat warming componentscould occur.
Page 26 of 446
39
Safety features of your vehicle
Rear seat adjustment
Headrest
The rear seat is equipped with head-
rests in all the seating positions for
the occupant's safety and comfort.
The headrest not only provides com-
fort for passengers, but also helps
protect the head and neck in the
event of a collision.
For maximum effectiveness in case
of an accident, the headrest should
be adjusted so the middle of the
headrest is at the same height of the
center of gravity of an occupant's
head.Generally, the center of gravity of
most people's head is similar with
the height as the top of their eyes.
Also adjust the headrest as close to
your head as possible. For this rea-
son, the use of a cushion that holds
the body away from the seatback is
not recommended.
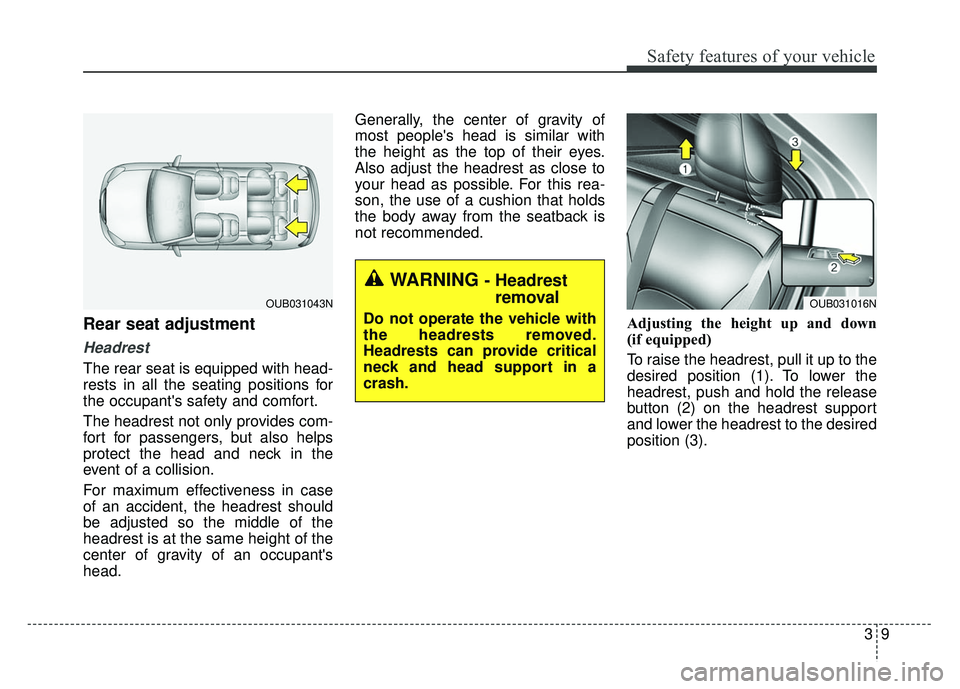
Adjusting the height up and down
(if equipped)
To raise the headrest, pull it up to the
desired position (1). To lower the
headrest, push and hold the release
button (2) on the headrest support
and lower the headrest to the desired
position (3).
OUB031043N
WARNING - Headrestremoval
Do not operate the vehicle with
the headrests removed.
Headrests can provide critical
neck and head support in a
crash.
OUB031016N
Page 27 of 446
Safety features of your vehicle
10
3
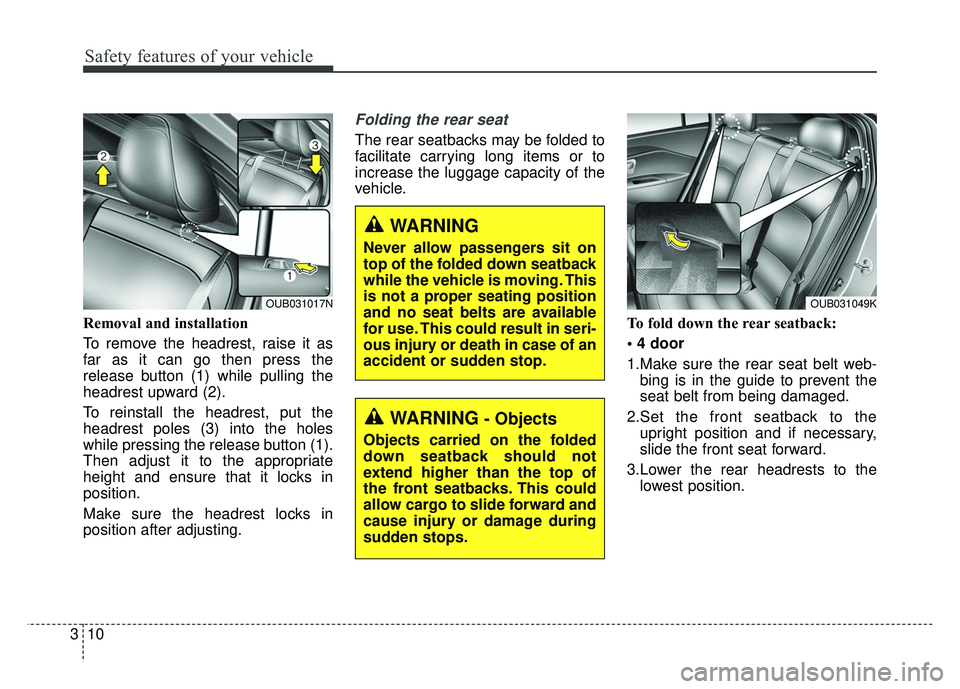
Removal and installation
To remove the headrest, raise it as
far as it can go then press the
release button (1) while pulling the
headrest upward (2).
To reinstall the headrest, put the
headrest poles (3) into the holes
while pressing the release button (1).
Then adjust it to the appropriate
height and ensure that it locks in
position.
Make sure the headrest locks in
position after adjusting.
Folding the rear seat
The rear seatbacks may be folded to
facilitate carrying long items or to
increase the luggage capacity of the
vehicle.
To fold down the rear seatback:
1.Make sure the rear seat belt web-bing is in the guide to prevent the
seat belt from being damaged.
2.Set the front seatback to the upright position and if necessary,
slide the front seat forward.
3.Lower the rear headrests to the lowest position.
OUB031017NOUB031049K
WARNING
Never allow passengers sit on
top of the folded down seatback
while the vehicle is moving. This
is not a proper seating position
and no seat belts are available
for use. This could result in seri-
ous injury or death in case of an
accident or sudden stop.
WARNING- Objects
Objects carried on the folded
down seatback should not
extend higher than the top of
the front seatbacks. This could
allow cargo to slide forward and
cause injury or damage during
sudden stops.
Page 28 of 446
311
Safety features of your vehicle
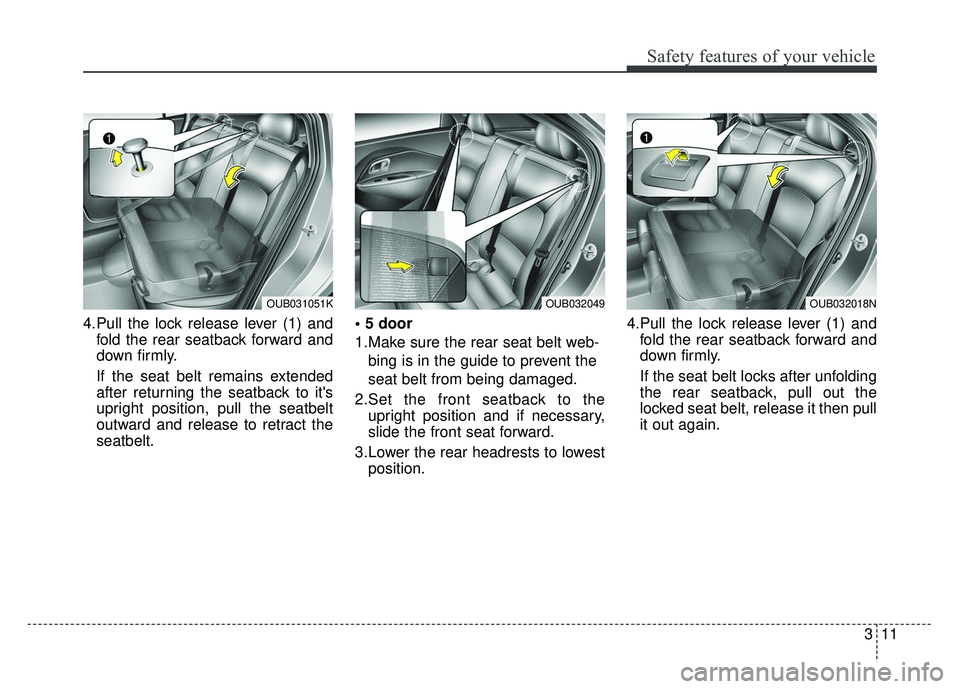
4.Pull the lock release lever (1) andfold the rear seatback forward and
down firmly.
If the seat belt remains extended
after returning the seatback to it's
upright position, pull the seatbelt
outward and release to retract the
seatbelt.
1.Make sure the rear seat belt web-
bing is in the guide to prevent the
seat belt from being damaged.
2.Set the front seatback to the upright position and if necessary,
slide the front seat forward.
3.Lower the rear headrests to lowest position. 4.Pull the lock release lever (1) and
fold the rear seatback forward and
down firmly.
If the seat belt locks after unfolding
the rear seatback, pull out the
locked seat belt, release it then pull
it out again.
OUB031051KOUB032049OUB032018N
Page 45 of 446
Safety features of your vehicle
28
3
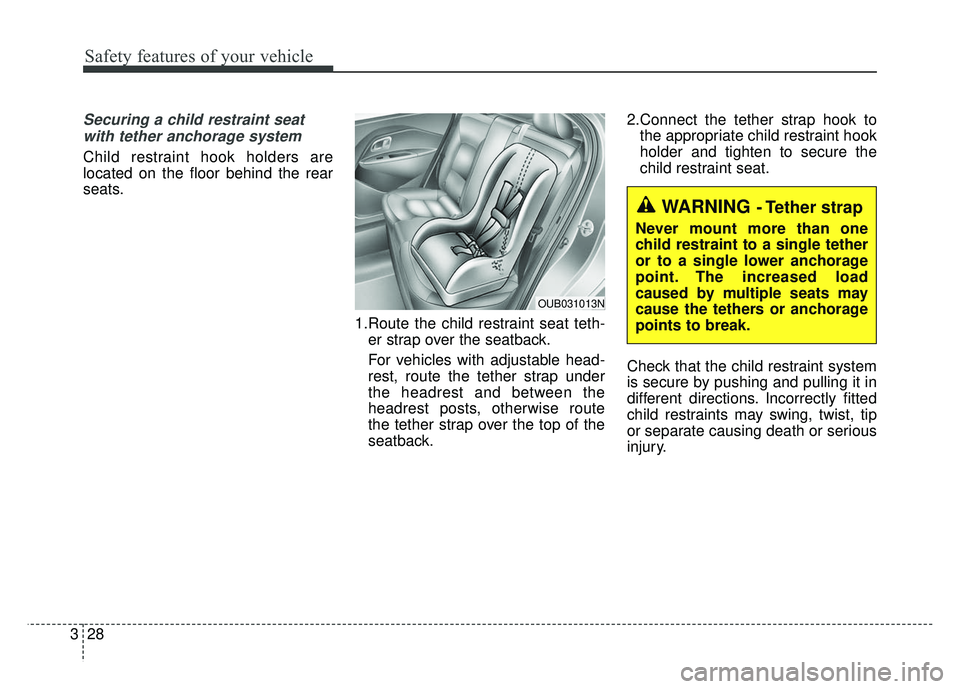
Securing a child restraint seat
with tether anchorage system
Child restraint hook holders are
located on the floor behind the rear
seats.
1.Route the child restraint seat teth-er strap over the seatback.
For vehicles with adjustable head-
rest, route the tether strap under
the headrest and between the
headrest posts, otherwise route
the tether strap over the top of the
seatback. 2.Connect the tether strap hook to
the appropriate child restraint hook
holder and tighten to secure the
child restraint seat.
Check that the child restraint system
is secure by pushing and pulling it in
different directions. Incorrectly fitted
child restraints may swing, twist, tip
or separate causing death or serious
injury.
WARNING - Tether strap
Never mount more than one
child restraint to a single tether
or to a single lower anchorage
point. The increased load
caused by multiple seats may
cause the tethers or anchorage
points to break.
OUB031013N
Page 440 of 446
I5
Index
GaugeEngine coolant temperature gauge ··················\
············4-47
Fuel gauge ··················\
··················\
··················\
·············4-47
GAW (Gross axle weight) ··················\
··················\
·········5-61
GAWR (Gross axle weight rating) ··················\
··············5-61
Glove box··················\
··················\
··················\
·················4-98\
GVW (Gross vehicle weight) ··················\
··················\
····5-61
GVWR (Gross vehicle weight rating) ··················\
·········5-61
Hazard warning flasher ··················\
··················\
··············4-76
Hazardous driving conditions ··················\
··················\
····5-48
Headrest(front) ··················\
··················\
··················\
···········3-5
Headrest(rear) ··················\
··················\
··················\
············3-9
Hight adjustment··················\
··················\
··················\
······3-16
Highway driving ··················\
··················\
··················\
······5-51
Hill-start assist control ··················\
··················\
···············5-31
Hood··················\
··················\
··················\
··················\
·······4-30
Horn ··················\
··················\
··················\
··················\
·······4-41
How to use this manual ··················\
··················\
···············1-2 Idle stop and go system ··················\
··················\
·············5-40
Immobilizer system ··················\
··················\
··················\
·4-11
Indicator symbols on the instrument cluster ··················\
·1-7
Indicators and warnings ··················\
··················\
·············4-58
Inside rearview mirror ··················\
··················\
···············4-42
Instrument cluster ··················\
··················\
··················\
····4-45
Car option ··················\
··················\
··················\
··············4-55
Engine coolant temperature gauge ··················\
············4-47
Fuel gauge ··················\
··················\
··················\
·············4-47
Instrument panel illumination ··················\
··················\
·4-46
LCD display warning ··················\
··················\
··············4-69
Maintenance ··················\
··················\
··················\
··········4-56
Odometer ··················\
··················\
··················\
···············4-48
Speedometer ··················\
··················\
··················\
··········4-46
Tachometer ··················\
··················\
··················\
············4-46
Trip computer ··················\
··················\
··················\
········4-49
User settings ··················\
··················\
··················\
··········4-54
Warning and indicators ··················\
··················\
············4-58
Instrument panel fuse··················\
··················\
·················7-57\
Instrument panel illumination··················\
··················\
····4-46
Instrument panel overview··················\
··················\
···········2-5
Interior care··················\
··················\
··················\
··············7-86
Interior features··················\
··················\
··················\
······4-102 Ashtray ··················\
··················\
··················\
················4-102
Aux, USB and iPod port··················\
··················\
········4-111
Cigarette lighter ··················\
··················\
··················\
···4-102
G
H
I
Page 443 of 446
Index
8I
Scheduled maintenance service ··················\
··················\
···7-8Maintenance under severe usage conditions ···············7-21
Normal maintenance schedule··················\
··················\
···7-9
Seat belt warning ··················\
··················\
··················\
·····3-14
Seat belts ··················\
··················\
··················\
··················\
3-13 3 Point rear center belt ··················\
··················\
············3-15
Hight adjustment ··················\
··················\
··················\
···3-16
Pre-tensioner seat belt ··················\
··················\
·············3-18
Seat belt - Driver's 3-point system ··················\
············3-15
Seat belt warning ··················\
··················\
··················\
···3-14
Seat belts - Front passenger and rear seat ··················\
·3-17
Seat Warmer ··················\
··················\
··················\
···············3-7
Seatback pocket ··················\
··················\
··················\
·········3-8
Seating capacity ··················\
··················\
··················\
·······5-57
Seats ··················\
··················\
··················\
··················\
·········3-2 Folding the rear seat ··················\
··················\
················3-10
Front seat adjustment·············\
··················\
··················\
····3-4
Headrest(front) ··················\
··················\
··················\
········3-5
Headrest(rear) ··················\
··················\
··················\
··········3-9
Rear seat ··················\
··················\
··················\
··················\
3-9
Seatback pocket ··················\
··················\
··················\
·······3-8
Warmer ··················\
··················\
··················\
··················\
··3-7
Shift Lock ··················\
··················\
··················\
················5-20
Shopping bag holder ··················\
··················\
················4-105
Side impact air bag ··················\
··················\
··················\
··3-45
Smart key ··················\
··················\
··················\
··················\
·4-5 Smooth cornering··················\
··················\
··················\
·····5-49
Snow tires ··················\
··················\
··················\
················5-52
Spare tire
Compact spare tire ··················\
··················\
··················\
·6-20
Compact spare tire replacement ··················\
················7-46
Removing and storing the spare tire···········\
·················6-15\
Special driving conditions ··················\
··················\
·········5-48 Driving at night ··················\
··················\
··················\
·····5-49
Driving in flooded areas ··················\
··················\
··········5-50
Driving in the rain ··················\
··················\
··················\
·5-50
Hazardous driving conditions ··················\
··················\
··5-48
Highway driving ··················\
··················\
··················\
····5-51
Rocking the vehicle ··················\
··················\
·················5-48\
Smooth cornering ··················\
··················\
··················\
··5-49
Speedometer··················\
··················\
··················\
·············4-46
Sports mode ··················\
··················\
··················\
·············5-18
SRS components and functions ··················\
··················\
·3-34
Starting difficulties, see engine will not start ··················\
6-4
Steering wheel ··················\
··················\
··················\
·········4-39 Electric power steering ··················\
··················\
············4-39
Horn ··················\
··················\
··················\
··················\
·····4-41
Tilt & Telescoping steering ··················\
··················\
·····4-40
Steering wheel audio control ··················\
··················\
···4-110
Steps For Determining Correct Load Limit ··················\
5-57
Storage compartment ··················\
··················\
·················4-98\
Center console storage·············\
··················\
··················\
4-98
Cool box ··················\
··················\
··················\
················4-99
Glove box ··················\
··················\
··················\
··············4-98
S